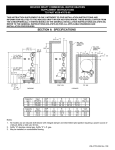
1
PROTOCOL SOLUTIONS GROUP
3385 SCOTT BLVD
SANTA CLARA, CA 95054
™
SAS InFusion
User Manual
Error Injection Platform for
Serial Attached SCSI and Serial ATA
For Software Version 1.2
August 2006
Version 1.2
SAS InFusion User Manual
Document Disclaimer
The information in this document has been carefully checked and is believed to be
reliable. However, no responsibility can be assumed for inaccuracies that may not have
been detected.
LeCroy reserves the right to revise the information in this document without notice or
penalty.
Trademarks and Servicemarks
LeCroy, CATC, InFusion, and BusEngine are trademarks of LeCroy.
Microsoft, Windows, Windows 2000, and Windows XP are registered trademarks of
Microsoft Inc.
All other trademarks are property of their respective companies.
Copyright
Copyright © 2006, LeCroy; All Rights Reserved.
This document may be printed and reproduced without additional permission, but all
copies should contain this copyright notice.
Part Number 730-0075-00
LeCroy Corporation
SAS InFusion User Manual
Version 1.2
TABLE OF CONTENTS
Chapter 1
Overview
1
Key Features . . . . . . . . . . . . . . . . . . . . . . . . . . . . . . . . . . . . . . . . . 1
Stand-alone vs. Networked Mode . . . . . . . . . . . . . . . . . . . . . . . . . 2
Chapter 2
General Description
3
System Components/Packing List . . . . . . . . . . . . . . . . . . . . . . . . .
SAS InFusion Front Panel . . . . . . . . . . . . . . . . . . . . . . . . . . . . . . .
LCD Panel . . . . . . . . . . . . . . . . . . . . . . . . . . . . . . . . . . . . . . . .
Front Panel Control Buttons . . . . . . . . . . . . . . . . . . . . . . . . . .
Initiator and Target SAS/SATA Cable Connectors . . . . . . . . . .
SAS InFusion Rear Panel . . . . . . . . . . . . . . . . . . . . . . . . . . . . . . .
BNC Input/Output Connectors. . . . . . . . . . . . . . . . . . . . . . . . .
Ethernet Connector . . . . . . . . . . . . . . . . . . . . . . . . . . . . . . . . .
USB Connector . . . . . . . . . . . . . . . . . . . . . . . . . . . . . . . . . . . .
Power Supply . . . . . . . . . . . . . . . . . . . . . . . . . . . . . . . . . . . . .
Chapter 3
Installation and Setup
3
3
3
4
4
4
4
5
5
5
7
PC Requirements. . . . . . . . . . . . . . . . . . . . . . . . . . . . . . . . . . . . . . 7
PC Firewall and Other Communication Settings . . . . . . . . . . . . . . 7
Installing SAS InFusion Software. . . . . . . . . . . . . . . . . . . . . . . . . . 7
Connecting SAS InFusion to an Ethernet LAN . . . . . . . . . . . . . . . 8
Assigning a Static IP Address Using the LCD Panel . . . . . . . . 9
Checking the IP Address Using the LCD Panel . . . . . . . . . . 11
Checking the DHCP Setting Using the LCD Panel . . . . . . . . 11
Linking the SAS InFusion Device and Software. . . . . . . . . . . . . . 12
Updating Firmware and Bus Engine . . . . . . . . . . . . . . . . . . . . . . 12
Connecting SAS InFusion to the SAS/SATA DUT . . . . . . . . . . . . 14
Connection without Analyzer . . . . . . . . . . . . . . . . . . . . . . . . . 14
Connection with Analyzer: 1-Channel Configuration . . . . . . . 15
Connection with Analyzer: 2 Channel Configuration . . . . . . . 15
Multiple Connections using "Octopus" Cables . . . . . . . . . . . 15
Chapter 4
Software Overview
17
Starting the SAS InFusion Program . . . . . . . . . . . . . . . . . . . . . . .
Application Layout and Description . . . . . . . . . . . . . . . . . . . . . . .
File Manager . . . . . . . . . . . . . . . . . . . . . . . . . . . . . . . . . . . . .
Libraries. . . . . . . . . . . . . . . . . . . . . . . . . . . . . . . . . . . . . . . . .
Work Area . . . . . . . . . . . . . . . . . . . . . . . . . . . . . . . . . . . . . . .
Output Window . . . . . . . . . . . . . . . . . . . . . . . . . . . . . . . . . . .
Device List . . . . . . . . . . . . . . . . . . . . . . . . . . . . . . . . . . . . . . .
Device List Buttons . . . . . . . . . . . . . . . . . . . . . . . . . . . . . . . .
Modifying Window Layout . . . . . . . . . . . . . . . . . . . . . . . . . . . . . .
Tabbed- Style Layout . . . . . . . . . . . . . . . . . . . . . . . . . . . . . .
Mixed-Style Layout . . . . . . . . . . . . . . . . . . . . . . . . . . . . . . . .
Moving Windows with "Smart Docking" . . . . . . . . . . . . . . . . .
Tool Tips . . . . . . . . . . . . . . . . . . . . . . . . . . . . . . . . . . . . . . . . . . . .
The Menu Bar . . . . . . . . . . . . . . . . . . . . . . . . . . . . . . . . . . . . . . .
LeCroy Corporation
17
18
18
18
19
19
20
21
26
26
28
29
30
31
iii
Version 1.2
SAS InFusion User Manual
Toolbars . . . . . . . . . . . . . . . . . . . . . . . . . . . . . . . . . . . . . . . . . . . . 32
Status Bar . . . . . . . . . . . . . . . . . . . . . . . . . . . . . . . . . . . . . . . . . . 32
Chapter 5
Test Scenarios
33
Scenarios Overview . . . . . . . . . . . . . . . . . . . . . . . . . . . . . . . . . . .
Global Rules . . . . . . . . . . . . . . . . . . . . . . . . . . . . . . . . . . . . .
Sequences. . . . . . . . . . . . . . . . . . . . . . . . . . . . . . . . . . . . . . .
Multi-Link Testing. . . . . . . . . . . . . . . . . . . . . . . . . . . . . . . . . .
Scenario Libraries . . . . . . . . . . . . . . . . . . . . . . . . . . . . . . . . . . . .
Main Library. . . . . . . . . . . . . . . . . . . . . . . . . . . . . . . . . . . . . .
File Libraries . . . . . . . . . . . . . . . . . . . . . . . . . . . . . . . . . . . . .
Device Libraries. . . . . . . . . . . . . . . . . . . . . . . . . . . . . . . . . . .
Test Events . . . . . . . . . . . . . . . . . . . . . . . . . . . . . . . . . . . . . . . . .
Dword Matcher . . . . . . . . . . . . . . . . . . . . . . . . . . . . . . . . . . .
SAS Data Pattern . . . . . . . . . . . . . . . . . . . . . . . . . . . . . . . . .
SATA Data Pattern. . . . . . . . . . . . . . . . . . . . . . . . . . . . . . . . .
Test Actions . . . . . . . . . . . . . . . . . . . . . . . . . . . . . . . . . . . . . . . . .
Using Counters in Events and Actions . . . . . . . . . . . . . . . . .
Capturing a Data Dword . . . . . . . . . . . . . . . . . . . . . . . . . . . .
Using Captured Data Dwords . . . . . . . . . . . . . . . . . . . . . . . .
Test Initiator and Target . . . . . . . . . . . . . . . . . . . . . . . . . . . . . . . .
Summary of Scenario Creation . . . . . . . . . . . . . . . . . . . . . . . . . .
Creating Global Rules . . . . . . . . . . . . . . . . . . . . . . . . . . . . . . . . .
Example 1: Creating a Single Event and Action (Removes a
Primitive) . . . . . . . . . . . . . . . . . . . . . . . . . . . . . . . . . . . . . . . .
Example 2: Wait for Primitive and Replace It with an Error . .
Example 3: Creating OR Conditions . . . . . . . . . . . . . . . . . . .
Example 4: Multiple Triggers and Actions . . . . . . . . . . . . . . .
Example 5: Multiple Actions on a Single Event . . . . . . . . . . .
Example 6: Using Timers. . . . . . . . . . . . . . . . . . . . . . . . . . . .
Creating a Sequence . . . . . . . . . . . . . . . . . . . . . . . . . . . . . . . . . .
Example 7: Creating Two Sequences and Global Rules. . . .
Example 8: Creating a Sequence With Many States #1 . . . .
Example 9: Creating a Sequence With Many States #2 . . . .
Creating Multi-Link Tests . . . . . . . . . . . . . . . . . . . . . . . . . . . . . . .
Example 10: Multi-Link Test. . . . . . . . . . . . . . . . . . . . . . . . . .
Downloading Scenarios . . . . . . . . . . . . . . . . . . . . . . . . . . . . . . .
Chapter 6
LCD Panel Menus
47
51
54
57
60
63
67
67
76
79
82
82
84
85
LCD Panel Overview . . . . . . . . . . . . . . . . . . . . . . . . . . . . . . . . . .
Boot Sequence . . . . . . . . . . . . . . . . . . . . . . . . . . . . . . . . . . . . . .
Booting from Boot-Code . . . . . . . . . . . . . . . . . . . . . . . . . . . . . . .
Root Menu . . . . . . . . . . . . . . . . . . . . . . . . . . . . . . . . . . . . . . . . . .
Submenus . . . . . . . . . . . . . . . . . . . . . . . . . . . . . . . . . . . . . . . . . .
Box Setup Submenu . . . . . . . . . . . . . . . . . . . . . . . . . . . . . . .
SAS Configuration Submenu. . . . . . . . . . . . . . . . . . . . . . . . .
Start InFusion . . . . . . . . . . . . . . . . . . . . . . . . . . . . . . . . . . . .
InFusion Setup Submenu . . . . . . . . . . . . . . . . . . . . . . . . . . .
iv
33
34
34
35
36
36
36
37
37
38
39
39
40
41
42
43
44
46
46
85
85
86
86
87
87
88
88
88
LeCroy Corporation
SAS InFusion User Manual
Chapter 7
Version 1.2
Licensing
89
Displaying License Information . . . . . . . . . . . . . . . . . . . . . . . . . . 89
Updating the License . . . . . . . . . . . . . . . . . . . . . . . . . . . . . . . . . . 90
Appendix A Specifications
93
Power Requirements . . . . . . . . . . . . . . . . . . . . . . . . . . . . . . . . . .
Environmental Conditions . . . . . . . . . . . . . . . . . . . . . . . . . . . . . .
Certifications . . . . . . . . . . . . . . . . . . . . . . . . . . . . . . . . . . . . . . . .
EC Declaration of Conformity . . . . . . . . . . . . . . . . . . . . . . . .
UL and cUL Listed . . . . . . . . . . . . . . . . . . . . . . . . . . . . . . . . .
LeCroy Corporation
93
93
93
93
94
How to Contact LeCroy
95
Limited Hardware Warranty
95
v
Version 1.2
SAS InFusion User Manual
LIST OF FIGURES
Figure 1 SAS InFusion Front Panel. . . . . . . . . . . . . . . . . . . . . . . . . . . . . . . . . . . . . . . . 3
Figure 2 SASInFusion Rear Panel . . . . . . . . . . . . . . . . . . . . . . . . . . . . . . . . . . . . . . . . 4
Figure 3 SAS InFusion Software Application Interface . . . . . . . . . . . . . . . . . . . . . . . . . 8
Figure 4 LCD Panel Root Menu at Initial Set-up . . . . . . . . . . . . . . . . . . . . . . . . . . . . . . 9
Figure 5 LCD Panel Box Setup Menu . . . . . . . . . . . . . . . . . . . . . . . . . . . . . . . . . . . . . . 9
Figure 6 LCD Panel IP Mode Menu . . . . . . . . . . . . . . . . . . . . . . . . . . . . . . . . . . . . . . 10
Figure 7 LCD Panel Box Setup Menu: Arrow at IP Mode . . . . . . . . . . . . . . . . . . . . . . 10
Figure 8 LCD Panel: IP Address Display . . . . . . . . . . . . . . . . . . . . . . . . . . . . . . . . . . 10
Figure 9 LCD Panel Box Setup Menu: Reboot Display . . . . . . . . . . . . . . . . . . . . . . . . 11
Figure 10 LCD Panel About Menu . . . . . . . . . . . . . . . . . . . . . . . . . . . . . . . . . . . . . . . 11
Figure 11 Device List Window . . . . . . . . . . . . . . . . . . . . . . . . . . . . . . . . . . . . . . . . . . . 12
Figure 12 Device Pop-Up Menu . . . . . . . . . . . . . . . . . . . . . . . . . . . . . . . . . . . . . . . . . 13
Figure 13 Update Devices Dialog Box . . . . . . . . . . . . . . . . . . . . . . . . . . . . . . . . . . . . 13
Figure 14 Device List Window: Update Version IDs . . . . . . . . . . . . . . . . . . . . . . . . . . 14
Figure 15 Connection Without Analyzer . . . . . . . . . . . . . . . . . . . . . . . . . . . . . . . . . . . 14
Figure 16 Connection with Analyzer: One-Channel Configuration . . . . . . . . . . . . . . . 15
Figure 17 Connection With Analyzer: Two-Channel Configuration . . . . . . . . . . . . . . . 15
Figure 18 Multiple Connections Using “Octopus” Cables . . . . . . . . . . . . . . . . . . . . . . 15
Figure 19 SAS InFusion Application Display: No Scenarios Open . . . . . . . . . . . . . . . 17
Figure 20 SAS InFusion Application Display: Main Elements . . . . . . . . . . . . . . . . . . . 18
Figure 21 Device List Window . . . . . . . . . . . . . . . . . . . . . . . . . . . . . . . . . . . . . . . . . . . 20
Figure 22 Add Device to List Dialog . . . . . . . . . . . . . . . . . . . . . . . . . . . . . . . . . . . . . . 22
Figure 23 Device Libraries . . . . . . . . . . . . . . . . . . . . . . . . . . . . . . . . . . . . . . . . . . . . . 22
Figure 24 Device Configuration. . . . . . . . . . . . . . . . . . . . . . . . . . . . . . . . . . . . . . . . . . 23
Figure 25 Restart InFusion Screen . . . . . . . . . . . . . . . . . . . . . . . . . . . . . . . . . . . . . . . 24
Figure 26 Application Window Layout: Tabbed Style . . . . . . . . . . . . . . . . . . . . . . . . . 26
Figure 27 Application Window Layout: Framed Style . . . . . . . . . . . . . . . . . . . . . . . . . 28
Figure 28 Application Window Display: Mixed Style . . . . . . . . . . . . . . . . . . . . . . . . . . 28
Figure 29 Application Display: Smart Docking Activated . . . . . . . . . . . . . . . . . . . . . . 29
Figure 30 Smart Docking Positioning Buttons . . . . . . . . . . . . . . . . . . . . . . . . . . . . . . . 29
Figure 31 Application Display: New Location of Window . . . . . . . . . . . . . . . . . . . . . . 30
Figure 32 Tool Tip . . . . . . . . . . . . . . . . . . . . . . . . . . . . . . . . . . . . . . . . . . . . . . . . . . . . 31
Figure 33 Status Bar . . . . . . . . . . . . . . . . . . . . . . . . . . . . . . . . . . . . . . . . . . . . . . . . . . 32
Figure 34 Open Scenario in Application Window . . . . . . . . . . . . . . . . . . . . . . . . . . . . 33
Figure 35 Global Rules and Sequence Areas of a Scenario . . . . . . . . . . . . . . . . . . . . 35
Figure 36 Open Library Listing . . . . . . . . . . . . . . . . . . . . . . . . . . . . . . . . . . . . . . . . . . 36
Figure 37 Test Cases for SATA Library . . . . . . . . . . . . . . . . . . . . . . . . . . . . . . . . . . . 37
Figure 38 Capturing a Data Dword . . . . . . . . . . . . . . . . . . . . . . . . . . . . . . . . . . . . . . . 42
Figure 39 Using a Captured Dword in a SAS Data Pattern. . . . . . . . . . . . . . . . . . . . . 43
Figure 40 Using a Captured Data Dword in Substitute Dword Test Action . . . . . . . . . 44
Figure 41 Entering Basic Scenario Information . . . . . . . . . . . . . . . . . . . . . . . . . . . . . . 45
Figure 42 Scenario Properties Dialog Box . . . . . . . . . . . . . . . . . . . . . . . . . . . . . . . . . 45
Figure 43 Example 1: Entering an Event. . . . . . . . . . . . . . . . . . . . . . . . . . . . . . . . . . . 47
Figure 44 Example 1: Event Properties Dialog Box . . . . . . . . . . . . . . . . . . . . . . . . . . 48
Figure 45 Example 1: Event Drop-Down List . . . . . . . . . . . . . . . . . . . . . . . . . . . . . . . 49
Figure 46 Example 1: Entering an Action . . . . . . . . . . . . . . . . . . . . . . . . . . . . . . . . . . 49
Figure 47 Example 1: Action Properties Dialog Box . . . . . . . . . . . . . . . . . . . . . . . . . 50
Figure 48 Example1: Complete Scenario . . . . . . . . . . . . . . . . . . . . . . . . . . . . . . . . . . 50
vi
LeCroy Corporation
SAS InFusion User Manual
Figure 49
Figure 50
Figure 51
Figure 52
Figure 53
Figure 54
Figure 55
Figure 56
Figure 57
Figure 58
Figure 59
Figure 60
Figure 61
Figure 62
Figure 63
Figure 64
Figure 65
Figure 66
Figure 67
Figure 68
Figure 69
Figure 70
Figure 71
Figure 72
Figure 73
Figure 74
Figure 75
Figure 76
Figure 77
Figure 78
Figure 79
Figure 80
Figure 81
Figure 82
Figure 83
Figure 84
Figure 85
Figure 86
Figure 87
Figure 88
Figure 89
Figure 90
Figure 91
Figure 92
Figure 93
LeCroy Corporation
Version 1.2
Example 2: Entering the Event . . . . . . . . . . . . . . . . . . . . . . . . . . . . . . . . . .
Example 2: Entering the Action . . . . . . . . . . . . . . . . . . . . . . . . . . . . . . . . . .
Example 2: Action Properties Dialog Box . . . . . . . . . . . . . . . . . . . . . . . . . .
Example 2: Action Drop-Down List . . . . . . . . . . . . . . . . . . . . . . . . . . . . . . .
Example 2: Complete Scenario. . . . . . . . . . . . . . . . . . . . . . . . . . . . . . . . . .
Example 3: Entering the Second Event . . . . . . . . . . . . . . . . . . . . . . . . . . .
Example 3: Event Properties Dialog Box . . . . . . . . . . . . . . . . . . . . . . . . . .
Example 3: Entering the Action . . . . . . . . . . . . . . . . . . . . . . . . . . . . . . . . . .
Example 3: Action Drop-Down List . . . . . . . . . . . . . . . . . . . . . . . . . . . . . . .
Example 3: Complete Scenario. . . . . . . . . . . . . . . . . . . . . . . . . . . . . . . . . .
Example 4: Entering Second Event . . . . . . . . . . . . . . . . . . . . . . . . . . . . . .
Example 4: Event Drop-Down List . . . . . . . . . . . . . . . . . . . . . . . . . . . . . . .
Example 4: Entering Second Action . . . . . . . . . . . . . . . . . . . . . . . . . . . . . .
Example 4: Action Drop-Down List . . . . . . . . . . . . . . . . . . . . . . . . . . . . . . .
Example 4: Complete Scenario. . . . . . . . . . . . . . . . . . . . . . . . . . . . . . . . . .
Example 5: Entering the Second Action . . . . . . . . . . . . . . . . . . . . . . . . . . .
Example 5: Action Drop-Down List (For Second Action) . . . . . . . . . . . . . .
Example 5: Entering the Third Action . . . . . . . . . . . . . . . . . . . . . . . . . . . . .
Example 5: Action Drop-Down List (For Third Action) . . . . . . . . . . . . . . . .
Example 5: Complete Scenario. . . . . . . . . . . . . . . . . . . . . . . . . . . . . . . . . .
Example 6: Entering the Second Event . . . . . . . . . . . . . . . . . . . . . . . . . . .
Example 6: Event Drop-Down List . . . . . . . . . . . . . . . . . . . . . . . . . . . . . . .
Example 6: Entering Second Action . . . . . . . . . . . . . . . . . . . . . . . . . . . . . .
Example 6: Action Drop-Down List . . . . . . . . . . . . . . . . . . . . . . . . . . . . . . .
Example 6: Complete Scenario. . . . . . . . . . . . . . . . . . . . . . . . . . . . . . . . . .
Example 7: Adding the First Sequence . . . . . . . . . . . . . . . . . . . . . . . . . . . .
Example 7: Adding an Event for the First State . . . . . . . . . . . . . . . . . . . . .
Example 7: Event Properties Dialog Box . . . . . . . . . . . . . . . . . . . . . . . . . .
Example 7: Adding an Action for the First State . . . . . . . . . . . . . . . . . . . . .
Example 7: Action Properties Dialog Box . . . . . . . . . . . . . . . . . . . . . . . . . .
Example 7: Adding an Event for the Second State . . . . . . . . . . . . . . . . . . .
Example 7: Adding an Action to the Second State . . . . . . . . . . . . . . . . . . .
Example 7: Adding a Second Sequence. . . . . . . . . . . . . . . . . . . . . . . . . . .
Example 7: Sequence Area of Scenario . . . . . . . . . . . . . . . . . . . . . . . . . . .
Example 8: Top Half of Scenario . . . . . . . . . . . . . . . . . . . . . . . . . . . . . . . .
Example 8: Bottom Half of Scenario . . . . . . . . . . . . . . . . . . . . . . . . . . . . . .
Example 9: Top Half of Scenario . . . . . . . . . . . . . . . . . . . . . . . . . . . . . . . .
Example 9: Bottom Half of Scenario . . . . . . . . . . . . . . . . . . . . . . . . . . . . . .
Example 10: Test Scenario for Each Box . . . . . . . . . . . . . . . . . . . . . . . . . .
Downloading Scenarios . . . . . . . . . . . . . . . . . . . . . . . . . . . . . . . . . . . . . . .
SAS InFusion LCD Panel . . . . . . . . . . . . . . . . . . . . . . . . . . . . . . . . . . . . . .
Device List Window: Selecting a Box . . . . . . . . . . . . . . . . . . . . . . . . . . . . .
Device List Window: Box is Selected . . . . . . . . . . . . . . . . . . . . . . . . . . . . .
Licensing Dialog Box. . . . . . . . . . . . . . . . . . . . . . . . . . . . . . . . . . . . . . . . . .
Update License Dialog Box . . . . . . . . . . . . . . . . . . . . . . . . . . . . . . . . . . . . .
51
52
52
53
54
55
55
56
56
57
58
58
59
59
60
61
61
62
62
63
64
65
65
66
66
69
70
71
71
72
72
73
74
75
77
78
80
81
83
84
85
89
90
90
91
vii
Version 1.2
SAS InFusion User Manual
LIST OF TABLES
Table 1 General Library Buttons . . . . . . . . . . . . . . . . . . . . . . . . . . . . . . . . . . . . . . . . .
Table 2 Device Library Buttons . . . . . . . . . . . . . . . . . . . . . . . . . . . . . . . . . . . . . . . . . .
Table 3 Log Buttons . . . . . . . . . . . . . . . . . . . . . . . . . . . . . . . . . . . . . . . . . . . . . . . . . .
Table 4 Device List Buttons. . . . . . . . . . . . . . . . . . . . . . . . . . . . . . . . . . . . . . . . . . . . .
Table 5 SAS InFusion Menu Bar Menus and Menu Options. . . . . . . . . . . . . . . . . . . .
Table 6 Application Toolbar Buttons . . . . . . . . . . . . . . . . . . . . . . . . . . . . . . . . . . . . . .
Table 7 Key Scenario Terms . . . . . . . . . . . . . . . . . . . . . . . . . . . . . . . . . . . . . . . . . . . .
Table 8 Test State Events . . . . . . . . . . . . . . . . . . . . . . . . . . . . . . . . . . . . . . . . . . . . . .
Table 9 Test State Actions . . . . . . . . . . . . . . . . . . . . . . . . . . . . . . . . . . . . . . . . . . . . .
Table 10 Global Rules Examples . . . . . . . . . . . . . . . . . . . . . . . . . . . . . . . . . . . . . . . .
Table 11 Sequence Rules . . . . . . . . . . . . . . . . . . . . . . . . . . . . . . . . . . . . . . . . . . . . . .
Table 12 Sequence Examples . . . . . . . . . . . . . . . . . . . . . . . . . . . . . . . . . . . . . . . . . .
Table 13 Example 7: Logic of Sequence 0 . . . . . . . . . . . . . . . . . . . . . . . . . . . . . . . . .
Table 14 Example 7: Logic of Sequence 1 . . . . . . . . . . . . . . . . . . . . . . . . . . . . . . . . .
Table 15 Example 7: States for Second Sequence. . . . . . . . . . . . . . . . . . . . . . . . . . .
Table 16 Example 8: Logic of Sequence 0 . . . . . . . . . . . . . . . . . . . . . . . . . . . . . . . . .
Table 17 Example 9: Logic of Sequence 0 . . . . . . . . . . . . . . . . . . . . . . . . . . . . . . . . .
Table 18 Box Setup Submenu . . . . . . . . . . . . . . . . . . . . . . . . . . . . . . . . . . . . . . . . . .
Table 19 SAS Configuration Submenu . . . . . . . . . . . . . . . . . . . . . . . . . . . . . . . . . . . .
Table 20 InFusion Setup Submenu. . . . . . . . . . . . . . . . . . . . . . . . . . . . . . . . . . . . . . .
Table 21 EC Declaration of Conformity . . . . . . . . . . . . . . . . . . . . . . . . . . . . . . . . . . . .
viii
19
19
20
21
31
32
34
38
40
47
67
67
68
68
73
76
79
87
88
88
94
LeCroy Corporation
SAS InFusion User Manual
LeCroy Corporation
Version 1.2
ix
Version 1.2
SAS InFusion User Manual
SAFETY REQUIREMENTS
This section contains information and warnings that must be observed to keep the SAS
InFusion or SATA InFusion operating in a correct and safe condition. You are required to
follow generally accepted safety procedures in addition to the safety precautions
specified in this section.
Safety Symbols and Terms
Where the following symbols or terms appear on front or rear panels of SAS/SATA
InFusion, or in this manual, they alert you to important safety considerations.
Symbol
Description
This symbol is used where caution is required. Refer to accompanying information
or documents in order to protect against personal injury or damage to the
instrument.
This symbol is used to denote a safety ground connection.
On (Supply)
I
Off (Supply)
O
This symbol is used to denote "Alternating Current."
x
CAUTION
The CAUTION sign indicates a potential hazard. It calls attention to a procedure,
practice or condition which, if not followed, could possibly cause damage to
equipment. If a CAUTION is indicated, do not proceed until its conditions are fully
understood and met.
WARNING
The WARNING sign indicates a potential hazard. It calls attention to a procedure,
practice or condition which, if not followed, could possibly cause bodily injury or
death. If a WARNING is indicated, do not proceed until its conditions are fully
understood and met.
LeCroy Corporation
SAS InFusion User Manual
Version 1.2
Operating Environment
The SAS/SATA InFusion is intended for indoor use and should be operated in a clean,
dry environment.
NOTE:
Direct sunlight, radiators, and other heat sources should be taken into
account when assessing the ambient temperature.
Before using this product, ensure that its operating environment will be maintained within
these parameters:
•
•
Temperature: 5 to 40 Centigrade.
•
Altitude: Up to 2,000 m.
Humidity: Maximum relative humidity 80% for temperatures up to 31
Centigrade, decreasing linearly to 50% relative humidity at 40 Centigrade.
WARNING
The SAS/SATA InFusion must not be operated in explosive,
dusty, or wet atmospheres.
The design of the SAS/SATA InFusion has been verified to conform to the applicable
safety standards (EN 61010-1:2001, UL 61010-1 2nd Edition and CAN/CSA C22.2
No.61010-1-04) per the following limits:
•
•
•
Installation (Overvoltage) Category II.
Pollution Degree 2.
Protection Class I.
NOTES:
Installation (Overvoltage) Category II refers to local distribution level, which
is applicable to equipment connected to main supply (AC power source).
Pollution Degree 2 refers to an operating environment where normally only
dry non-conductive pollution occurs. Occasionally, a temporary
conductivity caused by condensation must be expected.
Protection Class 1 refers to grounded equipment, in which protection
against electric shock is achieved by Basic Insulation and by means of a
connection to the protective earthing conductor in the building wiring.
LeCroy Corporation
xi
Version 1.2
SAS InFusion User Manual
Cooling
The SAS/SATA InFusion relies on forced air cooling with internal fans and ventilation
openings. Care must be taken to avoid restricting the airflow around the apertures (fan
holes). To ensure adequate ventilation, it is required to leave a 10 cm (4 inch) minimum
gap around the sides of the instrument.
CAUTION
Do not block ventilation holes located on both sides of
SAS/SATA InFusion.
AC Power Source
The SAS/SATA InFusion operates from a single-phase, 100-240 Vrms (+/-10%) AC
power source at 50/60 Hz (+/-5%).
No manual voltage selection is required because the instrument automatically adapts to
line voltage.
Depending on the accessories installed (PC port plug-ins, etc.), the instrument can draw
up to 55 W (55 VA).
The power supply of the SAS/SATA InFusion is protected against short circuit and
overload by a 5x20 mm fuse (T1.0 A/250 V). See "Fuse Replacement" in this section for
replacement instructions.
NOTE:
The SASInFusion/SATAInFusion automatically adapts itself to the AC
line input within the following ranges:
Voltage Range: 90 - 264 Vrms.
Frequency Range: 47-63 Hz.
Power and Ground Connections
The SAS/SATA InFusion is provided with a grounded cord set containing a molded
three-terminal polarized plug and a standard IEC320 (Type C13) connector for making
line voltage and safety ground connection. The AC inlet ground terminal is connected
directly to the frame of the instrument. For adequate protection against electrical shock
hazard, the power cord plug must be inserted into a mating AC outlet containing a safety
ground contact.
WARNING
Electrical Shock Hazard!
Any interruption of the protective conductor inside or outside
of the SAS/SATA InFusion, or disconnection of the safety
ground terminal creates a hazardous situation.
Intentional interruption is prohibited.
xii
LeCroy Corporation
SAS InFusion User Manual
Version 1.2
Fuse Replacement
Set the SAS/SATA InFusion power switch to OFF and disconnect the power cord before
inspecting or replacing the fuse. Open the black fuse holder using a small, flat-bladed
screwdriver. Remove the old fuse, replace it with a new 5x20 mm "T" rated 1.0 A/250 V
fuse, and reinstall the fuse holder.
WARNING
For continued fire protection at all line voltages, replace fuse
with the specified type and rating only. Disconnect the power
cord before replacing fuse.
Cleaning
Clean only the exterior of the SAS/SATA InFusion, using a damp, soft cloth. Do not use
chemicals or abrasive elements. Under no circumstances allow moisture to penetrate the
instrument. To avoid electrical shock, unplug the power cord from the AC outlet before
cleaning.
WARNING
No operator serviceable parts inside. Do not remove covers.
Refer servicing to qualified personnel.
LeCroy Corporation
xiii
Version 1.2
xiv
SAS InFusion User Manual
LeCroy Corporation
SAS InFusion User Manual
Version 1.2
Chapter 1: Overview
SAS InFusion is an error injector and traffic modification tool that allows users to verify
real-world fault handling for Serial Attached SCSI (SAS) and Serial ATA (SATA) systems.
SAS InFusion is designed to sit unobtrusively in the data path on a live system and to
programmatically alter or corrupt traffic. This makes SAS InFusion the ideal tool for
stress-testing systems using actual workloads.
SAS InFusion supports SAS SSP, SMP, STP and SATA-based protocols operating
across a single 1.5G or 3.0G SAS or SATA link. SAS Infusion monitors traffic from both
directions in real-time and relies on predefined rules to replace any bit(s), primitive, or
parameter with one specified by the user. The SAS InFusion system can change traffic
when it detects a specific sequence or within a designated time interval, yet it requires no
complicated scripts, programming, or simulation tools.
Small, flexible, and easy to use, SAS InFusion is specifically designed to verify recovery
characteristics within a subsystem. An easy pop-up menu interface allows users to create
specific test scenarios in just minutes.
Once a SAS InFusion session is started, the system automatically handles protocol
handshaking between devices. SAS InFusion transmits a faithful copy of the original data
stream down to the CRC value which, if needed, it recalculates. SAS InFusion allows
test engineers to systematically verify error recovery in ways not possible with other test
platforms.
Key Features
•
Error Injection: Can inject CRC, disparity, 8b/10b encoding, framing, and
coding errors.
•
Break Link Recovery: Can programmatically break the connection to test
link recovery.
•
Value Replacement: Can monitor the link for specific values, patterns or
primitives (as low as bit level) and replace with user-defined values. You can
replace values on every occurrence, after a specified number of occurrences,
or after a specified time interval.
•
Packet Drop: Can remove individual primitives, address frames, or data
frames from the stream to verify retry behavior.
•
Primitive Manipulation: Can replace handshaking and flow control
primitives to help validate robustness of a design.
•
Traffic Monitoring: Can operate as a traffic monitor, collecting statistical
data on user-specified parameters. In this mode, data are passed unchanged
in both directions.
•
Menu-Driven Interface: Allows easy set-up of test scenarios.
•
API based on C++: Allows users to develop custom test applications.
With respect to traffic modification, elements you can modify in the Link Layer include
primitives, CRC, scrambled traffic, and SSP, SMP and STP connection events. Elements
you can not modify in traffic include clock skew management, OOB & power
management, and signal integrity.
LeCroy Corporation
1
Version 1.2
SAS InFusion User Manual
Stand-alone vs. Networked Mode
The SAS InFusion platform consists of a hardware device that connects to the line under
test and a Windows-based software application used to create and download test scripts
to the device. You also can use the SAS InFusion software application to configure and
control the device across an Ethernet link. This is called networked mode.
SAS InFusion test scripts are called scenarios. Scenarios determine how the SAS
InFusion hardware device monitors and modifies line traffic. You must use the SAS
InFusion application to create and download scenarios.
However, once you have downloaded scenarios to the SAS InFusion device, you can
break the Ethernet link to the application and operate the device in stand-alone mode. In
stand-alone mode, you can easily relocate the device, and you use the device LCD panel
to select and execute scenarios.
Regardless of the mode you choose to control testing, the SAS InFusion connections to
the line are the same: the device is connected between the SAS/SATA host and the PHY
of the test target (DUT).
2
LeCroy Corporation
SAS InFusion User Manual
Version 1.2
Chapter 2: General Description
This chapter describes the SAS InFusion hardware device.
System Components/Packing List
•
SAS InFusion hardware device.
•
One power cable.
•
One BNC cable.
•
Two external-to-internal SATA/SAS Cables.
•
Two internal-to-external Junction Boards.
•
Five internal-to-internal Junction Boards.
•
SAS InFusion software application program on CD-ROM.
•
User Manual.
Note:
For brevity, this manual calls the SAS InFusion hardware device the
SAS InFusion box.
SAS InFusion Front Panel
The front panel of the SAS InFusion box consists of an LCD panel, three control buttons,
two external SAS/SATA connectors, and three LEDs (Figure 1).
Figure 1
LCD Panel
SAS InFusion Front Panel
The LCD panel displays backlit four-line, twenty-four character messages. It is a
menu-driven interface that allows a user to configure the box, view status, select
scenarios to run, and stop and start scenarios.
Chapter 6 describes the LCD panel menus. The first menu to appear after boot-up is the
Root menu (shown in Figure 1).When SAS InFusion box is turned ON for the first time,
the LCD panel shows two menu items:
Box Setup
SAS Configuration
LeCroy Corporation
3
Version 1.2
SAS InFusion User Manual
After you have downloaded some scenarios to the SAS InFusion box, the Root menu
shows four items:
•
•
•
•
Box Setup
SAS Configuration
Start Infusion
Infusion Setup
Front Panel
Control
Buttons
The control buttons are located on the right side of the control panel. They consist of two
buttons to navigate LCD menus, the Up and Down buttons, and a Center button to select
menu items.
Initiator and
Target
SAS/SATA
Cable
Connectors
The two external SAS/SATA connectors provide high-speed, differential connections to
the test initiator (host) and target (device-under-test, or for brevity, DUT). These
connectors support the external-to-internal SATA cables provided.
SAS InFusion Rear Panel
The SAS InFusion rear panel consists of two BNC Input/Output connectors, one USB
connector, an Ethernet port, and a power connector (Figure 2).
Figure 2
SASInFusion Rear Panel
BNC
The two BNC connectors are ports for Trigger In and Trigger Out signals for the box. They
Input/Output allow you to daisy-chain the box with other SAS InFusion boxes for multi-link tests. They
Connectors also allow you to connect the SAS InFusion box to an external test device, such as an
analyzer or oscilloscope.
The Trigger In signal is used to inject an error or other action into the protocol data stream
at a specific instance in time, while the Trigger Out signal can be asserted when a pattern
match or error injection occurs during SAS InFusion operation.
4
LeCroy Corporation
SAS InFusion User Manual
Ethernet
Connector
Version 1.2
The 10/100 Ethernet host connector allows you to link the SAS InFusion box to a PC
running the SAS InFusion software application. You use this link to download scenarios.
If you choose to operate the box in networked mode, you also can use the link to control
the box across an Ethernet LAN.
Scenarios are test scripts that define how the box monitors and modifies line traffic. You
can only create scenarios on a PC running the SAS InFusion application. You can not
create scenarios via the box LCD panel.
Once you have created and downloaded scenarios to the SAS InFusion box, you can
either use the SAS InFusion software on the PC or the LCD panel on the SAS InFusion
box to select the scenario that you wish to run and to start and stop that scenario.
By default, SAS InFusion is set up to use Dynamic Host Control Protocol (DHCP). This
means that, under normal circumstances, you will not have to set an IP address and
subnet mask. If you prefer to set a static IP address, you can do so via the box LCD
panel.
If you want to eventually run SAS InFusion in stand-alone mode (without an Ethernet
connection), you can do so only after creating the scenarios on the PC and downloading
them to the box. However, once you have downloaded scenarios, you can break the
Ethernet link between the PC and box and use the box LCD panel to select and execute
a scenario.
USB
Connector
The USB connector will be enabled in a future release. It will provide an alternative to the
Ethernet port for connecting the box to a PC running the SAS InFusion application.
Power
Supply
The internal, 125 watt triple-output (+3.3V, +5V, +12V) power supply can accept 110 to
240 VAC at 50 to 60 Hz.
LeCroy Corporation
5
Version 1.2
6
SAS InFusion User Manual
LeCroy Corporation
SAS InFusion User Manual
Version 1.2
Chapter 3: Installation and Setup
This chapter describes how to install and setup the SAS InFusion software application
and hardware device (the SAS InFusion box).
PC Requirements
SAS InFusion software installs on a Windows XP or Windows 2000 PC.
Refer to the readme file on the installation CD for PC requirements.
PC Firewall and Other Communication Settings
Software firewalls, IP filtering, IP security policies, and other items can limit the types of
messages that a PC can receive from the SAS InFusion. box. This can particularly affect
users attempting to dial-into a network and administer SAS InFusion remotely.
Note:
In order for SAS InFusion boxes to be visible on the network and to
communicate correctly, set communication parameters on the PC
as follows.
• Allow to initiate outbound TCP connections using ports 4000 and 4001
• Allow to send UDP broadcast messages using port 4002
• Allow to accept and process UDP messages using ports 4003 and 4004
(Dial-in users must set communication parameters in the dial-in
software.)
Note:
The mechanism by which SAS InFusion software discovers
(establishes communication with) boxes on the network only allows
one instance of the SAS InFusion software to run at a time. This
limitation includes applications based on the SAS InFusion API that
the user has created.
Installing SAS InFusion Software
SAS InFusion software installs on a windows-based PC. To install the software:
LeCroy Corporation
Step 1
Insert the SAS InFusion software CD into the CD ROM drive of the PC
that you will use to create SAS InFusion scenarios. The CD software
installer application runs.
Step 2
Follow the onscreen instructions for installing the software on
the PC hard drive.
Step 3
To start the application, launch the LeCroy SAS InFusion
program from the Start menu (Start > Programs > LeCroy >
InFusion > LeCroy InFusion). The application display appears.
7
Version 1.2
SAS InFusion User Manual
Figure 3
Note:
SAS InFusion Software Application Interface
You can use the software without connecting to a SAS InFusion box.
When not connected, you can create and store scenarios for later
download and use.
Connecting SAS InFusion to an Ethernet LAN
An Ethernet connection provides the means to download scenarios from the SAS
InFusion software to a box. If you intend to run the box in a networked mode, it is also the
primary means to control the box.
While many users will probably set up both their Ethernet and SAS/SATA line
connections at the same time, it is not necessary to do so. If preferred, you can install
SAS InFusion anywhere on your LAN, download scenarios to it, and then later move it to
your test lab.
Once in the lab, you can run the box in stand-alone mode (without Ethernet) and use the
LCD panel to select a scenario and execute it.
To connect SAS InFusion via Ethernet:
8
Step 1
Remove SAS InFusion from its shipping container.
Step 2
Connect the unit to a 100-volt to 240-volt, 50 Hz to 60 Hz, 120W
power outlet using the power cord provided.
Step 3
Connect a standard Ethernet cable between the Ethernet port
on the back of the SAS InFusion box and your Ethernet LAN.
LeCroy Corporation
SAS InFusion User Manual
Version 1.2
Step 4
Turn ON the power switch on the rear of the box. After power is
ON, the SAS InFusion box boots up. This initialization process
lasts a few seconds. During boot-up the box displays
initialization messages and beeps once.
If your LAN uses Dynamic Host Connection Protocol (DHCP), plugging the box into your
LAN will cause your DHCP server to allocate an IP address and subnet mask and bring
SAS InFusion up onto the network. If your LAN uses static IP addressing, you will need
to use the LCD panel to assign an IP address, subnet mask, and default gateway.
Assigning a
Static IP
Address
Using the
LCD Panel
If your network does not use DHCP, you can assign a static IP address via the LCD
panel.
Figure 4
Step 1
From the Root menu on the LCD panel, press the Select (middle) button
to go to the Box Setup menu. The Box Setup menu appears (Figure 5).
Figure 5
LeCroy Corporation
LCD Panel Root Menu at Initial Set-up
LCD Panel Box Setup Menu
Step 2
Press the Bottom button once on the LCD panel to move the
selection arrow next to IP Mode.
Step 3
Press the Select button to select IP Mode. The IP Mode menu
appears (Figure 6). It shows two options: Static and Dynamic.
The default selection is Dynamic.
9
Version 1.2
SAS InFusion User Manual
Figure 6
LCD Panel IP Mode Menu
Step 4
Press the Select button to select Static.
Step 5
Return to the previous menu by pressing the Bottom button
twice to move the Selection arrow to [Back], then press the
Select button to select it. The Box Setup menu appears
(Figure 7). The Selection arrow points to IP Mode.
Figure 7
Step 6
LCD Panel Box Setup Menu: Arrow at IP Mode
Press the bottom button once to move to IP Address, and then
press the select button to select it. The IP Address appears
(Figure 8).
Figure 8
Step 7
LCD Panel: IP Address Display
To edit the IP address, use the buttons as follows:
•
•
•
Bottom button: To move the cursor.
Top button: To edit the numbers.
Select (center) button: To go to the previous menu.
Step 8
When finished editing, press the Select button to return to the
previous menu.
Step 9
Repeat steps 6 and 7 for the subnet mask and default gateway.
Step 10 Once you have completed the IP addressing, reboot the box by
returning to the Box Setup menu and then pressing the Bottom
10
LeCroy Corporation
SAS InFusion User Manual
Version 1.2
button until you see Reboot.
Figure 9
LCD Panel Box Setup Menu: Reboot Display
Step 11 Press Select to select Reboot and then select Confirm to start
the reboot.
Rebooting saves the configurations. Do not simply power cycle the
box. Power cycling will not save your new settings.
Assuming that the SAS InFusion box is physically connected to an
Ethernet LAN, and that you have configured it correctly, it should
immediately come up on the network.
Checking
the IP
Address
Using the
LCD Panel
To verify the box IP address:
Step 1
From the Root menu, press the Select button to select Box Setup.
Step 2
Press the Down button eight times on the front of the SAS
InFusion device to display About.
Step 3
Press the Enter button on the front panel to select About. Scroll
until the IP address of the box appears (Figure 10).
Figure 10
Checking
the DHCP
Setting
Using the
LCD Panel
LeCroy Corporation
LCD Panel About Menu
The About menu now displays the IP Mode settings. You can verify that SAS InFusion
is set to use DHCP by going to the About menu (as shown above) and scrolling down to
IP Mode.
11
Version 1.2
SAS InFusion User Manual
Linking the SAS InFusion Device and Software
Once the SAS InFusion box is running and has been connected to a LAN, it should be
visible in the Device List window in the SAS InFusion software. If it is not, you may need
to wait or refresh the software in order for the box to appear. To refresh the software, click
Refresh Devices button, second from the left on the Device List Window toolbar.
Figure 11
Device List Window
Note: To display the Device List window, select View > Views > Devices from the menu
or press the Device List button from the application task bar.
Updating Firmware and Bus Engine
In general, when software upgrades are released, the new software requires that you
update the SAS InFusion firmware and BusEngine.
To update the firmware and the BusEngine:
12
Step 1
Click in the checkbox in the first column (under the Lock symbol) to
select the SAS InFusion device (box).
Step 2
After selecting the device, right click and choose Update Device
from the Popup menu (Figure 12).
Step 3
The software automatically chooses the proper image from the
InFusion directory. Click Update Devices to begin the update
process.
Step 4
The Update Devices window closes and a progress indicator
displays status of the update process (Figure 13). When update
has completed, the display should reflect the updated firmware
and BusEngine rev:
LeCroy Corporation
SAS InFusion User Manual
LeCroy Corporation
Version 1.2
Figure 12
Device Pop-Up Menu
Figure 13
Update Devices Dialog Box
13
Version 1.2
SAS InFusion User Manual
Figure 14
Device List Window: Update Version IDs
Connecting SAS InFusion to the SAS/SATA DUT
There are three ways to set-up SAS InFusion:
•
•
•
Connection
without
Analyzer
Direct connect without analyzer
Direct connect with analyzer
Multiple connections using octopus cables
The simplest way to set up SAS InFusion is to connect the box over a single line to a
device and host (Figure 15).
This set-up uses two external-to-internal SATA cables.
Figure 15
14
Connection Without Analyzer
LeCroy Corporation
SAS InFusion User Manual
Connection
with
Analyzer:
1-Channel
Configuration
Version 1.2
You can easily add an analyzer to the configuration above by placing it between the SAS
InFusion box and the DUT or the box and the host controller.
Figure 16
Connection
with
Analyzer: 2
Channel
Configuration
With a two channel analyzer, you can set up the analyzer so that it records traffic before
and after modification by the SASInFusion box (Figure 17).
The host controller sends unmodified traffic to the analyzer. The traffic is recorded by the
analyzer and then sent to the SASInFusion box where it is modified. Afterwards, the
modified traffic is looped back into a second channel on the analyzer and recorded again.
From there, the traffic passes back through to the device. The result will be a
two-channel recording.
Figure 17
Multiple
Connections using
"Octopus"
Cables
Connection With Analyzer: Two-Channel Configuration
To use internal "octopus" cables with the SAS InFusion box you will also need to use
LeCroy-provided junction boards and two external SATA cables.
Junction boards function as an interconnect between the external cables and the octopus
cables.
Figure 18
LeCroy Corporation
Connection with Analyzer: One-Channel Configuration
Multiple Connections Using “Octopus” Cables
15
Version 1.2
16
SAS InFusion User Manual
LeCroy Corporation
SAS InFusion User Manual
Version 1.2
Chapter 4: Software Overview
This chapter describes key features of SAS InFusion software.
Starting the SAS InFusion Program
To start the SAS InFusion Program from the PC Start menu:
Step 1 Click Start.
Step 2 Select Programs.
Step 3 Select LeCroy.
Step 4 Select InFusion.
Step 5 Click LeCroy InFusion.
The application display appears (Figure 19).
Figure 19
LeCroy Corporation
SAS InFusion Application Display: No Scenarios Open
17
Version 1.2
SAS InFusion User Manual
Application Layout and Description
The SAS InFusion software application presents a multi-windowed interface that consists
of the following elements (Figure 20):
•
File manager.
•
Libraries. There are two types: main library (shown below) and device
libraries (not shown).
•
Work area.
•
Log window.
•
Device list.
You can choose to hide most of these windows.
Figure 20
SAS InFusion Application Display: Main Elements
File
Manager
File Manager is a tool for navigating to SAS InFusion library files (*.infdb) and the folders
they are stored in.
Libraries
Libraries are windows responsible for holding scenarios. Scenarios are test scripts that
specify how SAS InFusion monitors and modifies line traffic.
There are two types of libraries: device libraries, which are associated with each SAS
InFusion device, and general libraries that serve as archives. You can download up to
ten scenarios to each device library. The software limits you to ten scenarios because ten
is the limit that the SAS InFusion hardware can store in flash memory.
General libraries can hold any number of scenarios. You can create multiple general
libraries and put them at any location on your hard drive.
18
LeCroy Corporation
SAS InFusion User Manual
Version 1.2
Table 1
General Library Buttons
General Library Toolbar
Create New Scenario
View/Edit Scenarios. Opens the Scenario window
for editing scenario settings.
Save Scenario
Insert Copy of Selected Item. Makes a copy of
selected scenario and adds it to the library.
Save Library
Delete Selected Scenario
Save Copy of Library
Table 2
Device Library Buttons
Device Library Toolbar
Download Scenario to Device
Delete Selected Scenario
Download All Scenarios To
Device
Refresh Scenario
Save Copy of Library
Start Scenario
View/Edit Scenarios. Opens the
Scenario window for editing
scenario settings
Stop Scenario
Work Area
The Work Area displays scenario contents. To see scenario contents, Click on the New
Scenario button or double-click on one of the listed scenarios (if present) in a library.
Output
Window
The Output Window logs status on commands and user actions.
LeCroy Corporation
19
Version 1.2
SAS InFusion User Manual
Table 3
Log Buttons
Output Toolbar
Save Log
Start Logging
Print Log
Stop Logging
Log Options
Clear Log
Device List
Figure 21
Device List Window
The Device List window keeps track of SAS InFusion boxes that it detects on the Ethernet
network (Figure 21). It shows identity information about each box, such as its name, IP
address, and license status. It also allows you to change the values in these fields.
Device List Fields
The fields in the Device List window have the following functions:
: Selects the box for use and locks it so that other users cannot use it.
Only one user can control a box at a time.
Status: Indicates if the box is ready for use or busy. For example, if a box
has been locked by another user, it will show up in the Status field as Busy.
The Status field also shows the name of the host PC connected to the box.
Name: Displays the name of the SAS InFusion platform. This is a
user-configurable field.
Protocol: Indicates the protocol of the InFusion box. At present, SAS is the
only option. Future InFusion products will be based upon other protocols.
IP Address: Lists the IP address of each device. The little grey box to the
right allows you to change the IP address directly from this screen.
MAC Address: Lists the MAC address of the box. The MAC address is a
factory-assigned setting that can not be changed. You can confirm the
MAC address by looking at the MAC address sticker affixed to the bottom of
the SAS InFusion box. It is also listed in the LCD menu (Box Setup >
About).
20
LeCroy Corporation
SAS InFusion User Manual
Version 1.2
Firmware Version: Lists the firmware version of the box.
Bus Engine Version: Lists the BusEngine version of the box.
Notes: Provides a field for adding comments about each device.
Device List
Buttons
The Device toolbar lets you change the settings for SAS InFusion boxes. It also lets you
open the Device List library for a selected box and start traffic modification.
To use the toolbar, first select a device by placing a check in the checkbox in the row
representing the box of interest. The same options as shown in the toolbar can also be
accessed by right-clicking while the mouse pointer is over the row representing that
device within the Device List window.
Selecting a box causes the software to establish an Ethernet connection to the box.
When a connection is established, the status for the device will read Connected and the
toolbar buttons activate.
Table 4
Device List Buttons
Device List Toolbar
Add Device to List. Opens a
dialog for entering a static IP
address, device name, and
notes
Refresh Device List. Causes
the software to poll the Ethernet
LAN for InFusion devices and to
repopulate the Device List with
its findings.
1
Stop Scenario
Device Configuration. Opens a dialog
for viewing the SATA Hold Handling &
Scrambling settings for each device.
Also controls swing voltages, SSC,
OOB select.
Update Device. Opens a dialog
for updating BusEngine &
Firmware files.
Rename Device. Changes the name
of the device as it appears in the
Device List.
Open Device Library. Opens
the Device Library window for
the selected SAS InFusion
device1. The Device Library will
display a list of scenarios for the
device and let you view and edit
them.
Edit Device Notes. Allows notes to be
added or edited to the Notes column in
the Device List window
Start Scenario. If a Device
Library is open and a scenario
has been selected, this button
will instruct the SAS InFusion
device to begin modifying traffic.
View/Update License. Opens a dialog
for displaying license status and
updating the license. See chapter 7
for an explanation.
You also can open the device library by double-clicking on the device name in the
device list.
More detail on some of these selections is shown in the sections below.
LeCroy Corporation
21
Version 1.2
SAS InFusion User Manual
Add Device to List
Selecting the Add Device to List button will bring up a screen (see below) that will allow
you to enter the IP Address (this is the address that was entered into the InFusion box in
“Assigning a Static IP Address Using the LCD Panel” on page 9).
Figure 22
Add Device to List Dialog
Enter any notes you would like associated with this device, and click OK. The device will
now appear on the list of available devices.
Update Device
If a device is highlighted in the list, selecting the Update Device button will bring up a
dialog box to allow you to update the BusEngine and/or the firmware (default setting is to
update both). See “Updating Firmware and Bus Engine” on page 12 for more details.
Open Device Library
If a device is highlighted in the list, selecting the Open Device Library button will add the
device library to the screen (alongside the Main Library).
Figure 23
Device Libraries
If the device library contains test cases, these test cases can be selected and run using
the arrow button (or stopped using the black square) either on the device list or on the
device library screen.
22
LeCroy Corporation
SAS InFusion User Manual
Version 1.2
Device Configuration
If a device is highlighted in the device list, selecting Device Configuration will bring up
a screen allowing you to configure the device. The screen is show below.
Figure 24
Device Configuration
When device configuration options are changed (see below for a description of these
options), you may save the new options as the default configurations for that device, or
you may save them temporarily by clicking OK. If you make a temporary change by
clicking OK, the new device configurations will remain until the InFusion box is powered
off (or the options are changed again through the Device Configuration screen).
If you select Save as Default, the InFusion box will need to be restarted to permanently
save the new configuration. A screen will appear as follows:
LeCroy Corporation
23
Version 1.2
SAS InFusion User Manual
Figure 25
Restart InFusion Screen
Click Yes. The InFusion device will temporarily disappear from the network (and from
the list of devices in the Device List), and then will reappear once it has restarted.
An explanation of some of the options available in Device Configuration is as follows:
24
•
SATA Hold Handling. Default setting is enabled. When enabled, InFusion
acts to maintain the data link integrity by intelligently managing HOLD
conditions. When disabled is selected, InFusion simply retransmits traffic
and does not attempt to manage HOLD conditions. For more on this issue,
see “SATA Hold Handling in SAS InFusion” on page 25.
•
Scramble data to Target. Default setting is enabled. When enabled,
InFusion will scramble frame data going to the target device as specified in
the SAS specification. When disabled, the scrambler is bypassed.
•
Descramble data from Target. Default setting is enabled. When enabled,
InFusion will descramble frame data coming from the target as specified in
the SAS specification. When disabled, the descrambler will be bypassed.
Data dword matchers will attempt to match scrambled data, just as if it had
been received on the line.
•
Scramble data to Initiator. Default setting is enabled. When enabled,
InFusion will scramble frame data going to the initiator device as specified in
the SAS specification. When disabled, the scrambler is bypassed.
•
Descramble data from Initiator. Default setting is enabled. When enabled,
InFusion will descramble frame data coming from the initiator as specified in
the SAS specification. When disabled, the descrambler will be bypassed.
Data dword matchers will attempt to match scrambled data, just as if it had
been received on the line.
•
Swing to Initiator. Default setting is Normal. Controls the peak-to-peak
voltage level of the signal sent by InFusion to the Initiator. Normal is 440mV
to 660mV peak-to-peak. High is 800mV to 1200mV.
•
Swing to Target. Default setting is Normal. Controls the peak-to-peak
voltage level of the signal sent by InFusion to the Target. Normal is 440mV
to 660mV peak-to-peak. High is 800mV to 1200mV.
•
Spread Spectrum Clock to Initiator. Default setting is Disabled. When
disabled, InFusion uses a normal (fixed frequency) clock to transmit traffic to
the Initiator. When enabled, InFusion uses a spread spectrum clock, where
the clock frequency varies over time through a small range of frequencies.
The intent of a spread spectrum clock is to reduce interference with other
devices that might be sensitive to the fixed clock frequency.
LeCroy Corporation
SAS InFusion User Manual
Version 1.2
•
Spread Spectrum Clock to Target. Default setting is Disabled. When
disabled, InFusion uses a normal (fixed frequency) clock to transmit traffic to
the Target. When enabled, InFusion uses a spread spectrum clock, where
the clock frequency varies over time through a small range of frequencies.
The intent of a spread spectrum clock is to reduce interference with other
devices that might be sensitive to the fixed clock frequency.
•
Out of Band Sensitivity to Initiator. Default is Normal. When set to
Decrease by 30mV or Decrease by 60 mV, the sensitivity of the idle detection
circuits are decreased, to enable correct detection of marginal signals.
•
Out of Band Sensitivity to Target. Default is Normal. When set to
Decrease by 30mV or Decrease by 60 mV, the sensitivity of the idle detection
circuits are decreased, to enable correct detection of marginal signals.
SATA Hold Handling in SAS InFusion
Under normal operation, SAS InFusion transmits data traffic in both directions without
any modifications at all, other than the specific modifications defined in scenarios and/or
test cases which the user has scripted and are currently active. The only normal effect
of inserting a SAS InFusion box into a data stream is the slight delay as traffic is received
by InFusion and then retransmitted.
However, there are certain unusual situations where even the slight delay in
retransmitting the traffic might cause problems in communication between initiator and
target, and one of these is the flow control mechanism defined as a HOLD condition.
SATA devices may pause data transfer from another device by issuing a HOLD primitive,
which requires the sending device to (very) quickly cease sending traffic and instead
transmit HOLDA primitives. Note that, under normal circumstances, the HOLD condition
applies to traffic in only one direction, and traffic in the other direction proceeds as usual.
In order to manage this issue, under these conditions InFusion will act like an expander
(which has to deal with the same issue), and as soon as InFusion receives a HOLD
primitive from a device, InFusion ceases to transmit data to that device and instead
transmits HOLDA primitives. To avoid losing data, InFusion will simultaneously begin
transmitting HOLD primitives to the sending device, and will buffer the small amount of
data received until the sending device can respond and cease sending data. When data
flow is restored, InFusion reestablishes communication including transmitting any data
traffic which was buffered before flow could be stopped.
Although highly unlikely, there are some special case scenarios that could develop. If
both devices begin sending HOLD primitives at the same time, InFusion cannot simply
send HOLDA primitives to both devices, since the device can continue to transmit data
while receiving HOLDA primitives. Instead, InFusion transmits HOLD primitives to one
device and HOLDA primitives to the other.
Another unlikely case is when the stream that gets interrupted (the stream flowing
towards the sender of HOLD) is already in a CONT condition. SATA has a mechanism
to prevent the need for repeated transmission of the same primitive. Instead of repeating
the same primitive hundreds or thousands of times, a device can send the primitive twice
followed inmmediately by a CONT (continue) primitive, which is a signal for the receving
device to assume the primitive repeated twice is continuing until a new primitive is
received. Any traffic that might occur between the CONT and the next valid primitive can
be treated as "junk data" and discarded by the receiver.
LeCroy Corporation
25
Version 1.2
SAS InFusion User Manual
If traffic in one direction is already in a CONT condition when a HOLD primitive is received
in the other direction, the HOLDA primative generated by InFusion cancels the CONT.
When the HOLD goes away and the data stream can be restarted, the CONT condition
must first be restablished. InFusion remembers which primitive has been "continued",
and reestablishes the CONT condition by sending that primitive twice followed by CONT,
before continuing with normal traffic flow.
In all these cases, InFusion is acting intelligently to maintain the integrity of the data link
under these unusual circumstances. In the vast majority of situations, these actions will
go unnoticed by the system and by the user. Only under circumstances where these
actions might interfere with the test case in progress (for example, if the HOLD condition
itself is under test) would the SAS Hold Handling option need to be disabled.
Modifying Window Layout
You can use SAS InFusion windows in three modes: Tabbed style, frame style, and
mixed style.
The modes are set apart by the presence/absence of tabs at the bottom of the windows.
Tabbed-style windows have tabs. Frame-style windows do not. Mixed-style windows
have some windows with tabs and some without.
Tabs are used to navigate from one window to the next.
TabbedStyle Layout
Figure 26
26
Application Window Layout: Tabbed Style
LeCroy Corporation
SAS InFusion User Manual
Version 1.2
Tabbed-style windows stack one on top of the other so that only the top window is visible
(Figure 26). Tabs allow you to navigate to the underlying windows.
Frame-style windows do not have tabs and appear side-by-side (Figure 27).
Mixed-style windows have some windows that are of a tabbed style and others that are
of frame style (Figure 28).
Framed-Style Layout
LeCroy Corporation
27
Version 1.2
SAS InFusion User Manual
Figure 27
Application Window Layout: Framed Style
Figure 28
Application Window Display: Mixed Style
Mixed-Style
Layout
28
LeCroy Corporation
SAS InFusion User Manual
Moving
Windows
with "Smart
Docking"
Version 1.2
SAS InFusion has a window-positioning feature called "Smart Docking" It allows precise
positioning of windows within the application. When Smart Docking is enabled,
Positioning buttons appear whenever you move a window (Figure 29 and Figure 30).
Figure 29
Application Display: Smart Docking Activated
Figure 30
Smart Docking Positioning Buttons
The function of positioning buttons is to allow windows to be precisely positioned within
the application.
Smart Docking is enabled by default and can be turned OFF or ON by selecting View >
Smart Docking from the application menu.
If enabled, two sizes of buttons appear as soon as you move a window. Small buttons
let you move the window in one direction. The larger button lets you position left, right,
up or down within the center of the application window.
The larger button can also let you create tabbed windows. To create tabbed windows,
drag the mouse over the central part of the positioning button (the Tab button in
Figure 30).
LeCroy Corporation
29
Version 1.2
SAS InFusion User Manual
To use move a window via the Positioning buttons:
Step 1 Position your mouse pointer over a title bar of a window and click
and hold the Mouse button. To reposition a tabbed window,
click and hold on the Windows tab. The Positioning buttons
appear as shown in Figure 30.
Step 2 Drag the window over one of the Positioning buttons. When the
mouse pointer is over the Positioning button, a ghost-like
window pane appears (Figure 31). It shows you a preview of the
new location of the window.
Step 3 Release the mouse button. The window repositions itself.
Figure 31
Application Display: New Location of Window
Tool Tips
Throughout the application, Tool Tips provide useful information about buttons on the
toolbars. To display a Tool Tip, position the mouse pointer over an item of interest ().
30
LeCroy Corporation
SAS InFusion User Manual
Version 1.2
Figure 32
Tool Tip
The Menu Bar
Table 5 lists commands in the SAS InFusion menu bar.
Table 5
Menu/Option
SAS InFusion Menu Bar Menus and Menu Options
Function
File
New Scenario
Opens an area for creating a new scenario. Scenarios are test
scripts that determine how SASInFusion monitors and modifies
traffic.
Open Library ...
Opens a dialog for selecting library files (*.INFDB)
Close Scenario
If open, closes the selected scenario.
Save Scenario
Saves any changes that have been made to an open scenario.
Print Scenario…
Prints part or all of the scenario.
Print Preview
Shows what the scenario will look like when printed.
Print Setup…
Sets up your current or new printer.
Exit
Exits the SAS InFusion program.
View
Views >>
Shows or hides the File Manager, Library, Output and Devices
windows. Also has a Customize option for customizing or
resetting menus, toolbars and tooltips.
Smart Docking
If enabled, causes Positioning buttons to appear onscreen any
time a window is moved. These buttons allow windows to be
precisely positioned and docked within the application.
Toolbars
Displays list of available toolbars.
Status Bar
Shows or hides the Status bar.
Window
New Window
Opens a copy of the current scenario window.
Cascade
Displays all open windows in an overlapping arrangement.
Tile
Displays all open windows as a series of strips across the display.
Arrange Icons
Arranges minimized windows at the bottom of the display.
Windows ...
Displays a list of open windows and provides controls for
activating or closing them.
Help
LeCroy Corporation
Help Topics ...
Opens this manual.
About SASInFusion
Displays version information about SAS InFusion.
31
Version 1.2
SAS InFusion User Manual
Toolbars
Toolbars provide quick access to most of the SAS InFusion software functions. You can
learn the function of each button by passing the mouse pointer over them.
Descriptions of the buttons appear on the status bar at the bottom of the window and as
tooltips above each button.
The application toolbar allows you to create, save and print scenarios and to open
libraries and windows within the application.
Table 6
Application Toolbar Buttons
New Scenario.
Show File Manager
Open Library. Opens a dialog
for browsing to a library file
(*.INFDB).
Show Library
Save Scenario
Show Output
Download Scenario
Show Device List
Print Scenario
Status Bar
The Status bar is located at the bottom of the Main Display window. The Status bar
provides status information on SAS InFusion and also provides descriptions of buttons in
the application whenever the mouse pointer is held over a button.
Figure 33
32
Status Bar
LeCroy Corporation
SAS InFusion User Manual
Version 1.2
Chapter 5: Test Scenarios
This chapter describes how to create and execute SAS InFusion scenarios. A scenario
is a test script that defines how the SAS InFusion box monitors and modifies line traffic.
Scenarios Overview
You create scenarios on a PC running the SAS InFusion application. You then download
the scenarios for execution on a SAS InFusion box. You can download up to ten
scenarios to each SAS InFusion box. You can start and stop a scenario either at the box,
using the device LCD panel, or at the PC, using the SAS InFusion software application.
The SAS InFusion application provides a menu-driven interface for building scenarios.
The interface prompts you for simple decisions and choices from drop-down menus. As
you make your selections, the script takes shape automatically in the scenario window.
The script is in the form of simple English sentences. You need not understand any
formal scripting language.
Figure 34
Open Scenario in Application Window
As described later in this chapter, you can create any number of scenarios and store
them in libraries on the PC hard drive. Scenario library files are named in the following
format:
<filename>.infdb
LeCroy Corporation
33
Version 1.2
SAS InFusion User Manual
Creating SAS InFusion scenarios is easy, but it requires an understanding of the
following terms: action, event, combined event, global rules, sequence, and state.
Table 7
Key Scenario Terms
Term
Definition
Action
SASInFusion response to an event.
Event
Condition that is detectable by SASInFusion.
Combined Event
Logical OR association of events (for example, event A or event B).
Global Rules
Portion of a scenario that can define a single SASInFusion test state.
Sequence
Portion of a scenario that can define multiple SASInFusion test states. More flexible than
the Global Rules, a sequence allows more powerful scenarios that include branching
and looping between test states (the Global rules can define only a single test state, so
there is no branching).
State
"Behavior" of the Global Rules or a sequence at any point in time. In terms of
SASInFusion testing, behavior is "waiting" for a certain set of events and responding with
a certain set of actions.
You can think of the Global Rules and each sequence as separate test routine or program
operating within the scenario. Each operates independently and in parallel with the
others. The purpose of each is to detect events and then respond with the appropriate
action or set of actions. In essence, they allow you to operate up to three test states
simultaneously within SAS InFusion.
Global
Rules
Global Rules are a portion of the scenario that can define only one test state. To create
the Global Rules, you use the menu-driven interface to enter an event or combined event
and the corresponding action or set of actions (the response of SAS InFusion hardware
to the event).
In the case of a combined event, the action is taken upon occurrence of any of the events
stated for the event combination. It is a logical OR association, meaning any of the events
will trigger the action.
After you enter the event or combined event, the interface prompts you for actions. An
action might be, for example, injecting a particular primitive or error into the traffic stream.
You can enter multiple actions, which will take place simultaneously.
After defining the event and actions within the Global Rule area, you can save the
scenario and download it to a SAS InFusion box.
Sequences
34
The Global Rules are all you will need for simple test scenarios. However, a scenario also
can contain one or two sequences, more powerful programs that can define multiple
states and allow branching between states. You also can do looping with a sequence,
which allows you to repeat a test state or to execute a test for a specified period of time.
LeCroy Corporation
SAS InFusion User Manual
Version 1.2
As with Global Rules, the menu-driven interface guides you in building a sequence.
Some of the prompts are different, however, because you now are encapsulating groups
of events and actions as distinct states. Recall that a state is a combination of events and
actions at a specific point in time. If the event or combined event defined by a state
occurs, the corresponding action or set of actions follows.
Figure 35
Global Rules and Sequence Areas of a Scenario
SAS InFusion hardware provides the capacity to have up to two sequences co-existing
in a scenario in addition to the Global Rules. Recall that both the Global Rules and any
sequences are active at all times. Each is a separate "state machine," having the
behavior of a particular test state at any point in time. Because the Global Rules has the
capacity for only one state, you can view it as a "degenerative state machine."
Multi-Link
Testing
SAS Infusion hardware supports testing of SAS wide-link configurations. Wide-link uses
multiple physical links to aggregate traffic from up to four separate lines into one logical
link.
Each SAS InFusion box has two BNC connectors on its rear panel that allow it to connect
to other SAS InFusion boxes in a daisy-chain. One connector is for signal input, the other
for signal output.
The BNC connectivity allows you develop wide-link test schemes. In such schemes, four
boxes are connected in a daisy-chain, with the BNC output on an upstream box linked to
the BNC input on its downstream neighbor.
A separate scenario runs on each box, but the scenarios interact through trigger signals
exchanged via their BNC ports. For example, you can set the first box in the daisy-chain
to send a trigger downstream when it detects a specific line condition. The trigger can
cause a state change in the scenario running on the downstream box. That box, in turn,
can cause a state change in the scenario running on its neighbor.
Each of the four boxes is monitoring/modifying its own line, but there is a synergy
between the four by way of the BNC daisy-chain. In this fashion, you can use a SAS
InFusion daisy-chain to coordinate error injection across multiple SAS or SATA physical
links.
LeCroy Corporation
35
Version 1.2
SAS InFusion User Manual
Scenario Libraries
As described, you can create any number of scenarios which you then can archive on
your PC hard drive. You also can download up to ten scenarios to each SASInFusion box
for test execution. You can think of the libraries as windows that hold scenarios.
Recall that each library is a separate *.infdb file.
Main Library When you launch the SAS InFusion application, it opens a window called the main library.
The main library is the default workspace for creating and storing new scenarios. The
main library corresponds with the following file in the Infusion folder on the PC hard drive:
DEFAULT.INFDB
File
Libraries
You can save the main library with a name other than default (while still using the .infdb
file extension). The new file becomes a file library that is functionally equivalent to the
main library with the following exception: It does not open by default in the Main Library
window. You can navigate to other file libraries using the File Manager of the SAS
InFusion application.
Note:
In this manual, the main library and other .infdb file libraries are
collectively called general libraries.
For example, if you select Open Library you will see a window similar to the following:
Figure 36
36
Open Library Listing
LeCroy Corporation
SAS InFusion User Manual
Version 1.2
By selecting the TestCasesForSATA.infbd file, you will get an additional library window
with predefined SATA test cases, similar to the following:
Figure 37
Device
Libraries
Test Cases for SATA Library
In addition to general libraries, the application defines device libraries. Each device
library is associated with a specific SAS InFusion box. Each device library opens in a
separate Device Library window and holds up to ten SAS InFusion scenarios for the box.
When you connect to the box and click on the entry for that box in the Device List, the
device library for the box opens automatically.
The scenarios that appear in the device library are those currently stored on the
corresponding box. They were uploaded from the box to your PC when you opened the
device library. You can click on any of the scenarios listed to open it for editing. When
you are finished with your edits, you can use the buttons on the Device Library toolbar to
download the revised scenario.
Test Events
As described, a scenario is a script you create using simple mouse clicks and text entries.
As you work, the script takes shape in the scenario area of the application display. You
can think of the scenario area itself as consisting of two subareas: A Global Rules area
at the top, where you create the Global Rules, and a sequence area beneath the Global
Rules, where you create any sequences.
Whether you are creating the Global Rules or a sequence, the menu-driven interface
prompts you to specify the event(s) for which you want to trigger actions.
While many events are line conditions, an event also can be a condition that occurs within
a SAS InFusion box (for example, detection of a BNC trigger signal from another box).
LeCroy Corporation
37
Version 1.2
SAS InFusion User Manual
Table 8 lists supported events. Note that some events are applicable only in the context
of creating sequences (those events appear on the drop-down list only if you are creating
a sequence). Sequences can have multiple states, and they allow branching between
states.
Table 8
Test State Events
Event
Description
Any Dword
Occurrence of any Dword on the line.
ATA Command
Occurence of a particular ATA Command on the line.
BNC Input
Occurrence of BNC input trigger.
Both Links Up
Occurrence of both line ports active (not idling).
CRC Error
Occurrence of a CRC error on the line.
Dword Matcher
Occurrence of a particular Dword on the line.
FIS
Occurrence of a particular SATA FIS on the line.
Frame
Occurrence of a particular frame on the line.
Invalid 10b Code
Occurrence of an invalid 10b code.
Links Speed 3G
Both lines operating at 3 Gbps.
OOB Signal
Occurrence of OOB signal.
Primitive Group
Occurrence of particular primitive group on the line.
Running Disparity Error
Occurrence of Running Disparity (RD) error.
SAS Data Pattern
Occurrence of a particular data pattern in a SAS frame.
SAS Primitive
Occurrence of a particular SAS primitive.
SATA Data Pattern
Occurrence of a particular data pattern in a SATA frame.
SATA Primitive
Occurrence of a particular SATA primitive.
Timer
Occurrence of a particular elapsed time (time period).
Following sections provide some additional details on three of the events.
Dword
Matcher
Dword Matcher is a dword pattern matcher that presents match and mask fields and a
K-Code Mask field. K-Codes are control characters that are always used in the first byte
of a four-byte primitive. Of the K-Code masks listed in the menu, D-D-D-D is used for
data bytes, and K-D-D-D is used for all primitives.
When you create a dword match, keep the following in mind:
38
LeCroy Corporation
SAS InFusion User Manual
SAS Data
Pattern
Version 1.2
•
The pattern can be inside or outside of frames (it does not matter if the pattern
is inside a frame or not)
•
•
Because the pattern can be inside or outside of frames, there is no offset.
•
You can use any K/D pattern.
You can make user-defined primitives. (This is the reason this feature was
created.)
When you create a SAS data pattern, keep the following in mind:
•
•
•
•
The pattern must be defined inside a frame that starts with a SOF or SOAF.
•
0x12345678 (hex), where "1" is the first digit on the cable and is the MSB as
given in the SAS Standard.
The pattern must be data only (no K-codes/primitives).
The pattern must be defined at a specific offset in the frame.
The pattern and mask must be specified in the same format as specified in
the SAS standard.
For example, for an SMP Request:
Pattern: 0x40000000
Mask: 0xFF000000
Offset: 0
SOF Type: SOF
SATA Data
Pattern
When you create a SATA data pattern, keep the following in mind:
•
•
•
•
The pattern must be defined inside a frame that starts with a SATA_SOF
Must be data only (no K-codes/primitives)
Must be defined at a specific offset in the frame
The pattern and mask must be specified in the same format as specified in
the SATA Standard.
For example, for Register H -> D FIS:
Pattern: 0x00000027
Mask: 0x000000FF
Offset: 0
SOF Type: SATA_SOF
LeCroy Corporation
39
Version 1.2
SAS InFusion User Manual
Test Actions
After you enter the set of events for a test state, the menu-driven interface prompts you
for the corresponding action or set of actions. If you define multiple actions, the actions
occur simultaneously. Table 9 lists supported actions. Note that some of these actions
only apply to creating sequences.
Table 9
Action
Description
Beep
Emit audible sound of duration selectable via drop-down list.
BNC Output
Send a signal out the BNC port to the box downstream.
Branch to Existing State1
Go to a state in this sequence that is already defined.1
Branch to New State1
Go to a state in this sequence that is not yet defined (you need to define it).1
Capture Data Dword
Captures a data dword into one of four registers.
Disconnect
Put both SAS InFusion SAS ports at electrical idle immediately.
Inject CRC Error
Inject a CRC error into the line.
Inject Invalid 10b Code
Inject invalid 10b code into the line.
Inject RD Error
Inject a Running Disparity (RD) error into traffic.
Monitor/Count
Open a window to count the number of events that occur during a session. A
session is the time period during which a scenario runs.
Reconnect
Start traffic pass-through immediately. This action is used to restart traffic after a
previous disconnect command. Once traffic is passing-through, the initiator and
target resume OOB signaling.
Remove2
Remove the targeted event from the traffic.2
Restart All Sequences1
Restart all sequences in the scenario.1
Restart Current Sequence1
Restart the sequence that contains this action definition. 1
Stop Scenario
Stop all scenario activity.
Substitute Data Dword
Substitute a data Dword in the traffic.
Substitute SAS Primitive
Substitute a SAS primitive in the traffic.
Substitute SATA Primitive
Substitute a SATA primitive in the traffic.
1
2
40
Test State Actions
Only shown in Action Properties dialog box when creating a sequence.
In SAS InFusion, a Remove primitive action is implemented by replacing the primitive
with an idle data dword. A Remove frame action is implemented by replacing the
start-of-frame and end-of-frame primitives with an idle data dword.
LeCroy Corporation
SAS InFusion User Manual
Using
Counters in
Events and
Actions
Version 1.2
Many of the events and actions supported by SAS InFusion also support counters which
can be used to control functions.
Within events, counters are used to determine how many times the event must occur
before the associated actions are triggered. Event counters are typically provided with
two properties:
•
Count Randomly, which can be set to "Yes" or "No" (default value is "No").
If set to "Yes", the event will need to be repeated a random number of times
(between 1 and the value set in the property Max Random Count, which
replaces the property Counter Value when "Yes" is selected), before the
action is triggered.
•
Counter Value, which is the number of repeats required when Count
Randomly is set to "No". The default value is 1.
Within actions, counters are used to determine how many times the action must be called
before it will act. Action counters are typically provided with two properties:
•
Random, which can be set to "Yes" or "No" (default value is "No"). If set to
"Yes", the action will need to be triggered for a number of occurrances before
the action will take place, That number will range randomly between 1 and
the value set in the property At least every Nth occurrence, which replaces
the property Every Nth occurrence when "Yes" is selected).
•
Every Nth occurrence, which is the number of times the action needs to be
called before it will act.
Note that there is some overlap in the way these counters can be used. For example, in
the simple case of a single event leading to a single action, it will make no difference
whether you specify the event to require 5 repeats before triggering the action, or the
action to require 5 occurances before it acts.
However, in the case of combined events and/or actions, the separate counters provide
a great deal of flexibility in designing test cases. For example, consider the case where
Event_1 OR Event_2 leads to Action. If Event_1 has a counter of 5, then the Action will
be triggered either when Event_1 has repeated 5 times or when Event_2 happens the
first time, whichever occurs first.
But if the event counters are set to 1 and the Action counter is set to 5, then the Action
will happen after 5 occurrences of EITHER Event_1 or Event_2.
LeCroy Corporation
41
Version 1.2
Capturing a
Data Dword
SAS InFusion User Manual
SAS/SATA InFusion provides the ability to capture individual data dwords and provides
four different registers to store captured dwords (Dword #0, #1, #2 and #3).
To capture a data dword, select Capture Data Dword from the Action Properties screen,
as shown below. Select the register to be used to store the dword from the drop-down
menu under the Capture Register property.
Figure 38
42
Capturing a Data Dword
LeCroy Corporation
SAS InFusion User Manual
Using
Captured
Data
Dwords
Version 1.2
Captured data dwords can be used in creating events for data that match the captured
dword(s), or in creating actions to substitute the captured dword(s) into the data stream.
To create an event using the captured dword, in the Event Properties menu select SAS
Data Pattern (or SATA Data Pattern), and then select any of the 12 dwords (Dword 0
Type through Dword 11 Type). The drop-down menu provides the choice of a custom
dword or any of the four captured dwords. If you select a captured dword, the Value field
beneath this selection will be hidden (the Value field is only used for specifying custom
dwords). Note that choice of a mask and an offset are still available when using captured
dwords.
Figure 39
LeCroy Corporation
Using a Captured Dword in a SAS Data Pattern
43
Version 1.2
SAS InFusion User Manual
Captured data dwords may also be used in the Substitute Data Dword test state action.
From the Action Properties screen, choose Substitute Data Dword and then select the
Substitute for property. A drop down menu is provided (see below) that allows the
choice of a custom dword or any of the four captured dword registers.
Figure 40
Using a Captured Data Dword in Substitute Dword Test Action
Test Initiator and Target
To begin the scenario creation process, you press the New Scenario button in a library
window or on the SAS InFusion application toolbar. As the first step in creating a
scenario, the application prompts you for scenario name, a short description (optional),
and the direction of traffic to which any traffic changes apply. Changes are, for example,
injection or removal of data or a primitive.
You identify direction of traffic change, or modification, in terms of traffic origin. The
application uses the following conventions:
•
From Initiator: Change is made to traffic coming from test host (for example,
CRC error is injected into traffic stream sent from initiator to target).
•
From Target: Modification is made to traffic coming from the target (for
example, CRC error is injected into traffic stream sent from target to initiator).
Figure 41 shows the first prompt in the scenario creation process. When you click on it,
the Scenario Properties dialog box appears, allowing you to enter the scenario name, a
short description, and direction of traffic change (Figure 42).
44
LeCroy Corporation
SAS InFusion User Manual
LeCroy Corporation
Version 1.2
Figure 41
Entering Basic Scenario Information
Figure 42
Scenario Properties Dialog Box
45
Version 1.2
SAS InFusion User Manual
Note:
You define direction of these traffic changes on a global basis for the
entire scenario. In other words, any scenario action that modifies line
traffic follows the rule established at the top of the scenario.
Summary of Scenario Creation
The suggested process of creating and executing a scenario is as follows:
Step 1
Create a scenario in the main library.
Step 2
Copy the scenario from main library to the desired device library
by drag-and-drop with a mouse. (Each device library is
associated with a specific SASInFusion box.)
Step 3
Download all scenarios in device library to the SAS InFusion
box.
Step 4
Select the scenario in the device library that you want to run on
the box.
Step 5
To run the scenario, click the Start Scenario button from the
Device Library toolbar. The box will start to monitor/modify
traffic.
Note:
Step 1 is described in detail for each example in following
sections. Steps 2 to 5 are described in detail at the end of
this chapter.
Creating Global Rules
This section gives several examples for creating the Global Rules area of a scenario.
Recall that the Global Rules area defines a single test state. The Global Rules do not
have the capacity for multiple states, so that area of a scenario cannot change state.
In terms of SAS InFusion testing, a state defines test “behavior.” In this context, behavior
is “waiting” for an event and responding with an action or set of actions that happen
simultaneously.
Keep in mind that a test state you implement with the Global Rules operates in parallel
with the active test state of each sequence in the scenario.
In effect, SAS InFusion lets you do up to three line tests at the same time. You can do
one test with the Global Rules and a separate test with each sequence you create. You
can have up to two sequences in a scenario.
Table 10 summarizes the Global Rules examples that follow.
46
LeCroy Corporation
SAS InFusion User Manual
Version 1.2
Table 10
Global Rules Examples
Example
Description
1
Creating a single event and action (removes a primitive).
2
Creating a single event and action (replaces a primitive).
3
Creating a combined event (a logical OR association of multiple events) and an action.
4
Creating multiple triggers and actions.
5
Creating multiple actions on a single event.
6
Using timers.
Example 1: In this example, the Global Rules area of the scenario waits for each RRDY Normal
primitive from the initiator and removes it.
Creating a
Single Event
Step 1 Click the New Scenario button in the main library or one of the
and Action
device libraries. At the top of the scenario area, enter general
(Removes a
scenario information, including scenario name, description, and
Primitive)
direction of traffic change.
Note:
For an example of filling in the general scenario information
fields, see Figure 41 and Figure 42.
Step 2
In the Global Rules area, click on the prompt to add an event
(Figure 43).
Step 3
The Event Properties dialog box appears (Figure 44). In the
Type column on the left, choose SAS Primitive.
Figure 43
LeCroy Corporation
Example 1: Entering an Event
47
Version 1.2
SAS InFusion User Manual
Figure 44
Step 4
In the Type column in the middle of the dialog box, click on
Description if you want to add a description of the event. Click
on Direction to choose the direction of traffic to monitor for the
selected event (the default is from initiator, which is what you
want for this example).
Step 5
Still in the middle column of the Event Properties dialog box,
click on Primitive to bring up a drop-down menu that lets you
choose the type of primitive you want to wait for in this scenario
(Figure 45). In this example, it is RRDY (Normal).
Step 6
Click OK to close the Event Properties dialog box.
Step 7
In the Global Rules area, click on the prompt to add an action
(Figure 46).
Step 8
The Action Properties dialog box appears (Figure 47). In the
Type column on the left, choose the action you want to occur
when an RRDY is detected. In this example, it is the Remove
action.
Note:
48
Example 1: Event Properties Dialog Box
In SAS InFusion, a Remove primitive action is implemented by
replacing the primitive with an idle data dword.
LeCroy Corporation
SAS InFusion User Manual
LeCroy Corporation
Version 1.2
Step 9
Click OK to close the Action Properties dialog box.
Step 10
In the File menu, select Save Scenario to save the scenario.
Figure 45
Example 1: Event Drop-Down List
Figure 46
Example 1: Entering an Action
49
Version 1.2
50
SAS InFusion User Manual
Figure 47
Example 1: Action Properties Dialog Box
Figure 48
Example1: Complete Scenario
LeCroy Corporation
SAS InFusion User Manual
Version 1.2
Example 2: In this example, the Global Rules portion of the scenario waits for each RRDY Normal
primitive and replaces it with an ERROR primitive.
Wait for
Primitive
Step 1 Click the New Scenario button in the main library or one of the
and Replace
device libraries. At the top of the scenario area, enter general
It with an
scenario information, including scenario name, description, and
Error
direction of traffic change.
Note:
For an example of filling-in the general scenario information fields,
see Figure 41 and Figure 42.
Step 2
In the Global Rules area, click on the prompt to add an event
(Figure 49). This brings up the Event dialog box.
Step 3
As you did in steps 1 through 6 of the previous example, choose
RRDY (Normal) as the type of primitive you want to monitor.
Step 4
In the Global Rules area, click on the prompt to add an action
(Figure 50).
Step 5
The Action Properties dialog box appears (Figure 51). In the
Type column on the left, choose Substitute SAS Primitive as
the action you want when an RRDY (Normal) occurs.
Step 6
In the middle column of the dialog box, click on Description if
you want to add a description of the action.
Figure 49
LeCroy Corporation
Example 2: Entering the Event
51
Version 1.2
52
SAS InFusion User Manual
Figure 50
Example 2: Entering the Action
Figure 51
Example 2: Action Properties Dialog Box
LeCroy Corporation
SAS InFusion User Manual
Version 1.2
Figure 52
Step 7
Still in the middle column of the Event Properties dialog box,
click on Primitive to bring up a drop-down menu that lets you
choose the type of primitive to substitute for RRDY (Normal)
(Figure 52). Choose ERROR.
Step 8
Click OK to close the Action Properties dialog box.
Step 9
In the File menu, select Save Scenario to save the scenario.
Note:
LeCroy Corporation
Example 2: Action Drop-Down List
In this example, you set the substitution action to happen at every
occurrence of an RRDY (Normal) (as shown in the Figure, the action
is set for every occurrence). However, you can set an action to
happen at other multiples of event occurrence (for example 5, 25,
1000 and so on). You also can set the action to happen at random,
within a specified number of event occurrences.
53
Version 1.2
SAS InFusion User Manual
Figure 53
Example 2: Complete Scenario
Example 3: In this example, the Global Rules area of the scenario waits for either of two types of
Creating OR RRDY primitive and replaces them with an ERROR primitive.
Conditions
This example includes a combined event (a logical OR association of two or more single
events). Here, the combined event consists of any occurrence of RRDY (Normal) or
RRDY (Reserved 0).
Step 1
Note:
54
Click the New Scenario button in the main library or one of the
device libraries. At the top of the scenario area, enter general
scenario information, including scenario name, description, and
direction of traffic change.
For an example of filling-in the general scenario information fields,
see Figure 41 and Figure 42.
Step 2
In the Global Rules area, click on the prompt to add an event.
Step 3
The Event Properties dialog box appears. As you did in example
1 of this chapter, choose RRDY (Normal) as the first primitive
you want to monitor.
Step 4
Click on the add combined event prompt to add a second event
(Figure 54).
Step 5
The Event Properties dialog box appears (Figure 55). Choose
RRDY (Reserved 0) as the second primitive you want to
monitor.
Step 6
Click OK to close the Event Properties dialog box.
LeCroy Corporation
SAS InFusion User Manual
LeCroy Corporation
Version 1.2
Step 7
In the Global Rules area, click on the prompt to add an action
(Figure 56).
Step 8
The Action Properties dialog box appears (Figure 57). In the
Type list on the left, choose Substitute SAS Primitive as the
action you want when either RRDY Reserved 0 or RRDY
Normal occurs.
Figure 54
Example 3: Entering the Second Event
Figure 55
Example 3: Event Properties Dialog Box
55
Version 1.2
56
SAS InFusion User Manual
Figure 56
Example 3: Entering the Action
Figure 57
Example 3: Action Drop-Down List
LeCroy Corporation
SAS InFusion User Manual
Version 1.2
Step 9
Click OK to close the Action Properties dialog box.
Step 10 In the File menu, select Save Scenario to save the scenario.
Figure 58
Example 4:
Multiple
Triggers
and Actions
In this example, the Global Rules area of the scenario waits for two events, each of which
triggers a different action.
Step 1
Note:
Click the New Scenario button in the main library or one of the
device libraries. At the top of the scenario area, enter general
scenario information, including scenario name, description, and
direction of traffic change.
For an example of filling-in the general scenario information fields,
see Figure 41 and Figure 42.
Step 2
As you did in example 2, choose RRDY (Normal) as the first
event to monitor, and substitute with the SAS primitive ERROR
as action.
Step 3
In the Global Rules area, click on the prompt to add the next
event (keep in mind this is not a combined event) (Figure 59).
Note:
Step 4
LeCroy Corporation
Example 3: Complete Scenario
In this example, there is a parallel set of events, but each event is
associated with its own action. In a combined event, there is a
parallel set of events sharing the same action.
The Event Properties dialog box appears. Using the drop-down
menu, choose RRDY (Reserved 0) as the second event to
monitor (Figure 60).
57
Version 1.2
SAS InFusion User Manual
Step 5
Click OK to close the Event Properties dialog box.
Step 6
In the Global Rules area, click on the prompt to add an action
to be triggered by the RRDY (Reserved 0) (Figure 61).
Step 7
58
Figure 59
Example 4: Entering Second Event
Figure 60
Example 4: Event Drop-Down List
The Action Properties dialog box appears (Figure 62). Use it to
choose Inject RD Error as the action triggered by RRDY
(Reserved 0).
LeCroy Corporation
SAS InFusion User Manual
LeCroy Corporation
Version 1.2
Step 8
Click OK to close the Action Properties dialog box.
Step 9
In the File menu, select Save Scenario to save the scenario.
Figure 61
Example 4: Entering Second Action
Figure 62
Example 4: Action Drop-Down List
59
Version 1.2
SAS InFusion User Manual
Figure 63
Example 4: Complete Scenario
Example 5: In this example, an event triggers a set of actions. The actions occur at the same time.
The box waits for an ACK from the initiator. When it occurs, the box beeps, injects an RD
Multiple
Actions on a error, and increments a counter monitoring for that event (ACK from initiator).
Single Event
Step 1 Click the New Scenario button in the main library or one of the
device libraries. At the top of the scenario area, enter general
scenario information, including scenario name, description, and
direction of traffic change.
Note:
60
For an example of filling-in the general scenario information
fields, see Figure 41 and Figure 42.
Step 2
As in previous examples, configure the first event and its
response in the Global Rules area. Choose ACK primitive as the
event, and Beep as the action. From the Action Properties
drop-down menu, configure 500 ms as the duration of the beep.
Step 3
Click on the add another action prompt to add a second action
(Figure 64).
Step 4
The Action Properties dialog box appears. Choose Inject RD
Error as the second action (Figure 65).
Step 5
Click on the add another action prompt to add a third action
(Figure 66).
Step 6
The Action Properties dialog box appears. Choose
Monitor/Count as the third action (Figure 67).
Step 7
Click OK to close the Action Properties dialog box.
Step 8
In the File menu, select Save Scenario to save the scenario.
LeCroy Corporation
SAS InFusion User Manual
LeCroy Corporation
Version 1.2
Figure 64
Example 5: Entering the Second Action
Figure 65
Example 5: Action Drop-Down List (For Second Action)
61
Version 1.2
SAS InFusion User Manual
Note:
62
Figure 66
Example 5: Entering the Third Action
Figure 67
Example 5: Action Drop-Down List (For Third Action)
This example sets the counter to increment at each occurrence of an
ACK (every 1 ACK).
LeCroy Corporation
SAS InFusion User Manual
Version 1.2
Figure 68
Example 6:
Using
Timers
In this example, the Global Rules portion of the scenario waits for an ACK primitive from
the initiator. Each time the box detects an ACK, it injects an RD Error into the traffic
stream. This state continues for a random period of time, not to exceed 1.790 seconds.
After the time period has elapsed (timer times out), the scenario stops.
Note:
Step 1
Although this example sets the timer for a random period, you also
can set the timer for known values (2 ms., 5 mins., 1 hr., and so on).
Click the New Scenario button in the main library or one of the
device libraries. At the top of the scenario area, enter general
scenario information, including scenario name, description, and
direction of traffic change.
Note:
LeCroy Corporation
Example 5: Complete Scenario
For an example of filling-in the general scenario information
fields, see Figure 41 and Figure 42.
Step 2
As in previous examples, configure the first event and its
response in the Global Rules area. Choose ACK primitive as the
event, and Inject RD Error as the action.
Step 3
Click on the prompt to add another event (keep in mind this is
not a combined event) (Figure 69).
63
Version 1.2
SAS InFusion User Manual
Step 4
The Event Properties dialog box appears (Figure 70). In the
Type column on the left, choose Timer. Set the timer for random
timing with a maximum time limit of 1.790 seconds.
Step 5
Click OK to close the Event Properties dialog box.
Step 6
Click on the prompt to add an action to correspond with the
second event (Figure 71).
Step 7
The Action Properties dialog box appears (Figure 72). In the
Type list on the left, choose Stop Scenario as the action you
want after the timer has expired.
Step 8
Click OK to close the Action Properties dialog box.
Step 9
In the File menu, select Save Scenario to save the scenario.
Figure 69
64
Example 6: Entering the Second Event
LeCroy Corporation
SAS InFusion User Manual
LeCroy Corporation
Version 1.2
Figure 70
Example 6: Event Drop-Down List
Figure 71
Example 6: Entering Second Action
65
Version 1.2
66
SAS InFusion User Manual
Figure 72
Example 6: Action Drop-Down List
Figure 73
Example 6: Complete Scenario
LeCroy Corporation
SAS InFusion User Manual
Version 1.2
Creating a Sequence
This section gives several examples for creating sequences. Recall that a sequence can
have multiple states, but only one state is active at any time. In other words, at any point
in time a sequences "waits" for one event (or combined event), and responds with the
corresponding action or set of actions when the event occurs.
A sequence is more powerful than Global Rules, because you can create branching or
looping test logic with a sequence.You can include up to two sequences in a scenario,
but each is completely independent of the other (there is no branching or other interaction
between the two, except through the Restart All Sequences action).
You must follow some simple rules when creating sequences (Table 11):
Table 11
Sequence Rules
You can use only two branch actions per state (When you specify actions for a state, you can only use two instances
of "Branch to an Existing State" or "Branch to a New State." If you try to use more than two, a red error message
appears in the status area of the application that says "Too Many Actions.")
You can use only one restart sequence action per state. (When you specify actions for a state, you can only use one
instance of "Restart Current Sequence" or "Restart All Sequences." If you try to use more than one a red error
message appears in the status area of the application that says "Too Many Actions.")
You can use a maximum of 255 states per sequence. (If you try to use more than 255 states, a red error message
appears in the status area of the application.)
Table 12 summarizes the examples that follow.
Table 12
Example 7:
Creating
Two
Sequences
and Global
Rules
LeCroy Corporation
Sequence Examples
Example
Description
7
Creating two sequences and Global Rules: This scenario has two objectives that you implement with
Global Rules and two sequences. 1) You use Global Rules to replace any of three types of primitives;
2) You use two sequences to detect the order in which a type of frame is received from initiator and
target.
8
Creating a sequence with many states #1: The objective of this scenario is to detect an incorrect order
of primitives and to cause the box to beep when it happens. You implement this scenario with a single
five-state sequence.
9
Creating a sequence with many states #2: This scenario is an enhancement on example 8. In this
scenario, the objective is to detect an incorrect order of primitives, fix it, and to cause the box to beep
when this happens. As with example 8, you implement this scenario with a single five-state sequence.
In this example, Global Rules substitute an Align (0) primitive for each of the following
received from the initiator: Align (1), Align (2), and Align (3). As a separate test operation,
two sequences determine the order in which each Identify Address frame is received
from initiator and target.
Table 13 and Table 14 summarize the logic implemented by each of the sequences.
67
Version 1.2
SAS InFusion User Manual
Table 13
Example 7: Logic of Sequence 0
State
Description
State 0
If Identify Address frame is detected from initiator, go to State 1;
otherwise, continue to check incoming frames (do not change state).
State 1
If next Identity Address frame detected is from target, beep 1 second.
Table 14
Example 7: Logic of Sequence 1
State
Description
State 0
If Identify Address frame is detected from target, go to State 1;
otherwise, continue to check incoming frames (do not change state).
State 1
If next Identity Address frame detected is from initiator, beep 2 second.
There is no interaction between the two sequences. Each of them operates
independently (and is independent of the Global Rules). However, the two sequences
complement each other with their logic. In this sense, they both combine to implement a
test objective.
Step 1
Click the New Scenario button in the main library or one of the
device libraries. At the top of the scenario area, enter general
scenario information, including scenario name, description, and
direction of traffic change.
Note:
For an example of filling in the general scenario information
fields, see Figure 41 and Figure 42.
Step 2
As in previous examples, create the Global Rules area as
shown in Figure 74.
Step 3
Click on the prompt to add a sequence. Prompts for the
sequence appear beneath the Global Rules area. You create a
sequence one state at a time. The application numbers states
consecutively from 0 up (1, 2, 3, and so on).
By default, the name of the first sequence in a scenario is Sequence 0.
The name of the first state is State 0. To change the name of a
sequence or state, or to associate a description with it, click on the
name of the sequence or state. A dialog box appears that allows you to
enter that information.
Note:
68
The description does not appear onscreen, but you can
bring it up by clicking on the name of the sequence or state.
Step 4
In the State 0 area, click on the prompt to add an event
(Figure 75).
Step 5
The Event Properties dialog box appears (Figure 76). In the
Event Properties dialog box, select Identify Address Frame as
the event.
LeCroy Corporation
SAS InFusion User Manual
Version 1.2
Step 6
Click OK to close the Event Properties dialog box.
Step 7
In the State 0 area, click on the prompt to add an action
(Figure 77).
Figure 74
Example 7: Adding the First Sequence
Step 8
The Action Properties dialog box appears (Figure 78). For the
action, select Branch to a New State.
Step 9
Click on the OK button to close the Action Properties dialog box.
This saves the action and automatically creates an area for
State 1 in the scenario.
Step 10 In the State 1 area, click on the prompt to add an event
(Figure 79).
Step 11 The Event Properties dialog box appears. In the Event
Properties dialog box, choose the Identify Address Frame
event. In the Direction column, select From Target (you want
State 1 to trigger on an Identify Address frame received from the
LeCroy Corporation
69
Version 1.2
SAS InFusion User Manual
target).
Step 12 Click OK to close the Event Properties dialog box.
Step 13 Click on the prompt to add an action for State 1 (Figure 80).
Figure 75
70
Example 7: Adding an Event for the First State
LeCroy Corporation
SAS InFusion User Manual
LeCroy Corporation
Version 1.2
Figure 76
Example 7: Event Properties Dialog Box
Figure 77
Example 7: Adding an Action for the First State
71
Version 1.2
72
SAS InFusion User Manual
Figure 78
Example 7: Action Properties Dialog Box
Figure 79
Example 7: Adding an Event for the Second State
LeCroy Corporation
SAS InFusion User Manual
Version 1.2
Figure 80
Example 7: Adding an Action to the Second State
Step 14 The Action Properties dialog box appears. In this example, you
enter the action Beep, and you set the duration of the beep for
1 second.
Step 15 Click on OK to close the Action Properties dialog box.
Step 16 You are finished creating the first sequence. Click on the add
another sequence prompt to create an area in the scenario
for the second sequence (Sequence 1) (Figure 81).
Step 17 Create two states in the second sequence with the
characteristics shown in Table 15.
Step 18 In the File menu, select Save Scenario to save the scenario
(Figure 82).
Table 15
LeCroy Corporation
Example 7: States for Second Sequence
State
Event
Action
0
Identify Address Frame from Target
Branch to State 1
1
Identify Address Frame from Initiator
Beep for 2 seconds.
73
Version 1.2
SAS InFusion User Manual
Figure 81
74
Example 7: Adding a Second Sequence
LeCroy Corporation
SAS InFusion User Manual
Version 1.2
Figure 82
Note:
LeCroy Corporation
Example 7: Sequence Area of Scenario
Figure 77 shows the Global Rules area of the scenario.
75
Version 1.2
Example 8:
Creating a
Sequence
With Many
States #1
SAS InFusion User Manual
In this example, a five-state sequence detects if a group of primitives is received
out-of-order from the initiator. The expected order is: Align (0), Align (1), Align (2), Align
(3). If this scenario detects any other order of these primitives, it causes the box to beep
and the scenario to restart.
This example is designed to give you an idea of the powerful logic that you can implement
with sequences.
Note that the states in this sequence have been renamed (do not have their default
names). Table 16 summarizes the sequence logic.
Table 16
State
Description
Wait for Align (0)
When an Align (0) is received, go to Wait for Align (1)
Wait for Align (1)
If an Align (1) is received next, go to Wait for Align (2)
otherwise, go to Indicate Error
Wait for Align (2)
If an Align (2) is received next, go to Wait for Align (3);
otherwise, go to Indicate Error
Wait for Align (3)
If an Align (3) is received next, restart test;
otherwise go to Indicate Error
Indicate Error
Indicate error and restart test
Step 1
Click the New Scenario button in the main library or one of the
device libraries. At the top of the scenario area, enter general
scenario information, including scenario name, description, and
direction of traffic change.
Note:
76
Example 8: Logic of Sequence 0
For an example of filling-in the general scenario information
fields, see Figure 41 and Figure 42.
Step 2
As in previous examples, create the five states for this
sequence.
Step 3
In the File menu, select Save Scenario to save the scenario
(Figure 83 and Figure 84).
LeCroy Corporation
SAS InFusion User Manual
Version 1.2
Figure 83
LeCroy Corporation
Example 8: Top Half of Scenario
77
Version 1.2
SAS InFusion User Manual
Figure 84
78
Example 8: Bottom Half of Scenario
LeCroy Corporation
SAS InFusion User Manual
Example 9:
Creating a
Sequence
With Many
States #2
Version 1.2
In this example, a five-state sequence not only detects if a group of primitives is received
out-of-order but it fixes any incorrect order. The logic is similar to that of example 8 with
a few small changes. Table 17 summarizes each state.
Table 17
State
Description
Wait for Align (0)
When an Align (0) is received, go to Wait for Align (1)
Wait for Align (1)
If an Align (1) is received next, go to Wait for Align (2);
otherwise, replace primitive with Align (1) and go to Indicate Error
Wait for Align (2)
If an Align (2) is received next, go to Wait for Align (3);
otherwise, replace primitive with Align (2) and go to Indicate Error
Wait for Align (3)
If an Align (3) is received next, restart test;
otherwise, replace primitive with Align (3) and go to Indicate Error
Indicate Error
Indicate error and restart test
Step 1
Click the New Scenario button in the main library or one of the
device libraries. At the top of the scenario area, enter general
scenario information, including scenario name, description, and
direction of traffic change.
Note:
LeCroy Corporation
Example 9: Logic of Sequence 0
For an example of filling-in the general scenario information
fields, see Figure 41 and Figure 42.
Step 2
As in previous examples, create the five states for this
sequence.
Step 3
In the File menu, select Save Scenario to save the scenario
(Figure 85 and Figure 86).
79
Version 1.2
SAS InFusion User Manual
Figure 85
80
Example 9: Top Half of Scenario
LeCroy Corporation
SAS InFusion User Manual
Version 1.2
Figure 86
LeCroy Corporation
Example 9: Bottom Half of Scenario
81
Version 1.2
SAS InFusion User Manual
Creating Multi-Link Tests
As described, each SAS InFusion box has two BNC connectors on its rear panel that
allow it to connect to other SAS InFusion boxes in a daisy-chain. One connector is for
signal input, the other for signal output.
The BNC connectivity allows you develop wide-link test schemes. In such schemes, BNC
output on an upstream box is linked to the BNC input on its downstream neighbor.
The scenarios that runs on each box interacts with the scenarios that run on its neighbors
through trigger signals exchanged via the box BNC ports. The trigger signals are called
toggle events: BNC Input Toggle and BNC Output Toggle.
Each of the boxes in the daisy-chain monitors/modifies its own line only, but there is
synergy between the boxes by way of the BNC daisy-chain. In this fashion, you can use
a SAS InFusion daisy-chain to coordinate events and actions across multiple SAS or
SATA physical links.
In the example that follows, four boxes are connected in a daisy-chain. In this test, each
box runs the same scenario. The boxes are linked as follows:
Box 1 BNC Output connects to Box 2 BNC Input
Box 2 BNC Output connects to Box 3 BNC Input
Box 3 BNC Output connects to Box 4 BNC Input
Box 4 BNC Output connects to Box 1 BNC Input
Example 10: In this example, the four separate links act as a wide link, and the same scenario runs in
each SAS InFusion box. This set-up allows detection of an Open Address Frame on any
Multi-Link
of the four links, that is responded to on any of the other four links. The detected
Test
OPEN_ACCEPT, regardless of which link it was detected on, is replaced with
OPEN_REJECT.
To achieve this result, the scenario has each box wating either for an Open Address
Frame or for a BNC signal from its neighboring box, meaning that it has detected an Open
Address Frame. In either case, the BNC output is toggled to signal the next box in the
BNC daisy-chain that the Open Address Frame has been detected, and that the box can
now transition to its next state (waiting for an OPEN_ACCEPT). This way, as soon as one
of the links gets an Open Address Frame, all four boxes will transition to state 1. State 1
waits for an OPEN_ACCEPT and replaces it with OPEN_REJECT, and this will happen
regardless of which link it is sent on, because ALL links are waiting for the same event.
82
LeCroy Corporation
SAS InFusion User Manual
Version 1.2
Figure 87
LeCroy Corporation
Example 10: Test Scenario for Each Box
83
Version 1.2
SAS InFusion User Manual
Downloading Scenarios
After you have created a scenario, you need to download it to the SAS InFusion box for
execution.
If you use a general library as a scenario archive, then the process of creating and
executing a scenario is as follows:
Step 1
Open the general library (Main library or a File library).
Scenarios in the library are listed in the library window (left side
Figure 88).
Step 2
Open the Device List window by clicking on the Show Device
List button on application toolbar.
Step 3
Open the Device library for the box to which you want to
download a scenario or scenarios. You can open the device
library in two ways: by clicking on the device library icon in the
device list window or by double-clicking on the device name.
Step 4
Copy the scenario from general library to device library by
dragging it with the mouse (Figure 88).
Figure 88
84
Downloading Scenarios
Step 5
Download all scenarios in device library to the SAS InFusion
device. To do so, click the Download all Scenarios button on
the Device library toolbar (second button from left).
Step 6
Select the scenario to be run by clicking it.
Step 7
To run the scenario, click the Run Scenario button on the
Device library toolbar (second button from the right). The SAS
InFusion device will then begin its session.
LeCroy Corporation
SAS InFusion User Manual
Version 1.2
Chapter 6: LCD Panel Menus
This chapter describes menus that appear on the LCD panel of the SAS InFusion box.
Note:
As described in Chapter 2, the LCD panel displays commands for
configuring the device, and for starting and stopping scenarios.
Figure 89
SAS InFusion LCD Panel
LCD Panel Overview
If you are using the SAS InFusion box in networked mode, you typically use the LCD
panel only to set an IP address so the box can be controlled by the SAS InFusion
software application. However, if you operate SAS InFusion box in stand-alone mode,
you might continue to use the panel as the primary means to control tests (view status,
change configuration options, start and stop scenarios).
Note:
Regardless if you operate in stand-alone mode or networked mode,
you must use the SAS InFusion application to create scenarios. You
can not do so using the box LCD panel.
Recall that you can download up to ten scenarios for storage on the box. To download
the scenarios, you need an Ethernet link between the box and the PC that runs the SAS
InFusion software application.
Boot Sequence
The boot sequence for the SAS InFusion box takes a few seconds. As the box boots, it
initializes itself, beeps, and shows status on the LCD panel. If the box boots successfully,
the LCD panel Root menu appears.
LeCroy Corporation
85
Version 1.2
SAS InFusion User Manual
During initialization, several status messages flash by in rapid sequence:
"LeCroy Infusion"
"Initializing ..."
"Configuring FPGA"
"BE Frequency Test"
"BE Beeper Test"
"Temp. Sensor Pass"
Booting from Boot-Code
If the SAS InFusion box does not boot successfully, or if it becomes non-responsive, you
can boot from default settings called boot-code.
Boot-code is a simplified version of SAS InFusion firmware. It allows the SAS InFusion
box to boot to the point where it can communicate with the SAS InFusion software
application. After communication is established between the box and software
application, you can download a different version of firmware and BusEngine files to the
box.
Note:
You can not download scenarios to the SAS InFusion box while
operating in boot-code.
To boot from boot-code,
Step 1
Press and hold any of the three buttons on the SAS InFusion box front
panel.
Step 2
While holding the buttons DOWN, turn the box ON.
After you complete these steps, download the new version of BusEngine and firmware
files, then reboot the box from the LCD panel menu (Box Setup > Reboot).
Root Menu
As mentioned, the Root menu appears after successful boot-up. There are submenus
beneath the Root menu, but most are just one layer deep (beyond the Root menu). The
deepest submenu is just two layers deep.
Figure 89 shows the LCD panel Root menu. Device status is shown on the top line, which
includes the following items:
[SAS]:
Indicates the InFusion hardware platform.
Actv: 1: This shows which scenario is active, and appears only if
scenarios have already been downloaded. The SAS Infusion box
can hold ten scenarios. The scenarios are numbered 1 through
10. You can use the LCD panel to select the scenario to run via
the InFusion Setup menu (Root menu > InFusion Setup).
Idle:
86
Shows traffic generation status. Status can be Idle or Busy.
When the box is not running a scenario, status is Idle. When
running a scenario, status is Busy.
LeCroy Corporation
SAS InFusion User Manual
Version 1.2
Submenus
The Root menu has four options:
•
•
•
•
Box Setup submenu (Table 18).
SAS Configuration submenu (Table 19).
Start Infusion command.
Infusion Setup submenu (Table 20).
Within each of these submenus are second-level submenus.
Note:
When lists of options are presented in a menu, current selections are
indicated with an asterisk
To navigate through submenus, use the Up Arrow and Down Arrow buttons (top and
bottom blue buttons) on the front of the unit. To select or change an option, use the
Select button (middle button).
Box Setup
Submenu
LeCroy Corporation
Table 18
Box Setup Submenu
Menu
Submenu
Command
IP Mode
Static
Dynamic
Static = you assign an IP address
Dynamic = A DHCP server assigns an IP address
IP Address
Default is 0.0.0.0. If IP Mode = Dynamic, this field is ignored.
Subnet Mask
Default is 0.0.0.0 If IP Mode = Dynamic, this field is ignored.
Default Gateway
Default is 0.0.0.0 If IP Mode = Dynamic, this field is ignored.
Reboot
Cancel
Confirm
Selecting Confirm causes SAS InFusion to save the current
configuration and reboot.
Shutdown
Cancel
Confirm
Selecting Confirm causes SAS InFusion to save the current
configuration and shutdown.
About
Displays status on the following parameters:
Subnet Mask:
Default Gateway:
BootCode:
Firmware:
Bus Engine:
IP Mode: (Dynamic or Static)
Loop Mode: (Infusion) - This option is disabled.
NOTE: To go back to the previous menu, press the Select
button (i.e., the middle button)
[ Back ]
Returns to Root menu.
87
Version 1.2
SAS
Configuration
Submenu
SAS InFusion User Manual
Table 19
Menu
SAS Configuration Submenu
Submenu
Command
Lists settings to enable/disable scrambling and SATA Hold
handling.
SATA Hold Handling
Scramble To Target
Descramble Frm Tar.
Scramble To Ini.
Descramble Frm. Ini.
High Swing To Init.
High Swing To Targ.
SSC To Initiator
SSC To Target
OOB Frm Init.
OOB Frm Targ.
Save & Return
Cancel
For an explanation of these settings, see “Device List Buttons” on page 21. To change
any setting, select the item, make the change, and then select Save & Return.
Note that any changes made to these settings are not saved permanently (they will reset
if the unit is powered off), unless you reboot the system. To reboot the system and
permanently save all current configuration settings, select Reboot from the Root menu.
Start
InFusion
This command causes SAS InFusion to start running the active scenario, which is the one
selected in the InFusion Setup menu.
When Start is selected, the menu changes to Stop InFusion.
InFusion
Setup
Submenu
Table 20
Menu
1. <N/A>
2. <N/A>
3. <N/A>
4. <N/A>
5. <N/A>
6. <N/A>
7. <N/A>
8. <N/A>
9. <N/A>
10. <N/A>
[ Back ]
88
InFusion Setup Submenu
Submenu
Command
Lists whatever scenarios you downloaded from the SAS
InFusion application on your PC. If no scenarios have been
downloaded, the InFusion Setup menu will not display - only
Box Setup menu and SAS Configuration menu will display.
LeCroy Corporation
SAS InFusion User Manual
Version 1.2
Chapter 7: Licensing
Each SAS InFusion box comes with a one year license that entitles the user to software
updates. This chapter describes how to view and update the licensing information.
Displaying License Information
You display and update licensing information in the Device List window.
To display the licensing information for your SAS InFusion box:
Step 1
If needed, power on your SAS InFusion box and make sure that
it is attached to your Ethernet LAN. The licensing information for
the box is managed via SAS InFusion software.
Step 2
In the SAS InFusion software, open the Device List (if needed)
by selecting View > Views > Devices. The Device List window
opens (Figure 90).
Figure 90
Step 3
Device List Window: Selecting a Box
To select your box, click in the checkbox in the first column
(under the Lock symbol). Selecting the box creates an Ethernet
connection to the device and locks out other users from
accessing it.
Selecting the device also activates the buttons on the Device List
toolbar and allows the software to read the firmware, BusEngine, and
licensing information within the SAS InFusion box.
Step 4
Click the Licensing button in the toolbar (looks like a lock). The
License dialog box opens (Figure 92).
The dialog shows the expiration date and a list of enabled features.
LeCroy Corporation
89
Version 1.2
SAS InFusion User Manual
Figure 91
Device List Window: Box is Selected
Figure 92
Licensing Dialog Box
Updating the License
Before your SAS InFusion license expires, contact LeCroy Technical Support to obtain a
new one (see How to Contact LeCroy.) A license key file will be emailed to you.
To install the new license key file do the following:
90
Step 1
Open the License dialog box (Figure 92).
Step 2
When the License Information dialog opens, click the Update
button. The Update License dialog box opens (Figure 93).
LeCroy Corporation
SAS InFusion User Manual
Version 1.2
Figure 93
LeCroy Corporation
Update License Dialog Box
Step 3
Click the Browse button and browse for the emailed license key
file.
Step 4
Click Update Device. The License Key file is transmitted to the
SAS InFusion box and will be reflected in the License
information dialog box.
91
Version 1.2
92
SAS InFusion User Manual
LeCroy Corporation
SASSuite User Manual
Version 2.7
Appendix A: Specifications
Power Requirements
90-264Vrms, 47-63Hz (universal input), 55W (55VA) maximum, internal power supply
with detachable cord.
Fuse
Enclosed 5x20mm 1.0A/250V 'T' rated glass fuse. A spare fuse is included in the fuse
holder.
Environmental Conditions
Temperature, Operating: 5 to 40 Centigrade.
Temperature, Storage: -20 to 60 Centigrade.
Humidity: Maximum relative humidity 80% for temperatures up to 31 Centigrade,
decreasing linearly to 50% relative humidity at 40 Centigrade.
Altitude, Operating: Up to 2,000 m.
Certifications
EC
Declaration
of
Conformity
LeCroy Corporation
Meets intent of the European Council Directives 73/23/EEC for product safety and
89/336/EEC for electromagnetic compatibility. This declaration is based upon
compliance of the SAS/SATA InFusion to the standards listed in Table A.1.
93
Version 2.7
SASSuite User Manual
Table 21
EC Declaration of Conformity
EN 61326: 1997 +A1:1998 +A2:2001 +A3:2003 EMC requirements for electrical equipment for measurement,
control, and laboratory use.
Emissions:
EN 55011: 1998+A2:2002 Radiated & Conducted Emissions (Class A)
EN 61000-3-2:2000 Harmonic Current Emissions
Immunity:
EN 61000-4-2:1999 Electrostatic discharge
(+/-4kV contact discharge; +/-8kV air discharge)
EN 61000-4-3: 2002+A1:2003 RF Radiated Fields
(3V/m, 80 MHz to 1 GHz, 80% amplitude modulated)
EN 61000-4-4: 2004) Electrical Fast Transient/Burst
(1 kV on AC mains)
EN 61000-4-5: 1995+A1:2001 Surge
(1 kV differential mode, 2 kV common mode)
Table A.1
EC Declaration of Conformity (continued)
Immunity (continued):
EN 61000-4-6: 1996+A1:2001 RF Conducted Field
(3 V, 150 kHz to 80 MHz, amplitude modulated with 1kHz sine wave)
EN 61000-4-11: 2004 Mains Dips and Interruptions
(100% interruption for 1 full AC cycle)
EN 61010-1: 2001 Safety requirements for electrical equipment for measurement control and laboratory use (with
the following limits):
Installation (Overvoltage) Category II
(Line voltage in equipment and to wall outlet)
Installation (Overvoltage) Category I
(All mains isolated terminals)
Pollution Degree 2
Protection Class I
UL and cUL
Listed
94
Conforms to UL 61010-1, 2nd Edition and CAN/CSA C22.2 No. 61010-1-04.
LeCroy Corporation
SAS InFusion User Manual
Version 1.2
How to Contact LeCroy
Type of Service
Contact
Call for technical
support…
US and
Canada:
1 (800) 909-2282
Worldwide:
1 (408) 727-6600
Fax your questions…
Worldwide:
1 (408) 727-6622
Write a letter…
LeCroy
Customer Support
3385 Scott Blvd.
Santa Clara, CA 95054
Send e-mail…
[email protected]
Visit LeCroy’s web site…
http://www.lecroy.com/
Limited Hardware Warranty
So long as you or your authorized representative ("you" or
"your"), fully complete and return the registration card
provided with the applicable hardware product or
peripheral hardware products (each a "Product") within
fifteen days of the date of receipt from LeCroy or one of its
authorized representatives, LeCroy warrants that the Product will be free from defects in
materials and workmanship for a period of three years (the "Warranty Period"). You may
also complete your registration form via the internet by visiting
http://www.catc.com/support/register/. The Warranty Period commences on the earlier
of the date of delivery by LeCroy of a Product to a common carrier for shipment to you or
to LeCroy's authorized representative from whom you purchase the Product.
What this Warranty Does Not Cover
This warranty does not cover damage due to external causes including accident, damage
during shipment after delivery to a common carrier by LeCroy, abuse, misuse, problems
with electrical power, including power surges and outages, servicing not authorized by
LeCroy, usage or operation not in accordance with Product instructions, failure to perform
required preventive maintenance, software related problems (whether or not provided by
LeCroy), problems caused by use of accessories, parts or components not supplied by
LeCroy, Products that have been modified or altered by someone other than LeCroy,
Products with missing or altered service tags or serial numbers, and Products for which
LeCroy has not received payment in full.
Coverage During Warranty Period
During the Warranty Period, LeCroy or its authorized representatives will repair or
replace Products, at LeCroy's sole discretion, covered under this limited warranty that are
returned directly to LeCroy's facility or through LeCroy's authorized representatives.
LeCroy Corporation
95
Version 1.2
SAS InFusion User Manual
How to Obtain Warranty Service
To request warranty service, you must complete and return the registration card or
register via the internet within the fifteen day period described above and report your
covered warranty claim by contacting LeCroy Technical Support or its authorized
representative.
You can reach LeCroy Technical Support at 800-909-7112 or via email at
[email protected]. You may also refer to the LeCroy website at http://www.lecroy.com
for more information on how to contact an authorized representative in your region. If
warranty service is required, LeCroy or its authorized representative will issue a Return
Material Authorization Number. You must ship the Product back to LeCroy or its
authorized representative, in its original or equivalent packaging, prepay shipping
charges, and insure the shipment or accept the risk of loss or damage during shipment.
LeCroy must receive the Product prior to expiration of the Warranty Period for the
repair(s) to be covered. LeCroy or its authorized representative will thereafter ship the
repaired or replacement Product to you freight prepaid by LeCroy if you are located in the
continental United States. Shipments made outside the continental United States will be
sent freight collect.
Please remove any peripheral accessories or parts before you ship the Product. LeCroy
does not accept liability for lost or damaged peripheral accessories, data or software.
LeCroy owns all parts removed from Products it repairs. LeCroy may use new and/or
reconditioned parts, at its sole discretion, made by various manufacturers in performing
warranty repairs. If LeCroy repairs or replaces a Product, the Warranty Period for the
Product is not extended.
If LeCroy evaluates and determines there is "no trouble found" in any Product returned
or that the returned Product is not eligible for warranty coverage, LeCroy will inform you
of its determination. If you thereafter request LeCroy to repair the Product, such labor
and service shall be performed under the terms and conditions of LeCroy's then current
repair policy. If you chose not to have the Product repaired by LeCroy, you agree to pay
LeCroy for the cost to return the Product to you and that LeCroy may require payment in
advance of shipment.
General Provisions
THIS LIMITED WARRANTY GIVES YOU SPECIFIC LEGAL RIGHTS. YOU MAY HAVE
ADDITIONAL RIGHTS THAT VARY BY JURISDICTION. LECROY'S RESPONSIBILITY
FOR DEFECTS IN MATERIALS AND WORKMANSHIP IS LIMITED TO REPAIR AND
REPLACEMENT AS SET FORTH IN THIS LIMITED WARRANTY STATEMENT.
EXCEPT AS EXPRESSLY STATED IN THIS WARRANTY STATEMENT, LECROY
DISCLAIMS ALL EXPRESS AND IMPLIED WARRANTIES FOR ANY PRODUCT
INCLUDING, BUT NOT LIMITED TO, ANY IMPLIED WARRANTIES OF AND
CONDITIONS OF MERCHANTABILITY AND FITNESS FOR A PARTICULAR
PURPOSE, AND ANY WARRANTIES THAT MAY ARISE FROM ANY COURSE OF
DEALING, COURSE OF PERFORMANCE OR TRADE USAGE. SOME
JURISDICTIONS MAY NOT ALLOW LIMITATIONS ON HOW LONG AN IMPLIED
WARRANTY LASTS, SO THE PRECEDING LIMITATION MAY NOT APPLY TO YOU.
LECROY DOES NOT ACCEPT LIABILITY BEYOND THE REMEDIES SET FORTH IN
THIS LIMITED WARRANTY STATEMENT OR FOR INCIDENTAL OR
CONSEQUENTIAL DAMAGES INCLUDING, WITHOUT LIMITATION, ANY LIABILITY
FOR THIRD PARTY CLAIMS AGAINST YOU FOR DAMAGES, PRODUCTS NOT
BEING AVAILABLE FOR USE, OR FOR LOST DATA OR SOFTWARE. LECROY'S
96
LeCroy Corporation
SAS InFusion User Manual
Version 1.2
LIABILITY TO YOU MAY NOT EXCEED THE AMOUNT YOU PAID FOR THE
PRODUCT THAT IS THE SUBJECT OF A CLAIM. SOME JURISDICTIONS DO NOT
ALLOW THE EXCLUSION OR LIMITATION OF INCIDENTAL OR CONSEQUENTIAL
DAMAGES, SO THE PRECEDING EXCLUSION OR LIMITATION MAY NOT APPLY TO
YOU.
The limited warranty on a Product may be transferred for the remaining term if the then
current owner transfers ownership of the Product and notifies LeCroy of the transfer. You
may notify LeCroy of the transfer by writing to Technical Support at LeCroy, 3385 Scott
Blvd., Santa Clara, CA 95054 USA or by email at: [email protected]. Please include
the transferring owner's name and address, the name and address of the new owner, the
date of transfer, and the Product serial number.
LeCroy Corporation
97
Version 1.2
98
SAS InFusion User Manual
LeCroy Corporation