1
Enhanced Mobile Document Imaging
User’s Guide
Intermec Technologies Corporation
Worldwide Headquarters
6001 36th Ave.W.
Everett, WA 98203
U.S.A.
www.intermec.com
The information contained herein is provided solely for the purpose of allowing customers to
operate and service Intermec-manufactured equipment and is not to be released, reproduced, or
used for any other purpose without written permission of Intermec Technologies Corporation.
Information and specifications contained in this document are subject to change without prior
notice and do not represent a commitment on the part of Intermec Technologies Corporation.
© 2009–2011 by Intermec Technologies Corporation. All rights reserved.
The word Intermec, the Intermec logo, Norand, ArciTech, Beverage Routebook, CrossBar,
dcBrowser, Duratherm, EasyADC, EasyCoder, EasySet, Fingerprint, i-gistics, INCA (under license),
Intellitag, Intellitag Gen2, JANUS, LabelShop, MobileLAN, Picolink, Ready-to-Work, RoutePower,
Sabre, ScanPlus, ShopScan, Smart Mobile Computing, SmartSystems, TE 2000, Trakker Antares,
and Vista Powered are either trademarks or registered trademarks of Intermec Technologies
Corporation.
There are U.S. and foreign patents as well as U.S. and foreign patents pending.
ii
Enhanced Mobile Document Imaging User’s Guide
Document Change Record
This page records changes to this document. The document was
originally released as Revision 001.
Version
Number
Date
Description of Change
004
5/2011
Updated capture and manual focus instructions, and
added information on messages shown during
document capture.
003
1/2011
This document was revised to include the following:
• Added support for the 70 Series Mobile
Computers.
• Added new configuration settings.
002
7/2009
Revised procedures on how to capture document
images and included information on how to obtain
an Intermec Software license for eMDI.
Enhanced Mobile Document Imaging User’s Guide
iii
iv
Enhanced Mobile Document Imaging User’s Guide
Contents
Contents
About Enhanced Mobile Document Imaging . . . . . . . . . . . . . . . . . . . . . . . . . . . . . . . . . . . . . . . . 7
Installing eMDI . . . . . . . . . . . . . . . . . . . . . . . . . . . . . . . . . . . . . . . . . . . . . . . . . . . . . . . . . . . . . . . . . . . 7
Installing eMDI Using Microsoft ActiveSync . . . . . . . . . . . . . . . . . . . . . . . . . . . . . . . . 8
Installing eMDI Using SmartSystems Foundation . . . . . . . . . . . . . . . . . . . . . . . . . . . 8
Obtaining the eMDI Software License . . . . . . . . . . . . . . . . . . . . . . . . . . . . . . . . . . . . . . 9
Using the eMDI Application . . . . . . . . . . . . . . . . . . . . . . . . . . . . . . . . . . . . . . . . . . . . . . . . . . . . . . 10
Capturing a Document Image. . . . . . . . . . . . . . . . . . . . . . . . . . . . . . . . . . . . . . . . . . . . . 11
Transferring Document Images To Your Desktop PC . . . . . . . . . . . . . . . . . . . . . . . 12
Configuring eMDI . . . . . . . . . . . . . . . . . . . . . . . . . . . . . . . . . . . . . . . . . . . . . . . . . . . . . . . 14
Configuring File Index Settings using eMDI . . . . . . . . . . . . . . . . . . . . . . . 14
Configuring eMDI Using Intermec Settings . . . . . . . . . . . . . . . . . . . . . . . . 15
Configure eMDI Settings with the eMDI Application . . . . . . . . . . . . . . . 16
Integrating or Creating a Custom Application . . . . . . . . . . . . . . . . . . . . . . . . . . . . . . . . . . . . . . 19
Creating and Editing the eMDI XML File . . . . . . . . . . . . . . . . . . . . . . . . . . . . . . . . . . 20
eMDI XML Example . . . . . . . . . . . . . . . . . . . . . . . . . . . . . . . . . . . . . . . . . . . . . 27
Troubleshooting eMDI . . . . . . . . . . . . . . . . . . . . . . . . . . . . . . . . . . . . . . . . . . . . . . . . . . . . . . . . . . . 29
Enhanced Mobile Document Capture User’s Guide
v
Contents
vi
Enhanced Mobile Document Capture User’s Guide
About Enhanced Mobile Document Imaging
Enhanced Mobile Document Imaging (eMDI) captures document
images of full page documents (8.5 x 11 or A4 paper sizes) while in the
field. Using the imager or camera on your computer, eMDI converts
paper documents into document images.
eMDI streamlines back-office operation and reduces data entry time
because document images can be transmitted from the field to backoffice applications over wireless networks. Customer service and other
staff gain real-time access to document images, which can be used to
answer customer queries, issue invoices, and update records.
eMDI is currently supported by these mobile computers:
•
CN4 Series Mobile Computer using the EA21 imager
•
CN50 Mobile Computer using the EA21 imager
•
70 Series Mobile Computer using a camera
Installing eMDI
If the eMDI application is not installed on your computer, you can
download the demo version from the Intermec web site.
To download eMDI
1 Go to www.intermec.com and select Support > Downloads. The
Downloads page appears.
2 In the Product Category field, select Computers.
3 In the Product Family field, select Handheld Computers.
4 In the Product field, select your computer and click the Submit
button. The Software Downloads page appears.
5 Search for and download the eMDI application.
The demo version places a watermark on captured document images.
To capture document images without a watermark, you must
purchase a software license. For more information, see “Obtaining
the eMDI Software License” on page 9.
You can copy eMDI to your mobile computer using Microsoft
ActiveSync or SmartSystemsTM Foundation.
Enhanced Mobile Document Imaging User’s Guide
7
Installing eMDI Using Microsoft ActiveSync
To install eMDI using Microsoft ActiveSync, you need:
•
a desktop PC with ActiveSync installed.
•
a communications dock.
•
a USB cable connecting your desktop PC to the communications
dock.
To install eMDI using Microsoft ActiveSync
1 Download and install the eMDI installation program.
For more information, see “Installing eMDI” on page 7.
2 When the installation program is complete, a window appears.
3 Place your computer into a communications dock and establish
communications.
4 Transfer the eMDI .cab file from your desktop PC to your
computer.
5 On your computer, tap the .cab file that you transferred in Step 4.
The eMDI application is installed onto your computer.
Installing eMDI Using SmartSystems Foundation
You can use the SmartSystems console to install Intermec
applications on your computer. For more information, go to the
Intermec web site at www.intermec.com/SmartSystems.
To install eMDI using the SmartSystems console
1 Download the application to your PC. For more information, go
to “Installing eMDI” on page 7.
2 Double-click the application. Follow the installation wizard to
load the application onto the SmartSystems console.
3 Drag the application to each computer in your network or to a
group of computers in a folder.
After eMDI is loaded into the SmartSystems console, the Software
Manager notifies you of any updates that are available for download.
8
Enhanced Mobile Document Imaging User’s Guide
Obtaining the eMDI Software License
When you install eMDI on a CN4 or CN50 Series, new document
images include a watermark. On a 70 Series, you can use eMDI for 30
days before new document images include a watermark. To remove
the watermark, you must purchase an Intermec Software license for
eMDI (P/N 454-025-001). For more information, contact your local
Intermec representative.
After ordering your license, you receive an e-mail with a Software
Entitlement ID. Go to the Intermec License Center at
https://license.intermec.com and follow the wizard to generate and
download your license. For more information, see the help
information provided in the wizard.
After downloading the license file from the Intermec License Center,
load the license in your SmartSystems Foundation console, using
SmartSystems Foundation version 3.41 or later. For more
information, see the SmartSystems Foundation Help.
Enhanced Mobile Document Imaging User’s Guide
9
Using the eMDI Application
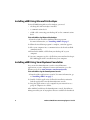
When you start eMDI, the Document Imaging screen appears.
eMDI Main Screen
From the main screen, you can:
10
•
capture document images. For more information on how to create
a document image, see “Capturing a Document Image” on
page 11.
•
view images or edit eMDI configuration settings. For more
information, see “Configuring eMDI Using Intermec Settings”
on page 15.
•
transfer files to your desktop PC. For more information, see
“Transferring Document Images To Your Desktop PC” on
page 12.
Enhanced Mobile Document Imaging User’s Guide
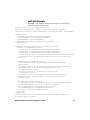
Capturing a Document Image
1 Select a document and place it on a flat surface.
2 If your mobile computer uses the Windows Mobile 6.1 operating
system, tap Start > Programs > Document Imaging.
If your mobile computer uses the Windows Mobile 6.5 operating
system, tap Start > Document Imaging.
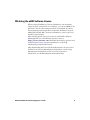
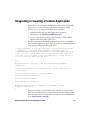
3 Align the laser frame or camera frame with the document image.
a If you have a CN50 or CN4, point the imager towards the
document you want to capture. Press and hold the Scan
button to show the laser frame.
b If you have a 70 Series, point the camera towards the document
you want to capture. Press the Scan button to show the video
preview and camera frame. You can also press the Enter key to
immediately take a snapshot, which can help with focusing.
If you have previously set the Focus Mode to manual, you can
press the up and down buttons next to the Scan button, use
the slider bar on the computer screen, or press the volume buttons on the side of the mobile computer to adjust the focus.
Scan button
Using the Laser Frame (left) or Camera (right) to Capture an Image
Enhanced Mobile Document Imaging User’s Guide
11
4 When you align the laser frame, messages or icons can appear to
help you capture a better image. These messages include:
•
Move closer to document
•
Hold mobile computer steady
•
Angle too sharp
For best results, position the mobile computer imager or camera
at a 90-degree angle over the center of the document.
5 If you are using a mobile computer with an imager, the laser frame
stops flashing when a document image is captured.
If you are using a mobile computer with a camera, the computer
beeps once and the camera frame disappears when an image is
captured.
The new image appears. You can:
•
Tap OK to save this image and return to the main screen.
•
Tap
to zoom in, and
•
Tap
to see all captured images in Gallery Mode.
•
Tap
to delete the image you captured.
to zoom out.
6 To view saved images, tap Options and choose Gallery.
Transferring Document Images To Your Desktop PC
You can use Microsoft ActiveSync or SmartSystems Foundation to
transfer document images to your desktop PC.
To transfer images using Microsoft ActiveSync
1 Create an ActiveSync connection between your desktop PC and
your mobile computer. For more information, see your computer
user’s manual.
2 In the Microsoft ActiveSync window, click Explore.
The File Explorer screen appears.
3 Open the My Windows Mobile Device > My Documents > MDI
folder.
4 Drag and drop the document images you want to transfer to a
folder on your desktop PC.
12
Enhanced Mobile Document Imaging User’s Guide
To transfer images using SmartSystems Foundation
1 Make sure that your device is Discovered in the SmartSystems
console. For more information, see SmartSystems Online Help.
2 Go to the File Transfer screen in the eMDI application.
3 Select the images you want to transfer:
•
Select or clear the check box next to each image.
•
Tap
to select all images.
•
Tap
to select none of the images.
4 Tap
to transfer the document images to the directory on your
desktop PC that you specified in the eMDI .xml file. For more
information, see “Configuring eMDI Using Intermec Settings”
on page 15.
Note: If no directory is specified in the .xml file, then the option to
transfer files is not available.
Enhanced Mobile Document Imaging User’s Guide
13
Configuring eMDI
You can configure eMDI to suit your needs and the environment you
are capturing document images. With eMDI you can configure:
•
file index settings, which allows you to set the index settings for a
document image. Indexes can include the type of document you
are capturing, the date the document image was captured, or the
document number.
•
eMDI settings within the eMDI application, or with Intermec
Settings. You can use these settings to adjust the focus check,
compression quality, brightness, and file format settings.
If you integrated eMDI into another application, or if you have
created a custom application, you must use Intermec Settings to
configure eMDI. For more information, see “Configuring eMDI
Using Intermec Settings” on page 15.
Note: If you need to allow or restrict certain eMDI settings, you need
to edit the eMDI .xml file to suit your needs. For more information,
see “Creating and Editing the eMDI XML File” on page 20.
Configuring File Index Settings using eMDI
You can change the index settings for a document image, including
the document type and number. You can change or add up to five
different index settings by editing the .xml file that comes with eMDI.
For more information, see “Configuring eMDI Using Intermec
Settings” on page 15.
You can only change File Index settings using eMDI if you start eMDI
from the Features Demo application, or if you have previously set file
index settings in the .xml configuration file.
To configure file index settings
1 In the eMDI application, tap Options > Index Settings. The
Index Settings screen appears.
2 Edit the text boxes. When you are finished, tap Options > Save
Changes and Exit.
14
Enhanced Mobile Document Imaging User’s Guide
Configuring eMDI Using Intermec Settings
If your computer supports Intermec Settings, you can use it to
configure eMDI.
To configure eMDI using Intermec Settings
1 For Windows Mobile 6.1, tap Start > Settings. In the System tab,
double-tap Intermec Settings.
For Windows Mobile 6.5, tap Start, then double-tap Settings >
System > Intermec Settings.
The Intermec Settings application starts.
2 On a CN4 or CN50, tap Data Collection > Internal Scanner >
Imager Settings > Document Imaging.
On a CN70 Series, tap Data Collection > Camera > Camera
Settings > Document Imaging.
3 Edit the Document Imaging settings. Tap OK to save your
changes and exit Intermec Settings.
Enhanced Mobile Document Imaging User’s Guide
15
Configure eMDI Settings with the eMDI Application
If you are using the eMDI application, you can configure eMDI in the
settings screen. If you have an integrated or custom application, you
must configure eMDI using Intermec Settings or the Intermec
Developer Library (IDL) APIs.
For more information on configuring eMDI using Intermec Settings,
see “Configuring eMDI Using Intermec Settings” on page 15.
For more information on using the IDL APIs, see the Developer
library page on the Intermec web site:
www.intermec.com/products/applications_software/
development_tools/
To configure the eMDI settings
1 In the eMDI application, tap Options > Settings. The Settings
screen appears.
2 Set your eMDI settings.
3 Save your settings by tapping Options > Save Changes and Exit.
Use the following table to understand the tabs in the Settings
screen.
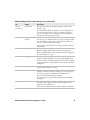
Understanding the Tabs in the Settings Screen
Tab
Setting
General
Movement Check Adjusts the focus level when you are capturing a document
image. If your document image is blurry, set the Movement
Check to a higher level to prevent blurry images. The default
is medium.
16
Description
Focus Mode
Adjusts the focus of the camera. Set the camera to constantly
search for the best focus, automatically focus when the
viewfinder starts, or allows the user to manually adjust the
focus.
Focus Mode is only available with the 70 Series Mobile
Computers.
Image Ratio
The ratio of the edge of a document image to the edge of the
image frame before a document image is captured. The
default is 80%.
Enhanced Mobile Document Imaging User’s Guide
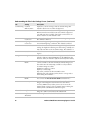
Understanding the Tabs in the Settings Screen (continued)
Tab
Setting
Description
General
(continued)
File Format
The file format that the document image is saved in. The
default is .jpg.
For the 70 Series Mobile Computer, document images that
are saved in .bmp format can be up to 15 MB each. If you
want to continue to save document images in .bmp format,
you must increase the memory limit.
Compression
Quality
Adjusts the compression quality of document images that are
saved as a .jpg or .tiff. The lower the setting, the lower the file
size. Adjust this setting if you are running out of disk space
on your computer. The default is 60%.
This setting is disabled if you are saving a document image in
.bmp format.
Color Conversion Set your document images to be saved in monochrome or
Enhanced TIFF Quality. The default is none (grayscale).
Enhanced TIFF quality is only available if you are saving your
document images as a .tiff.
Toggle Viewfinder When enabled, you press the Scan button to enable to
viewfinder. When disabled, you must hold the Scan button
down to keep the viewfinder displayed. the default is enabled.
Toggle Viewfinder is only available with the 70 Series Mobile
Computers.
On Capture
Set the action the computer takes when a document image is
captured. The default is one beep.
Record Location
Saves location data to .jpg files. If you enable Record Location
when Location Services is not enabled, you are prompted to
reboot the computer, and eMDI restarts with Record
Location enabled. The default is disabled.
Record Location is only available with the 70 Series Mobile
Computers.
Torch
When enabled, Torch uses the LED flash to illuminate the
document, which helps capture document images in lowlight areas. The default is on.
Torch is only available with the 70 Series Mobile Computers.
Enhanced Mobile Document Imaging User’s Guide
17
Understanding the Tabs in the Settings Screen (continued)
Tab
Setting
Conditioning Contrast
Enhancement
Description
Adjust the contrast settings of the document image.The
default is black text on a white background.
Text Enhancement Enhances the text in a document image. Increasing Text
Enhancement between black text and a white background
can make text more readable, but a high contrast level can
induce visual noise. The default is low.
Storage
Advanced
18
Perspective
Correction
Corrects the angle in which the document image is captured.
The default is enabled.
Lighting
Correction
Corrects the vignetting in an image, enable this to correct
non-uniform lighting conditions. The default is enabled.
Noise Reduction
Reduces the noise in a document image. The higher the
setting, the higher the filtering. Use this setting carefully as it
may add some blur to the document image. The default is 2.
Rotation
Rotate the document image when it is saved.The default is 0
degrees.
Image Location
Sets the location where document images are saved. The
default is \My Documents\MDI. If you call eMDI from the
Features demo, the default is \My Documents\DemoGallery.
Document File
Name
The file name that document images are saved as. Use the
counter variable to show how many document images you
have taken. Use the timestamp variable to tell you when a
document image was taken.
$(num) increments a counter.
$(time) is a timestamp.
$(location) adds the last known GPS location.
$(field#) adds a file indexing value, where # corresponds to
the indexing field number.
Snapshot File
Name
The file name used for snapshot images (70 Series only).
You can use the Document File Name variables here.
Memory Limit
The amount of storage space (in megabytes) allowed for
images in the Image Location folder. Once the limit is
reached, eMDI warns you that you need to increase the
memory limit or delete older document images. Setting the
memory limit to 0 MB allows unlimited space.
Brightness
Adjust the brightness when you are capturing a document
image in a darker environment. The default is 0.
Brightness
Threshold
Set the brightness threshold. The default is none.
Enhanced Mobile Document Imaging User’s Guide
Integrating or Creating a Custom Application
eMDI allows you to integrate eMDI features into an existing mobile
application, or create a custom application. To integrate eMDI
features into an existing mobile application, you must:
•
download and install the eMDI application. For more
information, see “Installing eMDI” on page 7.
•
use the code sample specified in this section to call the eMDI
application from another application.
If you are integrating the eMDI application, you need to call eMDI
from another application. To do this, you need to insert the following
code into your existing mobile application:
//
//
//
//
//
//
first parameter is the path and name of the DocumentCapture.exe
(default is "\\Program Files\\Intermec\\DocumentCapture\\
DocumentCapture.exe" second parameter is the path and name of the
xml file the calling application would like the eMDI application
to use. If it is blank it will use defaults or if xml exists in
local directory eMDI will use that.
try
{
ProcessStartInfo startInfo = new ProcessStartInfo(fileName,
arguments);
// working directory is the directory the calling application is
// running in.
startInfo.WorkingDirectory = directoryName +
Path.DirectorySeparatorChar;
Process.Start(startInfo);
}
catch (Exception exception)
{
MessageBox.Show("Failed to execute " + fileName + "\r\n" +
exception.ToString());
}
If you are creating a custom application, you must use the Intermec
APIs. For more information, see the Mobile Document Imaging APIs
in the Intermec Data Collection Resource Kit. For more information,
go to www.intermec.com/idl.
Enhanced Mobile Document Imaging User’s Guide
19
Creating and Editing the eMDI XML File
To further customize eMDI features, you can create or edit the eMDI
.xml file. This section lists eMDI field names, valid values, and
descriptions.
Note: The current eMDI .xml file can still be used, but is deprecated
for future versions of eMDI.
Field Definitions for MobileDocumentImaging_Config.xml
Field Name
Valid Values
Description or Notes
connectionTimeOut
Integer > 0
Number of seconds to wait for a connection
with the host before timing out. The default is 5
seconds.
transferTimeOut
Integer > 0
Number of seconds to wait for transfer to occur
before timing out. The default is 15 seconds.
fileWriteMode
Append, overwrite, Allows the transferred files to be appended,
or discard
overwritten, or discarded.
If this section is left blank, file transfer will not
be allowed. You will need to manually transfer
files to your desktop PC. For more information,
see “Transferring Document Images To Your
Desktop PC” on page 12.
destinationFilePath
Character string
Path where image files and their associated text
representing a file files will be placed on the desktop PC.
path.
If this section is left blank, file transfer will not
be allowed. You will need to manually transfer
files to your desktop PC. For more information,
see “Transferring Document Images To Your
Desktop PC” on page 12.
File Transfer
Settings
allowChanges
True or false
Allow or restrict the user from changing any
eMDI settings. The default is true.
allowGallery
True or false
Restricts the user from going to the gallery to
view document images that have been captured
if this value is set to false. The default is true.
20
Enhanced Mobile Document Imaging User’s Guide
Field Definitions for MobileDocumentImaging_Config.xml (continued)
Field Name
Valid Values
Description or Notes
True or false
Allow or restrict the user from making any
changes to the General Settings and hides the
General tab. The default is true.
allowChanges
True or false
Allow or restrict the user from changing the
Focus Check. The default is true.
focusCheck
Off, medium,
high, or no value
Adjusts the focus level when you are capturing a
document image. If your document image is
blurry, set the Focus Check to a higher level to
prevent blurry images. The default is no value.
allowChanges
True or false
Allow or restrict the user from changing the
Image Area to Capture Ratio. The default is
true.
imageRatio
10% to 85%
The ratio of the edge of a document image to
the edge of the image frame before a document
image is captured. The default is no value.
allowChanges
True or false
Allow or restrict the user from changing the
Output Compression. The default is false.
fileFormat
BMP, JPEG, or
TIFF
If no value is provided for this field, the
application does not change the File Format
setting. BMP corresponds to none, JPEG
corresponds to JPEG, TIFF, and TIFFG4
formats.The default is no value.
allowChanges
True or false
Allow or restrict the user from changing the
Compression Quality. The default is false.
compressionQuality
0% to 100%
Adjusts the compression quality of document
images that are saved as a .jpg or .tiff. The lower
the setting, the lower the file size. Adjust this
setting if you are running out of disk space on
your computer. The default is no value.
If you are saving your document images in
.bmp format, this setting is disabled.
General Settings
allowChanges
Focus Check
Image Area to Capture
Ratio
Output Compression
Compression Quality
Enhanced Mobile Document Imaging User’s Guide
21
Field Definitions for MobileDocumentImaging_Config.xml (continued)
Field Name
Valid Values
Description or Notes
allowChanges
True or false
Allow or restrict the user from changing the
Color Conversion setting. The default is false.
colorConversion
Grayscale,
monochrome, or
monochrome
enhanced TIFF
Set your document images to be saved in
monochrome or Enhanced TIFF Quality. The
default is none (grayscale). If the File Format is
set to TIFF, then the Color Mode setting is
forced to monochrome.
allowChanges
True or false
Allow or restrict the user from changing the On
Capture settings.
onCapture
None, beep, two
beeps, or vibrate
Set the sound the computer makes when a
document image is captured. The default is one
beep.
allowChanges
Yes or no
Allow or restrict the user to set the location
data. The default is no.
recordLocation
Yes or no
Saves location data to .jpg files. The default is
no.
Record Location is only available with the 70
Series Mobile Computers.
True or false
Allow or restrict the user from changing the
Conditioning Settings. The default is true.
allowChanges
True or false
Allow or restrict the user from changing the
Contrast Enhancement setting. The default is
true.
contrastEnhancement
None, photo,
black text on
white, or white
text on black
Adjust the contrast settings of the document
image. The default is no value.
True or false
Allow or restrict the user from changing the
Text Enhancement setting. The default is true.
Color Conversion
OnCapture
RecordLocation
Conditioning Settings
allowChanges
Contrast Enhancement
Text Enhancement
allowChanges
22
Enhanced Mobile Document Imaging User’s Guide
Field Definitions for MobileDocumentImaging_Config.xml (continued)
Field Name
Valid Values
Description or Notes
textEnhancement
True or false
Enhances the text in a document image.
Increasing Text Enhancement between black
text and a white background can make text
more readable, but a high contrast level can
induce visual noise. The default is true. If it is
set to false, the application is not able to change
the Text Enhancement setting.
allowChanges
True or false
Allow or restrict the user from changing the
Perspective Correction setting. The default is
true.
perspectiveCorrection
True or false
Corrects the angle in which the document
image is captured. The default is true.
allowChanges
True or false
Allow or restrict the user from changing the
Lighting Correction setting. The default is true.
lightingCorrection
True or false
Corrects the vignetting in an image, enable this
to correct non-uniform lighting conditions.
The default is true.
allowChanges
True or false
Allow or restrict the user from changing the
Video Noise Reduction setting. The default is
true.
noiseReduction
0-9
Reduces the noise in a document image. The
higher the setting, the higher the filtering. Use
this setting carefully as it may add some blur to
the document image. The default is 0.
allowChangees
True or false
Allow or restrict the user from changing the
Image Rotation setting. The default is true.
imageRotation
None, 90, 180, or
270
Rotate the document image when it is
captured. The default is none.
True or false
Allow or restrict the user from changing the
Storage Settings. The default is false.
Perspective Correction
Lighting Correction
Noise Reduction
Image Rotation
Storage Settings
allowChanges
Enhanced Mobile Document Imaging User’s Guide
23
Field Definitions for MobileDocumentImaging_Config.xml (continued)
Field Name
Valid Values
Description or Notes
allowChanges
True or false
Allow or restrict the user from changing the
Folder Memory Limit setting.
folderMemoryLimit
Unsigned integer
0 - xxx MB
The amount of storage space allowed for
images in the Image Location folder. Once the
limit is reached, you get a warning indicating
that you need to increase the memory limit or
delete older document images. Setting the
memory limit to 0 allows unlimited space. The
default is no value.
True or false
Allow or restrict the user from changing the
Captured Image Location. The default is false.
Folder Memory Limit
Captured Document
Location
allowChanges
capturedDocumentLocation File path
Specify a file path where all document images
are saved. If no file path is specified, document
images are saved to \My Documents\MDI. If
you call eMDI from the Features demo, the
path is \My Documents\DemoGallery.
The default is no value.
File Name Template
allowChanges
True or false
Allow or restrict the user to change the File
Name Template setting. The default is false.
nameTemplate
Character string
up to 200
characters
$(num) increments a counter.
$(time) is a timestamp.
snapshotNameTemplate
Character string
up to 200
characters
$(location) tells you where your document
image was captured.
$(field#) adds a file indexing value, where #
corresponds to the indexing field number.
True or false
Allow or restrict the user from changing
Advanced Settings. The default is true.
Advanced Settings
allowChanges
enableBarcodeDecodingOn True or false
Exit
24
Enable bar code decoding when you exit eMDI.
The default is true.
Note: When you are capturing document
images, bar code decoding is turned off.
Enhanced Mobile Document Imaging User’s Guide
Field Definitions for MobileDocumentImaging_Config.xml (continued)
Field Name
Valid Values
Description or Notes
allowChanges
True or false
Allow or restrict the user from changing the
Brightness setting.
Brightness
-100 to 100
Adjust the brightness when you are capturing a
document image in a darker environment. The
default is 0.
allowChanges
True or false
Allow or restrict the user from adjusting the
Color Mode Brightness Threshold setting. The
default is false.
colorModeBrightness
Very dark, dark,
Set the brightness threshold. The default is no
normal, bright, or value.
very bright
Brightness
ColorModeBrightness
Threshold
File Index Information
allowIndexInformation
Changes
Disabled, optional, If File Index Information is disabled, the option
or required.
to input information is not offered in the
application.
If File Index Information is optional, there is a
menu item in the Options menu to enter index
information.
If File Index Information is required, the screen
to input index information is displayed in the
application before the Capture screen, and the
user is forced to enter information set up as
required.
includeTextFile
True or false
If this is set to true, a text file with the same
name as the image is created. In the text file is
the index information.
fieldn where n is 1-5
Character string
up to 50
characters.
If no fields are set then
allowIndexInformationChanges should be set
to disabled. This is used in the
FileNameTemplate in the $(fieldn). Users can
also include fields to be use in the
FileNameTemplate, but set the
allowIndexInformationChanges to false. If this
is the case, eMDI uses the values supplied in
defaultValue.
Enhanced Mobile Document Imaging User’s Guide
25
Field Definitions for MobileDocumentImaging_Config.xml (continued)
Field Name
Valid Values
Description or Notes
entryRequired
True or false
The default is false. If it is set to true, the user
must enter something before leaving the screen
if a default is not set.
minLength
Numeric
The default is zero if not required. If
entryRequired is true, then the default is one.
maxLength
Numeric
The default is 30. Specifies the number of
characters the user can enter.
fieldType
AN, NUM, or DT
Users can enter alphanumeric characters up to
the maxLength specified.
If this is set to NUM, then the user can enter
only numeric values up to the maxLength
specified.
If this is set to DT, then the application displays
a Date Picker control used.
The default is AN.
displayName
Character string
up to 30
characters.
This value is used to display as the label on the
screen for the input value. It is also used in the
.txt file eMDI creates if includeTextFile is set to
true.
defaultValue
Should follow the
minLength,
maxLength, and
fieldType that are
set.
If one defaultValue is included, the application
displays a text or date entry field with the
defaultValue displayed. Users are allowed to
change it, and if more than one defaultValue is
included, then the user is able to pick from a
list of included values (the default is empty).
If no default value is included, then the user is
required to enter a value if Entry Required is
included.
26
Enhanced Mobile Document Imaging User’s Guide
eMDI XML Example
This XML code example demonstrates how to use the fields as
defined in the previous section.
<?.xml version="1.0" encoding="utf-8" ?>
<MobileDocumentImaging .xmlns:xsi="http://www.w3.org/2001/
.xmlSchema-instance".xmlns:xsd="http://www.w3.org/2001/.xmlSchema">
<FileTransfer>
<connectionTimeOut>5</connectionTimeOut>
<transferTimeOut>15</transferTimeOut>
<fileWriteMode></fileWriteMode>
<destinationFilePath></destinationFilePath>
</FileTransfer>
<Settings allowChanges="true" allowGallery="true">
<General allowChanges="true">
<focusCheck allowChanges="true">Off</focusCheck>
<imageRatio allowChanges="ftrue">75</imageRatio>
<fileFormat allowChanges="false">BMP</fileFormat>
<compressionQuality allowChanges="false">75</compressionQuality>
<colorConversion allowChanges="false">None</colorConversion>
</General>
<Conditioning allowChanges="true">
<contrastEnhancement allowChanges="true">true<contrast
Enhancement>
<textEnhancement allowChanges="true">true</textEnhancement>
<perspectiveCorrection allowChanges="true">true
<perspectiveCorrection>
<lightingCorrection allowChanges="true">true
</lightingCorrection>
<noiseReduction allowChanges="true">3</noiseReduction>
<imageRotation allowChanges="true">90</imageRotation>
</Conditioning>
<Storage allowChanges="true">
<folderMemoryLimit allowChanges="true">15</folderMemoryLimit>
<capturedDocumentLocation allowChanges="false">
My Documents\MDI</capturedDocumentLocation>
<fileNameTemplate allowChanges="false">
Document_$(num)</fileNameTemplate>
</Storage>
</Settings>
<FileIndexInformation allowIndexInformationChanges="Required"
includeTextFile="false">
Enhanced Mobile Document Imaging User’s Guide
27
<field1 entryRequired="true" minLength="1" maxLength="50"
fieldType="AN">
<displayName>Document Name</displayName>
<defaultValue>Bill of Lading</defaultValue>
<defaultValue>Receipt</defaultValue>
<defaultValue>Driver Log</defaultValue>
</field1>
<field2 entryRequired="false" maxLength="20" fieldType="NUM">
<displayName>PRO#</displayName>
<defaultValue>12450005</defaultValue>
</field2>
<field3 entryRequired="false" fieldType="DT">
<displayName>Service Date</displayName>
</field3>
<field4></field4>
<field5></field5>
</FileIndexInformation>
</MobileDocumentImaging>
28
Enhanced Mobile Document Imaging User’s Guide
Troubleshooting eMDI
Use this section to troubleshoot some common problems you may
experience with eMDI.
Problems While Using eMDI
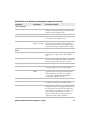
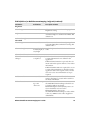
Problem
Possible Solution
Problems capturing full-sized Set your saved images to JPEG grayscale at 75% compression
documents (8.5 x 11 and A4) quality. Make sure the document and background have high
contrast, and good lighting.
or half-sized documents
(8.5 x 5.5 and A5).
Image appears grainy.
Decrease text enhancement or increase noise reduction.
Images are no longer
Restore menu defaults by tapping Start > Settings > Systems >
recognizable or the laser
Intermec Settings. Browse to Data Collection > Internal
frame no longer illuminates. Scanner > Imager Settings and tap Menu > Restore Menu
Defaults.
Place the document on a different background which is more
Laser frame flashes and is
aligned on the document, but uniform and has higher contrast with the document.
eMDI never captures an
image.
Laser frame is obscured.
Clean the imager window. For more information, see the user’s
manual.
Cannot capture document.
Reduce the image capture ratio and movement settings, then try to
capture the document again. Continue to reduce settings until you
successfully capture an image, then increase the settings more
slowly until the image quality is acceptable.
Enhanced Mobile Document Imaging User’s Guide
29
30
Enhanced Mobile Document Imaging User’s Guide
Worldwide Headquarters
6001 36th Avenue West
Everett, Washington 98203
U.S.A.
tel 425.348.2600
fax 425.355.9551
www.intermec.com
© 2011 Intermec Technologies
Corporation. All rights reserved.
Enhanced Mobile Document Imaging User’s Guide
*934-048-004*
P/N 934-048-004