1
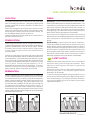
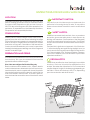
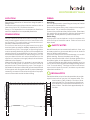
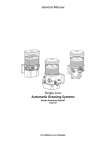
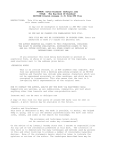
USER’S MANUAL
Class 7.2.2 Fireworks
9116 Twiss Road
Campbellville, ON L0P 1B0
Tel: 905.854.6124
Toll Free: 1.800.268.5034
www.handsfireworks.com
HF-BOOK - V1.0
SHELL FIRING INSTRUCTIONS
LOCATION
FIRING
Firing area should be free of obstructions along the flight
path of climbing pyrotechnics. Fireworks location should
provide a clear view of the sky 300-600ft / 92-183m above
the firing area.
Place shell storage boxes of each size a minimum of 8m
away from their respective mortars. Ensure that the shell
boxes are well covered with a fire resistant material. Do
not mix different sized shells in the same box.
Adhere to ERD specified Firing Distances for distance to
spectator and fall out zone.
Hand Firing: Connect the portfire and the portfire holder.
Remove the safety sleeve to expose the black match. The
matched trios or pairs have only one safety sleeve that will
expose one section of the black match that connects to
the multiple of shells. Do not lean over the firework item(s)
when igniting. Fully extend arm and touch the end of the
black match with the glowing end of the portfire.
The matched trios and pairs have half second timing
delays that provide a slightly rippled effect when they are
fired. Upon ignition, quickly distance yourself from the
item(s).
STABILIZATION
Shells are projected into the air using a mortar of the
corresponding diameter. Mortars should be embedded in
ground or sandboxed to over half of their height. Mortars
should not be buried in wet ground for long periods
o f time. When the ground is too wet sandboxes are
recommended.
Mortars for single shells of the same size may be grouped
but should be separated at least the distance equal to the
mortar diameter. For shell selections that offer trios or pairs
of favourite shells (joined together with quickmatch) the
mortars should be positioned at least 3" apart but no more
than 12" apart. Mortars may be angled 10-15° off
perpendicular and away from the spectators. To protect
the firework set up from moisture damage cover with
plastic sheeting. Remove the plastic prior to firing.
PREPARATION
If shell is equipped with tracer, please remove cellophane
cover to expose prime prior to placing in mortar. The shell
should be inserted into a clean mortar. (Be sure that any
paper or burning debris has been lifted from the bottom of
the mortar prior to loading). The correct sized mortar is the
one that provides a sliding fit for the shell. (Be sure that the
top side of the shell and the quickmatch fuse is UP). A
portfire holder should be used to ensure that no airspace
exists between the shell and the base of the bottom of the
mortar. Shells that are matched together should be loaded
and fired at the same time.
Electrical Firing: For ease of electric match installation,
Z6mm report shells and shells above 102mm now have a
plastic electric match holder installed. At the site, with the
shell(s) installed in the appropriate mortar(s), insert the
electric match, complete with shroud(the plastic tube
protecting the head of the electric match) into the hole of
the electric match holder. To secure in position, hook the
lead wires around the arms of the electric matchholder.
SAFETY NOTES
HANDS recommends that hard hats, face, eye and ear
protection be worn by all firing crew members. Each
member of the firing party should thoroughly read
instruction sheets.
Ensure that crowd control is in effect and that barriers are
securely in position. If an item fails to ignite, do not
approach it for 30 minutes.
** After the display and again during daylight hours, be
sure to search the firing area and neighbouring land for
"live" firework debris. Live findings should be collected,
reported to HANDS Fireworks and destroyed under
supervised conditions. **
10o - 15o
SINGLE SHELLS
MATCHED TRIO OF SHELLS
OR MATCHED FLIGHTS
HF-BOOK-06 V1.0
INSTRUCTIONS FOR MID LEVEL CAKES
LOCATION
An electric match must be added on site. For ease of
electric match installation, a plastic, electric match holder
has been attached to the fuse with the red safety sleeve.
Insert the electric match complete with shroud (the plastic
tube protecting the head of the electric match) into the
hole of the electric match holder. To secure in position,
hook the lead wires around the arms of the electric match
holder.
Cakes are effective when fired singly or in rapid
succession. The cakes will perform for 30 to 60 seconds
and effects will climb up to 250'/77m, depending upon the
construction and size of the unit.
green capped
fuse for chaining
NOTE: Protective foil is not shown
for purposes of illustration
ND
Electrical Firing:
DESIGN NOTES
OU
The cakes are outfitted with a foil cover to protect them
from moisture. This cover should be left intact and the
pyrotechnic effects will fire through it.
Hand Firing:
The fuse with the red safety sleeve is the hand-firing ignition
fuse. For hand firing, remove the red safety sleeve to
expose the end of the fuse. Do not lean over the item
when igniting. With portfire and holder, fully extend arm
and touch the exposed end of the fuse with the glowing
end of the portfire. Quickly distance yourself from the item.
HANDS recommend that hard hats, face, eye and ear
protection, gloves and safety boots or shoes be worn by
all firing crew members. Each member of the firing party
should thoroughly read instruction sheets. Ensure that
crowd control is in effect and that barriers are securely in
position.
If an item fails to ignite do not approach it for 30 minutes.
*** After the display and again during daylight hours, be
sure to search the firing area and neighbouring land for
"live" firework debris. "Live" findings should be collected,
reported to HANDS Fireworks and destroyed under
supervised conditions***
fuse with
plastic
electric
match
holder
Hand ignition fuse
with red sleeve
GR
PREPARATION AND FIRING
SAFETY NOTES
W
Embed cakes to half the height of the tubes, fir mly in
ground. Ensure the unit is level. If it is a "fanned" item, there
are arrows indicating the angle of fire of the tubes on the
appropriate sides or ends of the carton. Angled tubes
must not point towards spectators or firing crew.
Orientation of the fanned item constructed as illustrated
above is correct for spectators located in the background
and firing crew in the foreground and NOT to the left or
right.
LO
STABILIZATION
The plastic match holder may be tucked under the
protective foil covering the top of cake. To use, pull the
holder out and attach the electric match as described
above. If not using, you must pull the plastic, electric
match holder from inside the cake and tape it down.
Ensure a red plug is in the holder. If it has fallen out, tape
across the opening. Failure to do so could cause improper
firing.
BE
Firing area should be free of obstructions along the flight
path of climbing pyrotechnic effects. Fireworks location
should provide the audience with a clear view up to
250'/77m above the firing area, 300'/92m separation from
spectators, 20' separation from simultaneously fired items,
30' separation from sequentially fired items.
IMPORTANT CAUTION:
BELOW GROUND
HF-BOOK-07 V1.0
MINE SHELL INSTRUCTIONS
LOCATION
FIRING
Firing area should be free of obstructions along the flight
path of climbing pyrotechnics. Fireworks location should
provide a clear view of the sky 300-600ft / 92-183m above
the firing area.
Adhere to Explosives Branch specified Firing Distances for
distance to spectator and fall out zone.
Hand Firing: Connect the portfire and the portfire holder.
Remove the safety sleeve from the mine to expose the
fuse. Do not lean over the firework item(s) when igniting.
Fully extend arm and touch the end of the black match
with the glowing end of the portfire.
Mine shell fuses are configured with a 2-6 second delay.
Upon ignition, quickly distance yourself from the item(s).
STABILIZATION
Electrical Firing: For ease of electric match installation,
mine shells now have a plastic electric match holder
installed on the item(s).At the site, with the shell(s) installed
in the appropriate mortar(s), insert the electric match,
complete with shroud(the plastic tube protecting the head
of the electric match) into the hole of the electric match
holder. To secure in position, hook the lead wires around
the arms of the electric match holder.
Mine shell effects are projected into the air using a mortar
of the corresponding diameter. All mortars intended for
use should be set up during daylight hours in advance of
firing time. Mortars should be embedded in ground or
sandboxes to over half of their height. Mortars should not
be buried in wet ground for long periods of time. When
the ground is too wet sandboxes are recommended.
Mortars for mine shells of the same size may be grouped
but should be separated by a distance at least equal to
the mortar diameter. To protect the fireworks set up from
moisture cover with plastic sheeting. Remove the plastic
prior to firing.
PREPARATION
The mine shell should be inserted into a clean mortar.
(Be sure that any paper or burning debris has been lifted
from the bottom of the mortar prior to loading). Failure to
do so may lead to premature ignition of the mine shell.
The correct size mortar is the one that provides a sliding fit
for the mine shell. (Be sure that the top side of the mine
shell and the fuse is UP). A portfire holder should be used
to ensure no airspace exists between the shell and the
base of the bottom of the mortar.
SAFETY NOTES
HANDS recommend that hard hats, face, eye and ear
protection be worn by all firing crew members.
Each member of the firing party should thoroughly read
instruction sheets.
Ensure that crowd control is in effect and that barriers are
securely in position. If an item fails to ignite, do not
approach it for 30 minutes.
** After the display and again during daylight hours, be
sure to search the firing area and neighbouring land for
"live" firework debris. Live findings should be collected,
reported to HANDS Fireworks and destroyed under
supervised conditions. **
HF-BOOK-10 V1.0
INSTRUCTIONS FOR MID LEVEL SLICE CAKES
LOCATION
Firing area should be free of obstructions along the flight
path of climbing pyrotechnic effects. Fireworks location
should provide the audience with a clear view up to
250'/77m above the firing area, 300'/92m separation from
spectators, 20' separation from simultaneously fired items,
30' separation from sequentially fired items.
STABILIZATION
Embed cakes to half the height of the tubes, fir mly in
ground. Ensure the unit is level. Arrows indicating the angle
of fire of the tubes are located on the appropriate sides or
ends of the carton. Angled tubes must not point towards
spectators or firing crew. Orientation of the fanned item
constructed as illustrated above is correct for spectators
located in the background and firing crew in the foreground
and NOT to the left or right.
PREPARATION AND FIRING
The cakes are outfitted with a foil cover to protect them
from moisture. This cover should be left intact and the
pyrotechnic effects will fire through it.
Slice Cakes are configured for Electrical firing only.
Electric matches must be added on site. A plastic, electric
match holder has been attached to the fuse for each row.
Insert the electric match complete with shroud (the plastic
tube protecting the head of the electric match) into the
hole of the electric match holder. To secure in position,
hook the lead wires around the arms of the electric match
holder.
IMPORTANT CAUTION:
The plastic match holder may be tucked under the
protective foil covering the top of cake. To use, pull the
holder out and attach the electric match as described
above.
SAFETY NOTES:
HANDS recommends that hard hats, face, eye and ear
protection, gloves and safety boots or shoes be worn by
all firing crew members. Each member of the firing party
should thoroughly read instruction sheets. Ensure that
crowd control is in effect and that barriers are securely in
position.
If an item fails to ignite do not approach it for 30 minutes.
*** After the display and again during daylight hours, be
sure to search the firing area and neighbouring land for
"live" firework debris. "Live" findings should be collected,
reported to HANDS Fireworks and destroyed under
supervised conditions***
DESIGN NOTES
Cakes Slices are effective when fired singly from multiple
locations. Each row is fused to fire separate from one
another. The cakes slice will perform for 2 to 5 seconds and
may fire either left to right or simultaneously depending on
the effect. Effects will climb up to 250'/77m, depending
upon the construction and size of the unit.
HF-BOOK-12 V1.0
MONTMORENCY FALLS
LOCATION
FIRING
Firing area should be free of obstructions along the path of
falling showers.
Fireworks location should provide the audience with a
clear view of up to 50’/15m above the area.
Ensure a 1-5m separation from simultaneously fired items
and 5-9m separation from sequentially fired items.
Hand Firing:
This unit is prepared for hand firing and may be fired at
both ends for assured ignition.
Remove the paper safety cap to expose the length of
black match. Do not hold the quickmatch.
Connect the portfire and the portfire holder. Extend arm
fully and touch the quickmatch with the glowing end of
the portfire. Quickly distance yourself from the unit.
Electric Firing:
Slightly open fuse and place e-match complete with
shroud on top of the black match. Fold over once and
tape closed.
STABILIZATION
The unit consists of shower tubes wired to a length of rope
and joined together at the bottom of each tube with
quickmatch. Ensure that the quickmatch has not
loosened or detached from the tubes.
The unit must be tautly strung between two upright
structures (poles or extension ladders) separated by 9m for
a Montmorency Falls. The upright or supporting system
must be securely planted in ground to accommodate the
weight of the set up and the effect of any wind. The falls
should be secured at least 5.4m above the ground. The
rope provided with the unit may be tied directly to the
supports or it may be run through pulleys that have been
attached to the supports.
When positioning the unit, it is necessary to ensure that the
showers are aligned – parallel to each other and
perpendicular to the supporting rope. The length of
quickmatch that drops towards the ground should be tied
to the support units at regular intervals to prevent damage
caused by movement in the wind and to allow for proper
control of the match end at the time of firing.
SAFETY NOTES
Hands Fireworks recommends that hard hats, face, eye
and ear protection, gloves and safety boots or shoes be
worn by all firing crew members.
To protect the unit from moisture damage, cover with
plastic sheeting. Remove the plastic prior to firing.
Do not stand near the falls once it has been ignited. If the
item fails to ignite, do not approach it for 30 minutes.
*** After the display and again during daylight hours, be
sure to search the firing area and neighbouring land for
“live” firework debris. Findings should be collected,
reported to Hands Fireworks, and destroyed under
supervised conditions. ***
DESIGN NOTES
The falls should be set up to face the spectators to provide
a performance that may be fully appreciated. The
Montmorency Falls will drop a curtain of silver
approximately 5m. The showers are introduced
by a rainbow of colour flares that transform to a
spray of silver. The effect lasts approximately 60
seconds.
HF-BOOK-09 V1.0
FIRING STYLES
TO ELECTRICALLY FIRE
that complete 2 systems. Both wires should reach the
battery location and each wire should be bared.
Stabilize the item in the recommended fashion.
When ready to fire, touch one wire to the positive terminal
and the other wire to the negative terminal and hold
(count of 3).
Uncoil and fully extend the length of e-match wires.
Remove the plastic protector, to expose the leads of
the electric match. Untwist and separate the two leads.
Attach one of the e-match leads to the bared end of
a wire that will run to the battery location.
Attach the second of the e-match leads to a second
wire that will run to the battery location.
At the battery location bare the ends of the wire that
run from the firework item location.
When ready to fire simultaneously touch the bared end
of the first wire to the positive terminal of the battery
system and bared end of the second wire to the
negative terminal of the battery system.
Once the unit has ignited, shield yourself from the
firework action. If an item fails to ignite, do not
approach it for 30 minutes.
TO ADAPT AN ITEM TO ELECTRICAL FIRING
If an item is prepared for hand firing only, it may be
adapted by adding an electric match(e-match). Gently
slip the end of the e-match complete with shroud into the
paper wrapping of the quickmatch. Ensure that the
e-match comes into contact with the black match. Fold
once and apply masking tape to the newly created
junction to ensure that the contact between the e-match
and the black match is secured. Continue with the
electrical firing procedure as previously outlined.
ELECTRICAL FIRING OF MULTIPLE OF ITEMS
Items that are to be fired simultaneously but from different
locations should share the same 2 wires creating two
complete systems (one positive and one negative) that
then run to the battery location.
To create the system with 20 gauge wire – run one wire
from the battery location and pass by each of the items to
be fired simultaneously. Cut the wire once you have
reached the item that is located the farthest distance from
the battery location. Bare the end of this wire and join with
a twist to one of the e-match leads. At each of the other
firework locations, cut through the wire, bare the wire on
both sides of the cut. Twist together the cut pieces and
one of the e-match leads from each firework item. Repeat
this entire procedure – run a second wire from the battery
location, pass by each firework item, and attach the
second squib lead to the cut and bared ends of this
second length of wire. There should be two lengths of wire
To create the circuit with 14 gauge wire follow the same
procedure as above but in lieu of cutting the wire at each
location it is possible to simply strip away the plastic coating
to expose the wire underneath. The appropriate e-match
wire can then be wrapped around this bared wire and the
connection is complete.
To ensure secure connections and to prevent the possibility
of open connections causing a short in the circuit, you may
wish to apply electrical tape to each of the connection
points.
COMMON REASONS FOR IGNITION FAILURE
1. The resistance of the line is too great.
This can be alleviated by decreasing the lengths of
lines or by increasing the applied voltage or by
decreasing the number of e-matches on a line.
2. Both e-match wires are hooked to the same line.
Trace the path from the battery system location and
ensure that each e-match is attached to the two lines
of wire intended for the simultaneous firing.
3. E-match wires or firing line is shorted somewhere along
the line.
Ensure that the connections between e-match and
wiring lines are not touching each other or any other
conductor of electricity.
4. E-match lead has untwisted and the connection has
broken between the e-match and the wiring line.
Check connections prior to firing and secure junctions
with electrical tape.
TO ADAPT AN ITEM FOR HAND FIRING
If an item is prepared for electrical firing only, it may be
adapted for hand firing by cleanly cutting the quickmatch
or igniter cord length 5cm above the e-match and fuse
junction. Once cut, the igniter cord is ready for firing. The
quickmatch fuse must have 15cm of the paper sleeve
removed to expose the black match. If the quickmatch
fuse is too short an extra length may be added. Be sure to
establish contact between the existing black match and
the black match of the new length. Then apply masking
tape to seal the joint. Expose 15cm of blackmatch on the
added length and ignite with the glowing end of a portfire
as normal.
HF-BOOK-05 V1.0
DISPLAY FIREWORKS
SITE DIAGRAM
PLEASE DETAIL THE SITE CONDITIONS ON THE DIAGRAM PROVIDED BELOW.
Indicate the distance relationship between the firing area and the crowd control barriers, the spectator
location, the firework debris ‘fall-out zone’, the prevailing wind direction and the flight path of
ascending fireworks. Also please indicate the distance to neighbouring buildings, structures, streets,
parking lots, hydro/telephone lines, towers, trees or any other obstructions that may exist.
If your site plan varies from the one shown here, note that all minimum distances must be adhered to.
L-OUT ZONE
L
A
F
A=_____________ m
A
45o
45o
HIGH LEVEL RAMP
BARRICADE
SPECTATORS
BARRICADE
B
SPECTATORS
MID LEVEL EFFECTS
LOW LEVEL EFFECTS
C
B=_____________ m
D
C=_____________ m
BARRICADE
SPECTATORS
D=_____________ m
* NOTE: Please refer to the Firing Distances chart
for acceptable distances.
SUPERVISOR'S NAME:
SUPERVISOR'S SIGNATURE:
SHOW DATE:
HF-2009-11 V1.1
Maximum 2 wire
circuit length
Solid Copper Wire
20 gauge 14 gauge 1
50
200
6V
75
300
6V
100
400
6V
125
500
6V
150
600
6V
175
700
6V
200
800
6V
250
1000
6V
300
1200
6V
350
XXX
6V
400
XXX
12V
500
XXX
12V
600
XXX
12V
Maximum number of squibs
(Parallel Firing)
2
6V
6V
6V
6V
6V
6V
12V
12V
12V
12V
12V
18V
18V
3
6V
6V
6V
6V
12V
12V
12V
12V
12V
18V
18V
24V
24V
4
6V
6V
6V
12V
12V
12V
12V
18V
18V
24V
24V
X
X
5
6V
6V
12V
12V
12V
18V
18V
18V
24V
24V
X
X
X
6
12V
12V
12V
12V
18V
18V
18V
24V
X
X
X
X
X
7
12V
12V
12V
18V
18V
24V
24V
X
X
X
X
X
X
8
12V
12V
18V
18V
24V
24V
X
X
X
X
X
X
X
9
12V
18V
18V
24V
X
X
X
X
X
X
X
X
X
10
12V
18V
24V
X
X
X
X
X
X
X
X
X
X
11
18V
24V
X
X
X
X
X
X
X
X
X
X
X
Note: The "X" denotes conditions that should not be considered.
Based on Voltage(V) = Ampheres(I) x Resistance(R)
Resistance is total of ematch resistance, wire resistance, connection resistance.
Example: 2 e-match line
Resistance - 4.0 ohms
Voltage = 2 x 0.5 amps x 4.0 ohms = 4 volts.
12
18V
24V
X
X
X
X
X
X
X
X
X
X
X
13
24V
X
X
X
X
X
X
X
X
X
X
X
X
14
X
X
X
X
X
X
X
X
X
X
X
X
X
DISPLAY FIREWORKS
FIRING DISTANCES
OBLONG SITE WITH MAXIMUM 15° ANGLED MORTAR
OR
CIRCULAR SITE WITH VERTICAL MORTARS
Includes any Projection-Type Article such as: Aerial Shells, Roman Candles, Mines and Cakes
CIRCULAR SITE
OBLONG SITE
15° Angled Mortars & Articles
OR
Note: make appropriate wind adjustment
with Vertical Mortars
Note: make appropriate
wind adjustment
Radius to
Spectators (m)
80
50
Total
(m)
60
125
75
150
70
80
150
90
180
to 80
75
95
165
95
190
to 102
80
130
210
115
230
to 127
100
165
265
145
290
to 155
125
200
325
175
350
to 180
145
230
375
205
410
to 205
165
260
425
230
460
to 255
205
330
535
290
580
to 305
250
400
650
350
700
Size
(mm)
Spectator
Distance (m)
Fall-Out
Zone (m)
Total
(m)
Up to 30
45
35
to 50
65
to 60
100
NEW REGULATORY REQUIREMENTS:
Please remember………
The Explosives Regulatory Division (ERD) highly recommends that all display shells from 102mm to
155mm be fired ELECTRICALLY.
It is now mandatory that all sizes of Salute shells and all sizes of display shells above 155mm are fired
ELECTRICALLY.
HF-2009-12 V1.1
INSTRUCTIONS FOR MID LEVEL CAKE SLICES
PREPARATION AND FIRING
The cake slices are outfitted with a foil cover to
protect them from moisture. This cover should be left
intact; the pyrotechnic effects will fire through it.
Cakes slices are configured for electrical firing only.
Electrical Firing :
An electric match must be added on site. For ease of
electric match installation, a plastic, electric match
holder has been attached to the fuse with the red
safety sleeve. Insert the electric match complete
with shroud (the plastic tube protecting the head of
the electric match) into the hole of the electric
match holder. To secure in position, hook the lead
wires around the arms of the electric match holder.
SAFETY NOTES:
LOCATION
Firing area should be free of obstructions along the
flight path of climbing pyrotechnic effects. Fireworks
location should provide the audience with a clear
view up to 250'/77m above the firing area, 300'/92m
separation from spectators, 20' separation from simultaneously fired items, 30' separation from sequentially
fired items.
STABILIZATION
Cake slices must be secured to ensure the slice will
not shift or rock. Hands recommends a specially
designed form fitting box. Place each slice into the
box and secure with either expansion clamps or sand
bags. Ensure the box is level and on a stable surface.
An example of a form fitting box is shown below. Build
plans or finished box may be obtained from HANDS.
Arrows indicating the angle of fire are located on
each cake slice. Fanned items must not be pointed
towards spectators or firing crew.
HANDS recommend that hard hats, face, eye and
ear protection, gloves and safety boots or shoes be
worn by all firing crew members. Each member of
the firing party should thoroughly read instruction
sheets. Ensure that crowd control is in effect and that
barriers are securely in position.
If an item fails to ignite do not approach it for 30
minutes.
*** After the display and again during daylight hours,
be sure to search the firing area and neighbouring
land for "live" firework debris. "Live" findings should be
collected, reported to HANDS Fireworks and
destroyed under supervised conditions***
DESIGN NOTES
Cake slices are effective when fired singly or in rapid
succession. Spacing cake pans at 25’-30’ apart will
allow for effect overlap at the apex. Slices will
perform for 2-5 seconds and may fire either left to
right or simultaneously depending on the effect.
Effects will climb up to 250'/77m, depending upon the
construction and size of the unit.
HF-BOOK-13 V1.0