1
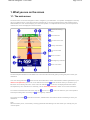
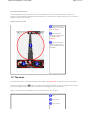
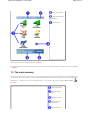
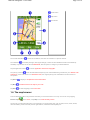
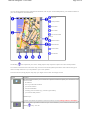
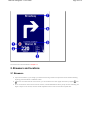
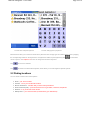
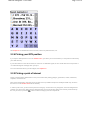
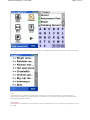
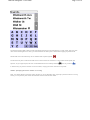
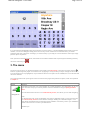
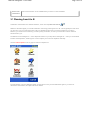
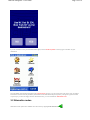
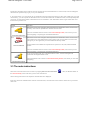
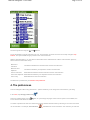
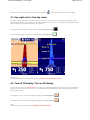
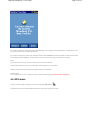
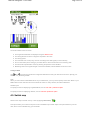
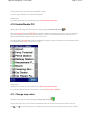
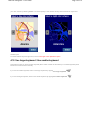
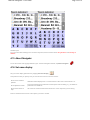
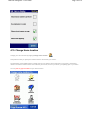
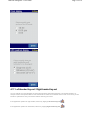
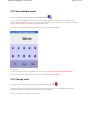
TomTom Navigator - User Guide
Page 1 of 36
Introduction
Thank you for purchasing TomTom Navigator as your navigation system. This User Guide is your reference for using
TomTom Navigator.
Table of Contents
1. What you see on the screen
1.1. The main screen
1.2. The menu
1.3. The route summary
1.4. The map browser
1.5. The schematic view
2. Browsers and locations
2.1. Browsers
2.2. Picking locations
2.2.1 Picking your HOME location
2.2.2 Picking a favorite location
2.2.3 Picking a recent destination
2.2.4 Picking your GPS position
2.2.5 Picking a point of interest
2.2.6 Picking an address
3. The menu
3.1. Planning from A to B
3.2. Alternative routes
3.3. The route instructions
4. The preferences
4.1. Use night colors
4.2. Turn off 3D display
4.3. Turn off map display
4.4. Hide POI
4.5. Turn sound off
4.6. Change volume
4.7. Maintain favorites
4.8. GPS status
4.9. Switch map
4.10. Enable/Disable POI
4.11. Change map colors
4.12. Use larger keyboard
4.13. About Navigator
4.14. Set name display
4.15. Change Home location
4.16. Set metric units
4.17. Left-handed lay-out
4.18. Set schematic speed
4.19. Change voice
4.20. Switch Language
4.21. POI appendix
5. Installation
5.1. Using the CD-ROM
5.2. Requirements for installation
5.3. (Re-)Installing TomTom Navigator, voices and maps
TomTom Navigator - User Guide
Page 2 of 36
1. What you see on the screen
1.1. The main screen
The main screen of TomTom Navigator is used to navigate to your destination. Your position is displayed on the map
using your GPS receiver. If your GPS receiver is switched off, or has not (yet) determined a clear position from the
GPS satellites, the main screen displays your last known position. To emphasize the fact that your actual position is
unknown, the screen is displayed in black and white.
"Sound off" warning
indicator
Next instruction
The name of the next
street
Journey information
Your current GPS
position
"Zoom in" button
"Next highway" indicator
"Zoom out" button
The dark red path indicates the calculated route. The route instructions will guide you along this path to reach your
destination.
Your next driving instruction
shows an arrow for the direction to follow and a distance indicator (presented in your
distance units preference) when to do it. The bottom of the screen
shows the street name you will reach if you
follow the current driving instruction. If the "sound off" indicator
is not shown, the displayed instruction will be
accompanied by voice instructions. If necessary, use the sound on preference to switch on the voice instructions.
To increase or decrease the scale of the map, tap
This keeps working when covered by the
The journey information
destination.
to zoom in or
to zoom out relative to your current position.
"next highway" indicator.
shows the current time, estimated time of arrival and the time remaining to reach your
Note:
When the battery is low, a "low battery" warning symbol will start blinking in the area where you normally see your
"current speed".
TomTom Navigator - User Guide
Page 3 of 36
Ignoring the planned route
TomTom Navigator is very flexible. If you take a turn different from the one in the instruction (by mistake or on
purpose), TomTom Navigator will adjust almost instantly to the new situation. It will keep guiding you to your current
position as fast as it can calculate.
Operate the main screen
Tap approximately in
the middle of the map to
open the menu
Tap the journey
information area to open
the detailed route
summary
Tap the instruction
area to repeat the last
spoken instruction (if still
available)
1.2. The menu
The menu opens when you tap approximately in the middle of the main screen. It provides access to all functions.
There are two pages. Use the
button to cycle through the pages. You select an icon by tapping it. Until you take
your stylus or finger off the screen, icons and buttons are only highlighted, not yet selected.
When a menu option is not available, the icon is dimmed and cannot be selected.
Title
Current time
Menu options
TomTom Navigator - User Guide
Page 4 of 36
"Next page" button
Relevant information
(if available)
Cancel button
The 10 main menu options are explained in chapter 3.
The "change preferences" option gives access to several menu pages with preference options, which are explained
in chapter 4.
1.3. The route summary
The route summary screen gives you an overview of the calculated route. From this screen you can decide how to
use the route. The route summary screen is shown immediately after you have calculated a route, for example with
"Navigate to...", "Plan from A to B", or "Find alternative...". You can also show this by tapping Show status
the menu.
Current destination
Battery and GPS
indicators
Application version
Map showing the
calculated route
Journey summary
in
TomTom Navigator - User Guide
Page 5 of 36
Route button
Map button
Done button
The current destination
is shown as an address, the name of a favorite or a point of interest.
The indicators
show battery strength, GPS signal strength, number of GPS satellites and GPS coordinates (if
available). Tap this area to see the full GPS details, with the option to configure your GPS hardware.
Tap the application version
to see the application version and copyrights.
The journey summary
shows the estimated total journey time and total distance (presented in your distance units
preference). If the route shown is an alternative route, the original journey time and distance are also shown for
comparison.
Tap Route
Tap Map
to display a complete list of route instructions.
to browse around on the map of your route.
Tap Done
to start navigating in the main screen.
1.4. The map browser
TomTom Navigator offers many features that allow you to browse around on a map. You can do so by tapping
Browse map
in the menu, or tap Map in the route summary screen.
On the map, you will find all the items you might find on a normal paper map, such as cities, towns, roads, streets,
rivers and lakes, points of interest (such as gas stations, restaurants and hospitals) etc.
TomTom Navigator - User Guide
Page 6 of 36
You can also find more dynamic and personal elements, such as your current GPS position, your favorite locations or
your current departure and destination.
Scale bar
Cursor position
GPS button
Zoom slider
Your current GPS
location
Options button
Search button
Cursor button
Done button
The blinking
icon represents your cursor. Simply tap the map anywhere to place the cursor at that position.
To increase or decrease the scale of the map, move the zoom slider (white square at the side of the screen) up or
down. The map will zoom in (or out) relative to your cursor position.
To browse around, simply tap the map, keep your finger on the screen and drag it around.
option
function
The search button allows you to search for a specific location and place your cursor there. You
use it to locate:
z an address
z one of your favorite locations
z your home location
z a recent destination
z a nearby point of interest (e.g. a hotel or gas station)
z your current GPS position
Related topic:
To learn more about the options to search a location, see the "Picking locations " description.
The cursor button provides functions for your cursor location (i.e. the location indicated by the
blinking
icon). You can:
TomTom Navigator - User Guide
z
z
z
z
Options
Page 7 of 36
calculate a route from your current location to the cursor location
find a point of interest near the cursor location
center the map around the cursor location
turn the cursor location into a favorite
The options button allows you to change the items that are currently being displayed on the
map:
z show the number of roads and streets
z show the number of street names
z show or hide all points of interest
z show or hide all favorites
Tap Show POI to use the Enable/disable POI preference to specify which categories of points
of interest can be displayed.
Note:
The option to show or hide all points of interest in this menu is the same as Show POI / Hide
POI preference. Changes have a direct effect on this preference.
Tap the GPS button (in the top right corner of the screen) to re-center the map around your
current GPS position.
Done
Tap Done to return to the main screen.
1.5. The schematic view
Instead of the main screen, a much simpler, schematic design can be used to display driving instructions. Some
people prefer the simplicity of this "at-a-glance" schematic display.
You can switch to the schematic display using the turn off map display preference.
You can also set TomTom Navigator to hide the map only when you go faster than a certain speed.
"Sound off" warning
indicator
Next instruction
Journey information
The name of the
street you are currently
on
A large copy of the
schematic instruction
arrow
The name of the next
street
TomTom Navigator - User Guide
Page 8 of 36
The screen items are described in Chapter 1.1.
2. Browsers and locations
2.1 Browsers
z
z
z
Tap a line to select it; if you change your mind and want to go back to the previous screen without selecting
anything, press the BACK or CANCEL button.
If there are more lines than fit on the screen, you can browse to the other pages of the list by tapping
and
.
When a line has too much text to fit on the screen, it will be abbreviated. When you tap an item and keep your
finger or stylus on the screen, the item will be adjusted in size in order to show the complete text.
TomTom Navigator - User Guide
browser with collapsed keyboard
Page 9 of 36
browser with popped-up keyboard
Most browsers allow you to search for items with a particular name. Simply type some letters of the name by tapping
the corresponding buttons on the keyboard. If no keyboard is visible, tap the keyboard symbol
corner to open it. See chapter 4.12 for how to change the size of the keyboard.
in the bottom
Tap
to remove a character.
Tap
to switch to the alternative keyboard, which allows you to enter digits and special symbols.
2.2 Picking locations
You can select a location with several options:
z
z
z
z
z
z
Home - your "home" location
Favorite - one of your own favorite locations
Recent destination - a location that you have recently travelled to
Point of Interest (POI) - a point of interest such as a gas station, restaurant, hospital etc.
Address - a city, street and house number
GPS position - your current location (as measured by your GPS device)
TomTom Navigator - User Guide
Page 10 of 36
2.2.1 Picking your HOME location
The main advantage of the HOME location is simply that you can select it with a single tap of your finger. It is
therefore useful to set it to the location that is most central in your travels, such as your home, your parking spot or
your office.
You can change your HOME location using the "change home location" preference.
If you don't specify a HOME position, the home icon in the location menu will remain dimmed.
2.2.2 Picking a favorite
Locations you travel to regularly (like family, friends, work address, important customers etc.) can be turned into
favorite locations.
If you have never turned a location into a favorite, the "favorite" icon in the location menu is dimmed. Otherwise, you
will be presented with a browser listing of all your favorite locations in alphabetical order:
TomTom Navigator - User Guide
Page 11 of 36
See chapter 2.1 for details about how to browse, search for particular items, etc.
You can turn locations into favorites using the "Add favorite" option in the menu, or using the "Add as favorite" cursor
action in the map browser. You can rename or delete favorites using the Maintain favorites preference.
2.2.3 Picking a recent destination
Every time you plan a route, the destination is automatically added to the list of recent destinations.
If you have never navigated anywhere, the "recent destination" icon in the location menu will be dimmed. Otherwise,
you will be presented with a browser listing the most recently used destinations.
TomTom Navigator - User Guide
Page 12 of 36
See chapter 2.1 for details about how to browse, search for particular items, etc.
2.2.4 Picking your GPS position
If you tap the "GPS position" icon in the location menu, you select your current location (i.e. the position measured by
your GPS devices).
If your GPS device is off or disconnected, or if there is no valid GPS signal, the icon will be dimmed or will produce a
"no valid GPS signal!" message when you tap it.
For more information about your GPS signal, see chapter 4.8.
2.2.5 Picking a point of interest
Points of interest (often abbreviated to "POI") are locations like parking garages, gas stations, hotels, restaurants,
hospitals, monuments etc.
Most TomTom Navigator maps offer huge numbers of POI (a notable exception is the Major Roads map, for which
the POI icon in the location menu will be dimmed).
In order to pick a POI, you first need to pick a POI category. As there are many categories, TomTom Navigator first
presents you with a menu listing the five categories that you have most often and/or most recently used. Either tap
the one you want, or press the
button to select a category from the complete list:
TomTom Navigator - User Guide
Page 13 of 36
Once you have picked the POI category you want, TomTom Navigator will provide a list of POI, in order of proximity.
Note:
The POI browser only shows the nearest points of interest, not all of them. Therefore, if you are looking for a
particular point of interest, say a restaurant with a certain name, you may have to type some (more) letters of that
name before it appears in the list.
Related topics:
See chapter 2.1 for details about how to browse, search for particular items, etc. in the list of POI categories or in the
list of POI.
TomTom Navigator - User Guide
Page 14 of 36
See chapter 4.4 for details about how to show or hide POI on the main screen
See chapter 4.10 for details about how to show or hide particular POI categories.
2.2.6 Picking an address
STEP 1. Specifying the city or zip code area
In TomTom Navigator, you find an address by going from the general to the specific. In other words, you first specify
the city or zip code area, then the street name, and then the house number or crossing. Although this is slightly
different from how addresses are normally written down, there are many advantages to searching for an address in
this order.
The first thing you are therefore asked to do, is to specify a city, town or village. Type the first letters of its name. A
few letters usually suffice. When you see the name of the city in the list, tap it.
TomTom Navigator will initially present you with a list of recently used city names. In other words, after you have
used TomTom Navigator for a while, you will often be able to pick the city without typing any letters at all.
TomTom Navigator also knows the postal code zones for most countries. This means that in those countries, you
can enter the (first part of) a postal code instead of entering the name of the city.
STEP 2. Specifying the street
Once you have selected a city, you will be asked for a street name. Once again, a few letters usually suffice. Note
that TomTom Navigator is quite capable of finding streets on the basis of misspelled or incomplete names. This also
means that if you are looking for a street such as "Avenue de Mazagran", you could forget about the "avenue" and
simply start typing "MAZ".
TomTom Navigator - User Guide
Page 15 of 36
The street browser initially offers recently selected street names in the selected city. In other words, after you have
used TomTom Navigator for a while, you will sometimes be able to pick a street without typing any letters at all.
Streets that cannot be entered by car are marked with a special symbol:
The browser may also contain items that aren't so much streets as "locations". This includes certain parks and
squares, as you might expect, but also crucial landmarks such as railway stations:
and "city centers":
.
In almost every city there is at least one such location, carrying the same name as the city itself.
STEP 3. Specifying the house number or crossing
Next, you will be asked to enter the house number. Or, as an alternative way of specify a precise location on a long
street, you can pick the place where the selected street crosses another street.
TomTom Navigator - User Guide
Page 16 of 36
If you pressed the CROSSING button when asked for a house number, or pressed DONE without entering a house
number, or if TomTom Navigator simply does not know any house numbers on the selected street, you will be
presented with a list of all known crossings (i.e. street corners). If you really do not care about the exact spot, simply
pick the option "Anywhere".
Note: just like the streets themselves, side streets are sometimes marked with a special symbol indicating that they
cannot be entered by car:
3. The menu
The menu pops up when you tap approximately in the middle of the main screen. There are two pages. Use the
button to cycle through the pages. You select an icon by tapping it. Until you take your stylus or finger off the screen,
icons and buttons are only highlighted, not yet selected. When a menu option is not available, the icon is dimmed and
cannot be selected.
The "change preferences" option gives access to several menu pages with preference options, which are explained
in chapter 4.
option
function
Calculates a route from your current position to a certain destination. The destination can be any
type of location except your current position. Enter the destination using the picking locations
menu.
Navigate to...
The calculated route is shown in the route summary screen, from which you can start navigating.
Note:
To calculate the route, TomTom Navigator must have a valid GPS signal. If you do not have this,
the route summary screen is shown with the message "Waiting for a valid GPS signal..." The
route will be calculated when the signal becomes available. If necessary, refer to your installation
poster to find out how to connect your GPS device.
Related topic:
TomTom Navigator - User Guide
Page 17 of 36
To learn more about the options to set a destination, see the "Picking locations " description.
If you are not happy with the route TomTom Navigator has calculated, you can recalculate a new
route. For detailed instructions, see Chapter 3.2.
Find alternative
The recalculated route is shown in the route summary screen, from which you can start
navigating.
Note:
Find alternative is not available when you have no route calculated.
The calculated route will be removed. The screen will show your position on the map without
providing route instructions or indicators.
Clear route
Note:
Clear route is not available when you have no route calculated.
Add a location to your list of favorites. You can do this using any type of location except another
favorite. Enter the location using the picking locations menu.
Add favorite
Related topic:
To learn more about the options to set a destination, see the "Picking locations " description.
TomTom Navigator has many preferences which set the behavior to your personal liking. Chapter
4 describes all the options from the preference menu in detail.
Change
preferences
To plan a route without a valid GPS signal. You can manually select the departure and
destination of your route. Chapter 3.1 describes this function in detail.
Plan from A to
B
Lets you explore and search for locations in the map browser. It is a digital version of your paper
map with a lot of detailed information available.
Browse map
Related topic:
To learn more the map browser screen, see the "Map browser " description.
Shows the route summary screen. This is the same screen as displayed after a route has been
calculated.
Show status
Related topic:
To learn more the route summary screen, see the "Route summary " description.
This option gives you a brief guided tour of the application, the most important menu options, and
the map browser.
Guided tour
Shows the calculated route as written instructions. Chapter 3.3 describes this function in detail.
Note:
TomTom Navigator - User Guide
Show route
instructions
Page 18 of 36
Show route instruction is not available when you have no route calculated.
3.1 Planning from A to B
Calculate a route between two selected locations, in the menu tap Plan from A to B
.
Without a valid GPS signal you can still calculate a route using "planning from A to B". This is typically the case when
you are not in your car. "Planning from A to B" is a valuable function when you want to prepare for your trip in
advance, you want to find out how long a certain journey would take, or when you want to find out how someone
should travel to you.
The difference with "Navigate to..." is the departure location of your trip. Where "Navigate to..." uses you current GPS
location as the departure, "Planning from A to B" requires you to enter the departure manually.
Use the locations picker to set any type of location to depart from.
For fast selection, TomTom Navigator offers you the option to use your last destination again. If you have not
calculated a route before, this option will not be offered.
TomTom Navigator - User Guide
Page 19 of 36
If you do not want to use your last destination again, use the locations picker to set any type of location as your
destination.
The calculated route will be presented in the route summary screen. You can review the route on the map, as written
instructions and the summary statistics (total distance and estimated total journey time). This gives a good overview
of your trip. If you are not happy with the calculated route, you can calculate an alternative route.
3.2 Alternative routes
Alternative route options are available from the menu by tapping Find alternative
.
TomTom Navigator - User Guide
Page 20 of 36
Routes are calculated on the basis of the time required to reach the destination. In other words, TomTom Navigator
calculates the quickest way to get you to your destination.
If, for some reason, you want to get rid of a particular route (for instance because you drive into a traffic jam or a road
construction), you can request an alternative route. Such an alternative will use different roads, and will probably take
more time. An unlimited number of alternatives can be calculated - each alternative will be longer and/or take more
time than the previous one.
option
function
Calculates a new route using the same departure and destination as the current route.
As many new roads as possible are used for the new route.
Calculate alternative
The new calculated route is shown in the route summary screen, from which you can
start navigating or exploring the calculated alternative.
Calculates a new route using the same departure and destination as the current route.
The roads for the next 2000 meters of the current route are not used in the new route.
This gives you the opportunity to avoid roadblocks directly ahead.
Avoid roadblock
Avoid roadblock is available as separate menu options for 100, 500, 2000 and 5000
meters.
The new calculated route is shown in the route summary screen, from which you can
start navigating or exploring the calculated alternative.
If you are not happy with any of the alternatives routes, TomTom Navigator will
recalculate the original fastest route.
Recalculate original
The recalculated route is shown in the route summary screen, from which you can start
navigating.
3.3 The route instructions
Show the route instructions from the menu by tapping Show route instructions
the route summary screen will show you the route instructions.
. Also, the ROUTE button in
All the driving instructions from departure to destination are displayed.
Every line shows the estimated time until the next instruction, the instruction arrow and the street name you should
drive onto.
TomTom Navigator - User Guide
Scroll through the list using the
and
Page 21 of 36
buttons.
To see the details of a single instruction, tap on it. The instruction is shown zoomed-in on the map using the map
browser. The option DONE will get you back to the route instructions.
With the OPTIONS button, you can select an alternative for the estimated time until the next instruction (which is
shown before the instruction arrow):
Distance to
instruction
The distance between the last instruction and the next instruction
Distance since
departure
The distance between your departure and the next instruction
Time to instruction
Estimated time between the last instruction and the next instruction
Time since departure Estimated time between your departure and the next instruction
Time of day
Estimated time for the next instruction
The distance is presented in your distance units preference.
4. The preferences
TomTom Navigator offers many preferences – options that allow you to change the look and feel to your liking.
In the menu, tap Change preferences
.
There are multiple pages. Use the
button to cycle through the pages. When a menu option is not available, the
icon is dimmed and cannot be selected.
A number of preferences work as a status which can be switched back and forth by selecting it. The icons show what
can be activated. For example, Turn off sound
will disable the voice instructions. The next time you enter the
TomTom Navigator - User Guide
preference menu, the icon has changed into Turn on sound
Page 22 of 36
, selecting this will turn on the sound again.
4.1. Use night colors / Use day colors
Normally, TomTom Navigator uses bright colors with a lot of contrast, so that you can see the map clearly, even in
bright sunlight. When it is dark outside, you may want to switch to night colors. The map will then be displayed using
subdued colors that will not interfere with your night vision.
If day colors are used, switch to night colors by tapping Use night colors
If night colors are used, switch to day colors by tapping Use day colors
.
.
Related topic:
To change the style of the map display, use the "Change map colors" preference option.
4.2. Turn off 3D display / Turn on 3D display
You can use the map in the main screen in two modes. The 3D display shows the map from a birds eye perspective
similar to the view you have while driving a car. The alternative is the 2D display which shows the map from the sky
like your paper maps.
If 3D display is used, switch to 2D display by tapping Turn off 3D display.
.
If 2D display is used, switch to 3D display by tapping Turn on 3D display.
.
Note:
This preference is not available if the map display has been disabled.
TomTom Navigator - User Guide
Page 23 of 36
Related topic:
To navigate with the schematic view, see the "Turn off map display" preference option.
4.3. Turn off map display / Turn on map display
You can navigate using either the map display or the schematic display. The map display gives you the most detailed
information about your current situation, including a map. The schematic view is focused on the next driving
instruction.
If map display is used, switch to the schematic display by tapping Turn off map display
.
If schematic display is used, switch on the map display by tapping Turn on map display
.
Related topics:
For more details about the schematic view, see the "schematic view" description.
To automatically hide the map when you drive faster than a certain speed, use the "Set schematic speed" preference
option.
Note:
If you have set a "schematic speed," your display will automatically turn off the map display when your driving speed
exceeds the schematic speed. The "turn map display on" option will NOT override this safety feature.
4.4. Hide POI / Show POI
The main screen can show points of interest (POI) as icons in the map. Every category of POI will be shown using its
own icon. This Hide POI/Show POI preference either shows all specified POI categories or no POI's on the map.
If Points Of Interest are shown, they can be hidden by tapping Hide POI
.
If no Points Of Interest are shown, you can make them appear by tapping Show POI
.
Note:
Only those categories of POI that have been enabled will be shown. If no POI categories have been enabled, you will
not see any POI on the map even if you use the "Show POI" option.
Related topics:
To specify which particular categories of Point Of Interest are shown, use the "Enable/Disable POI" preference
option.
4.5. Turn off sound / Turn on sound
You can turn off the voice that gives navigation instructions. You will then have to rely on the visual instructions on
your screen to navigate. To hear the navigation instructions again, turn on the sound once more. If the sound is
switched off, this is indicated during navigation by the
icon in the lower left-hand corner of the screen.
If the sound is currently switched on, switch it off by tapping Turn off sound
.
TomTom Navigator - User Guide
Page 24 of 36
If the sound is currently switched off, switch it on by tapping Turn on sound
.
Related topics:
To change the volume of the spoken instructions, use the "change volume" preference option.
To select another voice, use the "change voice" preference option.
4.6. Change volume
Change the sound volume by tapping Change volume
.
This preference option allows you to change the volume of the spoken instructions, from 10% (very soft) to 100%
(very loud).
Press the TEST button to hear a sample of the voice at the current sound volume.
Related topics:
To turn the sound completely OFF, use the "turn off sound" preference option.
To select another voice, use the "change voice" preference option.
4.7. Maintain favorites
Maintain your list of favorite locations by tapping Maintain favorite
.
TomTom Navigator allows you to maintain a list of favorites – locations that you use a lot, like your work address,
your company headquarters, your best friends, your most important customers, your hotel etc. You can rename or
delete any favorite from your list.
Use the browser to select a favorite from your favorites list.
TomTom Navigator - User Guide
Page 25 of 36
If you want to delete the selected favorite, select DELETE. The message "favorite DELETED..." briefly blinks in the
top corner of the screen to confirm the deletion.
If you want to change the name of the selected favorite, select RENAME. Use the text editor to enter the new name.
The message "favorite ADDED..." briefly blinks in the top corner of the screen to confirm the renaming.
Note:
If your favorite list is empty, the icon is dimmed and cannot be selected.
If the location changes for one of your favorites, create it again as a new location.
Deleting a favorite will be executed immediately without a confirmation.
Related topics:
For an explanation on how to use the browser to select a favorite, see the browser usage description.
4.8. GPS status
Check your GPS signal or configure your GPS by tapping GPS status
.
The GPS status screen shows detailed information on the GPS signal you receive:
TomTom Navigator - User Guide
Page 26 of 36
On the GPS status screen is shown:
z
z
z
z
z
z
z
The longitude and latitude are displayed using the distance units
The driving direction is shown in degrees compared to the north
The driving speed
The Universal Time Code (UTC), the time according to the GPS signal (not the local time)
An icon that shows (when circling) if your GPS device is well connected and if it is receiving data
The schematic representation of the sky showing the positions of the satellites
Measuring bars for the signal strength of each visual satellite, locked satellites are shown in blue
Configure GPS
Use
and
to browse through the list of supported GPS devices until your GPS device is shown. Specify your
GPS device by selecting DONE.
Note:
When you select "Other Cable NMEA GPS" as your GPS device, you may need to specify a baud rate. Refer to your
NMEA GPS receiver manual to find out the baud rate used. For many devices, this will be 4800 baud.
Related topics:
To specify the units for displaying longitude/latitude, use the "set units " preference option.
To specify the units for displaying distance, use the "set units" preference option.
4.9. Switch map
Switch to the map of another country or area by tapping Switch map
.
This option allows you to select a map from a list of available maps. Certain maps come pre-installed on your SD
card, others can be installed using your CD-ROM.
TomTom Navigator - User Guide
Page 27 of 36
The map that you are currently using is highlighted in yellow.
If only one map is available, it is selected automatically.
Related topics:
To install a specific map from the CD-ROM, use the map installation description.
4.10. Enable/Disable POI
Specify which POI categories can be shown on maps by tapping Enable/Disable POI
.
Both the main screen and the map browser are capable of displaying points of interest (POI) on the map. There are
many POI categories available, each represented by its own icon. The "Enable/Disable POI" preference lets you
specify which particular categories can be shown on the map.
You will be offered a browser listing of all the available POI categories. Place a checkmark in the boxes before those
POI categories that you want to be shown on maps.
Related topics:
Whether POI are shown at all is controlled by the "Show POI" preference option.
For more information about how to use browsers, see the browser usage description.
4.11. Change map colors
Change the way maps are colored by tapping Change map colors
.
All maps are shown using a color scheme, this determines the colors used for each element shown in the map.
Use
and
to browse through the list of available color schemes until your preferred scheme is shown. Specify
TomTom Navigator - User Guide
Page 28 of 36
your color scheme by selecting DONE. You need to specify a color scheme for day colors and then for night colors.
Related topics:
To switch between day and night colors, use the "Use night colors" preference option.
4.12. Use larger keyboard / Use smaller keyboard
This preference lets you select a larger keyboard (which makes it easier to enter letters) or a smaller keyboard (which
leaves more room for items in the list).
If you use the smaller keyboard, switch to the larger keyboard by tapping Use larger keyboard
If you use the larger keyboard, switch to the smaller keyboard by tapping Use smaller keyboard
.
.
TomTom Navigator - User Guide
Page 29 of 36
Related topics:
For more information relating to the use of the keyboard, see the sections about using browsers and entering an
address.
4.13. About Navigator
To see the version and copyright details of your TomTom Navigator software, tap About Navigator
.
4.14. Set name display
Set your name display preferences by tapping Set name display
.
This preference lets you specify how you want to show names in the main screen:
Show house numbers
prefixed
addresses will be displayed as “112 Oxford street” rather than “Oxford street 112”
De-emphasize E-roads
local road numbering are preferred over European road numbering, e.g. “A10/E35” is
preferred over “E35/A10”
Show street names on
map
the names of roads and side streets are shown on the map while you are driving
Place a checkmark in the boxes of the options you want to enable.
TomTom Navigator - User Guide
Page 30 of 36
4.15. Change Home location
Change your home location by tapping Change home location
.
This preference lets you specify the location that is to be used as your "home".
The advantage of the HOME location is simply that you can select it with a single tap of your finger. It is therefore
useful to set it to the location that is most central in your travels, such as your home, your parking spot or your office.
You can pick any type of location as your home location.
TomTom Navigator - User Guide
Page 31 of 36
4.16. Set metric units
Set the preferred units by tapping Set units
.
This preference lets you specify how distances are expressed (in kilometres or in miles); how longitudes and latitudes
are displayed (using decimals or sexagesimals); and how times are displayed (using 24-hour format, or using the 12hour am/pm format).
decimal display
sexagesimal display
(degrees, minutes and seconds)
TomTom Navigator - User Guide
Page 32 of 36
4.17. Left-handed lay-out / Right-handed lay-out
You can optimize TomTom Navigator for either right-handed or left-handed operation. Left-handed operation, for
example. means that important buttons and controls will be located on the left side of the screen. As a result, you will
be able to operate them with your left hand without obscuring the screen.
If the application operates for right-handed, switch it by tapping Left-handed lay-out
.
If the application operates for left-handed, switch it by tapping Right-handed lay-out
.
TomTom Navigator - User Guide
Page 33 of 36
4.18. Set schematic speed
Modify the schematic speed by tapping Set schematic speed
.
You can set TomTom Navigator to hide the map when you go faster than a certain speed. Instead of the map, a
much simpler, schematic design is used to display driving instructions. The simplicity of the "at-a-glance" schematics
can be a true benefit when you need to concentrate on the road.
If you do not enter a speed, or set the speed extremely high, you disable this feature.
Related topics:
To turn the schematic view on/off regardless of speed, use the "Turn on/off map display" preference option.
For more information about the schematic view, see the schematic view description.
4.19. Change voice
Change the voice used for driving instructions by tapping Change voice
.
This preference lets you change the voice used for driving instructions. Voices are available in many different
languages. For certain languages, several different voices are available.
To hear a sample of a voice, tap the TEST button.
TomTom Navigator - User Guide
Page 34 of 36
Related topics:
To change the volume of the voice instructions, use the "Change volume" preference option.
To turn the sound completely off, use the "Turn off sound" preference option.
4.20. Switch Language
Set the language used by TomTom Navigator by tapping Switch language
.
This preference will set the language in which the menus and screens are shown. Simply tap the language of your
choice.
TomTom Navigator - User Guide
Page 35 of 36
Note:
When you switch to another language, TomTom Navigator will also ask you to select an appropriate voice in that
language.
Related topics:
To change only the language of the voice instructions, use the "change voice" preference option.
4.21. POI Appendix
TomTom Navigator comes with a powerful POI management tool. Not only you can enable and disable the available
POI categories, you can also add new categories of POI's and your own POI's! TomTom Navigator can even warn
you when you are near POI in a chosen category.
TomTom Navigator - User Guide
Page 36 of 36
5. Installation
5.1. Using the CD-ROM
The CD-ROM provides maps and voices and allows you to install the TomTom Navigator software onto your
handheld.
The CD-ROM also includes documentation and provides links to the TomTom website. It also helps you register your
product for future updates, helpdesk support and product news.
To use the CD-ROM, insert it into your PC running Microsoft Windows ME or later. If you are not presented
automatically with the TomTom Setup Menu, launch it by opening My Computer, then double-clicking the icon of your
CD-ROM drive and then double-clicking "setup.exe".
After choosing your preferred language, carefully read the license agreement. Next you will be presented with the
main Setup Menu. You can use this menu to install TomTom Navigator, to load extra maps, to change voices and to
access further product information.
5.2. Requirements for installation
To install TomTom Navigator or additional voices or maps, a memory card (such as an industry standard SD Card)
for your handheld is required.
When performing an installation, make sure the memory card is inserted into your handheld.
Maps can also be loaded directly onto a memory card that is inserted into a PC Memory Card Reader that is attached
to your PC. Installing a map this way is quicker.
5.4. (Re-)Installing TomTom Navigator, voices and maps
From the main Setup Menu, choose the appropriate option. You will be guided through a number of screens to refine
your choices.
Note: Maps can be installed directly to a memory card that is inserted into a PC Memory Card Reader that is attached
to your PC.