1
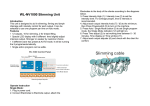
© All right reserved to netafim / Hendelmade 0901
The smart valve with
3 Independent
programs + 2
extra modes
EP
KE
&
D
A
o opc
ional en f
RE pro
ario
gramad
AQUA PRO Irrigation Controller
E
Easy to use battery operated irrigation controller.
Two in one: an irrigation controller and AQUANET,
a state of the art electric valve combined.
Offers 3 independent programs + 2 extra modes.
Programs:
P1: Once a day at the same time every day.
(Factory preset 15 minutes at 06:00 A.M).
P2: Once a day at the same time on selected Active days.
P3: Up to three start times per day on selected days.
Extra Modes
OFF: stops all irrigation activities.
Manual: to start/stop a program manually.
Start: press both <SET> and
keys.
Stop: press both <SET> and
keys.
Automatic stop: when the duration time of the
active program (P) passes.
Waterproof: I.P. 67.
Contains a backup battery to safeguard your settings.
Available in sizes: 3/4” and 1”.
2
E>
OD
<M
Table of contents:
Installation
Controller Keyboard
Controller Icons & Display
Electric valve control button
Battery Insertion or replacement
Installation into the watering system
Programming steps
Set P1
Set p2
Set P3
Programming guide table
Controller display in operating mode
Technical information
Warranty
>
ET >
<S SET
<
e.
E
E>
OD
<M
>
ET >
<S SET
<
cti , 3
ve , 5,
Da 7,
ys
.
Pro
Pre gra
ss mm
Tw On and ing
ic ce h th
Inc e - P - se old e A
Q
re 1. 3 t c
To
U
a
lo
A
Pre sele - S se time ck a
P
bri ss ct ets De s - nd 2 S RO
Tw efly the an a the e cre P2. 4 dait eco :
nd
cti ntr as ti
Fo ice : On
s
ve y e b me
ur fo ce
pro an lin s -P
ti
To M me r P2 for
b g d p kin 3
To sta an s fo . 3 ti P1. utto ram roc g dig
ee it
n :
P1 sto rt: p ual O r OF mes
d. .
for
P2 . -O p: p res pe F.
ra
P3
P3 . -O nce res s
ti
L
o
. -U nce da s
& on:
ba w
p to da ily a &
Irri ttery
3 ir ily o t sa
du ga
rig n se me
ra tio
ati le tim
tio n
on cte e
sta
sp d .
n.
er days
e.g
rt
da
tim
y: . Ac . 1,
e
>
ET
<S
E>
OD
<M
Stick your
language sticker
on the inside
cover.
E>
OD
<M
>
ET
<S
Pro
Pre gra
ss mm
Tw On and ing
ic ce h th
Inc e - P - se old e A
Q
re 1. 3 t c
To
U
as
tim lock
A
s
e
Pre ele S
P
e
bri ss ct ets De s - and 2 S RO
Tw efly the an a the e cre P2. 4 dait eco :
nd
cti ntr as ti
Fo ice : On
s
ve y e b me
ur fo ce
pro an lin s -P
ti
To M me r P2 for
b g d p kin 3
To sta anu s for . 3 ti P1. utto ram roc g dig
rt
m
:
e
n
P1 sto : p al OF e
ed it.
.
P2 . -O p: p ress Ope F. s for
ra
n
.
re
P
c
P3 -O e
ti
3
Lo
. -U nce da ss
& on:
ba w
p to da ily a &
tt
Ir e
3 ir ily o t sa
du riga ry
rig n se me
ra tio
ati le tim
tio n
on cte e
sta
sp d .
n.
er days
e.g
rt
da
tim
y: . A . 1
tiv 3, 5
eD ,7
ay ,
s.
.
4
5
6
7
8
9
10
11
12
14
15
3
Installation
Controller Keyboard
<MODE>: To select operating
sequence and to enter
programming.
<SET>: To set program values
and advance to next step.
: Increase program values.
: Decrease program values.
E
Controller Icons & Display
Irrigation duration.
Days - represented
by the digits 1-7.
start time.
Chosen day is framed.
Current day is blinking.
.e.g. 1, 3, 5, 7, Active Days.
Hours - represented in 24
hours format.
P3 -3 start times per day.
P1, P2 or P3 - operating
modes.
Set current
Manual irrigation.
time and day.
Low battery.
4
Electric valve
control buttons
E
Auto:
Close:
Open:
Note: If the override button
(marked with a red arrow) is
in Close position the AQUA
PRO will remain closed.
If the override button
(marked with a red arrow) is
in Open position the AQUA
PRO will remain open.
Flow Control:
Flow Direction:
(see page 7)
5
Battery Insertion or replacement
E
Note: to operate your controller you need a high quality
9V alkaline battery (not included)
The Low battery sign appears - insert or replace the battery
To insert or to replace the battery:
1. Release the four screws of the
battery compartment cover.
2. Gently remove the cover, seal
and screws. Take care to keep
the screws and seal in a safe place.
3. Insert/replace a new battery.
4. Replace the seal cover
and screws
5. Tighten the screws.
6
Installation into the watering system
1. Turn off the main water supply
2. Install the AQUA PRO into the
watering system making sure
that the water flow is in the
direction of the arrow on the
base of the valve.
3. Turn on the main water supply
4. You can control the flow using
the Flow Control lever on the
base marked from <+> to <->.
E
When installing
the AQUA PRO,
hold the valve only.
7
Programming steps
Note: Make sure that the override button (marked
with a red arrow) is in the central position AUTO).
E
Set Clock current time and day
Press <MODE> for 2 seconds.
1. Use
or
keys to adjust (MINS.)
2. Press <SET> to continue.
3. Use
or
keys to adjust (HRS.)
4. Press <SET> to continue.
5. Use
or
keys to select day of the week.
6. Press <SET>.
Clock setting is completed.
Important!
If no key is pressed for more than 30 seconds during
programming,the controller resumes operating mode.
8
Set P1
Once a day at the same time every day.
E
Press <MODE> twice for 2 seconds.
Set Irrigation duration
7. Use
or
keys to adjust (MINS.)
8. Press <SET> to continue.
9. Use
or
keys to adjust (HRS.)
10. Press <SET> to continue.
Set irrigation starting time
11. Use
or
keys to adjust (MINS.)
12. Press <SET> to continue.
13. Use
or
keys to adjust (HRS.)
14. Press <SET> to continue.
P1 programming is completed.
9
E
Set P2
Once a day at the same time on selected Active days
Note: Irrigation duration and start time has already
been set at P1.To change irrigation duration and/or
start time, go back to P1 (7-14)
Press <MODE> three times for 2 seconds.
15. Press
to activate day 1.
16. Press
to deactivate day 1.
17. Press <SET> to continue to day 2
18. Press
to activate day 2.
19. Press
to deactivate day 2.
20. Set in a similar way days 3,4,5,6,7.
P2 programming is completed.
day 1 ÒblinksÓ
10
Set P3
Up to three start times per day on selected Active days.
E
Press <MODE> four times for 2 seconds.
21. To Set duration for
(follow the instruction of P1. 7-14)
22. Set in a similar way for
and
23. To Select active days
(follow the instruction of P2. 15-20)
P3 programming is completed.
Note: To select an active program: press the <MODE> button
briefly: once for P1, twice for P2 three times for P3. and
four times to turn the controller OFF.
11
E
Programming guide table (example)
Example Day Active day Duration Start time
1
x
0:15
08:00
P1
2
3
4
5
6
7
x
x
x
x
x
x
Example Day Active day Duration Start time
1
x
0:15
08:00
P2
2
3
4
5
6
7
x
x
x
Example Day Active day Duration Start time
1
x
0:15
1
P3
2
3
4
5
6
7
12
x
x
x
0:15
0:15
2
3
Hour
08:00
13:00
18:00
Your program guide table
P1
Day Active day Duration Start time
1
2
3
4
5
6
7
P2
E
x
x
x
x
x
x
x
Day Active day Duration Start time
1
2
3
4
5
6
7
P3
Day Active day Duration Start time
Hour
1
2
3
4
5
6
7
13
E
Controller display in operating mode
Real time clock
Current day (blinking)
Active mode (P1, P2, P3 or OFF).
Technical information
Flow Range: 25-6000L/H (0.1 to 26 GPM).
Minimum pressure: 0.2 BAR (3 PSI.).
Maximum pressure: 10 BAR (150 PSI).
Valve cable 0.6 M. connected to the Controller. Maximum
extension from the valve to the Controller 100 M (330- feet)
(cable 1.0mm Ø).
AQUA PRO controller is compatible also with
Aquanet 1.5”, 2”. (D.C).
Operating Temperature: 0° to 50°C (32°-122°F).
Storage Temperature: -10° to 60°C (14°-140°F).
14
Warranty
Basic Netafim Warranty.
Netafim products are guaranteed
to be free from defects in material
and workmanship for a period of
one (1) year from the date of
delivery.
This warranty does not apply
where equipment is not used and
installed strictly in accordance
with Netafim specifications and
User Manual. Neither does it
apply to failures caused by
lightning strikes or damage due
to freezing temperatures or
mechanical causes (e.g. lawnmowers) Netafim is not liable for
indirect, incidental or
consequential damage in
connection with the use of
equipment.
Netafim reserves the right to alter,
modify or redesign its products,
pricing and warranty at all times
without creating any liability for
the obsolescence of customer
inventory of such parts or
products.
E
This manufacturer warranty policy
may apply differently in different
countries.
For more information,
contact your Netafim distributor
Email: [email protected]
To receive warranty benefits,
customers should return defective
parts to the nearest Netafim
distributor.
15