1
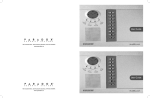
Magellan All-in-one Wireless Security System
MG6250 Console
User Guide
Warranty
For complete warranty information on this product please refer to the Limited Warranty Statement found on the Website www.paradox.com/terms. Your use of the Paradox product signifies
your acceptance of all warranty terms and conditions.
Limitations of Alarm Systems
We strongly advise that you review and take into consideration the Limitations of Alarm Systems document available on our website at http://www.paradox.com/Terms/.
Warning for Connections to Non-Traditional Telephony (e.g. VoIP)
Paradox alarm equipment was designed to work effectively around traditional telephone systems. For those customers who are using a Paradox alarm panel connected to a non-traditional
telephone system, such as "Voice Over Internet Protocol" (VoIP) that converts the voice signal from your telephone to a digital signal traveling over the Internet, you should be aware that
your alarm system may not function as effectively as with traditional telephone systems.
For example, if your VoIP equipment has no battery back-up, during a power failure your system's ability to transmit signals to the central station may be compromised. Or, if your VoIP
connection becomes disabled, your telephone line monitoring feature may also be compromised. Other concerns would include, without limitation, Internet connection failures which
may be more frequent than regular telephone line outages. We therefore strongly recommend that you discuss these and other limitations involved with operating an alarm system on a
VoIP or other non-traditional telephone system with your installation company. They should be able to offer or recommend measures to reduce the risks involved and give you a better
understanding.
Warnings: Information for the User
This equipment has been tested and found to comply with the limits for Class B digital devices, pursuant to Part 15 of FCC rules. These limits are designed to provide reasonable protection
against harmful interference in a residential installation. This equipment generates, uses and can radiate radio frequency energy, and, if not installed and used in accordance with the
instructions, may cause harmful interference to radio communications. However, there is no guarantee that interference will not occur in a particular installation. If this equipment does
cause harmful interference to equipment intermittently, the user is encouraged to try to correct the interference by one or more of the following measures: (1) re orient or relocate the
receiving antenna; (2) increase the separation between the equipment and receiver; (3) connect the equipment to an outlet on a circuit other than the one to which the receiver is
connected, or (4) consult the dealer or an experienced radio/tv technician for assistance. CAUTION: The user is cautioned that any changes or modifications not expressly approved by
Paradox Security Systems could void the user’s authority to operate/use the equipment. This device complies with Industry Canada licence-exempt RSS standards). Operation is subject to
the following two conditions: (1) this device may not cause interference, and (2) this device must accept any interference, including interference that may cause undesired operation of the
device.
Le présent appareil est conforme aux CNR d'Industrie Canada applicables aux appareils radio exempts de licence. L'exploitation est autorisée aux deux conditions suivantes : (1) l'appareil
ne doit pas produire de brouillage, et (2) l'utilisateur de l'appareil doit accepter tout brouillage radioélectrique subi, même si le brouillage est susceptible d'en compromettre le
fonctionnement.
This Class B digital apparatus complies with Canadian ICES-003. Cet appareil numérique de la classe B est conforme à la norme NMB-003 du Canada.
This device complies with part 15 of the FCC Rules. Operation is subject to the following twoconditions: (1) This device may not cause harmful interference, and (2) this device must accept
any interference received, including interference that may cause undesired operation.
Patents
One or more of the following US patents may apply: 7046142, 6215399, 6111256, 6104319, 5920259, 5886632, 5721542, 5287111, and RE39406. Canadian and international patents may
also apply. © 2012 Paradox Ltd. All rights reserved. Specifications may change without prior notice. Magellan and Spectra SP are trademarks or registered trademarks of Paradox Ltd. or its
affiliates in Canada, the United States and/or other countries.
Table of Contents
1
Chapter 1 - Introduction ............................................................................................................................... 6
MG6250 Console ................................................................................................................................................................................. 6
About this Manual............................................................................................................................................................................... 7
Document Conventions.................................................................................................................................................................... 7
How to Use this Manual .................................................................................................................................................................... 7
Chapter 2- Getting Started........................................................................................................................... 8
Your MG6250 System......................................................................................................................................................................... 8
MG6250 Console at a Glance .......................................................................................................................................................... 9
MG6250 LCD Screen ............................................................................................................................................................................................ 10
MG6250 Keypad.................................................................................................................................................................................................... 10
MG6250 Status LEDs............................................................................................................................................................................................ 11
Remote Controls at a Glance........................................................................................................................................................ 12
Secondary Keypads at a Glance .................................................................................................................................................. 13
Chapter 3 - Arming and Disarming ........................................................................................................ 14
Arming the System .......................................................................................................................................................................... 15
Exit Delay Timer..................................................................................................................................................................................................... 15
Arming Types .......................................................................................................................................................................................................... 15
Regular Arm............................................................................................................................................................................................................ 15
Stay Arming ............................................................................................................................................................................................................ 16
Sleep Arming.......................................................................................................................................................................................................... 17
MG6250 Console • User Guide
Table of Contents | 3
StayD Arming .........................................................................................................................................................................................................
Force Arming..........................................................................................................................................................................................................
Bypassing Zones ...................................................................................................................................................................................................
Auto-Arming ..........................................................................................................................................................................................................
Entry Delay Timer .................................................................................................................................................................................................
Disarming an Armed System............................................................................................................................................................................
Disarming a System in Alarm ...........................................................................................................................................................................
Alarm Memory Display .......................................................................................................................................................................................
17
18
19
19
20
20
21
22
Chapter 4 - User Features .......................................................................................................................... 24
Bypassing Zones............................................................................................................................................................................... 25
Using the Message Center ............................................................................................................................................................ 26
Recording a Message .......................................................................................................................................................................................... 26
Playing a Message ................................................................................................................................................................................................ 27
Erasing a Message ................................................................................................................................................................................................ 28
Setting the Alarm Clock .................................................................................................................................................................
Speakerphone ...................................................................................................................................................................................
Setting Chime Zones.......................................................................................................................................................................
Viewing the Alarm Memory..........................................................................................................................................................
Viewing the History Log.................................................................................................................................................................
Performing a System Test .............................................................................................................................................................
29
30
31
32
33
34
Chapter 5 - System Setup .......................................................................................................................... 35
Managing Users .................................................................................................................................................................................................... 36
Lost Remote............................................................................................................................................................................................................ 38
Communicator Settings ..................................................................................................................................................................................... 39
4 | Table of Contents
MG6250 Console • User Guide
Setting the Time and Date ................................................................................................................................................................................
Setting Delays and Tones ..................................................................................................................................................................................
Auto-arming ...........................................................................................................................................................................................................
Changing labels ....................................................................................................................................................................................................
Setting the Language..........................................................................................................................................................................................
Changing LCD Screen Settings........................................................................................................................................................................
Ring Setup...............................................................................................................................................................................................................
Viewing MG6250 Version Numbers ...............................................................................................................................................................
Demo Mode............................................................................................................................................................................................................
43
44
48
49
51
52
53
55
56
Chapter 6 - Fire and Panic Alarms .......................................................................................................... 57
Fire Alarms .......................................................................................................................................................................................... 57
Standard Fire Zones.............................................................................................................................................................................................
Delayed Fire Zones...............................................................................................................................................................................................
Fire Safety Tips.......................................................................................................................................................................................................
Minimizing Home Fire Hazards .......................................................................................................................................................................
Panic Alarms ...........................................................................................................................................................................................................
58
59
60
60
61
Index ................................................................................................................................................................. 62
MG6250 Console • User Guide
Table of Contents | 5
Chapter 1 - Introduction
1
This chapter introduces you to the MG6250 console and helps you understand the document conventions
used in this manual.
MG6250 Console
The MG6250 Console is the latest addition to the Magellan line of all-in-one consoles. The MG6250 offers a
combination of security, wireless convenience, and attractive consumer features. In addition, it features
Paradox’s simultaneous six-channel reporting that allows you to report via IP, GPRS, GSM, SMS, voice, and
traditional landline. In case of a panic or alarm, the console will report on all six channels, making sure the
report is transmitted. This ensures worry-free, reliable communication with the central station.
The MG6250 supports two partitions for two separate security-monitored areas with up to 64 wireless zones.
In addition, the console also offers different arming levels: Stay, Sleep, and Full arming, as well as StayD,
Paradox’s patented protection level that ensures better, adaptable, protected living. Seeing as Magellan
blends beautifully with any decor, install it anywhere in your home or small business. Not only an alarm
system, use your MG6250 to leave messages as an alarm clock, telephone, monitoring device, and much
more.
About this Manual
This manual provides information on how to operate your MG6250 alarm system. It includes definitions of
commonly-used terms, illustrative descriptions of the different keypads and remote controls compatible with
your MG6250 system, and detailed descriptions of the various alarms and trouble messages associated with
your system. This manual also contains a thorough table of contents and index, allowing you to easily search
for and find pertinent information regarding your system.
Document Conventions
The following typographical conventions are used throughout this manual:
Type
Description
Note
Notes will appear in blue typeface: e.g., NOTE: Includes relevant information on the topic, general
reminders, or suggestions on how to perform a specific action.
WARNING
Warnings will appear in bold typeface: e.g., WARNING: Important information
How to Use this Manual
This manual employs step-by-step instructions to explain the procedures required to use the MG6250’s most
common system features. When reading the instructions shown in this guide, you should also be following
what is displayed on your console’s LCD screen.
MG6250 Console • User Guide
Chapter 1 - Introduction | 7
Chapter 2- Getting Started
1
This chapter introduces you to the MG6250 console and helps you get acquainted with the products used in
conjunction with your alarm system. Also, this chapter provides a quick-reference guide to the most common
user-related tasks.
Your MG6250 System
Your MG6250 alarm system provides burglary protection for your residential or commercial establishment.
Monitoring is performed through various interior and exterior contact and motion sensors. Emergency
protection, such as fire, police, and medical emergencies may also be provided by your system.
As an end user, it is important to familiarize yourself with your MG6250 system. Your MG6250 alarm system
may consist of the following devices:
•
An MG6250 console
•
One or more secondary keypads to operate and control your system
•
Various sensors and detectors, installed on your doors, windows, ceilings, and walls
8 | Chapter 2- Getting Started
MG6250 Console • User Guide
MG6250 Console at a Glance
The following provides you with an overview of your console. For detailed information on the functions of
your console, refer to the function’s respective chapter.
Figure 1: MG6250 console
Speakerphone
Partition 1& 2
status LEDs
LCD screen
Up and down scroll arrows
One-touch keys
Menu action keys
Power LED
Main keypad
Number keys 0 to 9
Communication STAYD LED
Status LEDs
MG6250 Console • User Guide
Chapter 2- Getting Started | 9
MG6250 LCD Screen
The 32-character LCD screen provides visual aids for alarm settings, system information, system troubles, and
more. The following screen illustrates several types of symbols that you may encounter.
Figure 2: MG6250 LCD screen
Alarm clock feature enabled
Information symbol can indicate:
- There is a trouble in the system
- There is an alarm in memory
- Zones or a zone is currently bypassed
Instructions and/or messages appear here.
System Ready
menu
Press the action key to access the function
described directly above.
MG6250 Keypad
Use the keypad to enter user codes or required data, as well select desired menus.
Figure 3: MG6250 keypad
Main keypad
(digits 0-9)
Panic keys
Sends an alarm to your
monitoring station
requesting help from the
police, medical facility, or fire
department.
10 | Chapter 2- Getting Started
Phone key
Press once to make a telephone call or
answer an incoming call. Press again to
hang up.
MG6250 Console • User Guide
MG6250 Status LEDs
The following table provides a description of the MG6250’s LED functionality.
Figure 4: MG6250 LEDs
Partition 1 status LEDs
Partition 2 status LEDs
LED Type
OFF
STAY
SLEEP
ARM
AC POWER
SIM1
IP
MG6250 Console • User Guide
Description
Orange: System is armed
Green: Stay arm is activated
Orange: Sleep arm is activated
Red: System is armed
Orange: AC power is present
Blue: SIM card in use by GPRS14 module
Flashing: Communicating
OFF: Network not detected
Blue: IP reporting device is functional and connected to the console
SIM2
Blue: SIM card in use by GPRS14 module
Flashing: Communicating
OFF: Network not detected
STAYD
Green: System is armed in StayD mode
Chapter 2- Getting Started | 11
Remote Controls at a Glance
The remotes shown in figure 5 are those which are available with your MG6250 alarm system. For detailed
information on each of these remotes, refer to the remote’s user documentation. Your installer can add other
functions and/or change the default settings of your remote controls. Your remote control has been
programmed with the following features by default.
Figure 5: Compatible Remote Controls
= Full arm
= Full arm
= Disarm
= Stay arm
= Stay arm
= Sleep arm
= Sleep arm
REM1/RAC1
= Disarm
= Request feedback from the Magellan
system
= Full arm
= Unlock remote
= Stay arm
[SLP]= Sleep arm
= Sleep arm
[STAY]= Stay arm
12 | Chapter 2- Getting Started
[OFF]= Disarm
= Emergency/ Panic
= Disarm
[ARM]= Full arm
REM3
REM2/RAC2
REM15
REM101
MG6250 Console • User Guide
Secondary Keypads at a Glance
The K32RF and K37 keypads shown in figure 6 are compatible with your MG6250 alarm system. For detailed
information on the keypad functions, refer to the keypad’s user documentation.
Figure 6: Compatible keypads
K32RF
MG6250 Console • User Guide
K37
Chapter 2- Getting Started | 13
Chapter 3 - Arming and Disarming
1
This chapter describes the different methods of arming and disarming your MG6250 system.
In this chapter we will cover:
•
How to arm your system (see Arming the System on page 15)
•
How to bypass zones (see Bypassing Zones on page 19)
•
How to disarm your system (see Disarming an Armed System on page 20)
•
Viewing alarms in memory (see Alarm Memory Display on page 22)
14 | Chapter 3 - Arming and Disarming
MG6250 Console • User Guide
Arming the System
There are three different methods of arming your system: Regular arming, Stay arming, and Sleep arming.
Your choice of arming level will depend on whether you are leaving the premises, or staying in for the
evening.
Exit Delay Timer
When you arm your system, it will trigger the exit delay timer to provide you with enough time to exit the
protected area before your system is armed. The exit delay value can range from 1 to 255 seconds, inclusive the default value is 60 seconds. For more information on configuring exit delays, refer to Chapter 5 - System
Setup on page 35.
NOTE: Only a system master code can be used to program the exit delay timer.
Arming Types
The following section describes the procedures for the different arming methods that are available.
Regular Arm
This method is used for the everyday arming of your system when you leave the premises. All defined zones
in the system must be closed to regular arm the system.
To regular arm your system:
1.
Press the
2.
Enter your user code (default: 1234). The
MG6250 Console • User Guide
key.
LED will turn red indicating that the system has been armed.
Chapter 3 - Arming and Disarming | 15
Stay Arming
Stay arming will partially arm your system to permit you to remain in your home by arming the outer zones of
your system (e.g. doors and windows) and ignoring interior zones (e.g. motion detectors). All defined zones in
the system must be closed in order to stay arm the system.
To stay arm your system:
1.
Press the
2.
Enter your user code (default: 1234). The
STAY armed.
3.
If you have access to both partitions: Press the key corresponding to the desired partition (1 or 2). For
both partitions, press the other key after the confirmation beep.
key.
LED will turn green, indicating that the system has been
NOTE: The LCD screen will also display STAY in the top-right corner of the screen.
16 | Chapter 3 - Arming and Disarming
MG6250 Console • User Guide
Sleep Arming
Similar to Stay arming, Sleep arming allows users to remain in a protected area, but provides a higher level of
protection. For example, in a two-story house, the perimeter is protected with Stay arming. With Sleep
arming the perimeter as well as the main floor are protected (motion detectors, etc.), allowing you to roam
the second floor and sleeping quarters. Sleep zones are zones that are bypassed when sleep arming. For
example, when you go to sleep, the entire premises except your bedroom are fully armed. As a result, any
armed zone that is breached will immediately generate an alarm.
To Sleep arm your system:
1.
Press the
key.
2.
Enter your user code (default: 1234). The
sleep armed.
3.
If you have access to both partitions: Press the key corresponding to the desired partition (1 or 2). For
both partitions, press the other key after the confirmation beep.
LED will turn orange, indicating that the system has been
NOTE: The LCD screen will also display SLEEP in the top-right corner of the screen.
StayD Arming
StayD simplifies your life and makes it safer by protecting you 24 hours a day, 7 days a week without ever
having to disarm the system - even when entering an armed area. StayD lives with you and protects you at all
time, without any unprotected periods, and automatically re-arms the system for you.
MG6250 Console • User Guide
Chapter 3 - Arming and Disarming | 17
When entering/exiting a site, the system partly disarms to let you pass through. Simply notify the system with
your remote and go through the designated path which will automatically re-arm after you pass; all other
zones remain armed. The result is a system that is always protecting, without the uncertainty of whether the
system is armed or not.
Other benefits of StayD include knowing when your kids are accessing potentially dangerous areas, such as
the balcony, pool, or front door. With StayD, you can truly have peace of mind knowing that you are always
protected.
To arm your system in StayD mode:
1.
Press the
key.
2.
Enter your user code (default: 1234).
3.
Press the key. The and StayD LEDs will turn green, indicating that the StayD has been activated and
that the system is armed with StayD.
Force Arming
Force arming ignores open zones allowing you to arm your system. Once the zone closes, the system will
then arm that zone as well. This feature is useful when a motion detector is protecting the area where your
MG6250 console is located. During Force arming, the motion detector will remain unarmed until you exit the
area, after which the system will arm the motion detector as well. By default, your system is programmed
with this feature. You can also Force arm your system using your remote control.
NOTE: Force arming is not permitted in UL installations. To find out if your system is installed under UL
requirements, contact your service provider.
18 | Chapter 3 - Arming and Disarming
MG6250 Console • User Guide
Bypassing Zones
Bypassing a zone allows you to ignore (deactivate) specified zones the next time the system is armed. You
can bypass certain zones when you arm the system. When a zone is bypassed, it will be ignored the next time
you arm the system. Once the system is disarmed, they system will unbypass the zone. Zones that can be
bypassed are defined by your installer. For more information on how to bypass zones, refer to section
Bypassing Zones on page 25.
NOTE: Fire zones cannot be bypassed. For more information on fire zones, refer to Fire Alarms on page 57.
Auto-Arming
You can set the time that the system will arm itself automatically. There are two methods of auto-arming,
they include timed auto-arming and no movement auto-arming.
NOTE: Auto-arming is not permitted in UL installation. To find out if your system is installed under UL
requirements, contact your service provider.
Timed Auto-Arming
Your installer can set the timed auto-arming method to function in either Regular or Stay arming modes. A
60-second exit delay sequence will begin prior to your system automatically arming itself at the programmed
time. Contact your installer for more information.
MG6250 Console • User Guide
Chapter 3 - Arming and Disarming | 19
No Movement Auto-Arming
Your system can be programmed to send a report to your monitoring station and arm the system if there is
no activity, during a specified period of time. Your installer can set no movement auto-arming to function in
either Regular or Stay arming modes. Talk to your installer for more information.
Disarming
When your system is disarmed, it deactivates any alarms in progress as well as zones, therefore, an alarm will
not be triggered if zones are breached.
Entry Delay Timer
Your installer will program designated entry points (e.g., the front door) with an Entry Delay timer. This delay
gives you time to enter the armed premises and enter your user code to disarm your system before the alarm
is triggered. Up to two entry delay timers can be programmed in your MG6250 console. For more information
on how to program the entry delay timer, refer to Chapter 5 - System Setup on page 35.
NOTE: UL installations require a maximum entry delay of 45 seconds. To find out if your system is installed
under UL requirements, contact your service provider.
Disarming an Armed System
When an entry point, like the front door, is opened, the MG6250 console will produce a sound indicating that
the system has started the entry delay timer. If a valid user code is entered before the entry delay elapses,
your system will disarm and will not generate an alarm.
20 | Chapter 3 - Arming and Disarming
MG6250 Console • User Guide
To disarm an armed system:
1.
Enter designated entry point.
2.
Enter your user code (default: 1234). Once a valid user code has been entered, the
indicating that the system has been disarmed.
LED will turn orange
Disarming a System in Alarm
To disarm a system in alarm:
1.
Press the
key.
2.
Enter your user code (default: 1234). Once a valid user code has been entered, the LED will turn orange
indicating that the system has been disarmed. After the system has been in alarm the symbol will be
displayed on the console’s LCD screen. For more information on viewing alarm messages, refer to section
Alarm Memory Display on page 22.
WARNING: In case of a burglar alarm, leave the premises immediately and call the police from a safe
location (e.g., a neighbor’s house).
MG6250 Console • User Guide
Chapter 3 - Arming and Disarming | 21
Alarm Memory Display
When an alarm has occurred on your system, the MG6250 console will store that alarm in its alarm memory.
All zones where alarms have occurred will also be stored in the alarm memory. The MG6250 console will
indicate that there is an alarm in memory by displaying the information symbol (see page 10) on the
console’s LCD screen. Alarm messages can be viewed through the alarm memory menu, or by pressing the
menu action key. For more information on viewing alarms through the alarm memory menu, refer to section
Alarm Memory Display, on page 22.
To view alarms via the
menu action key:
1.
Press the
menu action key.
2.
Press the up and down scroll keys to scroll through the list of alarm
messages. Once the alarm messages have been viewed, select the exit
key.
Area 1
Verify
menu
Zone 02 in alarm
Area 1
NOTE: Once the alarm has been viewed using this method, the alarms will be cleared and the will be
removed from the display. You can still view the alarm messages via the Alarm Memory menu. For more
information refer to Alarm Memory Display on page 22.
22 | Chapter 3 - Arming and Disarming
MG6250 Console • User Guide
Viewing Alarms Through the Memory Display
After an alarm has occurred, alarm related information will be stored in the alarm memory menu. Up to 256
alarm and console related messages are stored in the menu.
To view alarms through the alarm memory display:
1.
Press the menu key.
Area 1
2.
Select 05-Alarm Memory or press 05. Press ok to view alarm messages
in memory.
05-ALARM MEMORY
next
ok
exit
3.
Press the next or prev key the scroll keys to switch between alarm
messages. Once done, select the exit key.
Zone 02 in alarm
Area 1
MG6250 Console • User Guide
Verify
menu
Chapter 3 - Arming and Disarming | 23
Chapter 4 - User Features
1
This chapter introduces you to various user features that will allow you to customize the system to best suit
your needs.
In this chapter we will cover:
•
How to bypass zones (see Bypassing Zones on page 25)
•
Using the message center (see Using the Message Center on page 26)
•
Setting the alarm clock (see Setting the Alarm Clock on page 29)
•
Speakerphone options (see Speakerphone on page 30)
•
Viewing alarms in memory (see Viewing the Alarm Memory on page 32)
•
Viewing the history log (see Viewing the History Log on page 33)
•
Performing a system test (see Performing a System Test on page 34)
24 | Chapter 4 - User Features
MG6250 Console • User Guide
Bypassing Zones
Bypassing a zone allows you to ignore (deactivate) specified zones the next time the system is armed. You
can bypass certain zones when you arm the system. When a zone is bypassed, it will be ignored the next time
you arm the system. Once the system is disarmed, the system will “unbypass” the zone. Zones that can be
bypassed are defined by your installer.
NOTE: Fire zones cannot be bypassed. For more information on fire zones, refer to Fire Alarms on page 57.
To bypass a zone:
1.
Press the menu key.
System Ready
menu
2.
Select 01-BYPASS ZONES, then press ok.
01-BYPASS ZONES
ok
next
exit
3.
Zones that are already bypassed are displayed first, followed by the rest of the
zones. Scroll through the zones and use the left menu key to bypass or
unbypass zones.
Zone 01 BYPASS
unbyp next back
4.
Press exit to return to the previous menu.
End of List
next
MG6250 Console • User Guide
exit
Chapter 4 - User Features | 25
Using the Message Center
The MG6250 comes with a message center that allows you to record a voice message that can be played at a
later time. This message center is useful when you need to leave a message for another member of your
family or even for yourself.
NOTE: The system will notify you if there is a message waiting by
displaying msg on the home screen.
Message
waiting
System Ready
msg
menu
Recording a Message
To record a message:
1.
Press the menu key.
System Ready
menu
2.
Select 2-MESSAGE CENTER, then press ok.
2-MESSAGE CENTER
ok
next
exit
3.
Scroll down to the Record Message menu. To begin recording your message,
press ok and follow the on-screen instructions.
Record Message
ok
next back
4.
When you finish recording your message, the system advances to the Play
Message menu, where you can listen to the message you recorded.
Play Message
ok
next back
26 | Chapter 4 - User Features
MG6250 Console • User Guide
5.
Press exit to return to the previous menu.
2-MESSAGE CENTER
ok
next
exit
Playing a Message
To play a message:
1.
Press the menu key.
System Ready
menu
2.
Select 2-MESSAGE CENTER, then press ok.
2-MESSAGE CENTER
ok
next
exit
3.
From the Play Message menu, press ok.
Play Message
ok
next back
4.
The system plays the message and displays the time and date the message
was recorded.
Left on:
09:15AM
Press exit to return to the previous menu.
2-MESSAGE CENTER
ok
next
exit
5.
MG6250 Console • User Guide
20-Dec
Chapter 4 - User Features | 27
Erasing a Message
To erase a message:
1.
Press the menu key.
System Ready
menu
2.
Select 2-MESSAGE CENTER, then press ok.
2-MESSAGE CENTER
ok
next
exit
3.
From the Erase Message menu, press ok to erase the existing message.
Erase Message
ok
next back
4.
Press exit to return to the previous menu.
2-MESSAGE CENTER
ok
next
exit
28 | Chapter 4 - User Features
MG6250 Console • User Guide
Setting the Alarm Clock
You can also use the MG6250 system as an alarm clock. At the programmed time,
the system will begin to play a selected tune. When the alarm clock is enabled, the
bell symbol will appear in the upper left corner of the screen.
To set the alarm clock:
System Ready
menu
Alarm clock
enabled
1.
Press the menu key.
System Ready
menu
2.
Select 03-ALARM CLOCK, then press ok.
03-ALARM CLOCK
ok
next
exit
3.
Pressing the left key will toggle the alarm clock between ON and OFF. To
continue, press next.
Alarm Clock: off
on
next back
4.
Set the time for the alarm. Select AM or PM using the middle key, then press
ok.
Time: 12:00 PM
ok
AM
back
5.
Use the scroll keys to select the tune or beep that will be played. To exit, press
ok.
Tone: Tonality 1
ok
next
back
MG6250 Console • User Guide
Chapter 4 - User Features | 29
Speakerphone
The MG6250 is equipped with a feature that transforms the console into a speakerphone. Dial the desired
telephone number and talk as you would on a normal telephone. You can also configure the ring tone and
volume for incoming calls.
Making a Telephone call Using the Console
1.
Press the
2.
Dial the telephone number.
3.
Press the
key.
key to disconnect, once the conversation is completed.
Answering an Incoming Call
1.
Press the
key.
2.
Press the
key to disconnect, once the conversation is completed.
NOTE: Refer to Chapter 5 - System Setup on page 35 for more information on setting the ring tone, volume,
and the system’s time and date.
30 | Chapter 4 - User Features
MG6250 Console • User Guide
Setting Chime Zones
You can program the system to emit a beep whenever designated zones are opened. These zones are
referred to as chime zones.
To set chime zones:
1.
Press the menu key.
System Ready
menu
2.
Select 04-CHIME ZONE, then press ok.
04-CHIME ZONE
ok
next
exit
3.
Select the zone you would like to modify, then press edit.
Zone 01
chime
edit
next back
4.
Select the tone that will play when the zone opens, the press ok.
Tone:
Tonality 1
ok
next back
5.
Press back to return to the previous menu.
Zone 01
chime
edit
next back
MG6250 Console • User Guide
Chapter 4 - User Features | 31
Viewing the Alarm Memory
When an alarm occurs in your system, the MG6250 will store the alarm event information in its alarm
memory. The system will notify you if there is a alarm in memory by displaying on the home screen.
The system will erase the contents of the alarm memory every time the
system is armed.
Alarm
memory
System Ready
menu
To view the alarm memory:
1.
Press the menu key.
Alternatively, you can press the left
key and proceed to step 3.
System Ready
menu
2.
Select 05-ALARM MEMORY, then press ok.
05-ALARM MEMORY
ok
next
exit
3.
The display cycles through information on the most recent alarm in memory.
Use the prev and next keys to view other alarm events.
03:25PM
20-Dec
prev next exit
4.
Press exit to return to the previous menu.
03:25PM
20-Dec
prev next exit
32 | Chapter 4 - User Features
MG6250 Console • User Guide
Viewing the History Log
The history log allows you to view a list of events that have recently occurred in the system.
To view the history log:
1.
Press the menu key.
System Ready
menu
2.
Select 06-HISTORY LOG, then press ok.
06-HISTORY LOG
ok
next
exit
3.
The display cycles through information starting from the most recent events in
memory. Use the prev and next keys to scroll through system events.
03:25PM
20-Dec
prev next exit
4.
Press exit to return to the previous menu.
03:25PM
20-Dec
prev next exit
MG6250 Console • User Guide
Chapter 4 - User Features | 33
Performing a System Test
The System Test option allows you to run diagnostics on certain system features. System test that can be
performed include signal strength, reporting, zones, remotes, and hardware. If a trouble is detected during a
system test, contact your installer to resolve the issue.
WARNING: When the system hardware is tested, the speaker and sirens will also be tested. Do not be in
close proximity to the MG6250 when performing the hardware test to avoid any damage to your
hearing.
To access the System Test menu:
1.
Press the menu key.
System Ready
menu
2.
Select 07-SYSTEM TEST, then press ok.
07-SYSTEM TEST
ok
next
exit
3.
Enter your master code (default: 1234).
Enter a Code
back
4.
Select the system test you would like to run, then press ok. Follow the onscreen testing instructions.
34 | Chapter 4 - User Features
Signal Strength?
ok
next exit
MG6250 Console • User Guide
Chapter 5 - System Setup
1
This chapter covers advanced system settings. The MG6250 settings menu (08-SYSTEM SETUP) was designed
to be extremely user-friendly. This section will give you the information that you require in order to easily
manage your system.
In this chapter we will cover:
•
Managing users (see Managing Users on page 36)
•
Lost remotes (see Lost Remote on page 38)
•
Communicator settings (see Communicator Settings on page 39)
•
Setting the time and date (see Setting the Time and Date on page 43)
•
Changing delays and tones (see Setting Delays and Tones on page 44)
•
Auto-arming (see Auto-arming on page 48)
•
Changing labels (see Changing labels on page 49)
•
Changing the language (see Setting the Language on page 51)
•
Display settings (see Changing LCD Screen Settings on page 52)
•
Setting the telephone ringer (see Ring Setup on page 53)
•
System version number (see Viewing MG6250 Version Numbers on page 55)
•
System demo (see Demo Mode on page 56)
MG6250 Console • User Guide
Chapter 5 - System Setup | 35
Managing Users
The following user types can be programmed into the system:
System Master The system master code will give you access to all of the features available on your system as well as
(default: 1234) the ability to add, modify, or delete users.
Of the 16 possible user codes, the system master code occupies position 01.
Users
Regular users in the system can arm and disarm only the areas to which they are assigned. Of the 16
possible user codes, regular users occupy positions 02 to 16.
Adding or Modifying a User
To add a new user to the system, or to modify an existing user:
1.
Press the menu key.
System Ready
menu
2.
Select 08-SYSTEM SETUP, then press ok.
08-SYSTEM SETUP
ok
next
exit
3.
Enter your master code (default: 1234).
36 | Chapter 5 - System Setup
Enter a Code
back
MG6250 Console • User Guide
4.
To enter the Users menu, press ok.
01-Users
ok
next
exit
5.
To modify the master code, press ok and continue to step 7. To continue to
user codes, press next.
Modify Master
ok
next
exit
6.
Scroll through the 16 available users. To select a user press ok.
Add User 02
ok
next
exit
Code:[****]
ok
clear
back
7.
Enter a user code and press ok. Each digit can be any value from 0 to 9.
8.
A voice tag allows you to record a short audio clip of the user’s name. To record
a voice tag, press ok, and follow the on-screen instructions.
Modify Voice Tag
ok
next
back
9.
Press ok to enter the user’s name. When finished, press ok.
Modify Text Name
ok
next
back
10. To program a remote, press ok, and follow the on-screen instructions. Press
ok.
MG6250 Console • User Guide
Program Remote?
ok
next
back
Chapter 5 - System Setup | 37
11. If your system is divided into areas, you will be given the option to assign the
user to an area, press edit. To program another user, press yes. To exit, press
no.
Another
Select Area?
User?
no
edit yes
next
back
Lost Remote
If you have lost a remote and would like to delete it from the system, the menu will guide you through the
process by verifying each remaining remote and eliminating any lost remotes.
To delete a lost remote:
1.
Press the menu key.
2.
Select 08-SYSTEM SETUP, then press ok.
3.
Enter your master code (default: 1234).
4.
Scroll through the options and select 02-Lost Remote, press ok.
38 | Chapter 5 - System Setup
System Ready
menu
08-SYSTEM SETUP
ok
next
exit
Enter a Code
back
02-Lost Remote
ok
next
exit
MG6250 Console • User Guide
5.
Collect all of the remaining remotes. Press ok.
Get All Remotes
ok
back
6.
Press a key on each of the remotes.
Press All Remote
finish
back
7.
Any remotes that have not been confirmed can now be deleted. Press yes to
delete.
Del Remaining?
yes no
back
Communicator Settings
In addition to the system contacting the monitoring station to report alarms, you can also program the
system to call up to eight telephone numbers. You can also select which system events will trigger a call to
which telephone numbers. When a telephone number is contacted, the system will play a voice message to
inform you of the system status.
To program a telephone number for system event reporting:
1.
Press the menu key.
2.
Select 08-SYSTEM SETUP, then press ok.
MG6250 Console • User Guide
System Ready
menu
08-SYSTEM SETUP
ok
next
exit
Chapter 5 - System Setup | 39
3.
Enter your master code (default: 1234).
4.
Scroll through the options and select 03-Communicator, then press ok.
03-Communicator
ok
next
exit
5.
To view and manage telephone numbers, press ok.
User Call List
ok
next
back
6.
Select the number you would like to modify, then press ok.
Add Tel #1?
ok
next
Enter a Code
back
back
7.
Enter a telephone number, then press ok. Pressing pause inserts a four second
pause before the rest of the number is dialled.
Tel#1 5555555555
ok
pause back
8.
Select whether or not you would like the system to place a voice call to the
number to report system events. Pressing the left key will toggle the selection
between yes and no. To continue, press next.
Voice Call?
no
next
40 | Chapter 5 - System Setup
yes
back
MG6250 Console • User Guide
9.
If your system includes a GPRS module, you will be given the option to send an
SMS text message to report system events. Pressing the left key will toggle the
selection between yes and no. To continue, press next.
Send SMS?
no
next
yes
back
NOTE: To make a change to the settings in the following options, press edit.
Pressing the left key will then toggle the selection between yes and no.
10. Select the area(s) that will an send alarm notification to the telephone number.
Press edit to modify; press next to continue.
Select Area?
1
edit next
back
11. Select whether you want the system to call the telephone number if a zone
goes into alarm. If you select edit, you will be given options to select which
zones will generate a call. Press next to continue to the next option.
Zone Alarm:
edit next
yes
back
All Zones?
yes
no
back
Panics?
edit next
yes
back
12. Select whether you want the system to call the telephone number if a panic
alarm is triggered. Press edit to modify; press next to continue.
MG6250 Console • User Guide
Chapter 5 - System Setup | 41
13. Select whether you want the system to call the telephone number if the area to
which it is assigned is disarmed. If you select edit, you will be given options to
select which users will generate a call. Press next to continue to the next
option.
Disarming?
edit next
yes
back
14. Select whether you want the system to call the telephone number if a trouble
occurs in the system. Press edit to modify; press next to continue.
Trouble?
edit next
yes
back
15. Press next to repeat the list. Press exit to return to the previous menu.
End of List
next
exit
42 | Chapter 5 - System Setup
MG6250 Console • User Guide
Setting the Time and Date
To set the time and date:
1.
Press the menu key.
2.
Select 08-SYSTEM SETUP, then press ok.
3.
Enter your master code (default: 1234).
4.
Scroll through the options and select 04-Time and Date, then press ok.
04-Time and Date
ok
next
exit
5.
Select 12 or 24-hour time format.
Time Format?
12hrs 24hrs
6.
Set the time, then press ok.
Time: 12:00 PM
ok
AM
back
7.
Set the year, month and day. Press ok to return to the previous menu.
Y:2010 M:12
ok
MG6250 Console • User Guide
System Ready
menu
08-SYSTEM SETUP
ok
next
exit
Enter a Code
back
D:14
back
Chapter 5 - System Setup | 43
Setting Delays and Tones
This setting allows you to change the duration of the exit delay as well as the tune/beep that is played during
the exit delay.
To set the exit delay and tone:
1.
Press the menu key.
2.
Select 08-SYSTEM SETUP, then press ok.
3.
Enter your master code (default: 1234).
4.
Scroll through the options and select 05-Delays&Tones, then press ok.
05-Delays & Tones
ok
next
exit
5.
To modify entry delay 1, press ok.
Entry Delay 1?
ok
next
back
6.
Set the entry delay 1 time between 0 and 255 seconds, then press ok.
Delay: [045] sec
ok
clear back
44 | Chapter 5 - System Setup
System Ready
menu
08-SYSTEM SETUP
ok
next
exit
Enter a Code
back
MG6250 Console • User Guide
7.
Select the tone or beep for the entry delay 1, then press ok.
Tone: Tonality 1
ok
next
back
8.
To modify entry delay 2, press ok.
Entry Delay 2?
ok
next
exit
9.
Set the entry delay 2 time between 0 and 255 seconds, then press ok.
Delay: [045] sec
ok
clear back
10. Select the tone or beep for the entry delay 2, then press ok.
Tone: Tonality 1
ok
next
back
11. To modify the exit delay, press ok.
Exit Delay?
ok
next
back
Area 1
ok
next
back
12. To modify the area 1 exit delay, press ok.
13. Set the area 1 exit delay time between 0 and 255 seconds, then press ok.
Delay: [045] sec
ok
clear back
14. Select the tone or beep for the area 1 exit delay, then press ok.
Tone: Tonality 1
ok
next
back
MG6250 Console • User Guide
Chapter 5 - System Setup | 45
15. If your system is divided into areas, you will be given the option to modify the
area 2 exit delay, press ok.
Area 2
ok
next
16. Set the area 2 exit delay time between 0 and 255 seconds, then press ok.
Delay: [045] sec
ok
clear back
17. Select the tone or beep for the area 2 exit delay, then press ok.
Tone: Tonality 1
ok
next
back
18. After an audible alarm, the built-in siren will stop upon the disarming of the
system or when the Bell Cut-off Timer has elapsed, whichever comes first. To
modify the bell cutoff delay, press ok.
Bell Cutoff Del?
ok
next
back
19. To modify the area 1 bell cutoff delay, press ok.
Area 1
ok
next
back
back
20. Set the area 1 bell cutoff delay time between 0 and 255 minutes, then press ok.
Delay: [004] min
ok
clear back
21. If your system is divided into areas, you will be given the option to modify the
area 2 bell cutoff delay, press ok.
Area 2
ok
next
46 | Chapter 5 - System Setup
back
MG6250 Console • User Guide
22. Set the area 2 bell cutoff delay time between 0 and 255 minutes, then press ok.
Delay: [004] min
ok
clear back
23. When this feature is enabled, the siren will squawk when you arm/disarm the
system. To enable or disable the bell squawk feature, press ok. Press next to
return to the previous menu.
Bell Squawk?
ok
next
back
24. To modify the pre-alarm delay, press ok.
Pre-Alarm Delay?
ok
next
back
25. Set the pre-alarm delay time between 0 and 255 minutes, then press ok.
Delay: [045] sec
ok
clear back
MG6250 Console • User Guide
Chapter 5 - System Setup | 47
Auto-arming
If you sometimes forget to arm the system before going to bed or before leaving for work, you can configure
the system to auto-arm at certain times during the day.
To configure auto-arm settings:
1.
Press the menu key.
2.
Select 08-SYSTEM SETUP, then press ok.
3.
Enter your master code (default: 1234).
4.
Scroll through the options and select 06-Auto Arming, then press ok.
06-Auto Arming
ok
next
back
5.
To select which area to arm, press next. To modify, press ok.
Area 1?
ok
next
6.
To select the arming level, press next. To modify, press ok.
48 | Chapter 5 - System Setup
System Ready
menu
08-SYSTEM SETUP
ok
next
exit
Enter a Code
back
exit
Auto Arm Full
ok
next
back
MG6250 Console • User Guide
7.
Set the time, and select AM/PM using the next key, then press ok to return to
the previous menu.
Time: 12:00 PM
ok
AM
back
Changing labels
You can label most of the components in the system with a text name as well as a short audio voice tag.
To add or modify text labels and audio tags:
1.
Press the menu key.
2.
Select 08-SYSTEM SETUP, then press ok.
3.
Enter your master code (default: 1234).
4.
Scroll through the options and select 07-Change Label, then press ok.
07-Change Label
ok
next
back
5.
To program zone labels, press ok.
Zones
ok
next
MG6250 Console • User Guide
System Ready
menu
08-SYSTEM SETUP
ok
next
exit
Enter a Code
back
back
Chapter 5 - System Setup | 49
6.
Select the zone you would like to modify, then press ok.
Modify Zone 1
ok
next
exit
7.
To modify the voice tag, press ok. Follow the on-screen instructions to record.
Modify Voice Tag
ok
next
back
8.
To modify the text name, press ok.
Modify Text Name
ok
next
back
9.
After confirming the text name, the system advances to the next zone.
Pressing no when the system prompts Another Zone will return you to the
previous menu where you can select the next label group to modify.
The following label groups can be modified with the same procedure as
described for zone labels: areas, outputs, keypads, repeaters, sirens, doorbells.
Another Zone?
no
yes
50 | Chapter 5 - System Setup
MG6250 Console • User Guide
Setting the Language
When a new language is selected, the change will be applied to all text prompts and voice prompts in the
system. Text labels will be unaffected and must be changed manually (see Changing labels on page 49).
To set a new language:
1.
Press the menu key.
2.
Select 08-SYSTEM SETUP, then press ok.
3.
Enter your master code (default: 1234).
4.
Scroll through the options and select 08-Language, then press ok.
08-Language
ok
next
back
5.
Select a new language, then press ok. The system returns to the previous
menu.
English
ok
next
MG6250 Console • User Guide
System Ready
menu
08-SYSTEM SETUP
ok
next
exit
Enter a Code
back
back
Chapter 5 - System Setup | 51
Changing LCD Screen Settings
You can manually change the contrast and brightness of the LCD display.
To change the LCD display settings:
1.
Press the menu key.
2.
Select 08-SYSTEM SETUP, then press ok.
3.
Enter your master code (default: 1234).
4.
Scroll through the options and select 09-LCD Display, then press ok.
09-LCD Display
ok
next
back
5.
To change the screen contrast, press ok.
Contrast Adj.
ok
next
exit
6.
Adjust the setting, then press ok.
Contrast Adj.
ok
+
52 | Chapter 5 - System Setup
System Ready
menu
08-SYSTEM SETUP
ok
next
exit
Enter a Code
back
MG6250 Console • User Guide
7.
To change the screen brightness, press ok.
Brightness Adj.
ok
next
back
8.
Adjust the setting, then press ok.
Brightness Adj.
ok
+
Ring Setup
The MG5260 includes a built-in telephone. The ring setup menu allows you to modify the ring tone and
volume, as well as the ring count.
To change the ring settings:
1.
Press the menu key.
2.
Select 08-SYSTEM SETUP, then press ok.
3.
Enter your master code (default: 1234).
4.
Scroll through the options and select 10-Tel. Ring, then press ok.
MG6250 Console • User Guide
System Ready
menu
08-SYSTEM SETUP
ok
next
exit
Enter a Code
back
10-Tel. Ring
ok
next
back
Chapter 5 - System Setup | 53
5.
To change the ring tone, press ok.
Ring Tone?
ok
next
back
6.
Select a new ring tone, then press ok.
Tone: Tonality 1
ok
next
back
7.
To adjust the ring volume, press ok.
Ring Volume?
ok
next
back
8.
Adjust the ring volume, then press ok.
Ring Volume
ok
-
+
Ring Count?
ok
next
back
Ring: [008]
ok
clear
back
9.
To change the ring count, press ok.
10. Enter a ring count between 1 and 255. Press ok to return to the previous menu.
54 | Chapter 5 - System Setup
MG6250 Console • User Guide
Viewing MG6250 Version Numbers
During a technical support call, the technician may need to know what software versions the system is
running.
To view your console’s version numbers:
1.
Press the menu key.
2.
Select 08-SYSTEM SETUP, then press ok.
3.
Enter your master code (default: 1234).
4.
Scroll through the options and select 11-Version Num., then press ok.
11-Version Number
ok
next
exit
5.
To scroll through current software versions (FW, RF, S/N, HW, and ECO), press
next. Press exit to return to the previous menu.
Ver. Main 00.00
next
exit
MG6250 Console • User Guide
System Ready
menu
08-SYSTEM SETUP
ok
next
exit
Enter a Code
back
Chapter 5 - System Setup | 55
Demo Mode
Use this demo mode to preview the MG6250 features. After entering demo mode, the system will begin
displaying its features by flashing its lights, playing tones, etc.
WARNING: When in Demo mode, the MG6250 console’s speaker and siren will also be played. Do not
stay in close proximity to the console to avoid damaging your hearing.
To access demo mode:
1.
Press the menu key.
2.
Select 08-SYSTEM SETUP, then press ok.
3.
Enter your master code (default: 1234).
4.
Scroll through the options and select 12-Demo Mode. To start the demo, press
ok.
56 | Chapter 5 - System Setup
System Ready
menu
08-SYSTEM SETUP
ok
next
exit
Enter a Code
back
12-Demo Mode
ok
next
exit
MG6250 Console • User Guide
Chapter 6 - Fire and Panic Alarms
1
This chapter describes what to do during a fire alarm, fire safety tips, and panic alarms.
Fire Alarms
For complete coverage in residential units, smoke detectors should be installed in the following locations:
•
In any hallway outside bedroom areas. Additional detectors should be installed for every bedroom area
as shown in Figure 7.
•
On every floor of a multi-floor home or apartment.
•
At both ends of a bedroom hallway if the hallway is more than 12m (40ft) long.
•
At the bottom of a basement stairwell.
•
At the top of the first to second floor stairwell and subsequent stairwells in multi-floored residential
units.
MG6250 Console • User Guide
Chapter 6 - Fire and Panic Alarms | 57
Figure 7: Single Residence with One or Two Sleeping Areas
One Sleeping Area
Dining Room
Kitchen
Bedroom Bedroom
Two Sleeping Areas
Family
Room
Kitchen
Kitchen
Bedroom
Bedroom
Bedroom
Bedroom
Living Room
Living Room
Sleeping
area
Bedroom
Living Room
Bedroom
= Smoke detectors for minimum security.
= Smoke detectors for additional security.
NOTE: Smoke detectors should be installed as close
to the center of the ceiling as possible.
Bedroom
Bedroom
Sleeping
areas
Standard Fire Zones
During a fire alarm, the siren emits an intermittent sound (BEEP-BEEP-BEEP) until silenced or reset. If the zone is
a standard fire zone, your system can immediately send an alert to your monitoring station.
To disarm a false alarm:
1.
Press the
2.
Enter your user code (default: 1234).
key.
WARNING: Call your monitoring station quickly to advise them of the false alarm.
58 | Chapter 6 - Fire and Panic Alarms
MG6250 Console • User Guide
Delayed Fire Zones
Figure 8: : Delayed Fire Zone
If the zone is a Delayed Fire Zone, there is an
automatic delay before your system contacts
your monitoring station. Refer to Figure 8 on
page 59 to prevent unnecessary reporting of
false alarms.
To clear a fire alarm triggered by accident:
1.
Press any key within 30 seconds of the alarm.
2.
Clear the problem from area (e.g., the smoke
around the smoke detector. If the problem
remains after 90 seconds, the alarm will
sound again. Alert will be delayed by another
30 seconds.
WARNING: If you are unable to cancel the false
alarm, your system will send an alert. Call your
monitoring station to advise them of the false
alarm.
MG6250 Console • User Guide
Chapter 6 - Fire and Panic Alarms | 59
Fire Safety Tips
How should you prepare in case of a fire in your home or business?
•
Remind everyone to escape first, and then call for help.
•
Develop a fire escape plan and designate a meeting place outside.
•
Practice the escape plan frequently.
•
Plan two ways to escape from every room, if possible.
•
Practice the escape plan with eyes closed.
•
Instruct everyone never to stand up during a fire. Always crawl under the smoke and keep mouths
covered.
•
Instruct everyone never to return to a burning building for any reason; it may cost them their life.
•
Check smoke detectors regularly. Working smoke detectors dramatically increase everyone's chance of
surviving a fire.
Minimizing Home Fire Hazards
How can you avoid the three most common causes of fire at home?
•
Never leave cooking food unattended. It is the leading cause of fire injuries. Cooking fires often result
from unattended cooking and human error, rather than mechanical failure.
•
Stay alert when smoking. Careless smoking is the leading cause of fire deaths. Smoke detectors,
smoulder-resistant bedding, and upholstered furniture are significant fire deterrents.
•
Maintain your heating system. Faulty heating systems are the second leading cause of residential fires.
60 | Chapter 6 - Fire and Panic Alarms
MG6250 Console • User Guide
Panic Alarms
Your system can be programmed to send an alarm to your monitoring station, requesting help from the
police, a medical facility, the fire department, or anyone you wish when you press a pre-determined
combination of keys on MG6250’s main keypad.
To generate a panic alarm:
1.
Press the OFF key.
2.
Press and hold the appropriate panic key for 2 seconds. Your installer can program the alarm to be either
silent or audible.
NOTE: Programming your system to send an alarm to your central monitoring station, requesting help from a
medical facility, is not permitted in UL installations.
Figure 9: Panic Alarm Keys
Panic 1
(Non-medical
Emergency
Panic)
Panic 2
(Auxiliary Panic)
Panic 3
(Fire Panic)
MG6250 Console • User Guide
Chapter 6 - Fire and Panic Alarms | 61
Index
MG6250 Console • User Guide
A
Auto-arming 35, 48
AC power 11
Adding a user 36
Alarm clock 10, 24, 29
Alarm memory 23
Alarm memory display 22
Alarms
Disarming 21
Fire 57
Panic 61
Viewing 32
Answering an incoming call 30
Areas
Assigning areas 38
Sleep areas 58
Arming methods
Auto-arming 48
Force arming 18
Instant arming 17
No movement auto-arming 20
Regular arming 15
Sleep arming 17
Stay arming 16
Audio voice tag 49
B
Bell cutoff delay 46
Built-in siren 46
Built-in telephone 53
Bypassing a zone 19
C
Changing labels 35
Chime zones 31
Clock setup 29
Communicator settings 35, 39
Conventions 7
D
Date
Display date and time 27
Setting the time and date 35, 43
Delayed fire zones 59
Delays
Changing delays and tones 35, 44
Exit 15
Disarming
An armed system 20
Index | 62
System in alarm 21
Display
Alarm memory 22
Display settings 35
Document conventions 7
E
Entry delay timer 20
Erasing a message 28
Exit delay timer 15, 20
F
Fire alarms
Delayed fire zones 59
Fire safety tips 60
Minimizing home fire hazards 60
Residential installations 25, 57
Standard fire zones 58
Fire hazards, minimizing 60
Fire safety tips 60
Fire zones
Delayed fire zones 59
Standard fire zone 58
Force arming 18, 19
G
GPRS 6, 41
GPRS14 module 11, 41
GSM 6
63 | Index
H
Hands-free speaker phone 9
History log 33
Home, Minimizing fire hazards 60
I
Information symbol 10
Instant arming 17
IP 6, 11
L
Landline 6
Language 35, 51
LCD screen 10
Lost remotes 35, 38
M
Main keypad 9
Managing users 35, 36
Memory display, Alarm 22
Menu action keys 9
Message center 26
MG6250
Answering a call 30
Communication Status LEDs 9
Console overview 9
Description 6
Hands-free speaker phone 9
Keypad 10
MG6250 Console • User Guide
LCD screen 10
Main keypad 9
Menu action keys 9
One-touch keys 9
Panic keys 10
Partition 1 status LEDs 9
Partition 2 status LEDs 9
Phone key 10
Power LED 9
Remote controls 12
Status LEDs 11
Minimizing home fire hazards 60
Modifying a user 36
N
No movement auto-arming 20
O
One-touch keys 9
P
Panic keys 10
Partition status LEDs 9
Performing a system test 34
Phone key 10
Place a voice call 40
Playing a message 27
Power 11
Power LED 9
MG6250 Console • User Guide
R
Recording a message 26
Regular arm 15
Remote controls 12
Ring count 53
Ring setup 53
S
Safety tips 60
Safety, Fire tips 60
Scroll arrows 9
Setting chime zones 31
Setting the alarm clock 29
Setting the language 35, 51
Setting the telephone ringer 35
Sleep arm 17
SMS 6
SMS text message 41
Speakerphone 30
Standard Fire Zone 58
Status LEDs 11
Stay arming 16
STAYD LED 9
System demo 35
System master default code 36
T
Time
Setting the date and time 43
Index | 64
Timers
Entry delay 20
Exit delay 15
Tips, Fire safety 60
Tones 45
U
Up and down scroll arrows 9
Users
Adding 36
Modifying 36
V
Version numbers 35, 55
Viewing alarms 32
Viewing the history log 33
Voice call 40
Voice message 26, 39
Voice prompts 51
Voice tag 37, 49, 50
Z
Zone
Delayed fire zones 59
Standard Fire zone 58
65 | Index
MG6250 Console • User Guide
The whole Paradox team wishes you a successful and easy installation. We hope this product performs to your complete satisfaction.
Should you have any questions or comments, please contact us.
For support, please contact your local distributor, or dial 1-800-791-1919 (in North America) or
+1-450-491-7444 (outside North America), Monday to Friday, from 8:00 a.m. to 8:00 p.m. EST.
You may also e-mail us at [email protected].
Additional information can be found at PARADOX.COM
Printed in Canada - 04/2012
PARADOX.COM
MG6250-EU01