1
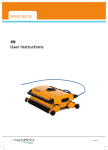
Dolphin Bio Suction
Dolphin Bio Suction
User Manual Instructions
8151191
by
Bio_cover_English_8151191.indd 4
www.maytronics.com
1/12/12 5:03 PM
by
Bio_cover_English_8151191.indd 1
1/12/12 5:03 PM
Dolphin Bio Suction
User Instruction Manual
Contents
1. INTRODUCTION ..................................................................... 2
2. SPECIFICATIONS .................................................................... 2
3. WARNINGS AND CAUTIONS ................................................. 2
3.1. Warnings.......................................................................... 2
3.2. Cautions .......................................................................... 2
4. POOL CLEANER PARTS .......................................................... 3
5. USING THE POOL CLEANER .................................................. 4
5.1. Caddy assembly .............................................................. 4
5.2. Caddy and power supply positioning ............................. 4
5.3. Connecting the power supply ......................................... 5
5.4. Putting the robot pool cleaner into the pool .................. 5
5.5. Removing the robot from the pool ................................. 6
5.6. Cleaning the filter cartridges ........................................... 7
5.7. Dismantling and cleaning the impeller............................ 9
5.8. Storage instructions ......................................................... 9
6. USING THE EXTERNAL SUCTION PIPE .................................. 9
7. USING THE REMOTE CONTROL............................................ 12
7.1. The Control Panel ........................................................... 12
7.2. Setting the Automatic Mode ........................................... 13
7.3. Manual direction control mode ....................................... 14
8. DIGITAL SWITCH-MODE POWER SUPPLY ............................. 15
8.1. Setting The Weekly Timer ............................................... 15
8.2. Full filter bag indicator .................................................... 15
9. TROUBLESHOOTING ............................................................. 16
10. CADDY ASSEMBLY INSTRUCTIONS....................................... 17
Bio_cover_English_8151191.indd 3
1/12/12 5:03 PM
Bio_English_8151191.indd 1
1/12/12 6:26 PM
1. INTRODUCTION
1. The Dolphin Bio suction pool cleaner expertly cleans biological and nature swimming pools.
As a result, it has been designed to handle large amounts of algae and dirt.
2. The robot can be operated in two modes:
Operation without external suction (regular mode - the robot collects dirt in built-in filtration
cartridges).
Operation with an external suction source: It is recommended to consult your dealer before
connecting the robot to an external pump.
Intended for pools with large amounts of algae and dirt. Dirt collected by the robot is transferred
through a pipe connected to an external pump and a filter. The pipe can be connected to virtually
any standard pool pump.
• In this mode, the external pump must be turned on throughout the robot’s operation.
3. The robot has a weekly timer option which allows the cleaning schedule to be set for the coming
week.
4. The default work cycle time is 3 hours.
5. Using the remote control, the work cycle time can be changed to 2 or 4 hours, according to the
pool’s specific cleaning requirements.
2. SPECIFICATIONS
Motor protection: IP 68
Minimum pool depth: 0.80m (2.6ft)
Maximum pool depth: 5m (16.4ft)
Water temperature: 6-34°C (43-93°F)
3. WARNINGS AND CAUTIONS
3.1.
CAUTION
Warnings
• Use only the original power supply provided with the robot.
• Ensure the electrical outlet is protected by a ground fault interrupter (GFI) or an earth
leakage interrupter (ELI).
• Keep the power supply out of standing water.
• Position the power supply at least 3m (10ft) away from the edge of the pool.
• Do not enter the pool while the robot is working.
• Unplug the power supply before servicing or cleaning the robot.
• Do not attempt to use the robot to clean a pool that has stones on the floor. This voids the
warranty.
• Maytronics is not responsible for any damage to the external pump.
• Maytronics is not responsible for damage done to pool vegetation.
3.2.
CAUTION
Cautions
• When not in use, store the robot on its Caddy in a shaded area.
• Extreme cold and frost can damage the robot. In the winter, always store the robot in a
protected place.
• Use the robot in water whose temperature is between 6-34°C (43-93°F) only.
2
Bio_English_8151191.indd 2
Dolphin Bio Suction | User Instructions Manual
1/12/12 6:26 PM
Bio_cover_English_8151191.indd 3
1/12/12 5:03 PM
4. POOL CLEANER PARTS
5
6
8mm (5/16”)
Dolphin Bio
Suction
Caddy
7
8
Filteration
Cartridge with
Spring net filters
Remote Control Unit
X4
Coarse net filter
9
X4
Weekly timer
Power Supply
Ultra-fine filter
10
* For
Remote Control
models
X10
Internal suction
adaptor
Swivel to pipe
connector
Suction inlet
plug
Cable to pipe
clip connector
Pipe (optional)*
* The pipe for the external pump is a standard pipe and can be purchased from your Dolphin dealer.
18
Bio_English_8151191.indd 18
Dolphin Bio Suction | User Instructions Manual
Dolphin Bio Suction | User Instructions Manual
1/12/12 6:27 PM
Bio_English_8151191.indd 3
3
1/12/12 6:26 PM
5. USING THE POOL CLEANER
10. CADDY ASSEMBLY INSTRUCTIONS
5.1. Caddy assembly
Instructions for assembling the Caddy - see page 17.
1
2
3a
3b
5.2. Caddy and power supply positioning
Position the power supply so that it is in the
approximate middle of the long side of the pool
at a distance of 3m (10ft) from the edge of the
pool.
10ft/3m
Unwind the floating cable and stretch it out completely so that it has no kinks.
Adjusting the handle angle
The handle angle can be adjusted to determine the speed at which the robot advances along the
water-line.
A
4a
4b
4c
* For Liberty models
B
To adjust the handle angle:
A. Press the latch down and hold it in position.
B. Move the handle to the desired position and release the latch to hold the handle in place.
4
Bio_English_8151191.indd 4
Dolphin Bio Suction | User Instructions Manual
Dolphin Bio Suction | User Instructions Manual
1/12/12 6:27 PM
Bio_English_8151191.indd 17
17
1/12/12 6:27 PM
5.3. Connecting the power supply
9. TROUBLESHOOTING
Attach the floating cable to the
power supply.
Problem
Solution
Cable twisting or cable coils up.
1.
2.
3.
4.
The robot is moving in circles or
does not reach all areas of the pool.
1. Check for foreign objects in moving parts.
2. Make sure filters cartridges are clean and well-mounted and that
the filter covers are closed.
3. Make sure that there is enough cable laid out to cover the whole
pool.
The robot is not moving sideways on
walls.
Adjust the diagonal angle of the handle.
The robot does not climb walls.
1. Clean the filter cartridge.
2. If this is the beginning of the season, use a coarse net filter to
remove large debris.
3. Check if brushes are worn and replace them if necessary.
4. Make sure the impeller area is clean.
5. Check that the remote control is set for climbing.
The robot is disengaging from wall
at water-line.
If the robot climbs too high, consult your Dolphin distributor.
Remote control unit is not working.
Check if the batteries need to be replaced.
Motor is not working.
1. Check if the impeller is blocked.
2. Check if the drive system is blocked.
3. Check power source.
If power is in order, please contact your Dolphin distributor.
Check for an obstruction in the pool.
Remove excess cable from the pool.
Clean the filters cartridges.
Straighten cable and lay it in the sun periodically.
Pipe is twisting.
The pipe might be too long. Use only the minimum length of pipe
necessary for the robot to reach all corners of the pool.
The robot does not climb walls with
external pump.
Increase the external pump’s suction.
Insert it by lining up the connector
notch (1) with the groove in the
socket and turning clockwise (2).
2
1
Plug in the power supply and leave it turned off.
Additional troubleshooting is available on our website:
www.maytronics.com
5.4. Putting the robot pool cleaner into the pool
Place the robot pool cleaner in the pool and
release it.
16
Bio_English_8151191. ndd 16
Dolphin Bio Suction | User Instructions Manual
Dolphin Bio Suction | User Instructions Manual
1/12/12 6:27 PM
Bio_English_8151191.indd 5
5
1/12/12 6:27 PM
8. DIGITAL SWITCH-MODE POWER SUPPLY
ON
Digital switch-mode power supply with Weekly Timer and Full Filter Bag Indicator
• INPUT - 100-250 AC VOLTS
• 50-60 Hertz
• 180 Watt
On/Off switch
• Output < 30 VDC
• IP 54
Switch the power supply on. The robot will now
begin working for a complete cleaning cycle. At
the end of the cycle, it will automatically switch
itself off.
8.1. Setting The Weekly Timer
The power supply has a weekly timer control. It allows
you to set an automatic cleaning schedule for the
week ahead.
When the power supply is switched on, the 3 LEDs
will blink for 5 seconds. At this time, by pressing the
SELECT button you can choose a pool cleaning schedule for the coming week.
5.5. Removing the robot from the pool
Important: The robot will always begin to work upon set-up.
OFF
CAUTION
LED 1 – The robot will automatically work every day for a full cycle – 7 times a week.
LED 2 – The robot will automatically work every other day for a full cycle – 3 times a week.
LED 3 – The robot will automatically work every 3 days – 2 times a week.
If you do not press any of the buttons within the first 5 seconds after the power supply has been
switched on, the robot will work for one cycle only.
While the robot is working in weekly timer mode, the LED will blink constantly between cycles.
At the end of the week the power supply automatically switches off. You must then reschedule the
robot for the next week.
1. Turn off and unplug the power supply.
2. Using the floating cable, pull the robot to
the edge of the pool. Grab the handle and
remove the robot from the water.
8.2. Full filter bag indicator
The power supply is equipped with a filter bag status indicator.
The red LED indicates two filter conditions.
• When blinking – The filter is partially blocked.
• When lighted – The filter is blocked and must be emptied and cleaned.
If the LED does not turn off after the filter had been emptied and cleaned, press the RESET button
while the robot is working.
Full filter bag indicator
CAUTION
6
Bio_English_8151191.indd 6
LED 1 LED 2 LED 3
DO NOT PULL THE ROBOT OUT OF THE POOL USING THE CABLE.
Dolphin Bio Suction | User Instructions Manual
Dolphin Bio Suction | User Instructions Manual
1/12/12 6:27 PM
Bio_English_8151191.indd 15
15
1/12/12 6:27 PM
7.3. Manual direction control mode
3.
4.
5.
6.
Manual Direction Control Mode
1. Press the On/off button once.
The remote control will start in
manual direction control mode.
2. Use the direction control
arrows (see right) to control the
movement of the robot around
the pool.
Place the robot on the edge of the pool and let the water drain out.
Clean the filter cartridges.
Rinse all brushes with clean water after each cleaning cycle.
Place the robot on its Caddy in a shady area.
5.6. Cleaning the filter cartridges
Note: Do not let the filter cartridges dry out before cleaning.
• Unplug the power supply before any servicing activity, including cleaning the filter cartridges.
CAUTION
Exiting Manual Direction Control Mode
1. To exit the manual direction
control mode, press the Manual/
automatic select button once
only.
2. The digital screen will light up
and three rows of function icons
will be displayed in default
mode.
3. To change the parameters press
the up or down arrows.
To select the parameter settings
use the right or left arrows.
4. When you reach the required
function press the Set/OK
button.
1. Open the filter covers and remove the cartridges from both sides of the robot.
2. Open the clips and remove the filters.
1
14
Bio_English_8151191.indd 14
Dolphin Bio Suction | User Instructions Manual
Dolphin Bio Suction | User Instructions Manual
1/12/12 6:27 PM
Bio_English_8151191.indd 7
2
7
1/12/12 6:27 PM
7.2. Setting the Automatic Mode
3. Clean the filters with a hose.
Press the manual/automatic select button and then choose the desired parameters according to the
following table:
4. Reassemble the filter elements:
Insert the locating tabs at the bottom of the filter element into their grooves on the base frame then
close the “S” clip.
Locating tab
Cleaning cycle
indicator
This determines
the length of the
cleaning cycle.
Fast
2-hour cycle
Efficient
3-hour cycle for
everyday use.
(default setting)
Heavy duty
4-hour cycle
Delay time
indicator
This determines
when the pool
cleaner starts to
work. Delaying
allows the dirt
to settle to the
bottom of the
pool.
Immediate start
(default setting)
One-hour delay
Two-hour delay
Cleaning action
indicator
Standard
Floor and wall
cleaning
(default setting)
More thorough
cleaning
Repeatedly cleans
the floor
Floor only
Cleans only the
floor and the area
where the floor and
walls meet
Locating tab groove
Note:
• If no button is pressed after two minutes, the remote control automatically turns off.
The robot will continue to work according to the last settings chosen.
• The last settings chosen are automatically saved. The next time the robot works, it will clean
according to the last set up made on the remote control.
Reinstall the base frames with filters according to the diagram.
CAUTION
DO NOT FORCE THE FILTERS INTO PLACE.
Grooved
end
fitting
8
Bio_English_8151191.indd 8
Increased wall
cleaning
More thoroughly
cleans the walls
Octagonal
end
fitting
Dolphin Bio Suction | User Instructions Manual
Dolphin Bio Suction | User Instructions Manual
1/12/12 6:27 PM
Bio_English_8151191.indd 13
13
1/12/12 6:27 PM
5.7. Dismantling and cleaning the impeller
7. USING THE REMOTE CONTROL
The remote control unit (RCU) offers two operation modes – Automatic mode and manual direction
control mode.
In automatic mode, the cleaning parameters can be changed.
In manual direction mode, the robot’s motion can be controlled manually.
Unplug the power supply before cleaning.
Dismantle the impeller cover and clean around
the impeller housing, then reassemble.
(Use Phillips head screwdriver).
7.1. The Control Panel
Radio reception meter
When no black lines are showing, move
closer to the power supply unit.
5.8. Storage instructions
Battery level meter
When flashing, change the batteries.
Coil the cable and store in a cool, dry place on
the Caddy.
• Do NOT store the robot where it will be exposed to direct sunlight.
• Do NOT store the robot where it will be exposed to excessive heat.
• Do NOT store the robot where it will be exposed to frost.
Manual control indicator
When flashing, you are in manual direction
control mode
Cleaning cycle icons
6. USING THE EXTERNAL SUCTION PIPE
Delay timer icons
Cleaning mode icons
1. Open the filter covers and remove the
cartridges from both sides of the robot.
ON/OFF button
Manual/automatic select button
Set/OK button
Direction control arrows
A
12
Bio_English_8151191.indd 12
Dolphin Bio Suction | User Instructions Manual
Dolphin Bio Suction | User Instructions Manual
1/12/12 6:27 PM
Bio_English_8151191.indd 9
2. Insert the internal suction adaptor into the
robot. It should be placed in the side of the
robot that has the pipe connection door hatch
on it (A). Press the adaptor against the right
wall and lower it (see the direction arrow on the
adaptor) until it reaches the suction inlet.
9
1/12/12 6:27 PM
B
4. Open the pipe connection hatch by pulling it
down.
Insert the swivel to suction adaptor connector
while adjusting the notch so that it points up.
To remove the connector, press the tab (C) on
the left side of the connector.
6. Connect the floating cable to the suction pipe using the clip connectors supplied (10 units).
6.1 Insert the electrical cable into the small side of the clip.
6.2 Snap the pipe into the bigger side of the clip.
6.3 To prevent the cable and pipe from becoming twisted, connect clip connectors along the
entire length of the pipe.
3. Insert the suction inlet plug into the suction
inlet which is on the opposite side from where
the suction adaptor is installed. To remove the
suction inlet plug, press the tabs (B) on both
sides of the plug and pull.
C
120 cm
5. Connect the suction pipe to the swivel
connector by pressing the pipe against the
black locknut. Do not tighten the pipe against
the locknut. Ensure that there is a small space between the locknut and the pipe (D).
1.
2.
4.
5.
6.
7.
8.
D
Bio_English_8151191.indd 10
Note:
To avoid the pipe twisting, use only the minimum pipe length necessary for the robot to reach all
corners of the pool.
Important: Before removing the robot from the pool, turn off the pump to prevent it from drawing
in air.
It is recommended to remove the robot from the water at least once a week to avoid the
accumulation of algae on the brushes. The accumulation of algae makes it harder for the robot to
climb the pool’s walls.
Always lift the robot out of the water by its handle. Pull the robot by the floating cable (and not by
the pipe!) to the pool’s edge then lift it out of the water by the handle.
When the robot is working with the external filter, ignore the full filter indicator.
Always make sure that the external pump is working when the robot is operating in external suction
mode. The external pump can work when the robot is turned off.
The robot will not clean areas with plants if they are higher than the pool’s floor.
A minimum suction of 10m3/hr is recommended for optimal cleaning efficiency. There is no
maximum limit.
Depending on the pool’s condition, the robot might not climb to the water-line.
CAUTION
3.
10
120 cm
9.
Dolphin Bio Suction | User Instructions Manual
Dolphin Bio Suction | User Instructions Manual
1/12/12 6:27 PM
Bio_English_8151191.indd 11
11
1/12/12 6:27 PM