1
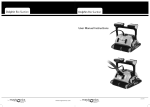
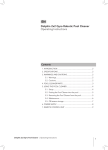
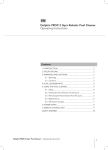
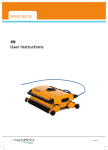
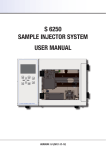
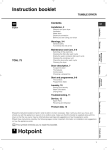
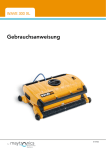
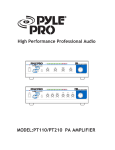
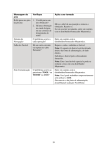
Table of Contents SAFETY PRECAUTIONS .....................................................................................................................II GENERAL NOTES.................................................................................................................................II INTRODUCTION ....................................................................................................................................1 DOLPHIN WAVE CADDY ASSEMBLY .............................................................................................1 ASSEMBLY INSTRUCTIONS ......................................................................................................................1 FIRST POOL CLEANING SESSION ...................................................................................................3 STARTING THE FIRST CLEANING SESSION ..............................................................................................3 EVERYDAY OPERATION ....................................................................................................................5 MANUAL STOP CONTROL .......................................................................................................................6 CUSTOMIZED SETTINGS....................................................................................................................7 MMI OPERATIONS..................................................................................................................................7 MAIN MENU PARAMETERS .....................................................................................................................9 CONFIGURING ADDITIONAL POOL PROFILES ..........................................................................9 MANUAL PROCEDURE FOR CONFIGURING POOL PROFILES ..................................................................11 STARTING CLEANING OPERATIONS ......................................................................................................13 MANUAL DIRECTION SETUP .................................................................................................................13 OPERATING GUIDELINES................................................................................................................14 MAINTENANCE .....................................................................................................................................14 REMOTE CONTROL UNIT ................................................................................................................15 TROUBLESHOOTING.........................................................................................................................17 I Safety Precautions Please adhere strictly to the following warnings: Do not operate the Dolphin Wave Robot Pool Cleaner when there are people in the swimming pool. When examining the Dolphin Wave Robot Pool Cleaner, disconnect the main power supply. Please ensure that the following precautions are implemented: Only a trained operator should operate the Dolphin Wave Robot Pool Cleaner. Operator should keep hands away from driving belt mechanism The Dolphin Wave Robot Pool Cleaner should not be operated out of the pool at distance of more than 3 meters from pool's edge. Keep the Dolphin Wave Robot Pool Cleaner out of the reach of children. Only an original power cable must be used, at all times. Replaced by a Dolphin Wave Robot Pool Cleaner certified technician, in case of need. When lifting the Dolphin Wave Robot Pool Cleaner, take care to prevent back injury. General Notes • In this user manual, the instruction press "Start" is performed by pressing both green buttons - simultaneously on the MMI (Figure 2). • The MMI is equipped with a screensaver that comes into effect after 5 minutes idle time. Press Pool and Home in that order to unlock the MMI console. II Introduction This user guide describes how to use your MMI operating console for the Dolphin Wave robotic pool cleaner. The interactive, state of the art MMI control console enables full control of the robot and allows you to determine the cycle time, operation delay, and cleaning scan that the robot performs. It also enables diagnosis of various technical functions and parameters. The console houses a remote control unit for manual operation and temporarily overriding automatic cleaning operations. The Dolphin Wave is designed to handle four different swimming pool configurations and when these are set, the pool configurations are stored in the MMI's memory. The robot is preset in the factory with specific default pool settings, which can be reset. Please refer to the first Main Menu screen, Figure 7 and Customized Settings, SDJH. Dolphin Wave Caddy Assembly Carefully remove all the items from the shipping box and check them against the packing list. You should have: • Documentation and accessories • Un-assembled caddy for storing and carrying the Dolphin Wave robot • MMI console • Dolphin Wave robot and floating cable • Filter Bags - 2 disposable bags assembled in the Wave robot, 2 permanent filter bags, 20 additional disposable bags • Power supply unit Assembly instructions Refer to Figure 1. 1. Attach the caddy handle to the caddy base and fasten with the screws and nuts provided. 2. Place the Dolphin Wave robot on the caddy in front of the power supply as shown in Figure 1. 3. Place the coiled Dolphin Wave's power cable on the caddy's cable support bracket and remove the binding sticker. 4. Connect the MMI communication's cable to the power supply unit. 5. Connect the Dolphin Wave floating cable to the power supply. Tighten the connecting adaptor firmly to ensure proper electrical connectivity. 1 MMI communications cable Cable holder Floating cable Floating cable handle Power supply Impeller cover MMI communications cable Wave Power supply Floating cable Connected to Wave Power supply Mail Power supply Cable Figure 1: The Dolphin Wave Disposable filter bags should be kept in a dark place - avoid exposure to direct sun light 2 First Pool Cleaning Session This section explains how to proceed with the first cleaning session. The robot is preset in the factory with certain configurations that enable you to commence pool cleaning immediately. The settings made during this setup session remain in use until changed by the operator. Remote Unit Wave Home Screen Keyboard Buttons Figure 2: The MMI Dolphin Wave Console To start a pool cleaning session directly after you have assembled your Dolphin Wave, proceed as follows: 1. Lift the MMI's protective cover. 2. Connect the Wave power supply to the main power supply line. 3. Switch on the power supply. The MMI Wave screen opens in the home window. 4. Position the caddy with robot about 0.5–1.0 meter from the pool edge with its sloping edge facing the swimming pool ensuring that the floating cable is facing the direction of the Dolphin Wave power supply unit. 5. According to the pool's size, release the appropriate length of cable. Starting the First Cleaning Session 1. On the MMI press POOL. The robot starts moving towards the pool and enters the swimming pool positioning itself on the pool floor. 2. Wait for the WAVE screen to appear. 3. Press Start. "Please select pool length" displays on the screen. After 2 seconds the Pool Length Set Up screen appears. 3 Pool Length Set Up 25 Set 30 35 40 50 60 back Figure 3: Pool Length Set Up 4. Using the arrows,, select the required pool length. Press Set. 5. The Align Robot to Pool Width screen displays. 6. Using the floating cable, move the robot so that it is parallel to the width of the pool with the cable behind it. 7. Press Start. The MMI screen displays "Direction setup please wait". The robot moves forward slowly for 20 seconds and stops. The screen displays "Direction setup completed". 8. Press Start. The cleaning session starts. Factory default settings are used. In order to change parameters refer to Configuring Additional Pool Profiles on page 9. The robot starts its cleaning cycle and the MMI displays the Countdown screen (Figure 4): hh:mm:ss 3hr - cycle Default cleaning 02:59:59 lock stop Figure 4: Countdown screen for 3 hour session The countdown screen shows that a 3 hour cycle time was selected and that the time remaining is 2 hours, 59 minutes and 59 seconds. At the end of the cleaning session, the robot stops automatically. To remove the robot from the pool, proceed as explained in Removing the Robot from the Swimming Pool on page 5. 4 Everyday Operation After you have set up the Dolphin Wave and configured it for the first time, the device is set for everyday operation. When performing your next cleaning session, proceed as follows: 1. Position the caddy about 0.5–1.0 meter from the pool edge with its front sloping edge facing the swimming pool and the floating cable pointing in the direction of the Dolphin Wave power supply unit. 2. Press Pool on the MMI. The robot starts moving towards the pool and enters the swimming pool positioning itself on the pool floor. 3. Wait for the Wave screen to display on the MMI. 4. To start the robot, press Start on the MMI. The robot starts its cleaning cycle and the Countdown screen displays: hh:mm:ss 3hr - cycle Default cleaning 02:59:59 lock stop Figure 5: Countdown screen To avoid unauthorized changes to the MMI settings you can lock the MMi's keyboard: From the countdown screen, press Lock (Figure 5). To unlock the keyboard, press POOL and then HOME in that order. At the end of the cleaning session, the robot stops automatically. Removing the Robot from the Swimming Pool: 1. Press HOME. The robot starts moving in the direction of the floating cable. 2. Holding the floating cable, gently pull the robot upwards and towards the caddy. As it reaches the side of the pool, pull the cable gently until the floating cable handle emerges. Grasp the handle, tilting the robot slightly allowing water to drain, place by the pool side, or guide it onto the caddy. The robot shuts down automatically. 5 Manual Stop Control If necessary, you can stop the robot during the cleaning session. 1. From the countdown screen (Figure 4), press Stop. The MMI screen displays the message: "Stopping robot – please wait". After 5 seconds the Manual Stop screen is displayed (Figure 6). Manual Stop Completed Time 01:20 Toal Hours Filter Bag Clean Exit Figure 6: Manual Stop screen 2. To stop the cleaning session completely, press Exit. The MMI display returns to the Wave screen. 6 Customized Settings The Dolphin Wave robot is controlled from the MMI console. You can customize the robot's settings to match the specific type of swimming pool that is to be cleaned. Four different swimming pool configurations can be set and stored in the MMI's memory for future use. When you configure the pool profile, you can also set the cleaning-cycle time and the delay time before the robot starts its cleaning cycle. The procedure for configuring additional pool profiles is explained in Configuring Additional Pool Profiles on page 9. The MMI keyboard procedures are explained in the next section. MMI Operations , located on the MMI below the screen, Use the control buttons, to activate the various commands. Use the MMI functions that appear in the various screen displays to navigate between the screens and to configure the software. MMI Functions: Command Menu Description From the opening screen press Menu to display the Main Menu. Ÿ Scroll up. ź Scroll down. Start Press both green buttons simultaneously to Start pool cleaning. Select Press Select to confirm your selection after using the scrolling buttons. Modify Press Modify to change settings after making a selection. Back Press to return to the previous screen. Exit Press to return to the Wave screen. Defining the robot's parameters: 1. Switch on the power supply. The MMI Wave screen opens in the home window. 2. Press Menu to enter the Main Menu (Figure 7). 7 Main Menu Pool Profile Filter Sate Clean Eror Report Statistics c Select d Exit Figure 7: Main Menu There are two Main Menu screens and you access the second screen by pressing the scroll down arrow, ź. After "Statistics", scroll down to the second Main Menu screen (Figure 8). Main Menu Clock Setup Date Setup Technician Mode English LanguDJH Select c d Exit Figure 8: Second Main Menu screen 8 Main Menu Parameters The Main Menu and the parameters are explained in the table below: Parameter Description Pool Profile Press Select to go to the Pool Profile screen. Selecting Pool Profile opens the Pool Profile screen for four different pool types. Pool A is the default setting. Filter State Reports on the filter’s condition. • Clean: Filter bag is ready for use • Full: Change/clean filter bag The FILTER BAG warning light on the console will also indicate that the filter bag needs cleaning/replacing. Error Report Displays information for Service Technician. Statistics Press Select to review data on robot usage. Second Main Menu screen parameters: Parameter Description Clock Setup Press Select to enter Clock Setup screen and 12/24 hour mode. Date Setup Date setup screen. Technician Mode Technician screen with restricted access. Language Language interface mode. Configuring Additional Pool Profiles As noted previously, the Dolphin Wave can be configured for four different pool types. The configured settings are stored in the MMI's memory. This section describes how to configure additional pool settings. To add a new pool configuration, proceed as follows: 1. Go to the Wave screen. "Pool A" is displayed as the currently defined setting as shown in Figure 9. 9 Menu Start Pool A Figure 9: Wave screen showing Pool A as default setting 2. From the Wave screen, press Pool A. The Pool Profile screen opens (Figure 10). Select Pool Profile Pool A Pool B Pool C Pool D select c b exit Figure 10: Pool Profile screen 3. To select a second pool profile, scroll down to Pool B and press Select. The Wave screen automatically displays showing that Pool B is the currently defined pool. 4. To configure Pools B, C and D, go to Step 1 of Starting the First Cleaning Session, page 3. To go to a previously defined pool setting: 1. From the Wave screen, press the currently displayed pool setting at the right side of the screen (see Figure 9) to open the Pool Profile screen. 2. Scroll to the required pool and press Select. The Wave screen is displayed with the chosen pool setting. 10 Manual Procedure for Configuring Pool Profiles 1. From the Wave logo menu, press Menu. 2. From the Main Menu, with Pool Profile highlighted, press Select and then modify, to display the current active profile screen. 3. Press Select to enter the Pool Length Setup screen. Pool A Profile 25 m Pool Length 3h Cycle Time Navigation Mode Rec. 1 Scanning Path Default c select b back Figure 11: Pool Length Setup screen 4. Using the Select and Scrolling buttons Ÿź, set each parameter in turn, for example: 5. With Pool Length highlighted, press Select. The Pool Length Set Up screen is displayed: Pool Length Set Up 25 set 30 35 40 _ 50 60 ` back Figure 12: Pool length setup screen 6. Using the arrows,, select the desired pool length. Press Select and scroll down to the next parameter, Cycle Time. Cycle Time determines the duration of each cleaning cycle. 11 7. Set each parameter and then scroll down to the next line. 8. Set Navigation Mode and choose either Rectangular 1 (Default), Rectangular 2, or Shaped. Rectangular 1- Recommended for pools with parallel walls, and 90º 'L' shape. Rectangular 2- as above, in case magnetic interference that cause curved motion. Shaped- Recommended for free formed pools. 9. Set Scanning Path and choose either Default, Lines to Right, or Lines to Left. Default- Recommended. Lines to Right / Left- To be used in cases when the pool scan needs to be limited to one direction or split into two sections. In order to use this mode, consult your dealer. 10. After setting the Scanning Path, from the Pool Profile screen, scroll down to the next screen to "Direction Setup" (Figure 13). Pool A Profile 180.0 Direction Setup 0h Delay Time Medium Line Spacing Reset Pool A profile select c b back Figure 13: Second pool profile screen 11. Press Select to enter Direction Setup. 12. To change the Direction Setup, proceed as explained in Manual Direction Setup, below. 13. Press Select to enter Delay Time. Setting a Delay Time allows you to delay the start of cleaning operations by a time factor selected from the MMI screen. To override the Delay Time instruction, from the Wave screen press Start. 12 14. Line Spacing- used only when Lines to Right / Left scanning path is used, in order to optimize scanning. Choose Fine / Medium / Coarse to set the distance between lines. 15. Reset Pool Profile- Allows to delete all current pool profile parameters. (Pool Length, Cycle Time, Navigation Mode, Delay time…) During parameter setting operations: • Press Back to return to the previous screen • Press HOME on the console, to return to the Wave screen Starting Cleaning Operations Once all the customized settings have been configured, you can proceed to a cleaning session: 1. Prepare the Dolphin Wave for operation and immersion into the pool. 2. Proceed as in Everyday Operation, page 5. If a Delay Time has been set (see Configuring the Dolphin Wave, above), the countdown commences and the time remaining before automatic cleaning starts is displayed on the screen. If no delay time is specified, the robot commences cleaning immediately. Once cleaning operations have started, the MMI screen displays the countdown time as in Figure 5, above. To override the delay time and commence cleaning immediately, press Start. The robot starts working immediately. Manual Direction Setup After the cleaning cycle has started, you might find it necessary to set the robot's direction more precisely. This can be performed in 2 ways: a) Using Direction Setup – from pool profile. Press start and go through similar procedure as described in Starting the First Cleaning Session, line No. 5, page 4. b) Using the Direction Setup procedure while the robot is in the pool, as described below. Direction Setup: 1. From the Countdown screen press Stop. (If the robot is during cleaning cycle) If the screensaver is displayed, press POOL and then HOME to unlock the MMI. 2. Navigate to the Pool Profile screen and select Direction Setup and then Fine Tuning. 3. Press Start. The robot starts moving along the width of the pool. 13 4. From the MMI, press "+" or "-" to correct the robot's direction until it moves exactly along the width of the pool. "+" = clockwise direction "-" = counter clockwise direction 5. Once the desired width direction is achieved, press Next. 6. The Robot will turn 90 degrees to the left and move along the length of the pool. 7. Next, fine tune along the pool's length using "+" or "-", as in step 2 until the robot moves along the pool's length. 8. Once the desired direction is reached, press Next to confirm the end of the fine tuning procedure. 9. Press HOME to return to the Wave screen and then press Start to continue the cleaning session. Operating Guidelines • A large-sized swimming pool of approximately 300 square meters requires approximately 2–3 hours cleaning time. This is the default setting. • An Olympic size pool of 1,250 square meters requires approximately 5 hours cleaning time. This is the default setting. Maintenance 1. Clean and replace filter as needed. When the MMI displays "Filter Bag Full", you should clean/replace the bag before the next operating cycle. It is not necessary to stop the Wave in the middle of the cycle when "Filter Full" indication appears. Clean the filter before the next cycle. Non-disposable filter bags can be cleaned in a washing machine. Under normal working conditions, disposable bags may be used for about 3 cleaning cycles. 2. Before each operating cycle, clean the robot body, brushes, and driving belt area and remove foreign objects, rubber bands, hair etc. 3. Once a week clean impeller area: • • • • Remove the impeller cover securing screw using a No. 2 Philips screw driver. Twist counter-clockwise and open the cylinder cover. Remove foreign objects from the impeller. Close the impeller cover and replace the securing screw. 4. Keep the electrical cable orderly enabling it to be rolled up easily and placed on the caddy's handle. Important: Every two or three cleaning sessions, disconnect the main 14 power supply, unroll the entire cable and re-arrange it on the caddy handle as required. 5. Preventive Maintenance (PM): should be performed on the Wave robot pool cleaner, in order to keep it in good and long lasting working condition. MAYTRONICS provides the parts required – as a dedicated PM kit. The work and the service will be provided through the dealer. PM service should be performed every 1,500 working hours or 1 year (the earlier of the two). 6. A warning message to perform PM will appear on the MMI screen, when applicable. It is obligatory that PM service will be performed. Please contact your dealer. Failure to perform the PM service will void the warranty. Remote Control Unit The remote control unit (RCU) is located on the MMI console and held in position by a magnet. Pull it upwards gently to remove it from its base. When the robot is in automatic operation, use the remote control to override the robot’s programmed direction settings. When the robot is moving in a forward direction, the floating cable follows the robot from its tail end. The remote unit has a control range of 50 meters from the Caddy. Forward On-the spot turning Reverse Touch pad On/Off switch Figure 14: Remote Control Unit Using the Remote Unit: 1. To activate the remote unit, press the touch pad as indicated in the diagram. Four activation lights are illuminated. 15 2. Press the forward arrow briefly. The robot commences moving in a forward direction. To stop the forward movement, briefly press and release the forward arrow. 3. Press the backward arrow briefly. The robot commences moving in a backward direction. To stop the reverse movement, briefly press and release the backward arrow. On-the-spot turns: On-the-spot turns can be carried out while the robot is in motion or executed when the robot stationary. 4. To turn the robot clockwise, press and hold down the right arrow. The robot turns on-the spot. Release the button to stop the robot from turning. 5. To turn the robot counter-clockwise, press and hold down the left arrow. Release the button to stop the robot from turning. 6. To deactivate the remote unit, press and hold down the touch pad. The activation lights switch off. The robot reverts to its programmed direction mode of cleaning after the manual correction. The remote unit deactivates automatically after approximately 3 minutes and the indicator lights switch off. Maintaining the remote unit: The remote control unit is powered by two AAA batteries. It is splash-proof and should not be immersed in water. To replace the batteries, remove the four back-cover securing screws and replace all the batteries with new battery cells. 16 Troubleshooting Error Message Check Action to Take Imp over load Is there dirt or other foreign matter in the impeller? Unscrew the bolt that secures the protective cover of the impeller. Turn it counterclockwise slightly, until it is released. Remove any dirt around the impeller. Replace the protective cover. Imp over load Does the problem reoccur on every operation? Contact the Maytronics dealer/distributor. Does the problem reoccur on every operation? Contact the Maytronics dealer/distributor. Drive over load Is there any interfering dirt in the driving belts, brushes, or drive axles? Remove any dirt or foreign bodies that might have become entangled with the driving belts, brushes, or drive axles. Drive over load Does the problem reoccur on every operation? Contact the Maytronics dealer/distributor. Does the problem reoccur on every operation? Contact the Maytronics dealer/distributor. 1. Is there an electrical short, partial or complete disconnection? 2. Is there a visible rupture in the floating cable? Contact the Maytronics dealer/distributor. Robot got stuck on pool wall 1. Has the robot stopped in a vertical position of more than 70º? 2. Has the robot stuck on an obstacle? Move the robot from its position and remove the obstacle. Reactivate. If this recurs, contact the Maytronics dealer/distributor. Out of water Was the robot operated 1. Check that the impeller is in order and out of the water for an that its blades are not broken. extended time? 2. Reactivate. If this recurs, contact the Maytronics dealer/distributor. Imp under load Drive under load DC input 17 Error Message Check Action to Take Robot is stuck on pool floor 1. Has the robot stopped on an obstacle? 2. Is there an obstruction in the water channel or in the robot's driving belts? Move the robot from its position and remove the obstacle. Reactivate. If this recurs, contact the Maytronics dealer/distributor. Does the problem re-occur on every operation? Contact the Maytronics dealer/distributor. Navigation System Fuse Fail Is there an electrical short or rupture in the floating cable? Repair cable and replace the fuse. Note: The fuse holder is located beneath the power supply on the right hand side. Replace the fuse with the spare provided. Note: This is a special fuse and a replacement can be obtained from your Maytronics dealer. No Communication Does the problem occur when pressing POOL or HOME on the MMI? Contact the Maytronics dealer/distributor. Note: You can work temporarily without using the MMI. Disconnect it from the power supply thus disabling the Pool/Home function. 18