1
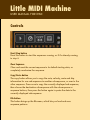
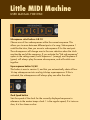
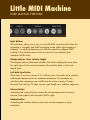
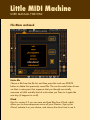
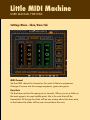
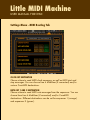
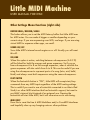
LITTLE MIDI
MACHINE v3.0
USER MANUAL FOR IPAD
Welcome to Little MIDI Machine!
This little app will let you turn your iPad into a vintage analog-style step
sequencer so that you can use your iPad to control your hardware
synthesizers with MIDI. Create melodic loops, mute and unmute notes,
skip steps, change clock speed, switch it into reverse, all the fun things a
traditional hardware step sequencer lets you do.
We’ve added a bunch of new features to v3.0 that make Little MIDI more
powerful and useful, including:
•Virtual MIDI support, so you can sequence other synth apps
•iCloud support, so you can share sequences between devices
•MIDI input support, enter sequence notes or transpose on the fly
•New supersequence feature lets you create 64 step sequences
•Sequence note length per step, just like pitch and velocity
•Un-link pitch, velocity and length parts so they run independently
•Improved MIDI routing and configuration
•OMAC fast switch support to quickly switch to other apps
•And more!
Yep, lots of cool new stuff to play with. Dive on in and make some music!
Little MIDI Machine
USER MANUAL FOR IPAD
Quick Start!
Instruction manuals are boring, right? Here are the most important parts
of the app to help you get started:
•Start button in the upper left corner starts the sequencer. Press it!
•Sliders control the pitch of the notes played by the sequencer. Move
them around!
•The LEDs below the sliders tell you which step the sequencer is currently
playing. After you hit play, watch it move between steps.
•The gate buttons below that with numbers on them turn notes off and
on. If this row is all dark, no notes will be played! Turn more on!
Little MIDI Machine
USER MANUAL FOR IPAD
Controls
Start/Stop button
Press this button to start the sequencer running, or if it's already running,
to stop it.
Clear Sequence
Clear and reset the current sequence to its default starting state, or
completely randomize the sequence.
Copy/Paste button
The copy button allows you to copy the note, velocity, mute and skip
information for one sub-sequence to another sub-sequence, or over to the
other sequence. Press once to copy the currently displayed sub-sequence,
then choose the destination sub-sequence with the sub-sequence or
sequence buttons, then press the button again to paste the data to the
currently displayed sub-sequence.
File button
This button brings up the file menu, which lets you load and save
sequence patterns.
Little MIDI Machine
USER MANUAL FOR IPAD
Tempo slider
Set the master tempo speed that the sequencer will run at. You can also
manually enter a specific numeric value by pressing on and holding down
the numerical TEMPO XXX.X BPM display.
Settings button
This button brings up the settings menu, where you can configure MIDI
routing, set channel and note values for your sequences, link the two
sequencers together, and more.
Help button
This button brings up the help menu where you can read this manual,
read some info about Little MIDI Machine, or check out some other apps
that work well with LMM.
Sequence 1 and 2 buttons
Pressing this button selects Sequence 1 (orange sequence) or Sequence 2
(green sequence) as the currently displayed sequence.
Little MIDI Machine
USER MANUAL FOR IPAD
Sequence Step sliders
These sliders allow you to set the note value (in note mode) or the
velocity value (in velocity mode) for each step of the sequence loop. The
red LEDs below tell you what step is currently playing.
Mute Step buttons
The buttons with numbers on them are mute buttons. These allow you to
turn the note on or off at each step in the sequence loop.
Skip Step buttons
These button allow you to skip a step in the sequence loop. The note for
that step will not be played, and the sequencer will skip over to the next
step immediately. Skipping steps allows you to create repeating loops
that are less than 16 steps long. For example, you can make a pattern 12
steps long by skipping the last four steps.
Little MIDI Machine
USER MANUAL FOR IPAD
Subsequence select buttons A B C D
Choose one of four subsequences within the current sequence. This
allows you to move between different parts of a song. Sub-sequence 1
could be the intro, then you move to sub-sequence 2 for the next part.
The sub-sequence will change over to the new selection when the clock
reaches the end of the sequence. If you activate the "link sub-sequences"
option in the settings menu, both Sequence 1 (orange) and Sequence 2
(green) will always play the same sub-sequence, and will switch over
together.
Supersequence button 16/64
This button is new to version 3, and lets you automatically chain all four
16 step subsequences into one big 64 step supersequence. If this is
activated, the subsequences will always play one after the other.
Clock Speed button
Sets the speed of the clock for the currently displayed sequence in
reference to the master tempo clock. 1 is the regular speed, 2 is twice as
slow, 4 is four times as slow.
Little MIDI Machine
USER MANUAL FOR IPAD
Input buttons
These buttons allow you to turn on and off MIDI record mode (when the
sequence is stopped) and MIDI transpose mode (when the sequence is
playing). To use these features you will also need to configure MIDI
routing in the Settings menu to set a source for record/input and
transpose MIDI notes.
Display buttons - Note, velocity, length
The display buttons determine whether the sliders display the note data
for each step of the current sequence, the velocity data, or the note
length data.
Lock data type button
This button is new for version 3.0, it allows you to have the note, velocity
and length sequences run as separate sequences. For example, by
unlocking the sequences you could have the notes running 16 steps
forward, the velocity 12 steps reverse, and length as a random sequence.
Reverse button
Activating the reverse button causes the current sequence to move in
reverse, from right to left instead of left to right.
Random button
Activating the random button causes the current sequence to play
randomly.
Little MIDI Machine
USER MANUAL FOR IPAD
File Menu
Load Sequence
Choose a previously saved sequence from the file list, and then press the
load button to load it into the sequencer, overwriting the current
sequence.
Save Sequence
To save you current sequences, press the SAVE button and a keyboard
should appear. Enter in a name for the sequence file, and save it to be
loaded later.
Little MIDI Machine
USER MANUAL FOR IPAD
File Menu continued
Delete file
Choose a file from the file list, and then press this trash can DELETE
button to delete that previously saved file. This can be useful when it turns
out that, in retrospect, that sequence that you thought was totally
awesome at 3AM actually kind of sucks when you listen to it again the
next day (it happens to us all).
iCloud
New for version 3.0 you can save and load files from iCloud, which
allows you to share sequences across all your iDevices. Sign up for
iCloud, activate it on your device, and choose the cloud icon to use it.
Little MIDI Machine
USER MANUAL FOR IPAD
Settings Menu - Chan/Base Tab
MIDI Channel
Set the MIDI channel to transmit on for each of the two sequencers.
Orange of course sets the orange sequencer, green sets green.
Base Note
Set the base note for the sequencer to transmit. When you set a slider on
the main page to its exact middle point, this is the note that will be
transmitted. At the top the slider will be one octave above this base note,
at the bottom the slider will be one octave below this note.
Little MIDI Machine
USER MANUAL FOR IPAD
Settings Menu - MIDI Routing Tab
CLOCK OUT DESTINATION
Choose where to send MIDI clock messages, as well as MIDI start and
stop messages. You can choose Line 6 Mobilizer (if connected) and/or
various CoreMIDI destinations.
NOTE OUT 1 AND 2 DESTINATION
Choose where to send MIDI note messages from the sequencer. You can
choose from Line 6 Mobilizer (if connected) and/or CoreMIDI
destinations. Different destinations can be set for sequencer 1 (orange)
and sequencer 2 (green).
Little MIDI Machine
USER MANUAL FOR IPAD
CLOCK IN SOURCE
Choose where your MIDI clock will be coming in from, either the Line 6
Mobilizer (if connected) or a CoreMIDI input source.
NOTE IN AND TRANS IN SOURCE
New for version 3.0, these allow you to choose MIDI sources for
sequence input (setting the notes in a sequence when the sequencer is
stopped) and transpose input (transposing notes in the sequence when it
is running). Note that you also need to activate REC and TRA buttons on
the main sequencer page for these functions to work properly.
CONNECT WIFI DEVICES
This will set up a connection between your iOS device and a nearby iOS/
computer connected to the same network. The other iOS device must be
running a CoreMIDI app to appear here. Once connected, you can send
and receive network CoreMIDI messages between the devices. For
example, run LMM on an iPad and sequence AniMoog on your iPhone.
Little MIDI Machine
USER MANUAL FOR IPAD
Settings Menu - Fast Switch Tab
New for version 3.0, this tab lets you choose which apps you want to
give a “fast switch” button to on the main page. For example, if you are
using Sequencer 1 (orange) to sequence the Arctic Keys synth app via
virtual MIDI, and you select it as the orange fast switch app on this page,
you will get a button in the lower right corner on the main Little MIDI
screen that says “ARCTIC”. Pressing that button will allow you to switch
over to Arctic Keys without having to double click the iPad’s home button.
If you are also sequencing NLog Synth Pro on with the green sequencer,
you can set it as a separate green fast switch app, and whenever you
edit the green sequence you’ll have an “NLOG” fast switch button.
Little MIDI Machine
USER MANUAL FOR IPAD
Other Settings Menu Functions (right side)
BUFFER SMALL/MEDIUM/LARGE
This button allows you to set the MIDI latency buffer that Little MIDI uses
for MIDI notes. You can make it bigger or smaller depending on your
current setup. If you are sequencing over WiFi, use large. If you are using
virtual MIDI to sequence other apps, use small.
SOUND ON/OFF
Turns Little MIDI’s internal sound engine on or off. Usually you will want
this off.
SEQ LINK
When this option is active, switching between sub-sequences (A B C D)
will be linked for both the orange and green sequences. So if you go
from sub-sequence A to B on the orange sequencer, when it switches the
green sequencer will also switch from A to B. This can be useful if you are
using the sub-sequences to represent parts of a song (intro, mid, build,
finish) and always want both sequencers using the same sub-sequence.
FOOT SWITCH
When the footswitch button is “ON”, Little MIDI will accept start/stop
commands from any MIDI input regardless of the MIDI routing settings.
This is useful if you want to use a footswitch connected to an Alesis iPad
Studi/o or other MIDI interface that has footswitch support, but want to
use LMM’s internal clock instead of an external one. Pressing the
footswitch will start Little MIDI, but it will otherwise use its own timing.
MIDI RESET
Press this to reset the Line 6 MIDI Mobilizer and/or CoreMIDI interfaces
and hopefully clear up any hanging notes or other problems.
Little MIDI Machine
USER MANUAL FOR IPAD
We hope you enjoy making music on your iPad with the
Little MIDI Machine app!
Let us know if you're using it to create music, we would love to hear
about what you're up to.
For the latest info, videos and tutorials check out the Little MIDI Machine
page. Also be sure to check out some of the other iOS music apps
available from Synthetic Bits, including our FunkBox vintage drum
machine app for iPad and iPhone:
Little MIDI Machine is ©2012 Synthetic Bits.