1
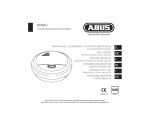
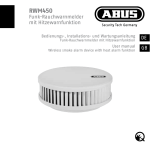
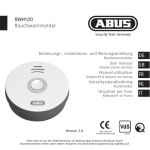
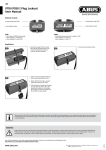
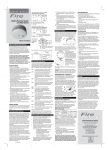
RM40Li Wireless Smoke alarm devices User manual Wireless Smoke alarm devices GB 12 0786-CPD-21145 EN 14604:2005 / AC:2008 Please read carefully through this instruction for use before starting up! Smoke detectors help save lives! Please keep save this instruction for use! G212035 Device description X 1 5 2 4 3 6m 4m 30-50 cm Y 50 cm 50 cm Z – 22 – Device description Contents Device description ...................................................................................22 Safety information ................................................................................. 24 Putting into operation ..............................................................................27 Cleaning and disposal ............................................................................. 34 Device description, see diagram X Item Name Comment 1 Sound outlet 2 LED status lamp 3 Battery compartment 4 Detector base With mounting holes 5 Test button Press the lower section of the housing cover to the actuate the test button. This button also funtions as the mute button for the alarm tone. The status lamp is under the cover (on the right) beneath the logo) and shines through it Function and features Smoke detection %/ Sound level At least 85 dB at a distance of 3 metres Optical alarm display ;Z/`Q + a second in the event of an alarm Temperature range 0 °C to +40 °C Humidity 0% to 90% – 23 – GB Device description Safety information Power supply >7?@$#$# Power consumption 7|PQV Environmental conditions Only approved for indoor use Wireless frequency 868 Mhz Wireless range Up to 30 m Networking Up to 32 detectors Battery service life Up to 2 years Audible battery warning V7|`Q # Height 35 mm Diameter 102 mm Applied standards Z[>P\QPH]QQ^_@ `^>^ $ | Scope of delivery • ABUS RM40Li wireless smoke detector incl. battery • This user manual • Installation material Explanation of symbols The following symbols are used in this manual and on the device: Symbol Signal word Meaning Warning Indicates risk of injury or health hazards. Warning Indicates risk of injury or health hazards caused by electrical voltage. Important Indicates possible damage to the device/accessories. – 24 – Safety information Note Indicates important information. Warning +$ /|+ | • People with hearing impairments may not be able to hear the alarm. Special alarms with visible signalisation are available for such cases. • Wireless smoke detectors help save lives. Therefore, for safety’s sake, you should regularly test the battery and the operation of the detector. For day-to-day use, remember that the wireless smoke detector cannot # | For your own safety, please replace smoke detectors every ten years at the latest. @ | do not install the detector near strong magnets or devices which produce electromagnetic radiation. The wireless smoke detector works optically by measuring smoke particles that #| 7 |+ $ in the measuring chamber. • Monitoring area: 40 m2 J >7?@#+ • Automatic battery state monitoring • Optical LED indicator lamp and acoustic alarm • Simple installation – 25 – GB Safety information Warning Observe the following instructions to prevent any failure of the device: • Do not cover the device. • Do not paint over the device or cover it with wallpaper. • Never open the device or attempt to repair it, as its function can then no longer be guaranteed. Failure to observe this instruction will invalidate the warranty. • Do not use the device if it has been dropped or damaged in any other way. • If you pass on the device to someone else, you must include this user manual. Before operation Warning • Keep children away from the packaging – there is a risk of | • Remove all packaging material before using the device. Intended use Only use the device for the purpose which it was designed and built for. Any other use is considered inappropriate. This device may only be used for the following purpose(s): _$ – 26 – Safety information Putting into operation What to do when you hear the alarm? • Leave the premises immediately. Every second counts – there is no time to get dressed or gather valuable belongings. Use the emergency escape routes. • Warn your fellow residents and make sure they also leave – especially children and people with impaired hearing. +$| is hot or you see smoke under it. Use an alternative escape route. If the surface is cool, push against it with your shoulder, slightly open it and be prepared to $# | }$$/ # cloth if possible. *| *# # back inside. # ## | [# # | What to do if there is a false alarm? • A false alarm can occur due to very high air humidity, the build-up of smoke +$# H 7| } |} alarm, you can mute the alarm tone by pressing the test button. The alarm will # #/;Z| $ ++$ *$# | – 27 – GB Putting into operation For recommended installation locations, see diagram • Position the wireless smoke detector directly on the ceiling in the centre of the room. • Priority rooms: living rooms, bedrooms and children’s playrooms. }# # ++ smoke detector. +$ # +# | Long corridors might require several smoke detectors. $$ >^ from the side walls and 50 cm from the corners. Warning Avoid the following locations to prevent malfunctions of the wireless smoke detector: %+7 ambient operating temperature (+0 °C to +40 °C). • Places where draughts can keep smoke away from the detector, + + *| %+ 7 trigger false alarms, e.g. in kitchens, bathrooms or garages. • Places where dust or dirt could impair the function of the smoke detector. • The highest point in rooms with gable ceilings. The distance to the highest point of the gable should be at least 30 cm. – 28 – Putting into operation For installation and attachment, see diagram Warning • When marking out the drill holes, make sure there are no electrical wires or cables, pipes or other important components behind them. } #7# | }+$ camper or caravan), you must contact the manufacturer or your local #| 1. Loosen the wireless smoke detector from the base of the housing by turning it anticlockwise. Mark the drill holes through the base. 2. Drill the holes, put in the plugs and screw in the base. 3. Insert the battery (see diagram ) and fasten the wireless smoke detector by GB twisting it clockwise onto the base. The detector has a safety device that prevents installation without a battery. 4. If you cannot fasten the wireless smoke detector to the base: Check whether the battery is correctly inserted and connected. Operation and function test • The wireless smoke detector is ready for use as soon as you put in the battery. • The smoke detector can be used alone or with other RM40 Li detectors connected +| +/`Q to show that the battery is correctly inserted and is delivering enough power to generate an alarm. • Check the function of the smoke detector at regular intervals. Press the test button +7|> |} the device is working properly and can be fastened. The test signal (3 beeps) P ;Z/| – 29 – Putting into operation • Alternatively, you can use the RM test spray available from ABUS to test the wireless smoke detector. If the RM test spray enters the detection chamber, an alarm should sound, so that you can test whether the wireless smoke detector is working properly. V* >Q # 7 $|% initiate a test alarm during this time. Networking the wireless smoke detectors • Please note: do not network another model of wireless smoke detector with this one. This may lead to improper functioning and it cannot be guaranteed that the device will operate problem-free. • If the test mode on one detector in a network is activated, all other networked detectors will produce a signal too. • If one of the detectors in the network detects an alarm, all other detectors in the network will raise the alarm. • If the battery in one detector is low, this will be indicated directly by the |} +# #+$ P#]# /;Z| Networking the detectors (recommended before installation) You will require at least two RM40 Li wireless smoke detectors to be able to create + +$|V7`] #+$ | Due to the network connection, the distance between individual detectors must #7`Q|+#/ # structural surroundings. The RM40Li detectors can be cascaded, meaning that the detectors are not connected in one direction only, so the alarm signal can be | – 30 – Putting into operation This means that when a detector receives an alarm signal, it forwards the signal on to the detectors it is connected to. GB Note:# @ connected sensor must not take more than 30 seconds. For correct assembly, make absolutely sure that this requirement is adhered to. >50 cm >50 cm >| %# 7|] ;Z/ slowly, roughly once a second. The detector is now in addressing mode. – 31 – Putting into operation ]| %# 7|] detector in addressing mode too. `| 7 *\Q | 4. The addressing process can take up to 60 seconds. When the detectors have been successfully trained, the LED on both detectors lights up for around 5 seconds, *+ 7 |}+ + *\Q | 5. If you wish to connect several detectors together, + with which you can connect the other detectors. Proceed with points 1 to 4 as described to connect the detectors in a network. \| +7 with another. Reset default factory settings/separate network connections In order to reset the smoke detectors to the default factory settings • Press the test button and hold it down. V*7|] ;Z+/ |V*^ ;Z+/7|+ | • Now let go of the button. If a short beep is heard, the procedure was successful. All network connections between the detectors have then been separated. Muting the detector If an alarm has been triggered, the wireless smoke detector can be muted by pressing the test button. In the case of networked detectors, the mute button on the activated detector can also silence the alarm of the other networked detectors. – 32 – Putting into operation Please note that in all other cases the muting only applies to the detector whose test button has been pressed. The mute remains active until the alarm is automati|+# + is muted. Audible and visual signals Mode Audible Visual Standby – ;Z/ 30 seconds Testing 3 beeps 4 times ;Z/+ a second Smoke chamber fault Beeps once every 30 seconds ;Z/+ a second Restforing the factory settings Short beep ;Z/+ Fault in smoke chamber Beeps once every 30 seconds ;Z/ 30 seconds Beeps once a second ;Z/+ a second Notes GB Acoustically and visually out of sync Indivisual operation Alarm Muting the detector – Low battery Beeps once every 30 seconds ;Z/ a second ;Z/ 30 seconds – 33 – Acoustically and visually in sync Putting into operation Mode Cleaning and disposal Audible Visual Beeps once a second ;Z/+ a second Notes Networked detector Alarm Muting the detector – – Low battery Beeps twice every 4 hours Flashes twice every 4 hours Addressing – Flashes once a second Addressing successful – LED lights up for 5 seconds Acoustically and visually in sync Replacing the battery • If the battery is low, the wireless smoke detector beeps twice a minute (for up to 30 days) to remind you to replace the battery. • You must change this battery when you hear this signal. • Even so, the wireless smoke detector remains functional in this condition. • You must test the wireless smoke detector each time you change the battery. • Carry out the test as detailed above to check if the functioning and the network connection can still be guaranteed. Note To ensure a long service life and reliable operation, we recommend using the following high-quality lithium batteries: ;Z@Z?@H% – 34 – Cleaning and disposal ## # /| V*#+#+ >Q +$|$* the battery. Alarms and error signals 7 | • The alarm continues sounding as long as there is smoke in the detection chamber. + +$ chamber. GB Note • Your device requires no maintenance. • Protect the device from dust, dirt and moisture. Cleaning • Dusty detectors must be cleaned. You can clean dust from the air vents of the detector using a vacuum cleaner or compressed air. If necessary, you can remove the dust with a brush. • When changing the battery, carefully clean the detection chamber in the wireless smoke detector with a vacuum cleaner to remove any dust or dirt. • You can clean the surface using a cloth slightly dampened in soapy water. – 35 – Cleaning and disposal Important • Do not allow water to penetrate inside the device. • Do not clean the device in a dishwasher. • Do not use sharp, pointed, abrasive or corrosive cleaning materials or hard brushes. • Do not use chemicals. /# | Information on the EU directive on waste electrical and electronic equipment To protect the environment, do not dispose of the device with domestic waste at the end of its service life. It can be disposed of at one of the appropriate collection points in your country. Please obey your local regulations when disposing of material. Dispose of the device in accordance with EU directive 2002/96/EC – WEEE (Waste Electrical and Electronic Equipment). If you have any questions, please contact the department of your local authority which is responsible + | # 7# your local or municipal authority, the local waste disposal company or your dealer. Information on handling batteries • Make sure that batteries are kept away from small children. Children may put batteries in their mouths and swallow them. This can cause serious harm to their health. If this happens, consult a doctor immediately. #+$ / 7 | • Change low batteries in good time. • Always change all the batteries at the same time and use batteries of the same type. – 36 – Cleaning and disposal Important • Leaky or damaged batteries can cause chemical burns on contact with the skin. In this case, wear protective gloves. Clean the battery compartment with a dry cloth. • Do not charge normal batteries, heat them up or throw them into naked /7 | Important information on disposing of batteries Your product uses batteries which are subject to the European directive 2006/66/EC and may not be disposed of with domestic waste. Find out about the regulations for the separate collection of batteries which apply in your country. Proper disposal of batteries helps prevent harm to health and the environment. Batteries that contain harmful chemicals are labelled with these signs: Pb = battery contains lead Cd = battery contains cadmium Hg = battery contains mercury Guarantee • ABUS products are designed and manufactured with the greatest care and tested according to the applicable regulations. • The warranty only covers defects caused by material or manufacturing errors that occurred before the product was purchased. If there are demonstrable material or manufacturing errors, the wireless smoke detector will be repaired or replaced at the warrantor’s discretion. • In such cases, the warranty ends when the original two-year warranty period 7|V7 | • The warranty does not cover the batteries supplied. – 37 – GB Cleaning and disposal VJ+# # #7 /|| normal wear and tear or failure to observe the instructions in this manual. • In the event of a warranty claim, the original receipt with the date of purchase and a short description of the problem must be supplied along with the wireless smoke detector. } +$ +7 ++| Declaration of conformity ABUS August Bremicker Söhne KG, Altenhofer Weg 25, 58300 Wetter, hereby declares that the RM40Li complies with the basic requirements and other relevant terms of the 1999/5/EG. For further information on the CE declaration or to view the CE declaration, please get in touch with ABUS August Bremicker Söhne KG, Kundenservicecenter, Altenhofer Weg 25, 58300 Wetter. Declaration of performance 201340 (RM40Li) $ # accordance with Regulation EU 305/2011. It has been manufactured subject to monitoring by regular and independent inspections for unchanges in compliance with legal and normative requirements. The respective declaration of performance can be found at www.abus.com – 38 – Note GB – 39 – Subject to technical alterations. No liability for mistakes and printing errors. © ABUS | D-58292 Wetter (Germany) www.abus.com © ABUS 07/2013 GB