1
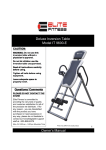
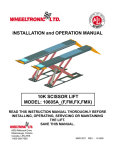
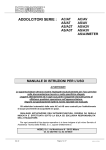
ThermoDesk ELITE™
Adjustable-Height Desk System
Installation and User Guide
Version 1.0
Congratulations on your purchase of a
ThermoDesk ELITE™ adjustable-height desk system!
We designed this product to be as easy as possible to assemble, but if you have any questions
during the assembly process please do not hesitate to contact our Customer Care department
(see back page for contact information).
Before you begin
• Tools required: #5 Allen key, Phillips head screwdriver
• Clear a good-sized area to lay out all the components of the desk system and to assemble it.
During the assembly process you will need to lay the table top down on the floor, upside
down. If not on carpet, we recommend placing a soft blanket down first in order to protect
the table top surface. Alternatively, this can all be done on top of another table rather than
on the floor.
• The ELITE base is designed to work with any table top, though assembly is easiest when
using a genuine ELITE table top. ELITE table tops include threaded insert nuts that remove
any confusion as to where to drill, the bit size to use, or how deep to drill. These recessed
nuts also extend the life of the product, by preventing degradation of the wood fibers that
comes from over-tightening, or from removing and reinstalling wood screws too many times.
Should you be installing your own table top on the ELITE frame, make sure to drill
appropriately-sized pilot holes before inserting wood screws. Correctly-sized wood screws
are supplied with the ELITE base. It is critical to pay attention to the available depth for
pilot holes so as not to damage the lamination of the table top surface. The ELITE tabletop
is 1-1/8” thick.
• Before you start assembling, check that all the parts have been included in the box. In
addition to these larger components there will be a small parts bag included with the base,
and another small parts bag included with the table top.
1
Assembly Instructions
Locate the parts kit that is included in the box with the ELITE base. Note: if you purchased an
ELITE table top to go with your ELITE base, the machine screws for attaching the top to the base
are separately packed with the table top.
This is what the complete base unit will look like when you are finished assembling it, before
attaching the table top:
Step 1: Attach the feet to the lifting legs
Attach the feet to each lifting leg, using four 1” machine screws for each leg. You will need to use
the appropriately-sized Allen key for these screws.
ThermoDesk ELITE Installation & User Guide
2
Step 2: Assemble the crossbars
There are two crossbars to be assembled and attached to the lifting legs. Each consists of two
square metal tubes and a “C channel” part that slides in between them. These crossbars need
to first be set to the width of your tabletop. Note that the crossbars arrive already set to a
centered “one hole width,” which is the correct setting for a 48” wide table top. If you’re
installing a larger table top refer to this table to determine the number of holes that will need
to be exposed for the given table top width:
Table top size
Number of holes
exposed in crossbar
30” x 48”
1
30” x 60”
3
30” x 72”
7
30” x 83”
9
To adjust the crossbar width, loosen (do not remove) the two bolts on either side of the center
hole. Slide the square tubes out to reveal the correct number of holes for your table top size,
keeping the C channel centered. For example, if installing for a 60” table top, slide the C
channel out to expose one additional hole left-of-center, and one additional hole right-ofcenter, to reveal a total of three holes. The original exposed hole must remain in the center,
with an equal number of newly-exposed holes to the right and left.
Align the holes on top of the crossbar with the corresponding holes on the C channel and then
tighten the four loose bolts back down to set the position.
3
Step 3: Attach the crossbars to the lifting legs
Attach the crossbars to both sides of each lifting leg using 1” machine screws. Cover the bar ends
and bolt pass-through holes using the plastic caps provided, as shown below.
Step 4: Attach the top support arms
Attach the two support arms to the base, using 1” machine screws. Note that the ELITE base is a
cantilevered “C-Leg” design. Of the four holes on the top support arm, use only the two holes
indicated here:
ThermoDesk ELITE Installation & User Guide
4
Step 5: Attach the base to the table top
Carefully lay the table top upside down on the carpet or a protective surface. Place the base
down on the table top and line up the holes in the top arms with the recessed nuts. The machine
screws for attaching the base are located in the box the table top arrived in.
Step 5A: Use the (6) 5m x 20mm machine screws to attach the top support
arms to the table.
Step 5B: Use the (8) 5mm x 60mm machine screws to attach the frame to
the table top.
Step 6: Install the digital hand controller
Using the (3) wood screws supplied with the base, attach the hand
controller to your preferred location. All ELITE table tops have predrilled pilot holes for installing the hand controller on either the left or
right side. The 72” and 83” long table tops also have a center position,
which is ideal for sit-stand-walk treadmill desk configurations.
Example: on 30”x84” (XXL) table top
Mount the digital hand controller wherever you’d prefer,
using the pre-drilled holes provided
5
Step 7: Install the power supply
Using the (2) 5mm x 25mm machine screws, attach the power supply to the table top.
Step 8: Attach the Cables
The power cord must be unplugged while cables are being attached to the control unit.
NOTE: ThermoDesk products are designed for use with a 120-volt circuit (American standard),
and should not be used with any other voltages or conversion adapters
1.
2.
3.
Plug the left- and right-side drive cables into either of the 8-pin motor sockets.
Plug the hand controller into the round 7-pin socket.
Connect the power supply to the power outlet.
After connecting all the cables and testing that the desk is working properly, you may want to
use cable ties or other devices to secure the motor and controller cables to the bottom of the
table top for a cleaner appearance.
Power plug adapter
Motor drive 2
Hand controller
Motor drive 1
ThermoDesk ELITE Installation & User Guide
6
User Instructions
Make sure that there is nothing blocking the travel of the desk in the space where it will
operate. After the desk is assembled and plugged into the power outlet, the controller will
need to be initialized. To do so, press and hold the “Down” button until the desk descends
completely, then “bounces” and ascends slightly. Doing so allows the control unit to
register the lowest elevation before use.
Storing a height setting in the controller
Adjust the desktop to the position you want to save
The display will show the desktop height (e.g. 73 cm)
Press the memory key
The display will read S Press the desired memory position key (e.g. 2)
The display will read S 2. The set desktop position will now be saved to
the selected memory position key
You will hear an audible double click and after about 2 seconds the
saved desktop position will be displayed
Adjusting the desktop to a saved position
Method 1:
Press the desired memory position key (e.g. 2) and hold it down. The
desktop will move until it reaches the saved position. If you release
the key before the saved position is reached, the desktop will stop and
the saved desktop position will not be reached.
Method 2:
Press the required memory position key twice quickly and release.
After the double press, the desktop will automatically adjust to the
saved position. The display will show the current (saved) desktop
position.
7
Manual Reset
If the actual desktop position no longer corresponds to the height displayed, you can
reset the lowest desktop position to the minimum height.
Press the desktop down key. Keep pressing it until the desktop has
reached the lowest position (programmed desktop position).
Press the desktop down key again and keep pressing it. After about
5 seconds, the desktop will slowly move further down until it
reaches the absolute lowest desktop position possible (22 in.).
Release the desktop down key. The electric height-adjustable desk
can now be used again normally.
NOTE: The Collision Avoidance feature is not enabled during reset. Ensure that the area
below the desk is completely clear before performing a reset.
Container- and Shelf-Stop Positions
These two features can be used to limit the movement area of the desktop (e.g. if a tall
trash can is placed underneath the desktop). A container stop position can be defined in
the lower half of the movement area, a shelf stop position in the upper half. If a
container stop position is set, this position will be the lower limit position. If a shelf stop
position is set, this position will be the new upper limit position.
To store a container stop / shelf stop position:
Move the desktop to a position where the container stop or shelf
stop position shall be stored.
Press S for 10 seconds. The Control Unit will click twice when the
container stop position is stored.
To deactivate the container stop / shelf stop position:
Move the desktop to any position in the lower half to deactivate the
container stop. Move the desktop to any position in the upper half
to deactivate the shelf stop.
Press S for 10 seconds. The Control Unit will click once when the
container or shelf stop position is deactivated.
ThermoDesk ELITE Installation & User Guide
8
Change the displayed height format (from inches to centimeters)
Press the first two memory keys and desktop up key at
the same time. Keep this combination pressed for about
3 seconds. Then release the keys.
The display will read S and any number, for instance S 1.
Press the desktop up key until the display reads S 5.
Press the memory key.
If the display was set to centimeters, it will now be
changed to inches. Use the same procedure to change
from inches to centimeters.
9
Installing Optional Accessories
ThermoDesk in-surface dual-AC power socket
The 3” grommet holes provided in the ELITE table tops are ideally sized for accepting the
flush-mounted power socket “nodes.”
Step 1
Step 2
ThermoDesk ELITE Installation & User Guide
Step 3
10
Installing Optional Accessories
ThermoDesk retractable ergonomic keyboard tray
Pre-drilled pilot holes have been provided in the ELITE table tops for making the installation of
the keyboard tray baseframe very simple. See the respective diagram for your table top
dimension for placement options. Use the (6) #12 x ¾” wood screws provided with the
keyboard tray.
If you would like to mount the rail in a different
location than where the pre-drilled holes are
provided then use the actual baseframe as a
template, or use the paper template that was
provided in the box with the keyboard tray. Use a
1/8” inch pilot hole, and drill 1/2” deep. Take care
not to drill through the table top surface.
Keyboard Tray Baseframe
Retracting the keyboard tray
Due to the position of the crossbars the keyboard tray may not be able to fully retract under
the desk. To move the keyboard tray completely under the desk simply rotate it out of the way,
rather than slide it back.
Note: on the 30”x48” top the rail is mounted left-to-right in order to provide sufficient
clearance for the keyboard tray to be fully rotated under the desktop without hitting the lifting
lets, as shown in the example below:
11
30”x60” (Large)
30”x72” (XL)
30”x84” (XXL)
ThermoDesk ELITE Installation & User Guide
12
Preventive Maintenance and Cleaning
After first week of use: Tighten down all screws and bolts.
Cleaning the base: Clean the base frame by wiping it down with a microfiber cloth moistened
with a standard household cleaning solution. Never use solvents or abrasive or corrosive
compounds on the frame. The base should be cleaned at regular intervals to remove dust and
dirt, and inspected for mechanical damage, wear and breaks - worn out parts should be
replaced.
Cleaning the table top: All ThermoDesk table tops are manufactured with a “3D lamination”
process that results in an extremely durable surface, similar to what is often used in hospital
environments. As such it can stand up to most cleaning solutions without risk of discoloration
or degradation. Anti-bacterial solutions may be used. Always test new cleaning solutions on a
less-seen surface first before using on the entire table top.
Extended non-use: Unplug the power cord if you do not intend to use the desk for a long
period of time.
Troubleshooting
If the table cannot be raised or lowered, check the cable connection between the
control unit and the motor units (leg system), the handset and the control unit, as well
as between the control unit and the power outlet.
If the table still does not respond, the control unit may have triggered the overheating
protection or the intermittency protection. Please wait for at least nine minutes and try
again before proceeding with other measures.
If a control unit has been replaced - or unplugged for a substantial period of time - it
must first be reset before it can be used:
13
•
Lower the table to its lowest position by holding the “Down” button on the handset
•
Press the “Down” button on the handset again and hold it down until the table first
moves fractions of an inch downwards and then fractions of an inch back up again.
The control unit has now registered the lowest elevation and is ready to use
•
Should the table still not work as intended after taking these measures, please
contact the iMovR Customer Care Department for assistance.
Warranty
The ThermoDesk ELITE warranty coverage is as follows:
20
YEARS
10
YEARS
5
Steel Frame
Moving parts
Table top
YEARS
2
Electronics
YEARS
To obtain warranty repair please contact the iMovR Customer Care department:
Hours:
Phone:
Fax:
E-mail:
Live chat:
ThermoDesk ELITE Installation & User Guide
See www.iMovR.com/hours
(888) 208-6770 or (425) 999-3550
(425) 999-3550
[email protected]
www.iMovR.com
14
Specifications
The ELITE base
Lift Capacity:
Height adjustment range:
Width adjustment range:
Noise level:
Travel speed:
Controller:
Power consumption:
Anti-collision detection:
Manufacturing origin
The ELITE table top
Lamination type:
Available sizes:
Available colors:
Easy installation features:
Edging:
Surface rating:
Manufacturing origin
220 lbs.
23.5" to 48.5"
44" to 75" - eight incremental positions
42dB during descent, 46 dB during ascent
1.5 inches per second
Four pre-programmable positions, displays height in centimeters or inches
0.375 watts on standby; 2.8A on start-up, 1.4A on continuous lift.
Programmable container-stop and shelf-stop positions
Made in America, incorporating precision BOSCH motors from Germany
Surf(x) 3D
30x48, 30x60, 30x72 and 30x83
Cherry, Mahogany, Maple, Black, White and Gray
Recessed nuts for attaching base legs, pre-drilled pilot holes for keyboard tray(s)
and hand controller
Ergonomically-contoured “comfort edge”
Ultra-durable
Made in Michigan
Available Options
• Ergonomic Retractable Keyboard Tray
• Single and Dual-Arm LCD Monitor Stands
• Grommet-mounted Dual-AC Power Socket
• Treadmill
ThermoDesk ELITE Installation & User Guide Part No. DO-IM-ELITE-INSTALL-MANUAL