1
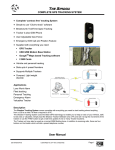
Kinectrics PedGen
User Manual
2013
Kinectrics PedGen User Manual v1.1
Page 1
Foreword
Thank you for purchasing a Firefly Kinectrics PedGen Pedal Power Generator. The Kinectrics PedGen converts human kinetic
energy into electrical energy which can be utilised to charge a Firefly Portable Solar Generator or power 12 Volt electrical items
suitable for plugging into a conventional vehicle’s power outlet.
The purpose of this manual is to help you understand the processes of setting up and operating a Kinectrics PedGen . The manual will also help you with fault finding and offers an insight into the basics of how the system works, what each component is
doing and why.
Conventions
Terminology:
The following terms are used in this manual to provide greater clarity:
The Kinectrics PedGen will be referred to as ‘Unit’.
The black enclosure attached to the metal frame will be referred to as the ‘Regulator Box’
Any items that consume power will be referred to as ‘Consumers’.
Standards & Regulations:
The Kinectrics PedGen conforms to the follow standards and regulations:
LVD 73/23/EEC
EN 61000-6-1, EN 61000-6-3, EN 55014
IP44
WEEE Directive
RoHS Directive
Disposal & Recycling:
The Kinectrics PedGen comprises of components that must disposed of responsibly. Many of the components within the unit
can be recycled or reused. For more information on safe and proper decommissioning of your Kinectrics PedGen please contact
the manufacturer.
Kinectrics PedGen User Manual v1.1
Page 2
Firefly Solar Contact Details
Firefly Solar Generators Ltd,
20 Cliffe Industrial Estate,
South Street
Lewes,
East Sussex,
BN8 6JL
Tel: +44 (0) 1273 40 95 95
Fax: +44 (0) 1273 40 95 96
E-mail: [email protected]
Web: www.fireflysolar.net
About Firefly Solar
Firefly Solar is a European leader in the design and manufacture of off-grid, portable and permanent solar-powered generators.
Our green energy products and services meet the needs of environmentally concerned individuals and organisations who are
looking to reduce the carbon emissions caused by the use of fossil fuels and diesel powered equipment.
Firefly Solar generators harness energy supplied by the sun using photovoltaic (PV) cells, storing it for when it’s needed. Additionally, multi-charge inputs allows kinetic and wind energy to be stored for convenient use. We are specialists in green energy
storage systems – our expertise in batteries, electronics and software has enabled our generators to overcome many of the
problems of intermittency which can be associated with renewable energy sources.
Firefly Solar generators can provide an uninterrupted electrical supply even in the absence of light or other charging input. Our
award-winning products, which include the 'Cygnus', 'Pictor' and ‘Pyxis’ models, have been widely used by well-known brands
such as Coca-Cola Enterprises, the BBC, Sky, Greenpeace, Friends of the Earth and Solar Aid.
Firefly Solar provides temporary stand-alone power for the events, broadcast, and construction industries; permanent standalone power for rural locations and telecommunications; and back-up (UPS) power with extended run times for locations with
intermittent grid connectivity. Firefly Solar power generating equipment is zero emission, true silent running and eliminates the
need for inflammable fuel.
Kinectrics PedGen User Manual v1.1
Page 3
Getting Started
Section 1 - Storage
I.
When not in use it is recommended that the unit is stored in a cool, dry place to optimise the lifetime of the
unit and its internal components.
II.
It is recommended that all cables are removed from the unit when not in use to minimise the chance of damage to the unit’s connectors.
Section 2 - Transportation & Handling
1.
2.
Transportation
I.
To ensure that the unit remains in good condition It is recommended that the unit is always transported in a
flight case. Flight cases are available from Firefly Solar as an optional extra.
II.
If not using a flight case, be sure that the unit is located securely and that the regulator box and its connectors
are not damaged.
Removing from packaging
I.
The unit should always be lifted and positioned by holding the metal frame. Do not lift by the regulator box or
generator as this may cause damage.
Section 3 - Setting Up & Positioning
1.
Setting Up
I.
Unfold the stand by placing it upright on its rubber feet, then holding with one hand while pulling out each leg
in turn until they reach the end of their travel and locate into position.
Kinectrics PedGen User Manual v1.1
Page 4
II.
2.
Positioning
I.
3.
Move the generator into position. It will hinge out and stop in the fully outward position.
For safety it is essential that the unit is always be placed on a flat, even & level surface. There should be enough
clearance around the unit and bicycle to ensure that nothing can interfere with or get caught in the moving parts.
Attaching the bicycle
I.
Once unfolded and positioned, ensure that the unit is stable.
II.
We recommend the bicycle is fitted with supplied rear quick release skewer for maximum stability. Firefly is not
responsible for any problem caused by using your own skewer*.
(* Quick release skewer = A wheel axle device which allows mounting/disengaging the wheel without any tool)
If not using the supplied skewer, please refer to appendix 1.
III.
Turn the Hub Handle counter-clockwise to ensure there is enough clearance between the couplings. You should
almost fully open the coupling to allow easier wheel installation.
IV.
Insert the left side (opposite the chain) skewer or hub nut into the left side coupling first. If using a quick release
skewer, the lever must be inserted into the cut-out on the coupling to hold the bike stable. Turn the coupling to
adjust the cut-out position prior to tightening the hub handle.
Kinectrics PedGen User Manual v1.1
Page 5
V.
While holding the bike in this position, turn the hub handle clockwise to engage the opposite side skewer end or
hub nut and hold the rear wheel. Once the rear wheel hub is completely engaged between the couplings and you
see the frame starts opening, stop tightening.
VI.
Turn the hub handle two more rotations. Do not try to over-tighten the Hub Handle.
Note: Over tightening may cause damage to both the unit and the bike frame. Under tightening may cause the
bike to come out of the unit during use.
Kinectrics PedGen User Manual v1.1
Page 6
5.
Adjusting the roller
I.
Adjustments must only be made when the rear wheel is not turning.
II.
The transverse position of the roller should be set so that there is approximately 5-10mm clearance between the
side of the bicycle’s rear tyre and the side of the generator.
III.
If the position needs adjusting, use a 5mm Allen Key to loosen the generator plate, slide it to the correct position and retighten.
Kinectrics PedGen User Manual v1.1
Page 7
IV.
Once the generator is in position horizontally, the pressure that the roller exerts onto the tyre should be set. This
is performed by means of the black roller pressure adjustment knob.
V.
Proper roller pressure ensures maximum life of both the generator and tyre. The best position is when the roller
compresses the tyre only slightly, to a depth of around 3-4mm.
Note: Tyre-to-roller contact will eventually wear both the tyre and roller, this is normal.
Kinectrics PedGen User Manual v1.1
Page 8
Section 4 - Connecting The Kinectrics PedGen
1.
Regulated, 12 volt output (only available on regulated versions of the PedGen):
I.
The unit’s regulated output uses Multi Contact MC3 connectors which are widely used in the renewables industry due to their high quality and reliability.
II.
A handlebar mounted MC3 to car cigar lighter socket adapter is available separately. This provides a regulated
12 volt output which is ideal for charging mobile phones, hand-held computer games consoles and other small
electronic devices.
III.
Insert and unplug the connectors one at a time, and avoid twisting while doing so.
IV.
Never connect or disconnect either end of the cable while the unit is being used.
V.
Note: Only use the correct type of connectors or damage will occur. Please contact the manufacturer if you
are unsure or have special requirements for the 12 volt output.
VI.
The units are factory calibrated to 12 volts. It is possible to set the unit to a different voltage. Please contact
the manufacturer for further details.
VII.
It is possible to use both the regulated and unregulated outputs simultaneously
Kinectrics PedGen User Manual v1.1
Page 9
2.
Unregulated, 0-60 Volt output:
I.
The unit’s unregulated output uses a 50A Anderson connector which is widely used in the renewables industry
due to its high quality and reliability. This output is primarily designed to output to a Portable Solar Generator.
Firefly can supply a range of wiring solutions to connect from one to 40 PedGen units. This connector is also
used for the Kinectrics Power Challenge and battery bank charging. Please contact Firefly Solar for further information if you are using this item on non Firefly Solar supplied equipment.
II.
When inserting the connector, the cutout in the outer weatherproofing sleeve should face towards the regulator
box. Push the connector fully home until the top of the outer weatherproofing sleeve reaches the centre of the
lower screw head and a positive click is felt.
III.
Never connect or disconnect either end of the cable while the Kinectrics PedGen is being used.
IV.
We only recommend the use of wiring looms and distribution units supplied by the manufacturer. Contact us if
you have any special requirements.
V.
It is possible to use both the regulated and unregulated outputs simultaneously.
Kinectrics PedGen User Manual v1.1
Page 10
Section 5– Operating The Kinectrics PedGen
1.
Once set up, the bicycle can be ridden as with any other bicycle. Please note the following:
I.
Keep children and pets at a safe distance from the unit and rear wheel of the bicycle.
II.
Avoid using the rear brake and especially harsh braking. Riders should only brake with high force in an emergency.
III.
It is best to remain seated while pedalling at a smooth, even pace. Avoid putting great sideways pressure on the
bicycle as it is being ridden.
IV.
A variation in resistance will be felt while pedalling as the electrical load on the unit increases or decreases, this is
normal. if the bicycle is equipped with gears, it may be necessary to select suitable gears while experiencing varying loads to achieve a comfortable riding pace.
V.
Firefly Solar can provide a bicycle suitable for use with the PedGen. Based on a standard off-the-shelf bicycle, The
PedGen Bicycle has been modified to ensure that it integrates perfectly with the Kinectrics PedGen.
Kinectrics PedGen User Manual v1.1
Page 11
Appendix 1 - Skewer and Axel Types
I.
Both right and left side couplings are designed to suit the supplied quick release skewer. The left side coupling
must fit perfectly in the skewer head to give correct stability. A skewer with an end located lever or that will not
be bent over right angle cannot be used on the unit.
II.
If your bike wheel is equipped with a standard hub nut type axle rather than a quick release skewer, remove the
black plastic grommet from the adjustable coupling for better and safer fitting.
Please note that if your bicycle has a standard hub nut type axle, it is possible to replace the axel with one which
will accept a quick release skewer.
Kinectrics PedGen User Manual v1.1
Page 12
Appendix 2 - Unregulated Output Options
I.
Wiring looms are available for directly connecting either a single or two PedGen units to a Firefly Portable Solar
Generator’s SPEC Pak connector.
II.
For greater output, a range of distribution units are available separately which can accept inputs from between
three and forty PedGen units.
Kinectrics PedGen User Manual v1.1
Page 13
Appendix 2 - Specification
I.
Regulated output
Output voltage:
12.5V DC
Output current:
12A
Output current limit (factory set) 17A ±10%
The output voltage is factory set. Output voltages of 4.5 - 30 are available as factory options
II.
Unregulated output
Output voltage:
Output power:
0V - 60V DC
250W Max.
Bike wheel size:
24” - 700c (28”)
An adapter is available for smaller wheel sizes.
Bike tyre pressure:
30 - 35 psi (2 - 2.5 bar)
III.
Stand weight:
9kg
IV.
Stand dimensions (folded):
525mm W x 180mm H x 470mm D
Kinectrics PedGen User Manual v1.1
Page 14
Appendix 2 - Troubleshooting Guide
Issue
Possible Cause(s)
Suggestions
The unit is not generating power
The roller is not exerting enough pres- Check the tyre is being depressed 3-4mm by the
sure on the tyre
roller. Adjust as necessary.
Refer to Section 3, Part 5
The unit is working correctly, but
is noisy
The roller pressure is set too high.
Check and adjust the roller pressure as necessary.
Refer to Section 3, Part 5
The tyre pressure is set too high.
Tyres should be inflated to around 30-35 psi (2-2.5
bar)
The tyre is not seated correctly.
Carefully view the tyre as the wheel is rotating and
check whether the tyre is moving in and out of the
rim. If this is the case, deflate the tyre to the point
that the tyre’s seating can be adjusted by hand.
Once the tyre is reseated, reinflate the tyre. The
tyre should run evenly with very little undulation.
Punctured tyre
The tyre pressure is set too low, alTyres should be inflated to around 30-35 psi (2-2.5
lowing the tyre to rotate on the rim.
bar)
This causes the rim to cut through the
valve stem.
A smell is detected coming from
the unit
Tyre is rubbing on the side of the gen- Check the gap between the side of the tyre and
erator.
the generator is set between 5-10mm and adjust
as necessary.
Refer to Section 3, Part 5
The bicycle is moving in the stand
allowing the tyre to rub against the
side of the generator.
Check that the bicycle is secured correctly and not
moving while being peddled.
Refer to Section 3, Part 3.
If secured correctly, the rider should pedal less
vigorously.
There has been a malfunction with
the regulating circuitry.
Contact the manufacturer to troubleshoot further
and to arrange a replacement regulator box if necessary.
There has been a malfunction with
the generator.
Contact the manufacturer to troubleshoot further
and to arrange a replacement generator if necessary.
Kinectrics PedGen User Manual v1.1
Page 15