1
DC SIDE CONNECTIONS
The DC input power to the inverter is derived from deep cycle batteries of the required
capacity. Read under “Specifying Batteries, Chargers and Alternators” on page 14 for
details on sizing and charging of batteries.
Preventing input over voltage
It is to be ensured that the input voltage of the inverter does not exceed 16.5 VDC for PST15S-12A or 33 VDC for PST-15S-24A to prevent permanent damage to the inverter. Please
observe the following precautions:
- Ensure that the maximum charging voltage of the battery charger / alternator / solar charge
controller is below 16.5 VDC for PST-15S-12A or 33 VDC for PST-15S-24A
- Do not use unregulated solar panels to charge a battery. Under cold ambient temperatures, the
output of the solar panel may exceed 18 V for 12V system or 36 V for 24V system. Always use
a charge controller between the solar panel and the battery.
- When using Diversion Charge Control Mode in a charge controller, the solar / wind / hydro
source is directly connected to the battery bank. In this case, the controller will divert excess
current to an external load. As the battery charges, the diversion duty cycle will increase. When
the battery is fully charged, all the source energy will flow into the diversion load if there are no
other loads. The charge controller will disconnect the diversion load if the current rating of the
controller is exceeded. Disconnection of the diversion load may damage the battery as
well as the inverter connected to the battery due to high voltages generated during
conditions of high winds (for wind generators), high water flow rates (for hydro
generators) or cold temperatures (for solar panels). It is, therefore, to be ensured that
the diversion load is sized correctly to prevent the above over voltage conditions.
- A series type of charge controller connects the solar / wind / hydro charging source directly to
the battery through the series connected switching MOSFET(s). The battery is a capacitive
type of load and will thus, dampen the input voltages of the charging source due to its capacitive
loading effect. As the inverter is connected to the battery bus, it will see the voltages of the
charging source as conditioned by the battery. Please ensure that the inverter is connected
to the battery bus only after the battery is connected to the battery bus or the inverter
is disconnected from the battery bus first before removing the battery from the
battery bus. If the inverter is connected to the battery bus without the battery
connected to the battery bus, the inverter will be fed with the high open circuit
voltages from the solar / wind / hydro and will damage the inverter permanently
- Do not connect the inverter to a battery system with a voltage higher than the rated battery
input voltage.
Preventing reverse polarity on the input side
When making battery connection on the input side, make sure that the polarity of battery
connection is correct (Connect the positive of the battery to the positive terminal of the
inverter and the negative of the battery to the negative terminal of the inverter). If the input is
connected in reverse polarity, DC fuse(s) inside the inverter will blow and may also cause
permanent damage to the inverter
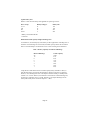
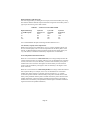
Connection from the batteries to the DC input side of the inverter – cable and fuse
sizes
The flow of electric current in a conductor is opposed by the resistance of the conductor. The
resistance of the conductor is directly proportional to the length of the conductor and inversely
proportional to its cross-section (thickness). The resistance in the conductor produces
undesirable effects of voltage drop and heating. Thus, thicker and shorter conductors are
desirable. The size (thickness / cross-section) of the conductors is designated by AWG
(American Wire Gauge). Please note that a smaller AWG # denotes a thicker size of the
conductor up to AWG #1.
Page 20