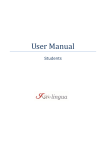
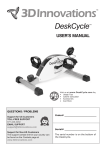
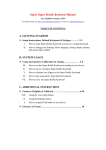
1
Business Computer Information Systems Student Book Unit 3 BUSINESS COMPUTER INFORMATION SYSTEMS UNIT three Word Processing Unit 3 Introduction................................................................................................................................. 1 Unit 3 Goals and Objectives .................................................................................................................... 1 I. Keyboarding Skills........................................................................................................................ 3 Keyboarding Pretest............................................................................................................ 3 Keyboarding Excercises........................................................................................................ 6 Number Key Pad............................................................................................................... 10 Project: Timed Typing Test.................................................................................................. 12 Self Test 1: Keyboarding Skills............................................................................................ 13 II. Creating Business Documents.................................................................................................... 16 Writing and Editing a Business Document.......................................................................... 16 Project: Creating a Memo.................................................................................................. 22 Business Letters................................................................................................................. 24 Project: Creating a Business Letter..................................................................................... 28 Resumes............................................................................................................................ 29 Project: Creating a Resume................................................................................................ 35 Brochures and Newsletter.................................................................................................. 36 Project: Creating a Newsletter........................................................................................... 40 Research Papers................................................................................................................ 42 Project: Formatting a Research Paper................................................................................. 46 Business Reports................................................................................................................ 48 Project: Creating a Business Report.................................................................................... 53 Self Test 2: Creating Business Documents.......................................................................... 55 III. Review Word Processing............................................................................................................ 59 Unit 3 Test: Word Processing........................................................................................... Pull-Out i LIFEPAC Business Computer Information Systems Foreword Business Computer Information Systems is a ten-unit high school elective that explores the use of technology applications in both business and personal situations. Occupations have transitioned from those that primarily produced things to those that manipulate and manage information. Whether it is at home, in a factory, at a school, for a business, or in an office, almost everyone today uses many forms of technology on a daily basis. This course will explore the software applications and information technologies that everyone is likely to use in business situations. Production Manager: Alan Christopherson Editorial: Managing Editor: Alan Christopherson In this course the students will learn computer terminology, hardware, software, operating systems and information systems that relate to the business environment. The units will concentrate on learning the standard applications of word processing, spreadsheets, database management and graphical presentation packages. In addition, skills in personal and interpersonal communications and in communication technologies will be studied. Copy Editor: Laura Messner Art, Layout, and Design: Layout and Design: Brian Ring, Melissa Fransen Illustration: The course is intended to help students arrive at the following understandings: Brian Ring, Melissa Fransen Cover Design: Ryan Egan Some images that appear in this unit are © 2008 JupiterImages Corporation. • Effective communication skills and productive work habits can increase employees’ success. • Technology solutions can help employees be more productive and effective. Keyboarding is a stated prerequisite for this course. While there are some keyboarding reviews in the course, there is no keyboarding instruction. Screen capture(s) created using OpenOffice.org 2.4.1 courtesy of Sun Microsystems Inc. Copyright 2000–2008 Sun Microsystems Inc. Business Computer Information Systems covers topics from TEKS §120.23 and §120.64. All trademarks and/or service marks referenced in this material are the property of their respective owners. Glynlyon, Inc. makes no claim of ownership to any trademarks and/or service marks other than its own and its affiliates’, and makes no claim of affiliation to any companies whose trademarks may be listed in this material, other than its own. Business Computer Information Systems contains the following units: LIFEPAC Business Computer and Information Systems – Unit 3: Word Processing © 2010 Glynlyon, Inc. 804 N. 2nd Ave. E. Rock Rapids, IA 51246-1789 ii Unit 1 — Communication Skills Unit 2 — Business Technology Unit 3 — Word Processing Unit 4 — Spreadsheets Unit 5 — Databases Unit 6 — Telecommunications Technology Unit 7 — Desktop Publishing Technology Unit 8 — Presentation Technology Unit 9 — Computer Networks Unit 10 — Computer Operating Systems Unit 3: Word Processing Introduction This unit will focus on keyboarding and word-processing skills. You’ll review keyboarding techniques and work toward improving your speed and accuracy. You’ll then turn your attention to word-processing skills. You’ll first study the correct format used by business professionals to create business documents, and then—using a word processor—you’ll create several different types of these business documents. Your goals for the unit include the following: • Improve keyboarding speed and accuracy. • Input data using the ten-key number pad. • Identify correct format of business documents. • Utilize hardware and software to produce business documents. • Edit a variety of written documents. The objectives for this unit include the following: • Use a keyboard with proper finger placement and posture. • Improve your keyboarding speed and accuracy. • Type numbers using the numeric keypad. • P repare a variety of effective written documents, including memos, business letters, resumes, newsletters, research papers, and business reports. • Edit and revise business communications for spelling, punctuation, and capitalization. • Make stylistic changes to business communications. • Add graphics, tables, and charts to word processing documents. 1 Note to Students: The lessons in this unit are intended to provide general information about using word processing programs to organize and work with text and graphics. You will learn the basics of entering, formatting, and editing text. You’ll also learn how to create some commonly used business documents. There are many different word processing applications on the market, and some programs have commands that are unique to their design. For this reason, the course developers have designed this unit to apply to word processing programs in general. Some of the demonstrations in this unit were created using Open Office Writer. Your word processing software may use a different process than the one demonstrated. If this is the case, you will need to learn the process used by your software to complete the projects. 2 I.Keyboarding Skills Keyboarding Pretest Suppose you ran a race one year ago. If you remembered your time, you could run another race and compare your times to see if you improved. In this lesson, you’ll do that very thing with keyboarding. First, you’ll review some keyboarding techniques and get some practice. Next, you’ll take a timed test to measure your skills. Finally, you’ll wrap things up with some additional practice exercises Objectives: • Measure your current keyboarding speed and accuracy. • Identify good keyboarding techniques. • Identify home row. Vocabulary: cursor - blinking line that indicates where the next letter, number, or character will appear. home row - component in the body of the computer that stores all your files and folders. Let's start with some warm-up exercises, followed by a timed test to measure your current speed and accuracy. During this timed test, your hands should rest lightly on home row. When your hands are on home row, your left hand is on asdf and your right hand is on jkl; with both of your thumbs on the space bar. Please refer to the media CD to do Warm Up 1 and 2. Timed Test Now that you have completed the warm-up exercises, let's take a one-minute timed test to measure your current keyboarding speed and accuracy. During the timed test, continue to keep your hands on home row and look up at the screen. In the timed test, you will not hear a beep when you make a mistake. Keep these three rules in mind when taking timed tests in this unit. Warm-up exercises Let's start with some brief warm-up exercises. If you make an error during any of the typing exercises in this section, you will hear a soft beep. Also your cursor will remain at the same location until the correct letter is typed. In other words, you will only progress through the exercises when you type the correct letter. You will not need to press "Enter" or "Return." The cursor will automatically jump to the next line of text. Adjust the volume on your computer to an appropriate level. • The cursor must remain in the text box during the test. • Do not hit the Enter or Return key at the end of a line. • Do not delete mistakes. Just type the correct letter. Please refer to the media CD to do the Speed Test. 3 If you made more than three errors in this timed test, please repeat the test. If you made less than three errors, please write down your keyboarding speed and accuracy. You'll need it later to measure how much you improved. • T ry not to look at the keyboard. If you must look at the keyboard, find the key quickly and look away before typing the key. Review of Proper Keyboarding Techniques Keyboarding was a prerequisite to this course. Therefore, in this section we will only review and practice keyboarding skills in four lessons. However, if you need basic keyboarding instructions or if you need more practice, you may search the following keywords for free online lessons and typing tests: • Peter’s online typing course • learn 2 type • Keyboarding Practice • Dance Mat Typing Your Turn Now that you have reviewed good keyboarding techniques, here are some exercises to start improving your speed and accuracy. It is important that during these exercises you become your own coach. A good coach helps you stay focused and disciplined and encourages you. Whether you are a beginner typist or if you are advanced, it is helpful to review proper technique. If you make the extra effort to use the proper keyboarding techniques, you are on your way to improving your speed and accuracy. Review the following techniques: • eep your hands resting on home row and return K your fingers quickly to home row after pressing a key somewhere else. Keeping your hands lightly resting on home row keeps your fingers grounded, providing a reference point for every other key. Therefore, returning your fingers to home row will help you remember the keystrokes faster. • eep your hands parallel to the keyboard and K fingers comfortably curved. • Relax your fingers. • Press the keys squarely in the center of the key. • eep your arms level with the keyboard and your K elbows close to your side. Your hands should be slightly lower than your elbows. • Sit up straight. • Take some breaks. • S tay in control and aim to get 100 percent correct. The more you type things correctly, the more certain you will be, and the faster you will keyboard. If you make an error during the following exercises, you will hear a soft beep and your cursor will remain at the same location until the correct letter is typed. There is no need to press “Return” or “Enter” at the end of the line of text. The cursor will automatically return. Please refer to the media CD to complete Exercises 1, 2, and 3. Lets Review! During this lesson, you took a timed pretest and reviewed proper keyboarding technique. Remember, home row is the row in the middle of the keyboard and is the correct placement for your hands while they are waiting to type the next letter. Using proper technique when keyboarding will help you improve your speed and accuracy. 4 Multiple Choice 1.1 While your hands are on home row, your left hand rests lightly on______. A. B. C. D. 1.2 While your hands are on home row, both of your thumbs are on______. A. B. C. D. JKL; ASDF ZXCV QWER the space bar the return key the mouse B and N Multiple Select 1.3 Select all examples of proper keyboarding technique._________________ A. B. C. D. E. Look at the keys while keyboarding. Sit up straight. Aim to make no mistakes. Relax your fingers. Keep your hands higher than your elbows. Multiple Choice 1.4 Select the graphic that shows the proper hand position for keyboarding.______ A. B. True or False 1.5True/False The cursor is the blinking line that indicates where the next letter, number, or character will appear. 5 Keyboarding Exercises Do you know someone who thinks it’s faster to type with only her index fingers? Some people call this kind of typing, “hunt and peck.” It is difficult to convince people that hunt and peck to keep their hands on home row and use proper keyboarding technique. But, in fact, much research has gone into identifying the fastest way to type on the QWERTY keyboard. Using only your index fingers, you can type no faster than thirty wpm (words per minute). However, by using the proper technique for touch typing you can type faster than sixty wpm or even as fast as one hundred wpm. In this lesson, you’ll review which fingers should type each key. You’ll also do some special exercises that will help you increase your dexterity Objectives: • Use the correct technique and hand position to keyboard. • Identify the correct finger used to type a specific key. • Improve your keyboarding speed and accuracy. Vocabulary: dexterity - skill and ease in using your hands QWERTY keyboard - m ost common layout of keys on a keyboard. The top row of letters includes QWERTY Dexterity Exercises Keyboarding Exercises Let's get started with some keyboarding exercises. Refer to the illustration and type the keys with the correct fingers. Take a short break and stretch your fingers between exercises. Using the correct fingers to type each of the keys will help you become a more efficient keyboarder. Each finger is responsible for a vertical column of keys. The column is not straight up and down. It slopes up and to the left. (Refer to the illustration below.) Both index fingers are responsible for an additional column in the middle of the keyboard. The thumbs type the space bar. The left-hand pinky is also responsible for the left shift key, caps lock, tab, tilde, and escape. The right-hand pinky is responsible for the apostrophe, brackets, enter key, the right shift key, the question mark, delete, and more. Take a close look at the illustration below. Notice that the color coding signifies which finger types each key. Please refer to the media CD to complete Exercises 1, 2 and 3. For more information... To make keyboarding practice more fun, try some of the online games by searching for keywords like the following: 6 • The Typing of the Ghosts • Space Invaders free typing game Dexterity Please refer to the media CD to complete Index Finger. Now, let’s try some special keyboarding exercises. Completing the following exercises will help you improve your dexterity and—in the long run—your speed and accuracy. Some of the exercises were specially created to help with finger coordination, and other exercises have been chosen to help you remember where keys are located. Next, you’ll have a chance to see how much you have improved. Take the following timed keyboarding test. Please refer to the media CD to complete Speed Test. Please refer to the media CD to complete Vertical Keys 1, 2 and 3. Lets Review! Please refer to the media CD to complete Reach and Return. In this lesson, we took a close look at which fingers type each key. We also used some special exercises to improve our dexterity. In the problem set, you will be asked to identify which finger types a specific key. Multiple Choice 1.6 Which finger presses the H key on the keyboard?______ A. B. C. D. 1.7 The second finger on the left hand types______. A. B. C. D. 1.8 The pinky finger on the right hand types______. A. B. C. D. index finger on the left hand pinky finger on the right hand index finger on the right hand thumb on the left hand 3EDC 1QAZ 7UJM 8IK, AQZ1~ SW2X ;P0‘/[] MJU7 7 True or False 1.9True/False The QWERTY keyboard is the most common layout of keys on a keyboard. Multiple Choice 1.10 If you were practicing keyboarding and the exercise contained the letters, s, w, e, z, r, v, and t, what section of the keyboard are you practicing?______ A.right B.left C.upper D.lower Keyboarding Exercises Practicing the most frequently used keys and the most frequently used combination of keys will also help you to become a more efficient keyboarder. Can you guess which letter is typed most often? Let’s see. In sports, athletes repeatedly practice moves to improve their performance. For example, if you were a basketball player, you would repeatedly practice your most frequent shot in order to master it. To improve at keyboarding, it makes sense that you should practice the most frequently used words to master them. In this section, you’ll complete keyboarding exercises that focus on improving speed by mastering frequently used words and frequently used letter combinations. Please refer to the media CD to complete Exercise 4. Now you’ll jump right into keyboarding exercises. The keyboarding exercises below are meant to drill the top three hundred most frequently used words. Take a short break between each exercise. If you’d like, you can repeat any of these exercises. Now you are ready to see how much you have improved. Take the following timed test. Please refer to the media CD to complete Exercises 1, 2 and 3. Please refer to the media CD to complete Speed Test. 8 True or False 1.11True/False To improve at keyboarding, it is a good idea to master frequently typed words. Multiple Choice 1.12To improve your keyboarding skills, you should ______ . A. B. C. D. concentrate on typing as fast as you can practice typing the most frequently used keys and key combinations use the fingers that you are most comfortable with type slowly so you won’t make mistakes 9 Number Keypad In certain jobs, employees need to be quick and accurate at typing numbers. For example, a bank teller who receives thirty checks needs to total the value of these checks accurately and rapidly. For another example, a cashier at the end of the day needs to total the cash in the cash register drawer. These employees would probably use a calculator with a numeric ten keypad to enter these numbers and calculate a total. Others may use the numeric keypad on the right side of a standard keyboard. Objectives: • Use the correct technique to type numbers on the numeric keypad. • Improve your speed and accuracy when typing numbers. Vocabulary: ten keypad - numeric keys on a calculator or the numeric keys on a keyboard. In the regular keyboard exercises, when you typed a number, you probably reached to the numbers at the top of the keyboard. This works and is the recommended method when you're typing a few numbers. But, when you need to type many numbers, it is much faster to use the numeric keypad. On a standard keyboard, numbers appear on a keypad at the right side of the keyboard. Take a closer look at your keypad. It has numbers, operation keys (+. -, /, *), a decimal point, and Enter. You are probably familiar with most of the symbols on the key pad. The key with an asterisk (*) is used to multiply numbers. The key with the forward slash (/) is used when you want to divide numbers. Make Note! If you are working on a laptop computer, you probably do not see this keypad at the right side of the keyboard. Some laptop keyboards have the numeric keypad embedded in the letter part of the keyboard. This means that some letter keys may also function as number keys. You may need to press and hold the function key for these keys to type numbers. Refer to your user’s manual for directions for activating this keypad. There is a home row or home keys on the numeric keypad as well. These keys are where your fingers should rest when waiting to type the next number. Your index finger should rest on the "4" key. Your middle finger should rest on the "5" key. And your ring finger should rest on the "6" key. Most keypads have a raised bump on the "5" key to help guide your hand back to the home keys. Each of these fingers is responsible for typing the keys directly above and directly below the home keys. (Refer to the illustration and color-coding.) The thumb is not used, and the pinky finger doesn't rest on a key. However, the pinky finger does type the subtraction key, the addition key and the Enter key. Make Note! Some sources encourage using the thumb for the zero key in ten-key technique. Check with your instructor for his or her preferred method. There are a few additional techniques to keep in mind when using a numeric keypad. These techniques include the following: • Place your hand over the home keys on the numeric keypad. • Relax and curl your fingers. • Keep your wrist straight. • Avoid resting your palm on the keyboard. • Press the keys squarely in the center of the key. • Try not to look at the keys. 10 Be sure the number lock is on. The keys on the number keypad will only work after this key has been pressed. Typically, a green light will indicate that the number lock is on. Next, you'll give the numeric keypad a try. The first exercise will focus on the home keys. The rest of the exercises will progress with other numbers and operations. After the last number in each line, do press the Enter key. Be sure to use good keyboarding technique and be your own coach. Between exercises, take a short break to relax and stretch your fingers. Please refer to the media CD to complete the Speed Test. Lets Review! Please refer to the media CD to complete Exercises 1-6. If you’d like to work the exercises again, refresh your browser page. In this lesson, you learned about proper keyboarding technique when using the numeric keypad. The exercises in this lesson allowed you to practice typing numbers. For more information... If you would like more practice using the numeric keypad, you may retake any of these exercises. You may also search Web sites for the key words: ten key number pad course, to find other practice resources. Multiple Choice 1.13 The home keys on the numeric keypad are______. A.123 B.456 C.789 D.0+- 1.14 The * key is used for______. A.addition B.subtraction C.multiplication D.division Multiple Select 1.15 Select all that apply. Proper numeric keyboarding technique includes: __________________ . A. B. C. D. E. resting your fingers gently on the home keys. pressing the keys squarely in the center. stiffening your fingers. looking at the keys. keeping your wrist straight. 11 Multiple Choice 1.16 Which finger types the highlighted keys?______ A.third B.first C.pinky D.thumb 1.17 If you needed to add 45, 34, and 67, you would type______. A.45-34-67 B.45*34*67 C.45+34+67 D.=45+34+67 Project: Timed Typing Test Please refer to the media CD to complete the Speed Tests 1-10. 1.18 1. Enter your Typing Speed: ____________ WPM Enter your Accuracy: __________ % 2. Enter your Typing Speed: ____________ WPM Enter your Accuracy: __________ % 3. Enter your Typing Speed: ____________ WPM Enter your Accuracy: __________ % 4. Enter your Typing Speed: ____________ WPM Enter your Accuracy: __________ % 5. Enter your Typing Speed: ____________ WPM Enter your Accuracy: __________ % 6. Enter your Typing Speed: ____________ WPM Enter your Accuracy: __________ % 7. Enter your Typing Speed: ____________ WPM Enter your Accuracy: __________ % 8. Enter your Typing Speed: ____________ WPM Enter your Accuracy: __________ % 9. Enter your Typing Speed: ____________ WPM Enter your Accuracy: __________ % 10. Enter your Typing Speed: ____________ WPM Enter your Accuracy: __________ % Teacher Check: _____________ Initial _____________ Date 12 Self Test 1: Keyboarding Skills True or False 1.01True/False Being fast and accurate at keyboarding will help an employee do a job more efficiently. Multiple Choice 1.02 While your hands are on home row, your right hand rests lightly on______. A. B. C. D. 1.03 Which finger types the Return or Enter key?______ A. forefinger on the right hand. B.thumb. C. pinky finger on the right hand. D. pinky finger on the left hand. 1.04 The index finger on your right hand types the______. A. F R V 4 B. J U M 7 H Y 6 N C.LO.9 D. J U 7 M G T 5 B JKL; ASDF ZXCV QWER 13 1.05 Write the letters T, R, N, M, Y, and U on the keyboard in the proper position. Multiple Choice 1.06 The / key on the number keypad is used for______. A.addition B.subtraction C.multiplication D.division 1.07 The home keys on the numeric keypad are______. A.123 B.258 C.789 D.456 1.08 If you need to multiply 400, 2, and 1 ½, what would you type on the numeric keypad?______ A.400*2*1.5 B.400/2*1.5. C.400/2/1.5 D.400*2*1½ 14 True or False 1.09True/False On the numeric keypad, your pinky types the Enter key. Multiple Choice 1.010 Which finger types the highlighted keys?______ A.third B.first C.pinky D.thumb Multiple Choice 1.011Lisa is a tax accountant. She needs to enter many numbers. To enter these numbers, she should use the______. A. numbers across the top row of the keyboard B. numeric keypad on the right side of the keyboard C.mouse D.modem Multiple Select 1.012 Select all examples of proper keyboarding technique.______________ A. B. C. D. E. Rest your fingers gently on the home row or home keys. Slouch in your chair. Rest your palms on the keyboard. Relax your fingers. Keep your hands lower than your elbows. Score: _____________ Teacher Initial: _____________ Date: ______________ Each Answer = 1 point; Essay and Paragraph Questions = 5 - 10 Points 15