1
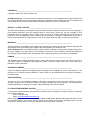
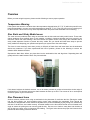
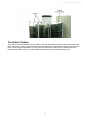
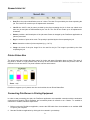
PrintServer
Operator’s Manual
Rev X4
1351 East Black Street • Rock Hill, SC 29730
Tel: 803-980-4141 • Fax: 803-980-4145 • www.allprosolutions.com
COPYRIGHT_____________________________________________________________________
Copyright © 2000–2010 All Pro Solutions, Inc
All Rights Reserved. This manual and the software described in it are copyrighted with all rights reserved. No
part of this publication may be reproduced, transmitted, transcribed, stored in a retrieval system or translated into
any language in any form by any means without the written permission of All Pro Solutions, Inc.
PRIVACY / ILLEGAL COPYING ____________________________________________________
The ZEUS Series printers are designed to help you easily reproduce material for which you own the copyright or
have obtained permission from the copyright owner to make copies. Unless you own the copyright or have
permission from the copyright owner to make copies, you may be violating copyright law and be subject to
payment of fines, damages and/or other remedies. All Pro Solutions Inc. accepts no responsibility for the use or
misuse of this equipment for illegal purposes. If you are uncertain about your rights, contact your legal advisor.
WARRANTY____________________________________________________________________
All Pro Solutions, Inc (hereinafter “All Pro Solutions”) warrants its products to be free from defects in materials and
workmanship under normal and proper usage for the period stated in your Warranty Card.
All Pro Solutions shall not be liable for direct, indirect, special, incidental or consequential damages arising from
the use or inability to use this product or documentation. In particular, All Pro Solutions shall not have liability for
any hardware used with this product, including the costs of repairing, replacing or recovering such hardware.
DAMAGE_______________________________________________________________________
This shipment was packaged and delivered to the carrier with the utmost care to ensure safe delivery of goods. If
your ZEUS system is damaged during shipment, please contact the freight carrier first, then contact your
distributor or All Pro Solutions
INCOMPLETE ORDERS___________________________________________________________
Check the shipment against the shipping papers thoroughly and immediately to ensure receivership of a full
shipment. Do not discard packing materials or cases. Check out all possibilities before reporting a shortage or
incomplete order.
SAVE PACKAGING_______________________________________________________________
You have to save your packaging materials so that if the need arises you can return your system for service.
Sending a system to All Pro Solutions without the original packaging will void the warranty. This packaging was
designed specifically for shipping your system. Other packaging may not be as suitable.
IF YOUR SYSTEM REQUIRES SUPPORT____________________________________________
If your system requires servicing, you should first contact the place of purchase and request support or contact All
Pro Solutions as follows:
Phone: (803) 980-4141
Email: [email protected]
Before shipping any item to All Pro Solutions, first obtain a RMA (Return Material Authorization) Number from All
Pro Solutions support. This number must be placed on the outside of the product packaging where it can be
easily found; otherwise the item will be refused and returned at the sender’s expense.
ii
PrintServer Operator’s Manual
Contents
Getting started ......................................................................................................................... 1
Manufacturer Recommendations ............................................................................................................ 1
Operating Environment ........................................................................................................................... 1
Mounting the Printer ............................................................................................................................... 2
Connecting power ................................................................................................................................... 2
Overview ................................................................................................................................... 3
Temperature Warning ............................................................................................................................. 3
Disc Static and Sticky Media Issues ....................................................................................................... 3
Disc Placement Issue............................................................................................................................... 3
The Robotic Platform .............................................................................................................................. 4
Operation.................................................................................................................................. 5
Software Installation ............................................................................................................................... 5
Alignment................................................................................................................................................ 5
PrintStation Overview ............................................................................................................................. 8
PrintServer Overview.............................................................................................................................. 8
Queued Jobs List ..................................................................................................................................... 9
Printer Status Box.................................................................................................................................... 9
Connecting PrintServer to Printing Equipment....................................................................................... 9
Disconnecting PrintServer from Printing Equipment ........................................................................... 12
Submitting Print Job(s) ......................................................................................................................... 13
Canceling a Job ..................................................................................................................................... 14
Process and Pause Jobs Options............................................................................................................ 15
License Key Manager............................................................................................................................ 15
PrintServer Operator’s Manual
Getting started
The removal of this product should be undertaken by at least 2 people because of its size and weight.
Please ensure safe manual handling procedures are followed
Carefully remove your system from it’s shipping box and verify that all parts are present. If there are missing or
damaged parts contact All Pro Solutions (APS) or an authorized distributor immediately to correct any misspacked or missing parts.
You should find the following packaged with your system:
Autoloader AU9 (up to 900 disc capacity), depends on your model configuration
EnduraJet printers
Three Power cords (1 for autoloader and 1 for each printer)
Printer USB Cables
CD Disc containing the PrintServer Software, Operator’s Manual and Framework 3.5
CD Disc containing “Discus” Labeling software
CD Disc containing EnduraJet printer driver
5/64 hex head key (Allen wrench) and a bottle with oil to maintain shafts functionality
Warranty card
NOTE:
If your system is damaged during shipment, please contact the freight carrier first, and then contact your
distributor or All Pro Solutions.
You have to save your shipping materials so that if the need arises you can return your system for service.
Sending a system to All Pro Solutions without the original packaging will void the warranty. This packaging was
designed specifically for shipping your system. Other packaging may not be as suitable. If you have already
disposed of your packaging materials, you can receive a new set from All Pro Solutions for a fee.
Manufacturer Recommendations
Place your system on a flat, steady surface in a climate controlled environment with regular office light (no
bright light to reflect into the system’s sensor), free of dirt, dust, excess humidity, excessive heat or electromagnetic interference.
Please fan the media before placing it into the Input Hopper and align it. Media has to slide easy on top of
each other
Do not use un-expensive media because it can generate problems: media sticks together and 2 or more discs
can be loaded even if the picker it’s designed to grab just one.
The 2 shafts used by the Picker to travel up and down should be oiled from time to time; use the multipurpose oil
provided
Operating Environment
Your APS System should be used in a climate-controlled environment free of dirt, dust, excess humidity,
excessive heat or electro-magnetic interference. Your APS System should be placed on a sturdy level surface –
away from sources of vibration and excessive lighting.
Allow at least four (4) inches of clearance around the sides and back of the system for ventilation.
1
PrintServer Operator’s Manual
Mounting the Printer
Place your printers (with their own plate mounted on the bottom) on the adapter. Do not tighten the screws until
the printer alignment is made. Proceed with “Connecting Power”
When alignment is OK, please tighten in the same time, front left and front right thumbscrews. Repeat this
operation for rear left and rear right thumbscrews.
Connecting power
Plug one power cable into the autoloader and another one into each printer. Plug each power cable into the
proper power source and connect all the other cables as shown below:
Before powering on your system, please ensure the picker is in the top position.
2
PrintServer Operator’s Manual
Overview
Before you start using this system, please read the following to ensure proper operation:
Temperature Warning
If the system was stored in a location where the temperature dropped below 32° F (0° C) within the past 24 hours,
leave the autoloader in a warm room with temperatures at least 65° F (19° C) for four hours prior to powering it on
for the first time. Failure to do so may cause irreparable harm and prevent the autoloader from functioning.
Disc Static and Sticky Media Issues
The most common problems when using an autoloader are the disc static and sticky media issues. These static
charge problems cause multiple discs to stick together, resulting in improper operation and more severely, can
shock the robotic arm while loading a disc that causes the system freeze. Even though the autoloader has a
sticky media separator function to prevent the sticky media, but you should still follow these steps to prevent
sticky media from disrupting your operation and protect your system from disc static charge.
This issue is most commonly seen when you buy a 100 pack of blank discs and insert them into the autoloader
without any treatment. If you have experienced this kind of problem, please do the following to remove the
adhesive static between the discs:
Separate the blank discs before you place them into the autoloader's bins and align them. Separating them will
greatly reduce the static between discs. See pictures below:
If this doesn't achieve the desired outcome, use an air duster (canned air) to blow air around the circular edge of
the blank discs. This process reduces the static between the discs up to 90%. The amount of air to use depends
on factors specific to your environment.
Disc Placement Issue
Another common problem when using an autoloader is the placement of media into the bins. Placing the media
into the bins properly can avoid possible picking errors when operating the autoloader. Even though the
autoloader is designed with certain tolerance adjustments to prevent mishandling by the picking arm, failures may
still arise if the bins are not loaded correctly. All media loaded into the bins should be flat and not slanted at an
angle to ensure the picking arm can securely grab the disc. Be sure not to load too many discs into the bins as
well as this may cause errors in placement and loading. The figure below shows the proper and incorrect disc
placements when loading media into the bins
3
PrintServer Operator’s Manual
The Robotic Platform
The robotic arm picks blank discs from Input Bin # 1 first, and places the successful copies into the Output Bin.
Once Input Bin # 1 is empty, it picks blank discs from Input Bin # 2, and places the successful copies into Input
Bin # 1 which becomes Output Bin # 2. It then picks from Input Bin # 3 and places into Input Bin # 2 which
becomes Output Bin # 3 and so on. Reject discs are placed on to the deck below the drive trays.
4
PrintServer Operator’s Manual
Operation
Software Installation
Install Printer Driver twice into your PC
Install “Discus” Labeling Software, Framework 3.5 and PrintServer Software into your PC.
Alignment
To align the system, connect the autoloader to the PC using the USB Network cable. Turn on the printer first then
turn on the autoloader. Double click Print Server to run the application. Once the Print Server application has
opened follow the following:
1. Go to Tools->Port Exerciser
2. You will get the following window, click connect at the bottom
3. The Printer Server Connection window will now open and will detect available stations. If it remains
empty click the scan button at the bottom of the screen. (If your Print Station does not have a name it will
display ---.)
5
PrintServer Operator’s Manual
4. Change the Autoloader drop down box to C.
5. Select the Available printers to be used in duplication and click the Add button.
6. Click the connect button.
7. You will need to name your Print Station before continuing. Type in the name of the Print Station and
click apply
8. The Port Exerciser will now be connected to your Print Station. To view how much estimated ink is left
select one of the printers and click Read Status.
6
PrintServer Operator’s Manual
9. Make sure you have media in the input bin, then select one of the printers and click Open Tray.
10. Once the tray has ejected Click on calibrate to make sure the arm is at it’s home position
11. Click Insert to have the arm grab the disc and place it on the tray. Depending how it placed it you may
need to adjust the printer either forwards, backwards, left, or right.
12. Manually remove the disc and click Insert again.
correctly on the tray.
Repeat the adjustment until it is placing the disc
13. Once it is placing it correctly on the tray, leave the disc on the tray and click Close Tray.
14. Click Open Tray and Click Accept this simulates how it will actually pick the disc off the tray.
15. Make sure the arm can Insert and Accept the disc off the tray.
16. Once finished with this printer tighten the screws at the same time: one on the left and one on the right
side to insure the printer doesn’t move. Tighten the second set of screws, and start aligning the other
printer.
17. Once done click Disconnect and click the Red close button at the upper right of the screen.
7
PrintServer Operator’s Manual
PrintStation Overview
PrintStation is a hardware/software solution that works with an autoloader, printers, and a PC to provide disc-ondemand printing. The PrintStation consists of:
•
An autoloader station with up to three USB printers and USB connection to a PC.
•
PrintServer software that runs standalone on a PC:
o Issues print jobs directly to the PrintStation
o Controls communications between networked clients and the PrintStation.
PrintServer utilities:
o Diagnostic utility for use by the OEM during factory test and calibration.
o Exerciser to aid installation setup and preventive maintenance.
This manual describes operation of the PrintServer software.
•
PrintServer Overview
PrintServer is an application similar to a print spooler in appearance and functionality. The PrintServer software
communicates with autoloader equipment and printers through a USB 2.0 port on the PC.
PrintServer software receives count and print files from all clients throughout a network, saves them into a special
job-spool folder, and moves the jobs to the autoloader equipment for processing. The PrintServer forwards job
execution status and progress to the client on a periodic basis.
Administrators can examine the job queue much as they would a standard print spooler.
automatically to the autoloader equipment for processing.
Jobs are moved
The above figure shows an example of the main screen of PrintServer. In this example there are 3 jobs in the
queue and one printer called ‘EngPrinter’ is available. The status and ink levels of the printer are shown at the
right of the screen. Descriptions of the Queued Jobs list and the Printer Status box are provided in the following
sections.
8
PrintServer Operator’s Manual
Queued Jobs List
•
User ID: is the unique identification name of a client. The User ID is provided by the client requesting the
job. The User ID can contain up to 25 alphanumeric characters.
•
Job ID: the Job ID is the job name provided by the client requesting the job. A client can submit more
than one job and jobs are differentiated by the Job ID. The Job ID can contain up to 25 alphanumeric
characters.
•
Status: provides a brief description of the job status. Status is changed by the PrintServer application as
jobs are processed.
•
Qty: the number of prints to be made. The quantity is provided by the client requesting the job.
•
Made: shows the number of prints completed (e.g., 6 of 10).
•
Image: the name of the print image file to be used for the job. The image is provided by the client
requesting the job.
Printer Status Box
The printer status box provides the printer name, ink levels, and status information about a printer. The name of
the printer is shown in a light colored frame at the top of the Printer Status Box. Below the printer’s name the
different ink levels are shown. The printer’s Status is shown at the bottom.
PrintServer supports up to 3 printers at a time and each has its own Printer Status Box.
Connecting PrintServer to Printing Equipment
In order to start processing print jobs, the PrintServer application must establish connection with the autoloader
equipment and printer(s). Each autoloader and connected printers is referred to as a ‘Station.’ To establish a
connection to a station, follow the steps below:
1. Before running the PrintServer application, connect the USB cable from the autoloader to an available USB
2.0 port of your computer.
2. Start the PrintServer application by clicking the icon created in your desktop
9
PrintServer Operator’s Manual
3. Click on File->Connect menu item to open the connection dialog. It may take a few seconds for the
PrintServer connection dialog to show.
4. The PrintServer connection dialog consists of three main groups to select the station desired and finally
establish connection with the station:
10
PrintServer Operator’s Manual
Select Station
Since multiple autoloader stations can be connected to one computer, PrintServer identifies each station by a
name (provided by user), a serial number, and a USB Serial COMM port number. A list of all stations found
connected to your computer is shown.
1. Select a desired station to work with by clicking on its name or serial number. A dashed name ‘----’ as
shown above means that no name has been assigned to the station and PrintServer will ask you to enter
a name at the time of connection. (See step X.)
2. Select the model of the autoloader being used: C
Select Operating Mode
Select the operational mode desired. PrintServer has four different operational modes: normal, manual, test and
demo.
Normal: this mode is used for normal printing operations with an autoloader and at least one printer.
Manual: this mode is used without an autoloader and the operator must manually load and unload discs from the
printers. In this mode printer trays are opened and closed automatically. The operator is notified when to load or
unload media. Use this mode if your equipment does not have a mechanical arm or your autoloader is out of
service and you need to print. When manual mode is selected, the autoloader selection is grayed out.
Test: in this mode discs loaded to printers are not actually printed. This mode tests the overall functionality and
interaction of the autoloader, printer, and requested jobs.
Demo: this mode is used to test that software runs properly under the installed platform. Requested print jobs are
simulated without using the autoloader or printers. When demo mode is selected, the station and autoloader
selections are grayed out.
11
PrintServer Operator’s Manual
Select Printer(s)
1. Select the printer(s) used by the autoloader equipment. Click on the name of desired printer from the
Available Printers list and then click the ‘Add’ button to move to the Selected Printer(s) list. To remove a
printer from the Selected Printers list click the name of the printer and then the ‘Remove’ button.
2. Finally click the ‘Connect’ button to establish communication with the autoloader station. Once the
connection is established, the connection dialog is closed and PrintServer starts receiving and processing
jobs.
The Scan button refreshes the list of available autoloader stations shown under the Station Selection
group.
Disconnecting PrintServer from Printing Equipment
To terminate the connection with the autoloader equipment and printers, click the File->Disconnect menu item. All
pending jobs from the queue are cleared but will be picked up next time a connection is made.
12
PrintServer Operator’s Manual
Submitting Print Job(s)
To submit print jobs follow the steps below.
1. Click the ‘Job Submission’ menu item to open the submission dialog.
2. Click the ‘Browse’ button and select a PRN file.
3. Provide a Job ID. The Job ID serves as unique identification for your job. Every time the ‘Job Submission’
dialog is open an automatic Job ID is assigned, but it can be changed to anything more meaningful, if
desired, as shown below:
13
PrintServer Operator’s Manual
4. Enter the desired number of prints. You may use the up and down arrow keys on the right of the quantity
box, or enter the number directly in the box.
5. Click the ‘Submit Job’ button.
Canceling a Job
In order to cancel job(s) follow the steps below.
**Note**
If you cancel a job that is already in progress, the media being printed will be
finished before the job is terminated.
1. Select the job to be canceled from the Queued Jobs list. To select multiple jobs at a time hold down the
CTRL key on the keyboard and select the first job. Then while still holding down the CTRL key, select the
second, third, etc. job.
2. Click the ‘Cancel Job’ button. The selected jobs will be canceled and removed from the Queued Jobs list.
14
PrintServer Operator’s Manual
Process and Pause Jobs Options
The process and pause jobs options control the flow of queued jobs.
•
Process Jobs: when this option is selected, jobs in the Server queue are allowed to be processed.
•
Paused Jobs: when this option is selected, the current job in process will be completed and remaining
jobs in the Queue are not allowed to be processed.
License Key Manager
The License Key Manager allows viewing, adding, and removing license keys. To open the License Key Manager
Dialog click on File->License Key menu item.
Installed keys are shown in a list with three columns:
15
PrintServer Operator’s Manual
•
Serial: the serial number of the PCM controller that has a license key assigned.
•
Key: the license key name assigned to the PCM controller.
•
Description: summary of the functionality that the specific license key enables.
For example, in the figure shown above there are two keys installed, SKY0007A and SKY0008A that apply to the
PCM controller with serial number PCM-1050.
Adding a License Key
1. Click the Add button.
2. Select the desired license key ‘SKY’ provided by your vendor and then click the open button.
Removing License Key
1. Select a license key to remove from the installed keys list.
2. Click the ‘Remove’ button.
16