Download User Manual - DVD publishers

Transcript
Standalone (built-in PC), fully automated
asynchronous CD/DVD Duplication System
User Manual
1351 East Black Street • Rock Hill, SC 29730
Tel: 803-980-4141 • Fax: 803-980-4145 • www.allprosolutions.com
Olympus Series/ Automated Asynchronous CD/DVD Duplicator System / User Manual
COPYRIGHT____________________________________________________________________
Copyright © 2000–2011 All Pro Solutions, Inc
All Rights Reserv ed. This manual and the software described in it are copyrighted with all rights
reserved. No part of this publication may be reproduced, transmitted, transcribed, stored in a
retrieval system or translated into any language in any form by any means without the written
permission of All Pro Solutions, Inc.
PRIVACY / ILLEGAL COPYING ____________________________________________________
The OLYMPUS Series copiers are designed to help you easily reproduce material for which you
own the copyright or have obtained permission from the copyright owner to make copies. Unless you
own the copyright or have permission from the copyright owner to make copies, you may be
violating copyright law and be subject to payment of fines, damages and/or other remedies. All Pro
Solutions Inc. accepts no responsibility for the use or misuse of this equipment for illegal purposes.
If you are uncertain about your rights, contact your legal advisor.
WARRANTY____________________________________________________________________
All Pro Solutions, Inc (hereinafter “All Pro Solutions”) warrants its products to be free from defects in
materials and workmanship under normal and proper usage for the period stated in your Warranty
Card.
All Pro Solutions shall not be liable for direct, indirect, special, incidental or consequential
damages arising from the use or inability to use this product or documentation. In particular, All Pro
Solutions shall not have liability for any hardware used with this product, including the costs of
repairing, replacing or recovering such hardware.
DAMAGE______________________________________________________________________
This shipment was packaged and delivered to the carrier with the utmost care to ensure safe
delivery of goods. If your OLYMPUS system is damaged during shipment, please contact the freight
carrier first, then contact your distributor or All Pro Solutions
INCOMPLETE ORDERS___________________________________________________________
Check the shipment against the shipping papers thoroughly and immediately to ensure receivership
of a full shipment. Do not discard packing materials or cases. Check out all possibilities before
reporting a shortage or incomplete order.
SAVE PACKAGING______________________________________________________________
You have to save your packaging materials so that if the need arises you can return your system for
service. Sending a system to All Pro Solutions without the original packaging will void the warranty.
This packaging was designed specifically for shipping your system. Other packaging may not be as
suitable.
IF YOUR SYSTEM REQUIRES SUPPORT____________________________________________
If your system requires servicing, you should first contact the place of purchase and request support
or contact All Pro Solutions as follows:
Phone: (803) 980-4141
Email: [email protected]
Before shipping any item to All Pro Solutions, first obtain a RMA (Return Material Authorization)
Number from All Pro Solutions support. This number must be placed on the outside of the product
packaging where it can be easily found; otherwise the item will be refused and returned at the
sender’s expense
3
Olympus Series / Automated Standalone Asynchronous CD/DVD Duplication System / User Manual
Table Of Contents
Quick Start...........................................................................................................................1
Ge tting Starte d …………………………………………………………………………….…..1
Manufacture r Re comme ndations ………………………..……………………………..…..2
Mounting the Towe r …………...……………………………………………………………...2
Mounting the Printe r …………...…………………………………………………………….3
O pe rating Environme nt……………………………………………………………………….4
Conne cting Powe r ……………………………………………………………………………..4
Cable Conne ctions …………………………………………………………………………….5
Drive and Printe r Alignme nt ………………………………………………………….……..7
Overview ……………………………………………………………………….…………….10
DVD Duplication Limitations ………………………………………………………………..10
Te mpe rature Warning ………………………………………………………………..….,,,…10
Mainte nance ………………………….……………………………………………..……….…10
Disc Static and Sticky Me dia ……....………………………………………………………..11
Disc Place me nt …….………………………………………………………………………..…12
Robotic Platform ….……………………………………………………………...………..…..12
Basic Operation ….………………………………………………………………..…….…..13
Drive Se le ction…………………………………………………………………………..….….13
Se tting Me dia Type …………………………………………………………………….…..…..13
Printe r Support…………………………………………………………………………...…….14
Olympus Series / Automated Standalone Asynchronous CD/DVD Duplication System / User Manual
Quick Start
Getting started
The removal of this product should be undertaken by at least 2 people because
of its size and weight. Please ensure safe manual handling procedures are
followed
Carefully remove your system from it’s shipping box and verify that all parts are
present. If there are missing or damaged parts contact All Pro Solutions or an
authorized distributor immediately to correct any miss-packed or missing parts.
You should find the following packaged with your duplicator:
Autoloader: AU4 (up to 330 disc capacity), or AU7 (up to 630 disc capacity) or
AU9 (up to 900 disc capacity), depends on your model configuration
Tower populated with drives
Driver Discs – M otherboard
Olympus Series Disc w/ M anuals
Windows Software and M anual
PoINT Publisher NG - Installed
5/64 hex head key (Allen wrench)
Warranty card
For systems configured with printer, besides the above, you should find:
Pro III, SpeedJet, EnduraJet II or Teac P55C Printer
Printer Plate (mounted on the bottom of printer)
Printer Power Cable
Printer Control Cable
Printer Cable (USB)
NOTE:
If your system is damaged during shipment, please contact the freight carrier first, and
then contact your distributor or All Pro Solutions.
1
Olympus Series / Automated Standalone Asynchronous CD/DVD Duplication System / User Manual
You have to save your shipping materials so that if the need arises you can return your
system for service. Sending a system to All Pro Solutions without the original
packaging will void the warranty. This packaging was designed specifically for
shipping your system. Other packaging may not be as suitable. If you have already
disposed of your packaging materials, you can receive a new set from All Pro Solutions
for a fee.
Manufacturer Recommendations
Before starting to operate your system, please read the User’s M anual entirely!
Place your system on a flat, steady
surface in a climate controlled environment with
regular office light (no bright light to reflect into the system’s sensor), free of dirt,
dust, excess humidity, excessive heat or electro-magnetic interference.
Please fan the media before placing it into the Input Hopper and align it. M edia has to
slide easy on top of each other
Do
not use un-expensive media because it can generate problems: media sticks
together and 2 or more discs can be loaded even if the picker it’s designed to grab just
one.
For audio duplication, please use good quality media and max 16x speed on CD
Because your system is equipped with up 24x DVD drives, use only 52x certified CD
and 16x certified DVD media.
From time to
time, the drives have to be cleaned using a CD Lens cleaning Kit or
blowing air using a compressed gas duster.
The 2 shafts used by
the Picker to travel up and down should be oiled from time to
time; use the multipurpose oil provided
Mounting the tower
For all systems, the tower is provided with a tower plate mounted on the bottom.
This plate will help in stabilizing the tower on the adapter (see Fig.1).
M ake sure all thumbscrews are loose, place the tower on top of the adapter matching
the blue/pink marks (see Fig.2).
Do not tighten the thumbscrews until the drive alignment operation is performed. (see
page 7)
2
Olympus Series / Automated Standalone Asynchronous CD/DVD Duplication System / User Manual
Mounting the Printer
This autoloader can be used with Pro III, SpeedJet, EnduraJet II or Teac P55C printers
and uses the same mounting system for either one of them.
Place your printer (with its own plate mounted on the bottom) on top of tower. Do
not tighten the screws until the printer alignment is made. Proceed with “Connecting
Power” (page 4) and “Drive and Printer Alignment” (see page 7).
When alignment is OK, please tighten front left and front right thumbscrews # 3 at the
same time. Repeat this operation for rear left and rear right thumbscrews # 3.
Fig. 1
S ystem unassembled – 4 drives and printer (AU7 autoloaders)
Fig.2
Tower alignment
3
Olympus Series / Automated Standalone Asynchronous CD/DVD Duplication System / User Manual
Operating Environment
Your APS System should be used in a climate-controlled environment free of dirt, dust,
excess humidity, excessive heat or electro-magnetic interference. Your APS System
should be placed on a sturdy level surface – away from sources of vibration and
excessive lighting.
Allow at least four (4) inches of clearance around the sides and back of the system for
ventilation.
Connecting power
Plug one power cable into the tower system, one into the autoloader and another one
into the printer. Plug each power cable into the proper power source and connect all
the other cables as shown in fig. 3a – 3h on the following pages.
Important
Before powering on your system, please ensure the picker (see fig.1, page 3) is in the top
position.
Please power on your APS system in the following order:
1. Printer
2. Tower
3. Autoloader.
NOTE: For Systems w/ EnduraJet II Printer, Power ON Tower, Autoloader, Printer
Power OFF Printer, then Autoloader & Tower.
Proceed with Drive and Printer Alignment on page 7.
Fig. 3a
4
Olympus Series / Automated Standalone Asynchronous CD/DVD Duplication System / User Manual
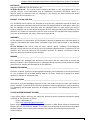
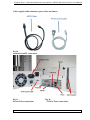
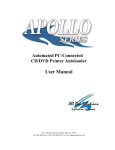
Cables supplied with autoloader (power cables not shown)
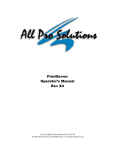
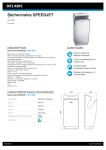
Fig 3b.
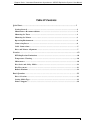
Autoloader and PC connections
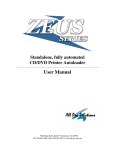
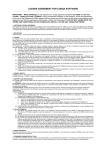
Fig 3c.
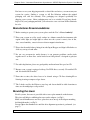
4-Drive Tower connections
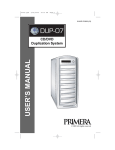
Fig 3d.
7/8 Drive Tower connections
5
Olympus Series / Automated Standalone Asynchronous CD/DVD Duplication System / User Manual
Fig 3e.
S peedJet Printer connections
Fig 3f.
Pro III Printer connections
Fig 3g.
EnduraJet II Printer connections
Fig 3h.
P55C Printer connections
6
Olympus Series / Automated Standalone Asynchronous CD/DVD Duplication System / User Manual
Drive and Printer alignment
Open Align.exe on your desktop and you will see “TES T” under S aved S essions as
in fig. 4a. When you open the TEST connection you will have access to the
communication port for alignment. Please do not change the COM Port or any other
settings. Please open the top drive and use the commands below to align the tower.
Then follow the same steps for the printer. M ake sure CAPS LOCK is ON.
C – Calibrates the picker to the home position
I – Inserts Disc into open drive/printer tray
A - Accept, grabs disc from tray and places in output spindle
2 – Opens Printer tray
1 – Closes Printer Tray
If you don’t have good alignment, adjust the tower (left and right, back and forth) and
repeat the steps above until you obtain the right alignment.
Fig. 4a Alignment S ettings
7
Olympus Series / Automated Standalone Asynchronous CD/DVD Duplication System / User Manual
Once the tower is aligned, gently tighten thumbscrews # 1 on both sides until they
touch the adapter and then tighten thumbscrews # 2 (they attach the tower to the
autolaoder – see Fig.7). Repeat the same steps to align the printer.
Fig. 5 S ide View
Now cycle the power to your system. Remember to turn on in this sequence: Printer,
Tower, Autoloader/PC. NOTE: For Systems w/ EnduraJet II Printer, Power ON Tower,
Autoloader, Printer. Power OFF Printer, then Autoloader & Tower.
8
Olympus Series / Automated Standalone Asynchronous CD/DVD Duplication System / User Manual
Overview
Before you start using this system, please read the following to ensure proper operation:
DVD Duplication Limitations
The DVD system will not copy any DVDs that have Copy Protection encoded in the
content. Typically, most DVDs you purchase or rent from a store, contain Copy
Protection.
In addition to the copy protection limitation, the autoloader will only copy a DVD5
format (4.7 GB) disc to another DVD5 format recordable DVD media. If your autoloader
has double layer/dual layer capability, you can copy a DVD9 format (8.5 GB) disc to
another DVD9 format recordable DVD media, but you cannot duplicate a DVD5 format
disc on to a DVD9 format recordable media or vice versa without enabling this feature
first.
Temperature Warning
If the system was stored in a location where the temperature dropped below 32° F (0° C)
within the past 24 hours, leave the autoloader in a warm room with temperatures at least
65° F (19° C) for four hours prior to powering it on for the first time. Failure to do so
may cause irreparable harm and prevent the autoloader from functioning.
Maintenance
It is very important to operate and keep the autoloader in a dust free, clean environment
since dust is the number one killer of CD/DVD recording devices. Failure to do so can
severely damage your autoloader. We strongly suggest that you constantly use an Air
Duster (Canned Air) to clear off any dust on the surface of the autoloader.
Note: Do not try to use an Air Duster to clean the autoloader while the writer trays are
open. In doing so, you may inadvertently blow dust into the recording device and damage
it.
9
Olympus Series / Automated Standalone Asynchronous CD/DVD Duplication System / User Manual
Disc Static and Sticky Media Issues
The most common problems when using an autoloader are the disc static and sticky media
issues. These static charge problems cause multiple discs to stick together, resulting in
improper operation and more severely, can shock the robotic arm while loading a disc that
causes the system freeze. Even though the autoloader has a sticky media separator
function to prevent the sticky media, but you should still follow these steps to prevent
sticky media from disrupting your operation and protect your system from disc static
charge.
This issue is most commonly seen when you buy a 100 pack of blank discs and insert
them into the autoloader without any treatment. If you have experienced this kind of
problem, please do the following to remove the adhesive static between the discs:
Separate the blank discs before you place them into the autoloader's bins and align them
using the Output Bin rod. Separating them will greatly reduce the static between discs.
See pictures below:
If this doesn't achieve the desired outcome, use an air duster (canned air) to blow air
around the circular edge of the blank discs. This process reduces the static between the
discs up to 90%. The amount of air to use depends on factors specific to your
environment.
10
Olympus Series / Automated Standalone Asynchronous CD/DVD Duplication System / User Manual
Disc Placement Issue
Another common problem when using an autoloader is the placement of media into the
bins. Placing the media into the bins properly can avoid possible picking errors when
operating the autoloader. Even though the autoloader is designed with certain tolerance
adjustments to prevent mishandling by the picking arm, failures may still arise if the bins
are not loaded correctly. All media loaded into the bins should be flat and not slanted at an
angle to ensure the picking arm can securely grab the disc. Be sure not to load too many
discs into the bins as well as this may cause errors in placement and loading. The figure
below shows the proper and incorrect disc placements when loading media into the bins
The Robotic Platform
The robotic arm picks blank discs from Input Bin # 1 first, and places the successful
copies into the Output Bin. Once Input Bin # 1 is empty, it picks blank discs from Input
Bin # 2, and places the successful copies into Input Bin # 1 which becomes Output Bin #
11
Olympus Series / Automated Standalone Asynchronous CD/DVD Duplication System / User Manual
2. It then picks from Input Bin # 3 and places into Input Bin # 2 which becomes Output
Bin # 3 and so on. Reject discs are placed on to the deck below the drive trays.
(Throughout this manual, this area is also referred as “Reject Area”).
Basic Operation
Please turn on your system in the following order: Printer, Tower, Autoloader/PC. If the
printer tray opens automatically, please push tray button to close. Keep this order every
time you turn on your system. NOTE: For Systems w/ EnduraJet II Printer, Power ON
Tower, Autoloader, Printer. Power OFF Printer, then Autoloader & Tower.
Your system comes with all software (required for your configuration) already installed. If
you need to reconfigure the settings or have reinstalled the software please see steps below:
Drive Selection
M ake sure all devices (Autoloader, Drives, and Printer) are powered on
Open PoINT Publisher NG Server
On the menu bar click Configuration and select S ettings
Click the Device Configuration tab
Click the S etup button
In the Printer box select your printer, if not applicable leave it at No Printer
In Drive assignment you will see Device 1: not configured
Select this by left clicking once and click the ADD button
A list of recorders will open up, select a drive and click the Identify button. This
will open and close the drive.
Verify that this is the correct drive you want to select and click OK
Repeat the steps until all drives have been added
Once done click Ok
On the Settings window click Apply and then click OK
12
Olympus Series / Automated Standalone Asynchronous CD/DVD Duplication System / User Manual
Setting the Media Type for the Input Bins
On the menu bar click Configuration and select S ettings
Click the Bins tab
Where it says Media Type click the drop down box and choose the appropriate
media
Click Apply and then click OK
(This needs to be done if you are switching between CD & DVD media)
Printer Support
If your configuration includes a printer, follow the instructions in your Printer User
M anual to create a label file.
Print files accepted: .prn, .plf, .btw
Plf = Point Label Editor Files (Recommended using the PoINT Label Editor)
Prn = Raw Label File
Btw = Bartender Label Files (only available if your package supports Advanced Print
Option)
To add a label to a job right click the job and select Properties
Left click the printing tab and select the correct radio button that you want to use
o Click Print raw file to use a prn file
o Click Print through label editor to use a plf file
o Click Print through other application to use a btw file
Below you will have a S elect box to select the appropriate file
Once the file is selected click Apply and OK
For more instructions on operation, please refer to the PoINT Publisher NG software manual
included with the system, and your printer User M anuals.
13