1
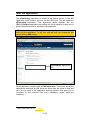
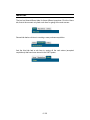
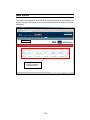
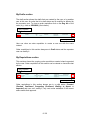
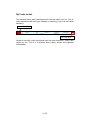
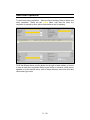
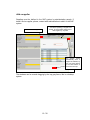
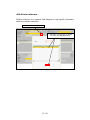
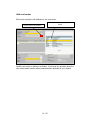
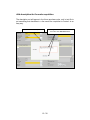
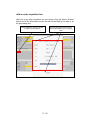
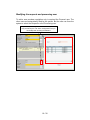
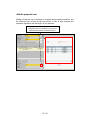
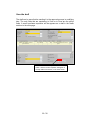
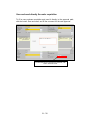
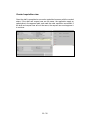
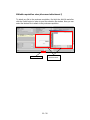
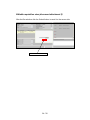
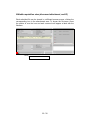
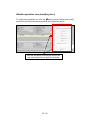
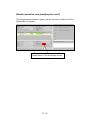
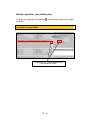
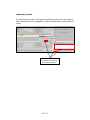
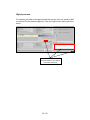
Computing Division
MIS Section
ePurchasing, User’s Manual
Manual
Last modification: 15/05/2008
Table of contents
Table of contents .............................................................................................2
Versions...........................................................................................................3
Introduction ......................................................................................................4
Start the application. ........................................................................................5
Menu bar..........................................................................................................6
Main Screen.....................................................................................................7
My Drafts section..........................................................................................8
My Requisitions section................................................................................8
My Tasks section..........................................................................................9
View order requisitions................................................................................... 10
New order requisition ..................................................................................... 11
Add a supplier. ........................................................................................... 12
Add division reference................................................................................ 13
Add cost center .......................................................................................... 14
Add description for the order requisition..................................................... 15
Add the expected delivery date .................................................................. 16
Add an order requisition line....................................................................... 17
Modifying the requests and processing user .............................................. 18
Add the proposal user ................................................................................ 19
Save the draft ............................................................................................. 20
Save and send directly the order requisition .............................................. 21
Created requisition view ............................................................................. 22
Editable requisition view (document attachment I) ..................................... 23
Editable requisition view (document attachment II) .................................... 24
Editable requisition view (document attachment, and III) ........................... 25
Editable requisition view (modifying line I).................................................. 26
Editable requisition view (modifying line, and II)......................................... 27
Editable requisition view (deleting line) ...................................................... 28
Approve process. ....................................................................................... 29
Reject process............................................................................................ 30
2 / 30
Versions
Version
1.0
Author
Oscar
Sanchez
Montaner
Date (dd/mm/yyyy)
15/05/2008
3 / 30
Comments
First version
Introduction
ePurchasing is web based, paperless, intranet application, that allows users
to do purchase requisitions and track it during all the approval process. In the
other hand the application helps to people that are responsible of any step in
the approval path of a requisition to accept it or rejects by our intranet.
The ePurchasing application works together a SAP BO system.
The application works together a workflow approval process, developed for
this application. It means that an order had information about who are the
creator and the people that can do an action over it. This information follows
the order for the rest of its lifecycle. Usually the creator of the requisition order
and the requestor will be the same person, but the application allows that a
user creates a requisition for other user that is the requestor. Other people
that are allowed to do an action are: processing user, proposal user and
authorize user. The processing user usually is the assistant of the cost center
where the orders will be imputes. The proposal user is the user that proposes
the requisition and usually is a section head, but can be another user. Finally
the authorize user is the responsible of the cost center, usually the division
head. Three of these users are known by the application, the creator and the
assistant and authorize by the cost center.
4 / 30
Start the application.
The ePurchasing application is hosted in the Intranet server, in the MIS
Application folder. Inside it you can find the CEPS link. This link opens the
ePurchasing application. This application works together with the
CELLS_Passport application that verifies the virtual passport of each user to
grant or deny the access to any area of the application.
Before your first access to the application, verify if you have a valid visa to
work with the application. To get your visa talk with your supervisor and
contact with the MIS section.
ePurchasing application
link
All the application complies with the MIS style rules. This means that all the
applications developed by MIS follow the same rules and styles to help and
save time to users in the application learning process. One basic rule to
remember is: not colorized field aren’t mandatory, yellow1 fields are
mandatory.
1
Colour-blind people: yellow = this colour.
5 / 30
Menu bar.
The bar had three different tabs for three different porpoises. First the Home
tab, that at the moment only had a sub item for going to the main screen.
Second tab had a sub item to creating a new purchase requisition.
And the third tab had a sub item to seeing all the real orders (accepted
requisitions) that have been stored in the SAP system.
6 / 30
Main Screen
The main screen shows a view with all the information that a user needs to do
a fast tracking of his orders or to see the task that the user must do over any
requisition.
Menu bar
Tracker view with drafts,
on-going requisitions
and tasks sections.
7 / 30
My Drafts section
The draft section shows the drafts that are created by the user or by another
user to this one. An order that is in draft status can be modified or deleted by
the requestor user. To view an order requisition click on the Reg. No. of the
order (e.g.: click on 20080006) (first column).
Open requisition
Clone requisition
User can clone an order requisition to create a new one with the same
content.
Order requisitions in this section always are in Draft status and the requestor
user can modify it.
My Requisitions section
This sections shows the ongoing order requisitions created or/and requested
by the user. Order requisitions in this section can be viewed or cloned like last
section.
Open requisition
Clone requisition
Order requisitions in this section always are in a valid status (Created,
Checked, Confirmed, Computing Confirmed, Waiting to Import or
Imported) and user can’t modify it, only cost center assistants if the current
status needs their approval.
8 / 30
My Tasks section
This sections shows order requisitions that need an action from you. This is,
order requisitions that need your validation or checking (if you’re a cost center
assistant).
Open requisition
Clone requisition
Usually a user with a task only should open the order requisition, check it and
confirm or not. This is a 9 seconds action; faster, simple and paperless
authorization.
9 / 30
View order requisitions
The screen to view an order requisition is divided in four areas, and each area
can be visible depends the status of the order requisition and the role of the
user.
Order requisition area
Attachments area
Approval path area
Purchase area.
10 / 30
Approval action area
New order requisition
To add a new order requisition… there are few mandatory fields to add a new
order requisition. These are the yellow fields, note that the order line
requisition is painted in other yellow scale because isn’t mandatory.
To fill the different boxes use the button on the right of each textbox, or below
in case of order lines requisition When a user clicks on a button, a little screen
appears to do the specific action, most of cases selects a value from a list and
other cases type a text.
11 / 30
Add a supplier.
Suppliers must be defined in the SAP system by administration people. If
doesn’t find a supplier, please, contact with administration to add it in the SAP
system.
…and select (clicking) a supplier from
the list. The list window had a box to
filter supplier by any field.
Click to select a supplier…
The window closes
automatically when a
supplier is selected, by
user can close directly
by the close button or
the cross in the top.
The windows can be moved dragging by the top gray frame, like in a desktop
system.
12 / 30
Add division reference.
Division reference is an optional field designed to add specific information
about the purchase requisition.
Click to insert a reference…
…and type it in the text box. To finalize
the action click Set value button.
13 / 30
Add cost center
Each order requisition will attributes to one cost center.
…and select (clicking) a supplier from
the list.
Click to select a cost center…
Usually cost center is related to a division. If you have any question about the
cost center please contact with the administration assistant of your division.
14 / 30
Add description for the order requisition
The description not will appear in the future purchase order, only is text file to
put something that describes in a few words the requisition to locate it in an
easy way.
Click to insert a description…
…and type it in the text box. To finalize
the action click Set value button.
15 / 30
Add the expected delivery date
The purchase requisition system needs an expected delivery date, or a date
closer to the expected delivery date.
Click to select the expected
delivery date…
16 / 30
Add an order requisition line
Add lines to an order requisition are very simple. Click the button (showed
below) and fill the information known, the rest can be filled by you later or by
the processing user.
Click the button to open the window
to add the line information.
17 / 30
User fills data that knows the rest of
data could be filled by the processing
user.
Modifying the requests and processing user
To add a new purchase requisition only is required the Proposal user. The
other users are automatically filled by the system. But the user can force the
system to select the Requestor or the Processing user.
Request and processing users aren’t mandatory because
they are fixed by the cost center configuration. But you
can modify their choosing one different.
18 / 30
Add the proposal user
Adding a Proposal user is required to complete the purchase requisition, and
the Proposal user is fixed by the cost center. In fact is who proposes the
purchase requisition and who sign it in first instance.
The proposal user is fixed by the cost center
configuration and it’s mandatory to choose one.
Use the button and the users finder screen.
19 / 30
Save the draft
The draft can be saved before sending it to the approval process to modifying
later. The only fields that are mandatory to Save or to Send are the yellow
fields. A saved purchase requisition will be appears as a draft in the drafts
sections in the main page.
To save the draft for modify it later, click the Save
button. And the current requisition will appear in
the My drafts menu section, in the main screen.
20 / 30
Save and send directly the order requisition
To fill a new purchase requisition and send it directly to the approval path,
click the button Save and send, and fill the comment for the next approver.
To save and send to next approver the draft, click
button Save and send.
21 / 30
Created requisition view
Once the draft is completed a new order requisition becomes with the created
status. If the draft and request user are the same, the application apply an
optimization in the approval path, and mark the order requisition as created. If
the draft and request user are not the same, the request user must approve it
to continue.
22 / 30
Editable requisition view (document attachment I)
To attach any file to the purchase requisition, first click the Add file and after
click the Select button in order to open the selection file window. Now you can
select the desired file to attach in the purchase requisition.
Choose file and
submit screens.
Add file option.
23 / 30
Editable requisition view (document attachment II)
After the file selection click the Submit button to send it to the server side.
Once selected, submit it.
24 / 30
Editable requisition view (document attachment, and III)
Each submitted file can be viewed, in a different browser screen, clicking the
corresponding icon in the attachments area. To known the file name, move
the pointer to over the icon and wait a second until appear a label with the
filename.
File icon to view/download it.
25 / 30
Editable requisition view (modifying line I)
To modify any requisition line click the
button (show it below) and modify
any field in the line detail window and click the Update item button.
Click the edit button to modify the current line
and click Update item to apply the changes.
26 / 30
Editable requisition view (modifying line, and II)
The changes appear marked in green color but not become effective until the
Update button is pressed.
To commit all the changes click the
Update button. If not all changes will lost.
27 / 30
Editable requisition view (deleting line)
To delete any requisition line click the
the action.
button (show it below) and confirm
Lines are deleted directly after accepts the action. A line cannot be
recovered once was deleted.
1
2
To delete a line click the delete button
and accept the action.
28 / 30
Approve process.
For approving any step in the approval path the current user only needs to
add a comment for the next approver, click the Accept button and confirm the
action.
3
2
1
Add a message for the
next approver, click Accept
and confirm the action.
29 / 30
Reject process.
For rejecting any step in the approval path the current user only needs to add
a comment for the previous approver, click the Reject button and confirm the
action.
3
1
Add a message for the
previous approver, click Reject
and confirm the action.
30 / 30
2