1
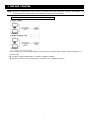
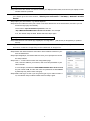
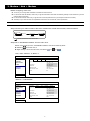
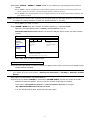
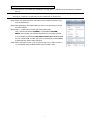
2. Router + Modem Before configuring, make sure: Your laptop / PC is connected to the same router as the video recorder is intended to connect to. You know the IP address, user name and password to access your router. The DHCP function of your router is on. Note: For details, please refer to the user manual of your router. The setup of your video recorder is completed as instructed in its user manual, and it’s powered on. Note: For details, please refer to the user manual of your video recorder. Step1: Connect your video recorder to the router with a RJ45 network cable, similar as follows: Laptop or PC LAN Port WAN Port Router POWE RA LM W A N L A N R Modem WAN Port Video recorder Devices connected with a RJ45 network cable Step2: Go to “ADVANCED CONFIG” from the main menu. Based on the model you have, “ADVANCED CONFIG” could be accessed by either: Selecting on the live view, or Right-clicking to show the main menu, and select " " or “ Then, select “Network” “WAN”, or ADVANCED CONFIG CONNECTION CAMERA DETECTION ALERT NETWORK DISPLAY RECORD WAN LAN E-MAIL DDNS NETWORK TYPE DHCP IP 192.168.1.112 GATEWAY 192.168.1.254 NETMASK 255.255.255.0 PRIMARY DNS 168.095.1.1 SECONDARY DNS 139.175.55.244 PORT 88 EXIT “Network” “NETWORK”. ADVANCED CONFIG CANERA DETECTION ALERT NETWORK DISPLAY RECORD DEVICES NETWORK SNTP FTP E-MAIL DDNS NETWORK TYPE DHCP IP 192.168.001.010 GATEWAY 192.168.001.254 NETMASK 255.255.255.000 PRIMARY DNS 168.095.001.001 SECONDARY DNS 139.175.055.244 PORT 0080 EXIT 2 ” or “ ”.