1
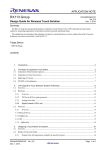
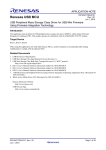
RX113 Capacitive Touch Evaluation System Quick Start Guide Overview: This document will help the user quickly get the Renesas Capacitive Touch Evaluation System and associated tools installed on the users target system. This will allow the user to quickly evaluate the Renesas Capacitive Touch solution. Kit Contents: Upon receiving your Renesas Capacitive Touch Evaluation System there will be several items in the box. Please verify that you have the following items as listed in the Capacitive Touch User’s Manual located documents directory of the included DVD. If you are missing any of these components, please contact your local Renesas Sales Representative. Capacitive Touch Evaluation System First-Start (Standalone Connection) 1) Perform the following steps to assemble the board Unpack the MCU main board, Button/Wheel/Slider board, plastic overlay, and USB cable from the kit box Assemble the plastic overlay onto the Button/Wheel/Slider board o Note the overlay will be on top with the screws securing the overlay thru to the standoffs Assemble the MCU board in a similar manner with 4 standoffs and 4 screws Connect the boards together ensuring the edge connectors are polarized and fully connected Ensure that the jumpers on the board are set as follows: o J15: populated with included jumpers o J9, J10, J12: 1-2 position populated with included jumper o J11: 2-3 position populated with included jumpers 2) DO NOT PLUG IN THE BOARD AT THIS TIME TO AVOID USB DRIVER CONFLICTS! Next perform tool installs by inserting the included DVD into your computers drive and browse to the root directory and reviewing the RX113 Cap Touch User’s Manual, Section 2.3.1 on the Cap Touch specific tools and USB driver install. Note: The Renesas E2Studio IDE and C Compiler do not need to be installed at this time 3) Now, using the kit provided USB cable, insert the cable into the PC and then into J6 on the TOP SIDE of the board. Once inserted LED4 will illuminate indicating that the board is powered from the USB connector Windows will begin a driver install process looking for the now-connected board. If the driver is not properly found, please see the instructions in the user’s manual appendix under USB Driver Installation. This manual can be found on the root directory of the included DVD Once powered, the board will illuminate the power LED. The board will function as follows: Number Keys (1-3): Touching any of the keypad keys will LED associated with that key. The LED is directly above the key. Slider: Sliding a finger up and down the slider area will illuminate the LEDs along the right side of the slider Wheel: Moving a finger around the wheel will illuminate the LEDs on the outside of the wheel SW 1-3 (Main MCU Board): Pressing the switches will illuminate the LEDs directly above the switch pressed Workbench Capacitive Touch Tuning Tool These steps will allow the user to quickly connect to the Renesas Capacitive Touch Tuning tool known as Workbench. Start the Workbench tool by clicking Start->Programs->Workbench6->Workbench o The Workbench GUI will start to its default screen as shown below EU_000161 Ver. 1.0 Page 1 From the file menu, select Connection->Serial port connection A dialog box will appear as shown below. Ensure to select the Renesas RX113 CDC Sample o Select a COM port speed of 115200 BPS o The PC will connect to the board and Connected will show at the bottom of the Workbench window From the Workbench Menu bar, select Capacitive touch->Status Monitor o A graphical window will open and default to TS00 on the upper tab Right-click in the graph field and change the channel display to TS09 as shown below From the Workbench Menu bar, select Capacitive touch->Start Monitor o Data values will appear on the right hand side of the graph o Graph lines will start to stream across the graph area Touching the ‘3’ will indicate touch while the graphs are streaming. A red bar will also appear at the bottom of the Workbench screen when a touch has occurred o Note other channels can be added to the window by right-clicking in the graph and selecting other TSx channels indicated in the below board picture. Note multiple graphs can be shown at once, this is a simple demonstration of the touch Workbench Next Steps: These steps show the basic functions of the pre-programmed demonstration code for the Renesas Capacitive Touch Evaluation System. Further investigation of the kit will be performed in a lab-style format that will include: Connection to Workbench, the Renesas tuning tool Use e2Studio to load the kit touch project and use the debugger interface Examine some key aspects of the Renesas Touch solution For the latest information on the Renesas Touch solution and kit updates, please visit the following Renesas web address: http://am.renesas.com/applications/key_technology/human_interface/touch_sensor_system_2gen/index.jsp EU_000161 Ver. 1.0 Page 2