1
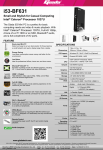
www.giadatech.com
II. About the product
1 Power switch
2 Base frame
3 Port of heat sink
1. Appearance
4 HDMI interface
5 USB interface
6 USB interface
7 VGA interface
8 LAN interface
9 Power interface
10 Input for mic
11 Output for audio
12 USB/e-SATA port
13 Card reader
14 Left air vent
15 Right air vent
Icon
Giada mini PC with multiple interfaces can be connected to various types of
monitors, storage devices and so on. There are some brief for all kinds of
6
Description
Use
Position
Power switch
Start the PC
1
Base frame
To fix the PC for safety purposes
2
Port of heat sink
To allow the heat to be vented out
3
HDMI interface
Connect to HDMI digital monitor
4
USB interface
Connect USB devices
5 6
VGA interface
Connect VGA analog monitor
7
LAN interface
Link to the internet
8
Power interface
Connect power adapter
9
Input for mic
Connect audio input device
10
Output for audio
USB/e-SATA port
Connect audio output device
11
Connect USB/e-SATA devices
12
pictures in following table. The table will make you better understand the
Card reader
To read SD/MMC/MS/MS PRO storage card
13
structure of the product.
Left air vent
To allow air to get through
14
Right air vent
To allow air to get through
15
7