1
2008 Chenxin Zhang (sx07cz6) Kleves Lamaj (sx07kl6) Monthadar Al Jaberi (d04ma) Praveen Mayakar (sx07pm7) [DAMN SMALL NAS] Project work for Advanced Embedded Systems Course, Lunds
Tekniska Hogskola
November 8, 2008
[DAMN SMALL NAS]
Abstract To build a small NAS with hardware resources enough to provide functionalities such as
remotely accessible storage and a locally operated menu based administration application.
Extensive effort was put into building the functional subsystems of the Damn Small NAS viz.,
PetaLinux installation and LCD controller. Implementation oriented issues within the project
time span prevented us from merging them successfully.
The main reason for not being able to complete the final product was due to the inconsistency
between the Xilinx software and the PetaLinux distribution.
Advanced Embedded Systems Project
2
November 8, 2008
[DAMN SMALL NAS]
Table of Contents Acronyms ..............................................................................................................................................................4
Keywords ..............................................................................................................................................................4
1.
2.
3.
Introduction..........................................................................................................................................................5
1.1
Project Description ......................................................................................................................................6
1.2
The Project Roadmap ..................................................................................................................................7
1.3
Deviations from the proposal .....................................................................................................................8
PetaLinux ..............................................................................................................................................................9
2.1 PetaLinux .....................................................................................................................................................9
2.2 User manual and Instructions ...................................................................................................................10
2.3
LCD Linux driver attempt...........................................................................................................................11
2.4
Problems with generating own hardware design ....................................................................................12
2.5
Problems in compilation of PetaLinux ......................................................................................................13
2.6
What could have been different? .............................................................................................................14
LCD interface standalone project ......................................................................................................................15
3.1
Hardware architecture .............................................................................................................................. 15
3.2
Controlling on LCD module .......................................................................................................................17
3.3
Software interface .....................................................................................................................................17
4.
Lessons Learnt ....................................................................................................................................................20
5.
Contributions......................................................................................................................................................21
6.
Appendix A : Xilkernel ........................................................................................................................................22
7.
Appendix B : File System ....................................................................................................................................23
7.1
Introduction ...............................................................................................................................................23
7.2
The PetaLinux File System .........................................................................................................................23
7.3
The Xilinx File System ................................................................................................................................23
8.
Appendix C: PS2 Controller ................................................................................................................................27
9.
References ..........................................................................................................................................................29
9.1
Reference 1 ................................................................................................................................................29
9.2
Reference 2 ................................................................................................................................................29
9.3
Reference 3 ................................................................................................................................................29
9.4
Reference 4 ................................................................................................................................................29
9.5
Reference 5 ................................................................................................................................................29
Advanced Embedded Systems Project
3
November 8, 2008
[DAMN SMALL NAS]
Acronyms NAS
FTP
LCD
CPU
PS2
FPGA
RAM
ROM
DDR-RAM
BRAM
VGA
UART
OPB
PLB
XPS
GPIO
IP Core
EDK
DHCP
OS
TCP/IP
TFTP
Xil MFS
LED
MDM
RS232
- Network Attached Storage
- File Transfer Protocol
- Liquid Crystal Display
- Central Processing Unit
- Personal System/2 - IBM Standard Controller for keyboard and Mouse
- Field-programmable gate arrays
- Random Access memory
- Read only memory
- double data rate random access memory
- Block Random Access Memory
- Video Graphics Array
- Universal asynchronous receiver transmitter
- On Chip Peripheral Bus
- Peripheral Logic Bus
- Xilinx Platform Studio
- General Purpose Input Output
- Intellectual property Core
- Embedded Development Kit
- Dynamic Host Configuration Protocol
- Operating System
- Transmission Control Protocol (TCP) and Internet Protocol (IP)
- Trivial File Transfer Protocol
- Xilinx Memory File System
- Light emitting Diode
- Microblaze and the Debug Module
- IBM Recommended Standard for serial cables
Keywords PetaLinux
XilKernel
PicoBlaze
MicroBlaze
Spartan
Virtex
FS-Boot
U-Boot
POSIX
Mutex
- Linux distribution from PetaLogix
- Kernel from Xilinx
- Processor core from Xilinx for FPGA & CPLD
- Processor core from Xilinx for FPGA
- FPGA family from Xilinx
- FPGA family from Xilinx
- File System Boot Loader
- Universal boot Loader
- Portable Operating System Interface for Unix systems
- Mutual exclusion algorithms used in concurrent programming Advanced Embedded Systems Project
4
November 8, 2008
[DAMN SMALL NAS]
1. Introduction
Network-attached storage (NAS) is a file-level computer data storage system connected
to a computer network providing data access to heterogeneous network clients. The
product has the following functionalities.
• Network connectivity
• Accessibility to storage medium
• FTP
• LCD display, can be used for menu based operations.
The user interacts with the product using a PC to connect to the FTP server to download
and upload files.
The Xilinx Spartan board was used with a built-in LCD considering enough support for
memory and CPU requirements. The necessity to have an operating system to support
low level implementations and for using a pre-implemented FTP was realized during the
implementation of the product. Linux seemed to be an ideal choice as it comes with
enough hardware and driver support and is small in size to fit the board requirements.
The enhancement on newer feature to add new drivers supported from within Linux
made Linux a much preferred choice.
This document describes in detail the implementation of such a product. An overview of
each of the sub system modules is described with details on both the hardware and the
software. The problems faced and necessary deviations done to realize things within the
limited time have been mentioned as well. A user manual for one willing to try the
product is available and a brief note on lessons learnt and future improvements are also
part of this document. The appendices describe all the efforts and investigations towards
getting the planned features implemented. Some of the investigations could not be used
in the project with available time to implement and hence could only be stated as some
useful learning. Hence some of these carried out during the implementation of the
project were not included in the final product. In the end, the product was two
subsystems which could not be merged, the PetaLinux installation and the LCD controller.
Advanced Embedded Systems Project
5
[DAMN SMALL NAS]
November 8, 2008
1.1 Project Description The project intended towards making a small working product of a NAS, was carried on
with an investigation on making use of available hardware resources.
The target board is a Xilinx Spartan 3E Starter board with the following specifications:
z
z
z
z
z
z
z
z
z
500K Gates
64 MB DDR RAM
16 MB ROM
Ethernet Port
2x Serial Ports
LCD screen
PS/2 Port
VGA Port
General I/O ports
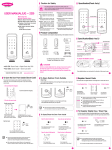
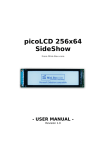
The hardware architecture used in building the NAS is as shown in Figure 1 below:
MicroBlaze
MAC controller
DDR Memory
Flash controller
PS/2
BUS
LCD
UART (debug)
Timer
Interrupt
BRAM
Figure 1: Hardware architecture for damn small NAS The damn small NAS as a product with the two sub systems PetaLinux installation and the
LCD controller which uses both hardware and software parts whose functionalities are
mentioned in the coming chapters. The hardware used was a Xilinx Sparta3E500 board
which included an LCD display. The software work was mostly confined to Linux, its
compilation.
Advanced Embedded Systems Project
6
November 8, 2008
[DAMN SMALL NAS]
1.2 The Project Roadmap Everything started with a brainstorm during week 1 and a NAS product was decided with
very few technical details. Will it use RAM as storage, Compact flash, SATA drive? Will it
contain an LCD or a VGA to give feedback to the user? Will it use a UART or keyboard to
be accessed through?
In early week 2 it was basically decided to use an LCD, RAM as storage and UART. Now
investigation for appropriate software architecture began with three main solutions:
•
•
•
All custom solution
XilKernel as the base OS kernel with xilMFS
Linnux as a complete operating system with accompanied applications
Human resources were split on the two latter options because the first was not viable for
such a short project. uCLinux was investigated. A shell like file system was written to test
how easy it was to use the provided Xil MFS from Xilinx. And Xilkernel was up and running
with an Echo, TFTP, HTTP servers.
During week 3, PetaLinux implementation of uClinux was chosen to be used as the Linux
solution. While Xilkernel was tested to run with pthreads, semaphores and message
passing between threads.
The fourth week was the week that the Linux solution was chosen to be fully
implemented. Cross compilation of PetaLinux was a problem. Also during this week flash
memory was successfully used to store bit-stream and code instead of being downloaded
again every time the board was turned off and on again.
In week 5 there were problems with synthesizing the reference design for the PetaLinux.
The cross compilation problems were still persistent. At the same time there was an
investigation of the PS2 controller that would be later on integrated into the reference
design. Also an LCD custom hardware was being developed separately on a standalone
system minimizing the potential problems that would occur if it would have been
integrated into the Linux directly. An investigation on installing PetaLinux for Virtex 2 was
also made with ambiguity towards enough space on the board with all the planned
features and extra ones that were planned to be used once Linux was up and running.
In week 6 the PetaLinux cross compilation was solved. LCD was suffering from software
synchronization. An attempt of writing a Linux driver for the LCD controller was done.
Advanced Embedded Systems Project
7
November 8, 2008
[DAMN SMALL NAS]
In the final week the LCD standalone solution was working successfully. PetaLinux was
only working with the reference hardware design without any modifications so PS2 was
abandoned. The LCD controller was treated as a separate project; therefore the LCD
controller Linux driver was not possible to be tested.
So in the end this project ended up with two projects, the PetaLinux design and the LCD
standalone project.
1.3 Deviations from the proposal The use of the LCD display was made for a menu based program to be able to administer
commands to see free space on the storage media or to format the media. The proposal
was however not implemented due to the lack of a good Linux reference system to test
the implementations done with LCD; however the final product has the stand-alone LCD
controller that can text data to the LCD display. The text can also move as a marquee. The
PS2 controller was used from the Xilinx IP core library however since the menu based
program could not be made its use could not be materialized.
Advanced Embedded Systems Project
8
November 8, 2008
[DAMN SMALL NAS]
2. PetaLinux 2.1 PetaLinux PetaLinux is source-based hardware and software distribution which has been developed
specifically for using Embedded Linux on reconfigurable logic devices. The PetaLinux
distribution includes everything needed to easily create Linux systems running on Xilinx
FPGAs. The entire PetaLinux development package is freely downloadable from the
PetaLogix homepage [see Reference 4 ], which includes the hardware reference projects
designed for varieties of Xilinx FPGA development kits, uClinux kernel configuration utility
with few Xilinx devices included, and some additional software tools such as the C crosscompiler, hardware design creation tool etc. Due to the availability of suitable
development packages from the PetaLogix and their promising demonstration reference
designs, the PetaLinux was chosen in this project without more relevant searching on
other OS platforms.
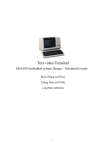
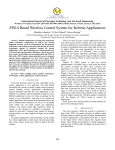
Included hardware units in the reference design are shown in Figure 2, where the project
was created in Xilinx EDK version 9.1. To generate system image file, the entire project
files were loaded in and updated to Xilinx EDK version 10.1, where some of the IP cores
were forced to be updated. On the software side, all the desired functionalities are
bundled with the OS platform, such as the file system, FTP server, HTTP server etc.
MicroBlaze
MAC controller
DDR Memory
Flash controller
BUS
UART (debug)
Timer
Interrupt
BRAM
Figure 2: Hardware units used in Reference design Referring to the building blocks shown in system architecture as shown in Figure 1, two
system peripheral devices are missing in the PetaLinux reference design. They are the LCD
controller and the PS2 core.
Advanced Embedded Systems Project
9
November 8, 2008
[DAMN SMALL NAS]
Therefore two additional hardware blocks have to be added into the hardware project,
and their corresponding device drivers in Linux have to be developed.
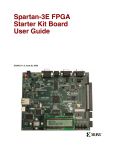
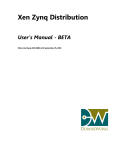
2.2 User manual and Instructions The board connections are as shown in Figure 3. The connections require one RJ45 for
Ethernet connection and one RS232 for the feedback from PetaLinux.
Figure 3: Connections to Spartan target board
When PetaLinux has booted up and the prompt is available, the user should type in the
account name and password which is as,
Username: root
Password: root
The installation, compilation and configuration instructions for the PetaLinux on the
Spartan board can be found on PetaLinux webpage [See Reference 3 & Reference 4]
Now, for the user to be able to communicate and transfer files to the target board, there
would be some network settings to be done. The host machine settings and target
machine settings are as mentioned in Table 1 and Table 2 below:
Advanced Embedded Systems Project
10
[DAMN SMALL NAS]
November 8, 2008
IP-Address
192.168.0. X (where X is not equal to 10)
Netmask
255.255.255.0
Table 1: Host machine network settings Once the above settings have been done the user can open a FTP-client and connect to
the server
IP-Address
192.168.0.10
Account
Root
Password
Root
Table 2: Target machine settings For the user to receive feedback from PetaLinux the RS232 cable will be used along with
a terminal program that must have the settings as in Table 3 below:
Bits per second
115200
Data bits
8
Parity
None
Stop bits
1
Flow control
Hardware
Table 3: Terminal program settings The only read/write directory in the target machine is “/tmp” and hence the user can
upload data only to “/tmp”.
2.3 LCD Linux driver attempt After completion of the LCD standalone module the second step would be to write a Linux
driver. After some searching in the file structure of PetaLinux a similar driver was found,
that was controlling the rotary button [See Reference 5]. Keypaddev.c was an example
driver provided with the reference design which takes care of communicating with a
rotary button that is supplied with the Spartan 3E board.
Advanced Embedded Systems Project
11
November 8, 2008
[DAMN SMALL NAS]
A new driver was created called “picolcd.c” [See Reference 5] based on the “keypaddev.c”
driver. And a new entry was added to the Makefile so that the driver would be visible in
the kernel configuration menu.
obj-$(CONFIG_INPUT_PICO_LCD) += picolcd.o
The driver was stripped down to only setting up what is necessary (excluding interrupt
handling) to make the device visible to applications running inside PetaLinux. Basically
that is allocating memory within the system and doing a mapping from the address of the
device to where the newly created resource is, then giving the driver a name, in this case
“PicoLCD”. Whenever an application tries to access the device it will search for the
driver’s name. A copy of the modified Makefile and the driver is attached with the
project.
After adding the driver, one would need to include it in the cross compilation of PetaLinux
and that is done while customizing the kernel,
Linux Kernel Configuration → Device Drivers → Input device support
then enabling the driver, in this case called PicoLCD.
But due to failure of adding custom hardware to the reference design the driver was
never tested.
2.4 Problems with generating own hardware design 2.4.1 The only successful synthesis of the hardware was while synthesizing the reference design
without any changes. Also another major issue was that the synthesis was only successful
with Xilinx EDK version 10.1 without any service packs installed otherwise the FS-Boot,
which is the first stage boot-loader, fails to boot U-Boot, the second stage boot-loader. All
attempt to synthesize on the universities’ computers or different laptops with different
service packs install failed.
2.4.2 A major blow to the project was the inability to add custom hardware design into the
reference design. The same problem mentioned above was observed even when adding
the smallest, unused, custom hardware design. The Xilinx EDK version problem
mentioned earlier could also have been a cause for this.
Another fact that confirms our suspicion about version problem is that Xilinx EDK version
9.2i succeeded in compiling and running the whole Linux operating system while just
adding an extra OPB core, but that was discovered after the project ended.
Advanced Embedded Systems Project
12
November 8, 2008
[DAMN SMALL NAS]
Based on the observations made, the reasons for the problems encountered are
presumed to be one of these:
•
•
Synthesizer/Place & Route.
IP-Core changes.
With limited support and available time, we could not proceed to fix this issue and hence
the pre-built hardware design was used.
2.5 Problems in compilation of PetaLinux 2.5.1 One of the major issues that stood in the way of compiling PetaLinux was that the host
operating system that contained the chain-tool for cross compilation wasn't configured
and hence had to be re-configured. The host machine was running Ubuntu distribution (a
Linux distribution based on Debian another Linux distribution) that used a different
command interpreter than what was expected by PetaLinux. A change in the symbolic link
fixed the problem. The change to be done is as mentioned below
$sudo rm /bin/sh
$sudo ln -s /bin/bash /bin/sh
The fix was to use Bash command interpreter instead of Dash, which is a lightweight
implementation of Bash
2.5.2 The other problems that was encountered during the compilation of PetaLinux was with
the missing libraries, a list of them is presented below
•
•
ncurses-dev
zlib1g-dev
These libraries may have different name for other distributions.
2.5.3 An effort to use PetaLinux on Virtex 2 was made to support enough usage required for
the LCD and for other features intended along with Linux. The Virtex2 had more resources
in comparison to the Spartan 3E board. However, there was no support provided from the
PetaLinux group for the Virtex2 board but for a similar family of board. The investigation
was done following PetaLinux manual with some changes necessary for the Virtex 2
board; however there were issues in getting it done and it seemed to be a big task with
no support being available. Further work on trying to compile PetaLinux for Virtex 2
seemed rather not goal oriented and hence was stopped
Advanced Embedded Systems Project
13
November 8, 2008
2.6
[DAMN SMALL NAS]
What could have been different? If there was a second chance to do the project Xilkernel would have probably been
chosen instead of PetaLinux. This choice would not be because it is better but to meet the
project time requirements. All problems with compilation and synthesis would not have
emerged. That would have been a major advantage in looking for optimization and
enhanced features for the product.
On the other hand, using Xilkernel is not a long term solution because it is really hard to
expand the product with new features. Everything needs to be written by hand, for
example if DHCP would be a requirement for the product then a DHCP program along
with some low level implementation would have to be done. Thus it would be a major
hindrance in project time constraints.
Choosing Linux as the operating system, one would have higher complexity in the initial
phase to compile, configuring the system, booting and running custom applications. This
would facilitate ease of adding newer features and hence would be faster
implementations. One could also add variety of applications from open source which are
developed by the Linux community.
On the contrary, using Xilkernel would be less complex and be a faster implementation
initial phase. However, it would have a higher complexity and hence time taking as the
need to add more features are required. The key factor to choose the OS should be based
on project’s timeline requirements
Advanced Embedded Systems Project
14
November 8, 2008
[DAMN SMALL NAS]
3. LCD interface standalone project A customized LCD IP core was designed to drive the LCD module available on the Xilinx
Spartan-3E starter kit. The core provides an interface to the host side (MicroBlaze) to
control or communicate with the LCD module. From a user standpoint, a simple software
interface is highly desirable.
Running speed of the available LCD module is slow comparing with the main system, since
all the timing and delay requirements for the LCD module are given in milliseconds, where
the main system runs at nanoseconds. To issue commands into the LCD module, a certain
running procedure needs to be followed with well controlled timing requirements as
specified in datasheet. To control the LCD module, the needs could be seen as a well
controlled state machine behaving at a lower action speed than the main application. A
small microcontroller was chosen in this case to achieve requirements not only due to the
conveniences but also the smaller hardware occupation.
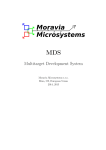
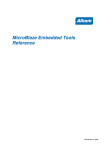
3.1 Hardware architecture The customized LCD IP core is created on an OPB bus, where communications with the
main application are realized through two bus registers, as shown in Figure 4. The LCD IP
core is mainly composed of a PicoBlaze with a program ROM attached. Because the
PicoBlaze has only one input port and one output port that each port has 8-bit data, a
multiplexer for driving multi-input/output port signals is used to interface with different
bus registers. Due to the hardware connections available on the board, the LCD module is
used in 4-bit data transmission mode. So a 4-bit data bus and three additional control
signals (enable, register select, read/write) are connected to the port multiplexer of the
PicoBlaze. A list of the assigned port IDs for different input/output port selections is as
shown in Figure 4 below.
Figure 4 Simplified LCD IP core block diagram Advanced Embedded Systems Project
15
November 8, 2008
[DAMN SMALL NAS]
Port ID
Port direction
Port selection
0x00
Input
Bus register 0 bit 0 ~ 7
0x01
Input
Bus register 0 bit 8 ~ 15
0x02
Input
Bus register 0 bit 16 ~ 23
0x03
Input
Bus register 0 bit 24 ~ 31
0x40
Input
Bus register 1 bit 0 ~ 7
0x20
Output
LCD data bus and control signals
Table 4: Port address of input/output multiplexer PicoBlaze is a simple 8-bit microcontroller primarily for the Spartan-3 devices, which is
mainly used in applications requiring a complex, but non-time critical state machine [See
Reference 1]. The main reason of choosing the PicoBlaze to drive LCD module is due to
the smaller hardware size. As stated in datasheet, complete processor requires only 96
slices in Spartan-3 FPGA devices. When considering the needs in driving LCD module if a
finite state machine was used, one could guess a similar or even larger hardware usage
would be required. In addition, choosing to use a microcontroller in this case also
simplifies system design flow and leaves rooms for updating system functionalities
without requiring more hardware resources. The PicoBlaze used in this application is
driven by the OPB bus clock and bus reset signal. The device utilization for LCD controller
is as in Table 5 below:
Device: 3s500efg320‐4 Used Total Usage Number of Slices
198
4656
4%
Number of Slice Flip Flops
241
9312
2%
Number of 4 input LUTs
327
9312
3%
Number used as logic
259
Number used as RAMs
68
Number of IOs
119
Number of bonded IOBs
0
232
0%
Number of BRAMs
1
20
5%
Table 5: LCD Driver Device utilization summary Attached program ROM for the PicoBlaze is formed by a single block RAM and has a
limited program size of 1024 instructions. To simplify system architecture and
Advanced Embedded Systems Project
16
November 8, 2008
[DAMN SMALL NAS]
configuration procedures, no debugging facilities is included for the PicoBlaze and all the
instructions are hard coded in the program ROM.
Although both microcontrollers are running at the same system speed, but certain
running procedures have to be followed when operating with the LCD module. Therefore
the PicoBlaze will take several clock cycles to complete an action requested from the
MicroBlaze. So to accomplish one complete data transmission, the MicroBlaze has to issue
command to start an action and the PicoBlaze has to acknowledge this back when action
is finished. This is known as the communication handshaking.
Bus interface registers are 32-bit each, and they are in principle readable and writeable
for both MicroBlaze and PicoBlaze. In this application, bus register 0 is utilized as a
bidirectional interface for control signal transmissions between two microcontrollers,
where communication handshaking is performed; register 1 is treated as a unidirectional
register for data transmissions from the MicroBlaze to PicoBlaze.
3.2 Controlling on LCD module Since a small microcontroller is chosen, controlling the LCD module is straightforward.
Timing delays needed by the LCD module are generated in the software level, and all the
controlling sequences are coded in assembler. Refer to the LCD datasheet [See Reference
2] for more hardware requirements.
3.3 Software interface Software interface provides the user few function calls that can be used in a standalone
application to operate with the LCD controller. In the current application project, a text
string is sent form the MicroBlaze to the LCD controller, and entire data contents shown
on the LCD module are left shifted every second.
Since PicoBlaze can only handle 8-bit input data at a time, each 32-bit interface register is
divided into 4 entries, as shown in Figure 5. Lower 8-bit data in both registers are used in
the MicroBlaze to send data to PicoBlaze. Upper 8-bit data in register 0 is used by the
PicoBlaze for sending acknowledgement signal back to the main application. The rest of
register entries are reserved for further developments. Control commands sent from the
MicroBlaze through register 0 lower 8-bit are listed in Table 6.
Advanced Embedded Systems Project
17
November 8, 2008
[DAMN SMALL NAS]
Each data communication in the main application acts as a block read or write. It is
initialized by putting data in the register 1, and then sending data command through
register 0. The main application will then be blocked until reading an acknowledgement
signal back. Inside the LCD controller, the PicoBlaze runs in an idle stage after initializing
the LCD module, where it listens on its input port and records input data in both
command register and temporary data register. A known data command as listed in Table
6 will trigger the PicoBlaze to jump into the corresponding sub-routines to execute a
certain task. At the same time a recognized data command will also trigger the PicoBlaze
to send an acknowledgement signal back to the MicroBlaze through register 0. Additional
logics on the OPB bus will clear the lower 8-bit data in register 0 when PicoBlaze
responses, which prevents command re-executing in the PicoBlaze. The software flow
chart is shown in Figure 6.
Figure 5: Software interface register entries Command code Command name
0x01
Write data
0x02
Reset
0x03
Clear display
0x04
Set cursor position
Description Sending data to the LCD controller,
and display data content on the
LCD module
Reset the LCD module
Clear data contents on the LCD
module
Set cursor position on the LCD
module for next character writing
0x05
Shift display left
Shift entire data contents displayed
on the LCD module to left by 1
position
0x06
Write instruction
Sending function code to the LCD
Advanced Embedded Systems Project
18
November 8, 2008
[DAMN SMALL NAS]
controller to execute
Delay 1mS
Call for 1m second delay achieved
in the LCD controller written in
assembler
Delay 20mS
Call for 20m second delay achieved
in the LCD controller written in
assembler
0x09
Delay 1S
Call for 1 second delay achieved in
the LCD controller written in
assembler
0x0A ~
Reserved
0x07
0x08
---
Table 6: Command list of LCD IP core The software flow chart is shown in Figure 6 below.
LCD initialization
Waiting ack signal from
LCD controller to
initialize the LCD
module
Data sending via REG1
Acknowledge to host
Command sending via
REG0
Function call: Writing
text string on LCD
Record input in
command register
Waiting for
acknowledgement
Record input in data
register
Forever loop
Received
Function call: Delay 1s
Known command?
Function call: Display
left shift
No
Yes
Execute command
(a)
(b)
(c)
Figure 6: Software flow charts. (a) Program flow in a standalone project. (b) Program flow in a function call. (c) Program flow in the LCD controller. Advanced Embedded Systems Project
19
November 8, 2008
[DAMN SMALL NAS]
4. Lessons Learnt 1. It is hard to estimate a complex project without knowledge or experience of tools
which have dependencies
2. One must be careful in parallelizing the tasks in a project with a shorter deadline
3. Relying on external tools create a lot of dependencies and lack of support could lead
to delay
Advanced Embedded Systems Project
20
November 8, 2008
[DAMN SMALL NAS]
5. Contributions Chenxin Zhang
•
•
•
•
•
LCD Standalone project design
PetaLinux analysis
Compiling PetaLinux
LCD Linux driver attempt
Sections 2.1, 3.1, 3.2 & 3.3
Kleves Lamaj
•
•
•
•
•
•
Project proposal presentation
File system analysis
File system shell programming
Investigation for Linux file system
Investigation for PS2 Controller
Chapter 7
Monthadar Al Jaberi
•
•
•
•
•
Xilkernel Analysis
Compiling PetaLinux
LCD Linux driver attempt
Final project presentation
Sections 1.2,2.2,2.3,2.4 & 2.5
Praveen Mayakar
•
•
•
Investigation for PS2 Controller
PetaLinux investigation for Virtex 2
Sections Abstract, 1.1, 1.3, 2.6,
Chapter 4, Appendix C & Chapter 9.
Advanced Embedded Systems Project
21
November 8, 2008
[DAMN SMALL NAS]
6. Appendix A : Xilkernel Xilinx provides a small kernel called Xilkernel that is packed with many features. The
major features are:
•
•
•
•
Multithreaded
Posix compliant
File system for RAM/ROM devices
TCP/IP stack called lwIP
These features made Xilkernel an interesting candidate to be the base software platform
for the product.
Despite of being successfully able to run not just a TFTP but also an echo and web-server
it wasn't chosen to be used in the product. Message passing and mutex handling was also
running successfully. The reason to abandon it in favor for a Linux kernel was for the vast
access to already running and tested open-source application that was not just shipped
with Linux but is also available to be downloaded from the web and then cross compiled
to run inside Linux.
Advanced Embedded Systems Project
22
November 8, 2008
[DAMN SMALL NAS]
7. Appendix B : File System 7.1 Introduction Any NAS (Network Attached Storage) would be in need of a file system, where the user’s
data would be stored and retrieved from with ease. When the project was started a
common decision was taken to investigate at least two file systems, and then later on
commit to one of them. This was done to be able to parallelize work among group
members. Our choices in this matter were Xilinx’ own file system XilMFS and Linux’ file
system. This appendix will cover the former of the two.
7.2 The PetaLinux File System A quick glance at this file system reveals that it is capable of all the standard operations
upon files and folders, i.e. creating, moving, copying and deleting them. All of these while
maintaining an active pointer to the active working directory, which can be retrieved
through PWD (present working directory). This allows for successful storage and retrieval
operations on data, which would be catered to the user of the NAS through the FTP
server. So far it is lacking the ability to add/remove users at runtime like most standard PC
Linux’s would. This can be remedied by creating the user accounts prior to the cross
compilation of PetaLinux.
7.3 The Xilinx File System Xilinx has included with the EDK a file system called Xilinx Memory File System (MFS). This
file system can be utilized on the standalone project mode or even together with the
Xilinx’s kernel called XilKernel. The system resides in RAM/ROM/Flash memory and can be
accessed directly. The following are a list of functions built in the XilMFS:
void mfs_init_fs(int_numbytes,_char_*address,_int init_type)
void mfs_init_genimage(int numbytes, char *address, int
init_type)
int mfs_create_dir(char *newdir)
int mfs_delete_dir(char *dirname)
int mfs_get_current_dir_name(char *dirname)
int mfs_rename_file(char *from_file, char *to_file)
int mfs_exists_file(char *filename)
int mfs_dir_open(char *dirname)
int mfs_dir_close(int fd)
int mfs_file_open(char *filename, int mode)
int mfs_file_write(int fd, char *buf, int buflen)
Advanced Embedded Systems Project
23
November 8, 2008
int
int
int
int
int
[DAMN SMALL NAS]
mfs_file_close(int fd)
mfs_ls(void)
mfs_cat(char* filename)
mfs_copy_stdin_to_file(char *filename)
mfs_file_copy(char *from_file, char *to_file)
To illustrate the usage of these functions, a shell-like application was written, which
would run on a system built with EDK. The following hardware setup was chosen as
shown in Figure 7 below
Figure 7: Hardware Layout Some of the IP cores on this system are redundant (such as Ethernet_MAC, LEDs_4Bit,
PushButtons, etc); they were left there in case this system would have been the chosen
architecture for the NAS project. The only IP Cores that are relevant to this test setup
are the UART, the Microblaze and the Debug Module (MDM).
On the software side a C program was written, which would read an entire line of text
from the UART, tokenize it and store it into an array of strings, and send it to another
function which would match it against some predefined commands (i.e. “ls”, “mkdir”,
“clear”, etc), and execute the command by using the appropriate XilMFS function/s. The
layout of the software is shown on Figure 8 below
Advanced Embedded Systems Project
24
November 8, 2008
[DAMN SMALL NAS]
Figure 8: Software Layout The code has been divided into two source files, and a header file is included to keep
the functions declarations and other major constants and defines. Since the shell was
never intended to be used as a fully fledged shell (i.e. being able to load/execute other
files) due to lack of operating system, it is rather a simple program that wraps the filesystem functions provided by Xilinx. In Figure 9 and Figure 10 the settings for the
platform generator are shown. It is necessary to enable the “xilmfs” library on the
library generator to be able to use the functions included on the “xilmfs” library.
Furthermore as shown on Figure 10 the settings for the new file system would have to
be indicated to the library generator.
Figure 9: Platform Settings ‐ Library settings for enabling xilmfs Advanced Embedded Systems Project
25
November 8, 2008
[DAMN SMALL NAS]
Figure 10: Platform Settings ‐ Details of the xilmfs library Advanced Embedded Systems Project
26
November 8, 2008
[DAMN SMALL NAS]
8. Appendix C: PS2 Controller The PS2 controller used in the product was an IP core from Xilinx called XPS PS2. The core
is a PLB bus slave designed to control PS2 protocol keyboard and mouse. It uses simple
state machine and works on shift registers. Each of the PS2 ports is controlled by a 4 byte
wide registers. For transmitting data, a byte is written to the transmit register and then
the data is serialized and transmitted to the PS2 device. Transmit status registers and
interrupts indicate whether the transmission is complete and if there are any errors
reported. The received data is written into the receive register. Similar to the transmit
status registers, receive status registers and interrupts indicate whether data has been
received from the PS2 device. The XPS PS2 Controller generates interrupts upon various
transmit and receive conditions.
Initially the Virtex 2 board was used as it was a hardware resource available with the team
working on the PS2 controller. Later the same methodology was used for the Spartan
board. The below sequence of steps were followed while the core was used for our
reference design.
• Verify standalone usability in a polled mode:
o Platform : Virtex 2 Board.
o Hardware : PS2 XPS core, Microblaze, XPS Bus controller.
o Software : Standalone in polled mode.
•
Verify standalone usability in a polled mode:
o Platform
: Virtex 2 Board.
o Hardware : PS2 XPS core, Microblaze, XPS Bus controller, OPB to PLB Bridge,
OPB bus controller.
o Software : Standalone in polled mode.
The inclusion of the bridge was necessary for the PS2 controller operating on the PLB
bus to communicate with the main OPB bus in PetaLinux.
•
Verify standalone usability in a polled mode:
o Platform
: Spartan 3E Board.
o Hardware : PS2 XPS core, Microblaze, XPS Bus controller, OPB to PLB Bridge,
OPB bus controller.
o Software : Standalone in polled mode.
Advanced Embedded Systems Project
27
November 8, 2008
[DAMN SMALL NAS]
The next step was to run the controller for the Spartan board and make it work for the
interrupt mode. An idea to integrate the core with the Linux and use Linux’s interrupt
scheme for the controller was conceived. However, since there were no known methods
to integrate the cores with the PetaLinux and time was spent on investigating methods to
make the integration work, the interrupt mode could not be attempted.
Advanced Embedded Systems Project
28
November 8, 2008
[DAMN SMALL NAS]
9. References 9.1 Reference 1 PicoBlaze Manual
http://www.xilinx.com/products/ipcenter/picoblaze-S3-V2-Pro.htm
9.2 Reference 2 Spartan user guide Xilinx UG230 Spartan-3E Starter Kit Board User Guide:
http://www.xilinx.com/products/boards/s3estarter/reference_designs.htm
9.3 Reference 3 Compiling & Configuring PetaLinux
http://developer.petalogix.com/wiki/UserGuide/Basics
9.4 Reference 4 Downloading PetaLinux
http://developer.petalogix.com/wiki/BoardGuides/Xilinx/S3E500/Tutorial
Note that this tutorial is for revision C of the Spartan board. It would require minor
changes to be done while following the tutorial.
9.5 Reference 5
Keypaddev.c available in the download package from PetaLinux
${PETALINUX}/software/linux-2.6.x-petalogix/drivers/input/keypaddev.c
Picolcd.c is available in the archive “lcd drivers” files submitted.
Advanced Embedded Systems Project
29