1
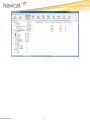
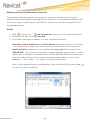
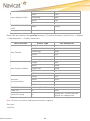
Table of Contents GETTING STARTED 2 CONNECTION SETTINGS 4 General Settings for MySQL 7 General Settings for Oracle 8 Oracle Basic Connection General Settings 9 Oracle TNS Connection General Settings 10 General Settings for PostgreSQL 11 General Settings for SQLite 12 General Settings for SQL Server 13 SSH Settings (Available only for MySQL, Oracle, PostgreSQL and SQL Server and supports SSH2 Protocol only) 14 Benefit of SSH Tunneling 15 Password Authentication 16 Public Key Authentication 18 HTTP Settings (Available only for MySQL, PostgreSQL and SQLite) 20 SSL Settings (Available only for MySQL and PostgreSQL) 21 Installation of OpenSSL and MySQL/PostgreSQL 22 Setting up SSL Certificate for MySQL/PostgreSQL 23 Setting up Client Certificate for Navicat 26 Advanced Settings 28 Setting Advanced Database Properties (Available only for MySQL and PostgreSQL) 32 WORKING WITH DATABASES OR SCHEMAS 33 MySQL Database Management 34 Oracle Schema Management 36 PostgreSQL Database Management 37 PostgreSQL Database Designer 39 Editing PostgreSQL Database General 40 SQLite Database Management 41 SQL Server Database Management 43 SQL Server Database Designer 44 Editing SQL Server Database General 45 Editing SQL Server Database Filegroups 47 Editing SQL Server Database Files 48 Editing Advanced SQL Server Database Properties 49 WORKING WITH DATABASE OR SCHEMA OBJECTS 55 Viewing Object Information Getting Started 56 1 Getting Started To start working with MySQL/Oracle/PostgreSQL/SQLite/SQL Server databases in Navicat, you should first establish a connection or several connections using the Connection Windows. If you are new to the server or 'Net in general' and are not quite sure how things work, you may want to look at: MySQL User Manual Oracle Database Documentation PostgreSQL User Manual SQLite User Manual SQL Server MSDN Library Click or choose File -> New Connection to set up the Connection Properties. Connection Settings After the connections being established, you can connect to database, manage its objects, table data, and so on. See the instructions below to learn how to perform these operations in the easiest way. Working with databases/schemas Working with database/schema objects Navicat Explorer! The Navicat window includes a navigation pane (the left pane) and an object pane (the right pane). Navigation Pane is the basic way to navigate with connections, databases and database objects. It employs tree structure which allows you to take action upon the database and their objects through their popup menus quickly and easily. Object pane displays the opened tables, queries and so on. Toolbars at the top of window provide other controls that you can use to manipulate your data. To view or hide Navigation Pane, click the Red Indicator below or choose View -> Connection Tree from main menu. Getting Started 2 Getting Started 3 Connection Settings Navicat assembles utilitarian tools to manage your databases. To start managing your databases in Navicat, the first thing you require to do is to establish your server connection. Create Connection Navicat provides three typical approaches to establish your connection, click File -> or choose New Connection to start the setup. General Settings for MySQL General Settings for Oracle General Settings for PostgreSQL General Settings for SQLite General Settings for SQL Server SSH Settings (Available only for MySQL, Oracle, PostgreSQL and SQL Server) HTTP Settingsh (Available only for MySQL, PostgreSQL and SQLite) Note: For MySQL or PostgreSQL server, a commonly-used protocol - Secure Sockets Layer (SSL) is employed for managing the security of a message transmission on the Internet (see SSL Settings for details). Navicat provides evaluated accounts for testing purpose. The remote MySQL server connection settings are: Host Name/IP Address: server1.navicat.com Port: 4406 User Name: navicat Password: testnavicat The remote PostgreSQL server connection settings are: Host Name/IP Address: server1.navicat.com Port: 5432 Initial Database: HR User Name: navicat Password: testnavicat Getting Started 4 Note: Navicat authorizes you to make connection to remote server running on different platform, i.e. Windows, Mac, Linux and UNIX. To create a new connection with the same properties as one of the existing connection has Right-click the connection in the navigation pane and choose Duplicate Connection.... The newly created connection will be named as "connectionname_copy". Delete Connection To delete a connection Right-click the connection in the navigation pane and choose Confirm deleting in the dialog window. Delete Connection. Open Connection To open a connection Double-click the connection to open in the navigation pane. Close Connection To close a connection Right-click the connection in the navigation pane and choose Close Connection. Edit Connection To edit a connection information Close the connection if it is being opened. Right-click the connection and choose Connection Properties.... Open Connection Settings Save Path To open a connection settings save path Select the connection in the navigation pane. Right-click the connection and choose Go to settings save path or press Ctrl+G to open the settings save path folder. Getting Started 5 Export Connection Settings To export connection settings Choose File -> Export Connections.... Select the connections and the export file path. Import Connection Settings To import connection settings Choose File -> Import Connections.... Specify the connection settings file path. Confirm replacing or skipping in the dialog window if the connection already exists. Achieve Connection Information To achieve a connection information Open the connection in the navigation pane. Right-click the opened connection and choose Connection Information.... Getting Started 6 General Settings for MySQL The following instruction guides you through the process of creating a new connection. To successfully establish a new connection to local/remote MySQL - no matter via SSL, SSH or HTTP, set the connection properties in the corresponding boxes: Connection name, Host name, Port number, User name, and Password. By default, MySQL gives "root" as username and leave the password field blank. Connection Name A friendly name to best describe your connection. Host Name/IP Address A host name where the database is situated or the IP address of the server. Port A TCP/IP port for connecting to the database server. User Name User name for connecting to the database server. Password Password for connecting to the server. You can connect to your MySQL Server remotely however for security reasons native remote direct connections to the MySQL server are disabled. Therefore, you cannot use Navicat Premium or other similar MySQL admin applications running on your computer to connect to the remote server directly unless the User Privileges has been configured. If your Internet Service Provider (ISP) does not provide direct access to its server, Secure Tunneling Protocol (SSH) / HTTP is another solution. Getting Started 7 General Settings for Oracle The following instruction guides you through the process of creating a new connection for server. To successfully establish a new connection to local/remote Oracle - no matter via SSH, set the connection properties in the corresponding boxes: Connection name, Host name, Port number, User name, and Password. By default, Oracle created a number of user accounts upon installation. Administrative accounts: SYS, SYSTEM, SYSMAN, and DBSNMP. Sample schema accounts: SCOTT, HR, OE, OC, PM, IX and SH. Navicat supports 2 types of Oracle Server connection: Basic Connection TNS Connection If your Internet Service Provider (ISP) does not provide direct access to its server, Secure Tunneling Protocol (SSH) is another solution. Getting Started 8 Oracle Basic Connection General Settings Connection Name A friendly name to best describe your connection. Connection Type Connection type for connecting to the server: Basic or TNS. Basic In Basic mode, Navicat connects to Oracle through the Oracle Call Interface (OCI). OCI is an application programming interface that allows an application developer to use a third-generation language's native procedure or function calls to access the Oracle database server and control all phases of SQL statement execution. OCI is a library of standard database access and retrieval functions in the form of a dynamic-link library. Host Name/IP Address A host name where the database is situated or the IP address of the server. Port A TCP/IP port for connecting to the database server. Service Name/SID Set the Service Name/SID which the user connects when making connection. Select the corresponding radio button. User Name User name for connecting to the database server. Password Password for connecting to the server. Getting Started 9 Oracle TNS Connection General Settings Connection Name A friendly name to best describe your connection. Connection Type Connection type for connecting to the server: Basic or TNS. TNS In TNS mode, Navicat connects to Oracle server using an alias entry from a tnsnames.ora file through the Oracle Call Interface (OCI). OCI is an application programming interface that allows an application developer to use a third-generation language's native procedure or function calls to access the Oracle database server and control all phases of SQL statement execution. OCI is a library of standard database access and retrieval functions in the form of a dynamic-link library. Net Service Name The net service name. User Name User name for connecting to the database server. Password Password for connecting to the server. Getting Started 10 General Settings for PostgreSQL The following instruction guides you through the process of creating a new connection. To successfully establish a new connection to local/remote PostgreSQL - no matter via SSH, HTTP or SSL, set the connection properties in the corresponding boxes: Connection name, Host name, Port number, Initial Database, User name, and Password. By default, PostgreSQL gives "postgres" as username and leave the password field blank. Connection Name A friendly name to best describe your connection. Host Name/IP Address A host name where the database is situated or the IP address of the server. Port A TCP/IP port for connecting to the database server. Initial Database The initial database to which user connects when making connection. User Name User name for connecting to the database server. Password Password for connecting to the server. If your Internet Service Provider (ISP) does not provide direct access to its server, Secure Tunneling Protocol (SSH) / HTTP is another solution. Note: For security reasons native remote direct connections to the PostgreSQL server are disabled. Therefore, you may not be able to use Navicat Premium or other similar PostgreSQL admin applications running on your computer to connect to the remote server. For more details, refer to next paragraph on Server Administration. For Server Administration: By default, PostgreSQL only allows connections from the local machine using TCP/IP connections. Other machines will not be able to connect unless you modify listen_addresses in the postgresql.conf file, enable host-based authentication by modifying the Getting Started 11 $PGDATA/pg_hba.conf file, and restart the server. For more information: Client Authentication General Settings for SQLite The following instruction guides you through the process of creating a new connection. To successfully establish a new connection to local/remote SQLite - no matter via HTTP, set the connection properties in the corresponding boxes: Connection name, Type and Database Name. Connection Name A friendly name to best describe your connection. Type Specify the type of database. Existing Database File Connect an existing database in the Database File. New SQLite 3 Create a new SQLite 3 database in the Database File. New SQLite 2 Create a new SQLite 2 database in the Database File. Database File Specify the initial database file. If the HTTP Tunnel is enabled, you need to enter an absolute file path of the database file in your webserver. Getting Started 12 General Settings for SQL Server The following instruction guides you through the process of creating a new connection. To successfully establish a new connection to local/remote SQL Server - no matter via SSH, set the connection properties in the corresponding boxes: Connection name, Host name, and Authentication Type. Connection Name A friendly name to best describe your connection. Host Name/IP Address A host name where the database is situated or the IP address of the server. Authentication SQL Server uses two ways to validate connections to SQL Server databases: SQL Server Authentication and Windows Authentication. SQL Server Authentication SQL Server Authentication uses login records to validate the connection. Users must provide their login username and password every time that they connect. User Name User name for connecting to the database server. Password Password for connecting to the server. Windows Authentication When a user connects through a Windows user account, SQL Server validates the account name and password using the Windows principal token in the operating system. This means that the user identity is confirmed by Windows. SQL Server does not ask for the password, and does not perform the identity validation. If your Internet Service Provider (ISP) does not provide direct access to its server, Secure Tunneling Protocol (SSH) is another solution. Getting Started 13 SSH Settings (Available only for MySQL, Oracle, PostgreSQL and SQL Server and supports SSH2 Protocol only) Secure SHell (SSH) is a program to log in into another computer over a network, execute commands on a remote server, and move files from one machine to another. It provides strong authentication and secure encrypted communications between two hosts, known as SSH Port Forwarding (Tunneling), over an insecure network. Typically, it is employed as an encrypted version of Telnet. In a Telnet session, all communications, including username and password, are transmitted in plain-text, allowing anyone to listen-in on your session and steal passwords and other information. Such sessions are also susceptible to session hijacking, where a malicious user takes over your session once you have authenticated. SSH serves to prevent such vulnerabilities and allows you to access a remote server's shell without compromising security. Benefit of SSH Tunneling. To ensure that the incoming connection request is from you, SSH can use a password, or public/private key pair (also called public key) authentication mechanism. Password Authentication. Public Key Authentication. Note: Please make sure that the parameter - "AllowTcpForwarding" in the Linux Server must be set to value "yes", otherwise, the SSH port forwarding will be disabled. To look for the path: /etc/ssh/sshd_config .By default, the SSH port forwarding should be enabled. Please double check the value settings. ** Even the server support SSH tunnel, however, if the port forwarding being disabled, Navicat cannot connect via SSH Port 22. Getting Started 14 Benefit of SSH Tunneling SSH has a wonderful feature called SSH Port Forwarding, sometimes called SSH Tunneling, which allows you to establish a secure SSH session and then tunnel arbitrary TCP connections through it. Tunnels can be created at any time, with almost no effort and no programming, which makes them very appealing. SSH Port Forwarding can be used for secure communications in a myriad of different ways. Many Hosting Companies that provide server hosting will block access to the Server from outside the hosting company's network, and only grant access to users connecting from localhost. There are several benefits to using SSH: Connection to a server from behind a firewall when the server port is blocked. Automatic authentication of users, no passwords sent in plain text to prevent the stealing of passwords. Multiple strong authentication methods that prevent such security threats as spoofing identity. Encryption and compression of data for security and speed. Secure file transfer. Getting Started 15 Password Authentication Using this mode, SSH is almost identical to the program telnet. When you make a connection, you are asked for your password. You type it in and you are either logged in or denied. Your password is first encrypted and then sent over the network and then decrypted at the remote host. This is the mode that most users will be encouraged to use, as it requires no additional setup or configuration. The following instruction guides you through the process of configuring a SSH connection using Password Authentication. To successfully establish a SSH connection, set the SSH connection properties in the corresponding boxes: Host name/IP address, Port number, User name, Authentication Method and Password. 1. Click or choose File -> New Connection to set up the Connection Properties. 2. Select the SSH tab and enable Use SSH Tunnel. 3. Fill in the required information: Host Name/IP Address A host where SSH server is activated. Port A port where SSH server is activated, by default it is 22. User Name A user on Linux machine. (It is a Linux user. It is not a user of Database Server.) Authentication Method Choose between Password Authentication and Public Key Authentication Password It is a Linux user password. Getting Started 16 4. Navicat host name at the General Settings page should be set relatively to the SSH server which provided by your database hosting company. Getting Started 17 Public Key Authentication Public-key Authentication is based on the use of digital signatures and provides the best authentication security. For Public Key Authentication to work four things are needed: the remote server(s) you are connecting must have your public key. the local client you are connecting from must have your private key. the remote server must be configured to allow you to login using your public key. the local client must be configured to use your private key while logging into remote server. The following instruction guides you through the process of configuring a SSH connection using Public Key Authentication. To successfully establish a SSH connection , set the SSH connection properties in the corresponding boxes: Host name/IP address, Port number, User name, Authentication Method, Private Key and Passphrase. 1. Click or choose File -> New Connection to set up the Connection Properties. 2. Select the SSH tab and enable Use SSH Tunnel. 3. Fill in the required information: Host Name/IP Address A host where SSH server is activated. Port A port where SSH server is activated, by default it is 22. User Name A user on Linux machine. (It is a Linux user. It is not a user of Database Server.) Authentication Method Choose between Password Authentication and Public Key Authentication Private Key It is used together with your public key. The private key should be readable only by you. Passphrase Getting Started 18 A passphrase is exactly like a password, except that it applies to the keys you are generating and not an account. The passphrase be any length under 1024 characters. 4. Navicat host name at the General Settings page should be set relatively to the SSH server which provided by your database hosting company. Getting Started 19 HTTP Settings (Available only for MySQL, PostgreSQL and SQLite) HTTP Tunneling is a method for connecting to a server that uses the same protocol (http://) and the same port (port 80) as a webserver does. It is used while your ISPs do not allow direct connections, but allows establishing HTTP connections. Steps of setting up HTTP Connection: 1. Uploading the Tunneling Script To use this connection method, first thing you need to do is to upload the tunneling script to the webserver where your server is located. Note: ntunnel_mysql.php, ntunnel_pgsql.php or ntunnel_sqlite.php is available in the Navicat installation folder. 2. Setting up HTTP Tunnel The following instruction guides you through the process of configuring a HTTP connection. i. Click or choose File -> New Connection to set up the Connection Properties. ii. Select the HTTP tab and enable Use HTTP Tunnel. iii. Enter URL of the tunneling script, e.g. http://www.navicat.com/ntunnel_mysql.php . iv. If your server installed ModSecurity, you can check the Encode outgoing query with base64 option. v. If the tunneling script is hosted in a password protected server or you have to access internet over a proxy server, you can provide the required authentication details in Authentication or Proxy tab.. vi. Navicat host name at the General settings page should be set relatively to the HTTP server which provided by your database hosting company. Note: HTTP Tunnel and SSH Tunnel cannot function simultaneously. The SSH Tunnel is disabled when you select the HTTP Tunnel and vice versa. Getting Started 20 SSL Settings (Available only for MySQL and PostgreSQL) Secure Sockets Layer(SSL) is a protocol for transmitting private documents via the Internet. To get a secure connection, the first thing you need to do is to install OpenSSL Library and download Database Source. Steps of setting up SSL Connection and Navicat: 1. Installation of OpenSSL and MySQL/PostgreSQL. 2. Setting up SSL Certificate for MySQL/PostgreSQL. 3. Setting up Client Certificate for Navicat. Note: Support from PostgreSQL 8.4 or later. Getting Started 21 Installation of OpenSSL and MySQL/PostgreSQL Installing OpenSSL 1. Download OpenSSL - http://www.openssl.org 2. Linux command : [zcat 0.96l.tar.gz | tar xvf -] 3. Linux command : [./config] 4. Linux command : [make] 5. Linux command : [make install] Installing MySQL 1. Download MySQL - http://www.mysql.com 2. Linux command : [./configure --with -vio --with -openssl] 3. Linux command : [make] 4. Linux command : [make install] Note: Please ensure if MySQL Server supports OpenSSL using query statement: [SHOW VARIABLES LIKE 'have_openssl';] - Returns value = YES Installing PostgreSQL 1. Download PostgreSQL - http://www.postgresql.org 2. Linux command : [./configure --with-openssl] 3. Linux command : [gmake] 4. Linux command : [gmake install] Note: Please ensure if PostgreSQL Server supports OpenSSL using query statement: [SHOW ssl;] - Returns value = ON Getting Started 22 Setting up SSL Certificate for MySQL/PostgreSQL To create server/client side Certificate, login to the Linux Server as root and employ the Shell Command below: MySQL 1. DIR=`pwd`/openssl 2. PRIV=$DIR/private 3. mkdir $DIR $PRIV $DIR/newcerts 4. cp /usr/share/ssl/openssl.cnf $DIR 5. replace ./demoCA $DIR -- $DIR/openssl.cnf 6. Generation of Certificate Authority(CA) /usr/local/ssl/bin/openssl req -new -x509 -keyout $PRIV/cakey.pem -out $DIR/cacert.pem -config $DIR/openssl.cnf Note: If "PEM" is required, please enter different "PEM pass" via steps below. 7. Create server request and key /usr/local/ssl/bin/openssl req -new -keyout $DIR/server-key.pem -out $DIR/server-req.pem -days 3600 -config $DIR/openssl.cnf 8. Remove the passphrase from the key (optional) /usr/local/ssl/bin/openssl rsa -in $DIR/server-key.pem -out $DIR/server-key.pem 9. Sign server cert /usr/local/ssl/bin/openssl ca -policy policy_anything -out $DIR/server-cert.pem -config $DIR/openssl.cnf -infiles $DIR/server-req.pem 10.Create client request and key /usr/local/ssl/bin/openssl req -new -keyout $DIR/client-key.pem -out $DIR/client-req.pem -days 3600 -config $DIR/openssl.cnf Getting Started 23 11.Remove a passphrase from the key (optional) /usr/local/ssl/bin/openssl rsa -in $DIR/client-key.pem -out $DIR/client-key.pem 12.Sign client cert /usr/local/ssl/bin/openssl ca -policy policy_anything -out $DIR/client-cert.pem -config $DIR/openssl.cnf -infiles $DIR/client-req.pem 13.Create a my.cnf file for testing the Certificates. Store it either in /etc or MySQL data directory (typically /usr/local/var for source installation) my.cnf example content: [client] ssl-ca=$DIR/cacert.pem ssl-cert=$DIR/client-cert.pem ssl-key=$DIR/client-key.pem [mysqld] ssl-ca=$DIR/cacert.pem ssl-cert=$DIR/server-cert.pem ssl-key=$DIR/server-key.pem 14.To start MySQL daemon: /usr/local/libexec/mysqld -u mysql & or /usr/local/sbin/mysqld -u & Getting Started 24 PostgreSQL 1. To create a quick self-signed certificate for the server, use the following OpenSSL command: openssl req -new -text -out server.reqm 2. Fill out the information that openssl asks for. Make sure you enter the local host name as "Common Name"; the challenge password can be left blank. The program will generate a key that is passphrase protected; it will not accept a passphrase that is less than four characters long. To remove the passphrase (as you must if you want automatic start-up of the server), run the commands: openssl rsa -in privkey.pem -out server.key rm privkey.pem 3. Enter the old passphrase to unlock the existing key. Now do: openssl req -x509 -in server.req -text -key server.key -out server.crt 4. to turn the certificate into a self-signed certificate and to copy the key and certificate to where the server will look for them. Finally do: chmod og-rwx server.key Getting Started 25 Setting up Client Certificate for Navicat The following instruction guides you through the process of configuring a connection between Navicat and MySQL/PostgreSQL Server using SSL. To successfully establish a SSL connection, please complete Step 1 and Step 2, and set the connection properties in the corresponding boxes. MySQL 1. Click or choose File -> New Connection to set up the Connection Properties. 2. Select the SSL tab and enable Use SSL. 3. To provide authentication details, fill in the required information: Client Key, Client Certificate and CA Certificate are usually stored in your Server - /usr/local/openssl. Please copy them from the remote server to local computer. Specified Cipher (optional) is only required while ssl_type field has been set to "SPECIFIED" - [ssl_type can be found in a system database called "mysql" -> table called "user"]. Example of Specified Cipher is "EDH-RSA-DES-CBC3-SHA" which can be filled in either through the Connection Properties shown above or the "mysql" database -> "user" table -> "ssl_cipher" blob field shown below. Note: You are allowed to store your Specified Cipher into a text file in order to load into the "ssl_cipher" blob field. Getting Started 26 PostgreSQL 1. Click or choose File -> New Connection to set up the Connection Properties. 2. Select the SSL tab and enable Use SSL. 3. Select the SSL Mode. require - only try an SSL connection. verify-ca - only try an SSL connection, and verify that the server certificate is issued by a trusted CA. verify-full - only try an SSL connection, verify that the server certificate is issued by a trusted CA and that the server hostname matches that in the certificate. 4. To provide authentication details, enable Use Authentication and fill in the required information: Client Key, Client Certificate and CA Certificate are usually stored in your Server - /usr/local/openssl. Please copy them from the remote server to local computer. Certificate Revocation List specifies the file path of the SSL certificate revocation list (CRL). For PostgreSQL server, OpenSSL supports a wide range of ciphers and authentication algorithms, of varying strength. While a list of ciphers can be specified in the OpenSSL configuration file, you can specify ciphers specifically for use by the database server by modifying ssl_ciphers in postgresql.conf. Getting Started 27 Advanced Settings Customize connection options according to your needs. The detailed description is given below: Settings Save Path When a new connection being established, Navicat will create a subfolder under the Settings Save Path. Most files are stored within this subfolder: Navicat Objects Query Export Query Result Profile Export View Result Profile Backup Backup Profile Report Import Wizard Profile Getting Started Server Type File Extensions All .sql MySQL .npeq Oracle .nopeq PostgreSQL .nppeq SQLite .nlpeq SQL Server .nmpeq MySQL .npev Oracle .nopev PostgreSQL .nppev SQLite .nlpev SQL Server .nmpev MySQL, PostgreSQL and compressed (.psc), SQLite uncompressed (.psb) MySQL .npb PostgreSQL .nppb SQLite .nlpb All .rtm MySQL .npi Oracle .nopi PostgreSQL .nppi SQLite .nlpi SQL Server .nmpi 28 Export Wizard Profile Export Materialized View Profile ER Diagram File MySQL .npe Oracle .nope PostgreSQL .nppe SQLite .nlpe SQL Server .nmpe Oracle .nopem All .ned Other files are located in the profiles directory. To look for the path, choose Tools -> Options -> Miscellaneous -> Profiles Save Path. Other Profiles Server Type File Extensions MySQL .npt Oracle .nopt PostgreSQL .nppt SQLite .nlpt SQL Server .nmpt Premium (Cross Server) .napt MySQL .npd Oracle .nopd PostgreSQL .nppd SQLite .nlpd SQL Server .nmpd MySQL .nps Structure Oracle .nops Synchronization PostgreSQL .npps SQL Server .nmps Batch Job Premium (Cross Server) .napj Model File All .ndm Virtual Grouping All Data Transfer Data Synchronization vgroup.xml - stores how the objects are categorized. Hint: All your connection settings are stored in registry. See also: Log Files Getting Started 29 MySQL Encoding Choose a codepage to communicate with MySQL Server while MySQL character set not being employed. Keepalive Interval (sec) This option allows you to keep the connection with the server alive by pinging it. You can set the period between pings in the edit field. Use MySQL character set This option should be enabled if employing MySQL 4.1 or above. Use Compression This option allows you to use compression protocol. It is used if both client and server support zlib compression, and the client requests compression. Auto Connect With this option on, Navicat automatically open connection with the registered database at application startup. Use Named Pipe, Socket With this option on, Navicat uses socket file for localhost connection. Oracle Role Indicate that the database user is connecting with either the Default, SYSOPER or SYSDBA system privilege. Keepalive Interval (sec) This option allows you to keep the connection with the server alive by pinging it. You can set the period between pings in the edit field. OS Authentication With this option on, Oracle Database uses Windows user login credentials to authenticate database users. Auto Connect With this option on, Navicat automatically opens connection with the registered database at application startup. Getting Started 30 PostgreSQL Keepalive Interval (sec) This option allows you to keep the connection with the server alive by pinging it. You can set the period between pings in the edit field Auto Connect With this option on, Navicat automatically opens connection with the registered database at application startup. SQLite Auto Connect With this option on, Navicat automatically opens connection with the registered database at application startup. Encrypted Enable this option and provide Password when connecting to an encrypted SQLite database. Attached Database To attach or detach databases in the connection. SQL Server Initial Database The initial database to which user connects when making connection. Keepalive Interval (sec) This option allows you to keep the connection with the server alive by pinging it. You can set the period between pings in the edit field. Use Encryption This option allows you to use encryption. Auto Connect With this option on, Navicat automatically opens connection with the registered database at application startup. Getting Started 31 Setting Advanced Database Properties (Available only for MySQL and PostgreSQL) Set the advanced database properties, which are not obligatory. To start working with advanced database settings, check the Use Advanced Connections. The detailed description is given below: Show Selected Databases To show the selected databases in the close state in the navigation pane Click the preferable databases in the Databases list box, the check box will show as To show the selected databases in the open state in the navigation pane Double-click the preferable databases in the Databases list box, the check box will show as Add Hidden Database To add a hidden database Click Add DB to List button. Enter the database name. Select the newly added database in the Databases list box. Enter User Name and Password which provide by your ISP. Remove Database To remove a database Select the database to remove in the Databases list box. Click Remove DB from List button. Note: The database will be just removed from the Databases list box, it will still exist in the Server. Getting Started 32 Working with Databases or Schemas After you have created your connections, your databases/schemas appear in the navigation pane on the left. If the Show objects in connection tree option is checked at the Options window, all database/schema objects are also displayed in the pane. To connect to a database/schema, simply double-click it in the pane. If connection succeeds, the database/schema node turns into or and expands showing the tree of its objects. For Oracle server, when you create a user account, you are also implicitly creating a schema for that user. A schema is a logical container for the database objects (such as tables, views, triggers, and so on) that the user creates. The schema name is the same as the user name, and can be used to unambiguously refer to objects owned by the user. Other user schemas are showed under Getting Started Schemas. 33 MySQL Database Management Navicat provides all the tools you need to manage and navigate databases. Note that to start working with databases in Navicat you are to establish the connection. Create Database To create a database Double-click the connection to open in the navigation pane. Right-click the opened connection and choose New Database.... or Right-click any existing database and choose Fill in the required information: New Database.... Enter database name Set the name for a new database. Character set The Character set specifies the default database character set. Collation The Collation specifies the default database collation. Delete Database To delete a database Right-click the database in the navigation pane and choose Confirm deleting in the dialog window. Delete Database. Note: This operation is irreversible. Open Database To open a hidden database Double-click the connection to open in the navigation pane. Right-click the opened connection and choose Enter the database name. Getting Started 34 Open Database. To open a database which shows in the navigation pane Double-click the database to open in the navigation pane. or Right-click the database and choose Open Database. Close Database To close a database Right-click the database in the navigation pane and choose Close Database. Edit Database To edit a database Right-click the database in the navigation pane and choose Database Properties.... Please notice that MySQL does not support renaming database through its interface at this moment. Access the directory in which databases being stored. By default, all databases store within a directory called data under MySQL Installation folder. For example: C:\mysql5\data. Note: You must stop MySQL before you can rename the database. Getting Started 35 Oracle Schema Management To start working with schemas in Navicat you are to establish the connection. Open Schema To open a schema which shows in the navigation pane Double-click the schema to open in the navigation pane. or Right-click the schema and choose Open Schema. Close Schema To close a schema Getting Started Right-click the schema in the navigation pane and choose 36 Close Schema. PostgreSQL Database Management To start working with databases in Navicat you are to establish the connection. Create Database To create a new database Double-click the connection to open in the navigation pane. Right-click the opened connection and choose New Database.... or Right-click any existing database and choose New Database.... Edit database properties on the appropriate tabs of the Database Designer. Edit Database To edit the existing database(manage its general etc) Right-click the database in the navigation pane and choose Database Properties.... Edit database properties on the appropriate tabs of the Database Designer. Delete Database To delete a database Right-click the database in the navigation pane and choose Confirm deleting in the dialog window. Delete Database. Open Database To open a hidden database Double-click the connection to open in the navigation pane. Right-click the opened connection and choose Enter the database name. Getting Started 37 Open Database. To open a database which shows in the navigation pane Double-click the database to open in the navigation pane. or Right-click the database and choose Open Database. Close Database To close a database Getting Started Right-click the database in the navigation pane and choose 38 Close Database. PostgreSQL Database Designer Database Designer is the basic Navicat tool for working with PostgreSQL database. It allows you to create new database and edit the existing database properties. Editing Database General Editing Database Comment Getting Started 39 Editing PostgreSQL Database General To create a database, you must have the Can create database (usecreatedb) right. Refer to Role Editor or User Editor on how to set user properties. Database Name Define the name of the database. Encoding Define the encoding for the database. If omitted, the default is the encoding of the template database. Owner Define the owner for the database. If omitted, defaults to the user executing the command. Only superusers may create database owned by users other than themselves. Template Create the database from a template database. Note: It is essential that the source database be idle (no data-altering transactions in progress) for the duration of the copying operation. CREATE DATABASE will check that no session (other than itself) is connected to the source database at the start of the operation, but this does not guarantee that changes cannot be made while the copy proceeds, which would result in an inconsistent copied database. Therefore, it is recommended that databases used as templates be treated as read-only. Tablespace Define the tablespace for the database. If omitted, defaults to pg_default. Getting Started 40 SQLite Database Management Navicat provides all the tools you need to manage and navigate databases. Note that to start working with databases in Navicat you are to establish the connection. Attach Database To attach a database Double-click the connection to open in the navigation pane. Right-click the opened connection and choose Attach Database. or Right-click any existing database and choose Fill in the required information: Attach Database. Database File Set the file path for a database. Database Name Enter the database name which displays in Navicat. Encrypted Enable this option and provide Password when connecting to an encrypted SQLite database. Open Database To open a database which shows in the navigation pane Double-click the database to open in the navigation pane. or Right-click the database and choose Open Database. Detach Database To detach a database Getting Started Right-click the database in the navigation pane and choose 41 Detach Database. Encrypt Database To encrypt a database Right-click the database in the navigation pane and choose Encrypt Database. Enter the password. Decrypt Database To decrypt a database Right-click the database in the navigation pane and choose Decrypt Database. Confirm decrypting in the dialog window. Close Database To close a database Getting Started Right-click the database in the navigation pane and choose 42 Close Database. SQL Server Database Management To start working with databases in Navicat you are to establish the connection. Create Database To create a new database Double-click the connection to open in the navigation pane. Right-click the opened connection and choose New Database.... or Right-click any existing database and choose New Database.... Edit database properties on the appropriate tabs of the Database Designer. Edit Database To edit the existing database(manage its general etc) Right-click the database in the navigation pane and choose Database Properties.... Edit database properties on the appropriate tabs of the Database Designer. Delete Database To delete a database Right-click the database in the navigation pane and choose Confirm deleting in the dialog window. Open Database To open a database Double-click the database to open in the navigation pane. or Right-click the database and choose Open Database. Close Database To close a database Getting Started 43 Delete Database. Right-click the database in the navigation pane and choose Close Database. SQL Server Database Designer Database Designer is the basic Navicat tool for working with database. It allows you to create new database and edit the existing database properties. Editing Database General Editing Database Filegroups Editing Database Files Editing Advanced Database Properties Editing Database Comment (SQL Azure does not support) Database SQL Preview Getting Started 44 Editing SQL Server Database General Options for SQL Server Database Name Define the name of the database. Owner Choose the owner of the database. Collation Choose the default collation for the database. Collation name can be either a Windows collation name or a SQL collation name. If not specified, the database is assigned the default collation of the instance of SQL Server. A collation name cannot be specified on a database snapshot. Recovery Model Control database recovery options and disk I/O error checking. FULL Provide full recovery after media failure by using transaction log backups. If a data file is damaged, media recovery can restore all committed transactions. BULK_LOGGED Provide recovery after media failure by combining the best performance and least amount of log-space use for certain large-scale or bulk operations. SIMPLE A simple backup strategy that uses minimal log space is provided. Log space can be automatically reused when it is no longer required for server failure recovery. Compatibility Level Choose the version of SQL Server with which the database is to be made compatible. Options for SQL Azure Database Name Define the name of the database. Getting Started 45 Edition Choose the edition of the database: web or business. Max Size Choose the maximum size of the database. Getting Started 46 Editing SQL Server Database Filegroups SQL Azure does not support this tab. Filegroups Add or delete a filegroup. PRIMARY filegroup cannot be deleted. FILESTREAM Filegroups Add or delete a FILESTREAM filegroup. Note: Support from SQL Server 2008 or later. Getting Started 47 Editing SQL Server Database Files SQL Azure does not support this tab. Database Files Name Specify the logical name for the file. Type Choose the file type. Filegroup Choose the filegroup. File Directory The path used by the operating system when you create the file. File Name The file name used by the operating system when you create the file. Size Specify the size of the file. Allow Auto Growth Check this option if you want to allow automatic growth. Growth Specify the automatic growth increment of the file. Max Size Specify the maximum size to which the file can grow. Unlimited Specify that the file grows until the disk is full. In SQL Server, a log file specified with unlimited growth has a maximum size of 2 TB, and a data file has a maximum size of 16 TB. Getting Started 48 Editing Advanced SQL Server Database Properties SQL Azure does not support this tab. State Database Read Only If this option is on, users can read data from the database but not modify it. Database State Choose the state of the database. OFFLINE The database is closed, shut down cleanly, and marked offline. The database cannot be modified while it is offline. ONLINE The database is open and available for use. EMERGENCY The database is marked READ_ONLY, logging is disabled, and access is limited to members of the sysadmin fixed server role. EMERGENCY is primarily used for troubleshooting purposes. Restrict Access Control user access to the database. SINGLE_USER Specifies that only one user at a time can access the database. RESTRICTED_USER RESTRICTED_USER allows for only members of the db_owner fixed database role and dbcreator and sysadmin fixed server roles to connect to the database, but does not limit their number. MULTI_USER All users that have the appropriate permissions to connect to the database are allowed. Getting Started 49 Encryption Enabled Checks this option if you want to encrypt the database. Note: Support from SQL Server 2008 or later. SQL ANSI Null Default Checks this option if you want to determines the default value as NULL. ANSI Nulls Enabled If this option is on, all comparisons to a null value evaluate to UNKNOWN. ANSI Padding Enabled If this option is on, strings are padded to the same length before conversion or inserting to a varchar or nvarchar data type. ANSI Warnings Enabled If this option is on, errors or warnings are issued when conditions such as divide-by-zero occur or null values appear in aggregate functions. Arithmetic Abort Enabled If this option is on, a query is ended when an overflow or divide-by-zero error occurs during query execution. Concatenate Null Yields Null If this option is on, the result of a concatenation operation is NULL when either operand is NULL. Numeric Round Abort If this option is on, an error is generated when loss of precision occurs in an expression. Quoted Identifiers Enabled If this option is on, double quotation marks can be used to enclose delimited identifiers. Recursive Triggers Enabled If this option is on, Recursive firing of AFTER triggers is allowed. Getting Started 50 Cursor Close Cursor On Commit Enabled If this option is on, any cursors open when a transaction is committed or rolled back are closed. Default Cursor LOCAL When LOCAL is specified and a cursor is not defined as GLOBAL when created, the scope of the cursor is local to the batch, stored procedure, or trigger in which the cursor was created. The cursor name is valid only within this scope. The cursor can be referenced by local cursor variables in the batch, stored procedure, or trigger, or a stored procedure OUTPUT parameter. The cursor is implicitly deallocated when the batch, stored procedure, or trigger ends, unless it was passed back in an OUTPUT parameter. If the cursor is passed back in an OUTPUT parameter, the cursor is deallocated when the last variable that references it is deallocated or goes out of scope. GLOBAL When GLOBAL is specified, and a cursor is not defined as LOCAL when created, the scope of the cursor is global to the connection. The cursor name can be referenced in any stored procedure or batch executed by the connection. Automatic Auto Close If this option is on, the database is shut down cleanly and its resources are freed after the last user exits. Auto Create Statistics If this option is on, the query optimizer creates statistics on single columns in query predicates, as necessary, to improve query plans and query performance. Auto Shrink If this option is on, the database files are candidates for periodic shrinking. Auto Update Statistics Specify that the query optimizer updates statistics when they are used by a query and when they might be out-of-date. Getting Started 51 Auto Update Statistics Asynchronously Specify that statistics updates for the AUTO_UPDATE_STATISTICS option are asynchronous. The query optimizer does not wait for statistics updates to complete before it compiles queries. Note: Support from SQL Server 2005 or later. Recovery Page Verify Discovers damaged database pages caused by disk I/O path errors. Disk I/O path errors can be the cause of database corruption problems and are generally caused by power failures or disk hardware failures that occur at the time the page is being written to disk. NONE Database page writes will not generate a CHECKSUM or TORN_PAGE_DETECTION value. SQL Server will not verify a checksum or torn page during a read even if a CHECKSUM or TORN_PAGE_DETECTION value is present in the page header. TORN_PAGE_DETECTION Save a specific 2-bit pattern for each 512-byte sector in the 8-kilobyte (KB) database page and stored in the database page header when the page is written to disk. CHECKSUM Calculate a checksum over the contents of the whole page and stores the value in the page header when a page is written to disk. Service Broker Note: Support from SQL Server 2005 or later. Broker Enabled Specify that Service Broker is enabled for the specified database. Message delivery is started, and the is_broker_enabled flag is set to true in the sys.databases catalog view. The database retains the existing Service Broker identifier. Honor Broker Priority Send operations take into consideration the priority levels that are assigned to conversations. Messages from conversations that have high priority levels are sent before messages from conversations that are assigned low priority levels. Getting Started 52 Note: Support from SQL Server 2008 or later. Change Tracking Note: Support from SQL Server 2008 or later. Change Tracking Enabled Enable change tracking for the database. When you enable change tracking, you can also set the AUTO CLEANUP and CHANGE RETENTION options. Retention Period Specifty the minimum period for keeping change tracking information in the database. Data is removed only when the AUTO_CLEANUP value is ON. Auto Clean Up Change tracking information is automatically removed after the specified retention period. Miscellaneous Note: Support from SQL Server 2005 or later. Cross Database Ownership Chaining Enabled If this option is on, database can be the source or target of a cross-database ownership chain. Trustworthy If this option is on, database modules (for example, user-defined functions or stored procedures) that use an impersonation context can access resources outside the database. Date Correlation Optimization Enabled SQL Server maintains correlation statistics between any two tables in the database that are linked by a FOREIGN KEY constraint and have datetime columns. Parameterization SIMPLE Queries are parameterized based on the default behavior of the database. Getting Started 53 FORCED SQL Server parameterizes all queries in the database. VarDecimal Storage Enabled Indicate that decimal and numeric data types are stored by using the vardecimal storage format. Getting Started 54 Working with Database or Schema Objects You are authorized to access your database or schema objects of the selected database through the nodes of the navigation pane. Depending on the server version you connected, the supported objects will appear in the tree. To open a particular object, double-click to open in the appropriate editor. Right-click the object to display the popup menu, which allows you to perform various operations over the selected object or database. Getting Started 55 Viewing Object Information To view the object information, just simply select an object in the navigation pane/object pane and click View -> Object Information or right-click an object and choose XXX Information to open an Object Information in the object pane. General Shows the object information as a grid. DDL Shows the DDL statement of the object. Using Shows the objects that the current object used. Note: Available only for Oracle, PostgreSQL and SQL Server. Used by Shows the current object used by whom. Note: Available only for Oracle, PostgreSQL and SQL Server. Objects Shows the objects in the tablespace. Note: Available only for Oracle and PostgreSQL. Preview Shows the sql statement in the query. Member of Shows the roles that the user or the role assigned to. Note: Available only for Oracle, PostgreSQL and SQL Server. Members Shows the members of the role. Note: Available only for Oracle, PostgreSQL and SQL Server. Getting Started 56 www.ognelis.ru