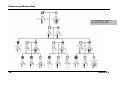
1
Cyrillic 2.1
Getting Started Guide
AP Benson Limited
Soane Point
6-8 Market Place
Reading RG1 2EG
United Kingdom
E-mail: [email protected]
Tel:
+44 (0) 8702 417019
Fax:
+44 (0) 8702 417023
End User License
End User
License
Agreement
1. LICENSE
1.1. Cyrillic © A P Benson Limited 2000
1.2. All rights in this product are reserved and exclusive distribution and marketing licenses
have been granted to A P Benson Limited (‘the Publisher’). This end-user license agreement
describes the rights and warranty granted to its customers by the Publisher. By using the
enclosed disk you, the customer, are agreeing to be bound by the terms of this agreement,
which includes the software license, software limited warranty, and hardware limited
warranty.
1.3. License: The Publisher grants the customer and the customer accepts a non-exclusive, and
non-transferable license to use the Cyrillic software (‘software) so long as the customer
complies with the terms of this Agreement.
2. COPIES
2.1. The Publisher grants the customer the right to make copies of the software for back-up
purposes only. The customer agrees to reproduce and incorporate the author’s copyright
notice on any copies. It is expressly understood that such copies will not be used for any
purpose except to substitute for the initial copy in the event that it is unusable.
3. USE
3.1. In addition, the license granted herein includes the right to move the software from one
computer to another provided that the software is used on only one computer at a time and
that two people will not use the program at the same time on different computers.
4. SECURITY
4.1. The customer agrees to secure and protect each disk, the documentation, and copies
thereof from copying (except as permitted above) or from modification and shall ensure
that its employees or consultants do not copy or modify the product.
Cyrillic 2.1
i
End User License
5. OWNERSHIP
5.1. The Publisher represents that it has the right to grant the licenses herein granted.
6. LIMITED WARRANTY
6.1. Whilst all reasonable efforts have been made to test the software and user manual prior to
first publication, the authors and Publisher welcome corrections being brought to their
attention. The liability of the Publisher in respect of any defect, error, or omission in the
disk, user manual, or software (‘defective material’) and in respect of any breach of
warranty or condition is limited to the purchase price paid by the customer. The Publisher
shall have no liability whatsoever arising out of any defect, error, or omission or breach of
warranty or condition unless the customer shall have returned the defective material to the
Publisher within 90 days of the date of purchase. In that event the Publisher shall, as
requested by the customer, either replace the defective material without charge or refund
the purchase price paid by the customer in respect of the defective material.
6.2. The Publisher (or the authors or copyrightcopyright-holders) shall have no further or other liability
including without limitation in respect of damage to other property or in respect of any
economic or consequential loss of whatever
whatever nature arising out of or in connection with the
product or any part thereof or its use or application.
6.3. Should you have any questions concerning this license or this limited warranty or if you
want to contact A P Benson for any reason, please write to:
A P Benson Limited, Soane Point, 66-8 Market Place, Reading RG1 2EG United Kingdom
Copyright Notice
Copyright
© A P Benson Limited 2000
All rights reserved. No part of this publication or the program Cyrillic may be reproduced, transmitted,
transcribed, stored in a retrieval system, or translated into any language or computer language in
any form or by any means, electronic, mechanical, magnetic, optical chemical, manual, biological, or
otherwise, without prior written permission of the publisher. This manual refers to version 2.1 of the
program. ISBN 0 9518236 2 0 Cyrillic User Manual 2000
Disclaimer
AP Benson Limited make no representations or warranties with respect to the contents hereof and
specifically disclaims any implied warranties of merchantability or fitness for any particular purpose.
Trademarks
Publisher
Author
All trademarks and registered trademarks are the property of their respective companies.
Cyrillic was written by Cyril Chapman. Professor John Edwards is acknowledged for his contribution to
the development of the haplotyping algorithm. Richard Houlston is acknowledged for his assistance
with risk calculations.
Cyrillic 2.1 is published by:
AP Benson Limited
Soane Point
6-8 Market Place
Reading RG1 2EG
United Kingdom
Cyrillic 2.1
E-mail: [email protected]
Tel:
+44 (0) 8702 417019
Fax:
+44 (0) 8702 417023
iii
Copyright Notice
E-mail support queries should be sent to [email protected].
[email protected]
You may find an answer to your question on the CyrillicSoftware web site:
http://www.cyrillicsoftware.com/support/techsupport.htm
http://www.cyrillicsoftware.com/support/techsupport.htm
To log a support question by telephone, please call our UK office directly on:
+44 (0) 8702 417019
between the hours of 9.30 and 17.30 UK time Monday to Friday inclusive (excluding UK public
holidays). Telephone calls will be logged in our support system and you will be contacted by e-mail,
fax, or telephone with a solution or a request for more information.
Technical
Support
Copyright Notice
Note on the
Developer
For some years Senior Lecturer in Clinical Genetics at the University of Auckland School of Medicine,
Dr Chapman moved to the Churchill Hospital, Oxford, in the summer of 1993, where he is now
Clinical Director in the Department of Clinical Genetics. Cyrillic has its origins in a program developed
by Dr Chapman from 1987 to 1989 for the Atari ST. The intention was to create a simple, interactive
method of entering pedigree data and family frees on the screen. The program has retained this
original focus while it has evolved through several versions and operating environments. An early
version of Cyrillic was described in a paper in the American Journal of Medical Genetics, 1990
36:155-160. Work on the present Windows implementation started in 1991 and version 1 was
released in 1993. The programs name was coined by the clinical geneticist Dr Mac Gardner who
combined the name of the programmer with an interest he had in the Russian language.
Cyrillic 2.1
v
Contents
Contents
1.
ABOUT THIS GUIDE
2
INSTALLING ADOBE® ACROBAT READER
LOCATING CYRILLIC SOFTWARE DOCUMENTATION
CONVENTIONS USED IN CYRILLIC DOCUMENTATION
2
3
4
2.
INTRODUCTION AND OVERVIEW
OVERVIEW
6
PRINCIPAL FEATURES
OVERVIEW OF CYRILLIC
NEW IN VERSION 2.1
NEW IN VERSION 2
HARDWARE AND SOFTWARE REQUIREMENTS
KEYBOARD SHORTCUTS
6
8
9
10
10
11
3.
14
INSTALLING AND STARTING
STARTING CYRILLIC
DEFAULT INSTALLATION
16
4.
20
GUIDED TOUR
STEP I - LOOK AT A FAMILY TREE
20
Cyrillic 2.1 vi
STEP 2 - DATA ABOUT INDIVIDUALS
STEP 3 MARKERS, DISEASES AND OTHER KINDS OF DATA
STEP 4 PRINTING OPTIONS
-
5.
PEDIGREES WITH PERSONAL
PERSONAL DATA
Contents
23
25
28
30
RELATIONSHIPS
PERSONAL DATA
DISPLAY AND PRESENTATION PART I
35
41
47
6.
DISEASE AND MARKER DATA
DATA
55
MARKERS SETUP
DISEASES SETUP
FAMILIES, DISEASES, AND MARKERS
DISPLAY AND PRESENTATION PART 2
56
61
65
74
7.
80
LINKAGE ANALYSIS
RUNNING MLINK
NEXT STEPS
Cyrillic 2.1
80
83
vii
About this Guide
Part I
About this Guide
1
Cyrillic 2.1
About this Guide
1. About this Guide
The Cyrillic CDROM contains full documentation of the Cyrillic 2.1 software. This Getting Started
Guide is intended to help you to get the software installed and to guide you through a first Cyrillic
tutorial.
The full Cyrillic software documentation is contained in a .pdf file, which can be located using
Windows Explorer or My Computer. The CDROM also contains the Adobe® Acrobat Reader software
needed to read them. The most current version of the Acrobat Reader can be found on the Adobe®
website at:
http://www.adobe.com/products/acrobat/main.html
Installing Adobe® Acrobat Reader
Installing
Acrobat Reader
Skip the installation of Acrobat Reader is you already have software capable of reading .pdf files
installed on your computer.
To install the Acrobat Reader software from the CDROM:
2
Cyrillic 2.1
About
About this Guide
•
Insert the Cyrillic CD into your CD-ROM drive
The installation routine should run automatically. If it does not, you must locate and run autorun.exe:
•
•
•
Open Windows Explorer or My Computer
D:\ (where D is the name of your CD drive)
Navigate to D:\
Locate and double click autorun.exe to run the installation
The Cyrillic Software CD menu will open.
•
Locating Cyrillic
Software
Documentation
Select Install Adobe Acrobat 4
Locating Cyrillic Software Documentation
When you have Acrobat Reader software installed, you will be able to read both the User Guide and
Reference guide from the CDROM:
•
•
•
Open Windows Explorer or My Computer
Navigate to D:\
D:\Manual (where D is the drive letter of your CDROM drive)
Locate and double click on the .pdf file to access the full user manual
o
D:\Manual\UserGuide.pdf– the full Cyrillic 2.1 “User Guide”
The User Guide contains sections reproduced in this Getting Started Guide, but Chapters 7 to 13
make up the bulk of the manual and explain how Cyrillic’s tools and features work – running the
Cyrillic 2.1
3
About this Guide
application, using the interface, pedigree drawing, disease and marker data and linkage and risk
analysis techniques.
Conventions used in Cyrillic documentation
•
•
•
Program menu commands are referred to as File|Open, for example, meaning select Open
from the File menu.
Angled brackets are used to refer to keyboard characters. For example, <Esc> means press
the Escape key, <Ctrl+C> means hold down the Control key whilst pressing C, <Alt, F,O>
means press the Alt key followed by F then O.
LMB refers to the Left Mouse Button and RMB refers to the Right Mouse Button menu. For
example, RMB|Parameters means click the right mouse button within the Model Viewer
panel and select Parameters from the menu.
In Cyrillic, there are typically several ways to access dialog boxes and features. These methods
include toolbars, program menus, the Right Mouse Button (shortcut) menu and keyboard shortcuts.
In general, only toolbar icons and program menus have been documented in this manual. However,
the shortcut menu will also access many Cyrillic functions. Note that the appearance of the shortcut
menu depends on the area or component that is clicked. See the Cyrillic User Guide for a list of
keyboard shortcuts.
4
Cyrillic 2.1
Installing and starting Cyrillic
Part 2
Introduction
Cyrillic 2.1
5
Installing and starting Cyrillic
2. Introduction and overview
Cyrillic is a program designed to display the most useful information about a pedigree for people
working in human genetics, clinical genetics, genetic counseling, and human molecular genetics.
Principal features
The user draws pedigrees on the screen using a mouse and some simple dialogs. Symbols are easily
moved around the screen and their appearance altered, with the program managing the details of
the connections between individual symbols. The pedigree data is displayed graphically and the user
can select from a wide range of symbols, including the option of adding letters as captions to
symbols. The editing of drawings is straightforward, with simple selection of symbols and of regions
of the drawing. Text annotations may be placed anywhere on the drawing. The main editing features
are accessible from a toolbar and from floating menus, for which both the right and left mouse
buttons are used to make selections. Information about menus and toolbar buttons is displayed in a
status-bar. Colour may be used to highlight various features of the drawing.
Genetic marker data, with full documentation of the marker, is defined once for all families which
use that marker. Thereafter, phenotypes are selected from a list in a dialog box. The program will
haplotype families automatically, and the user can draw patterned bars to represent haplotypes,
including crossovers, and an indication of a region of uncertainty. For certain types of families, the
program will create bars with crossovers as necessary. Bars may be coloured as well as patterned.
6
Cyrillic 2.1
Installing and starting Cyrillic
Disease loci can have user defined penetrance classes, or be defined as quantitative, the details
being in accordance with the requirements of the LINKAGE package. For output to LIPED, these
disease details are translated automatically. The user can select from four individual numbering
systems which are automatically updated when new individuals arc added to the drawing.
Individual names, dates of birth, and comments are entered into dialogs, and can be displayed on
the screen. There is complete control over line widths, fonts, colours, symbol sizes, scaling of the
drawing and the information displayed about each symbol.
Pedigree drawings or parts of them, can be added to word processed documents using the Windows
clipboard. In addition, tables of information about individuals and genetic markers can be placed
into tables in reports, etc., also using the Windows clipboard.
The drawings can be printed on any Windows compatible printer with full annotation and control over
the display. Individuals and their descendants can be hidden from the drawing as can information
about the genotypes of individuals. Subsets of the pedigree can be printed on their own,
unconnected parents can be removed from the drawing (they are always stored in a pedigree file in
order to satisfy the requirements of linkage analysis programs). Complete annotation of the
pedigree, the genetic markers, and the genotype symbols can be added to a drawing. Printouts are
available of alphabetic and numeric lists of the individuals and information about them. The program
will also create circular drawings on one page.
It is possible to import pedigrees and marker data from standard sources such as MLINK pedigree
files, or GEDCOM files. Output files for LIPED, MLINK, and CriMap can be easily set-up and it is
straightforward to run risk calculations using MLINK and a batch file created automatically by Cyrillic.
7
Cyrillic 2.1
Installing and starting Cyrillic
The maximum family size is 10,000 persons, with no limit on the number of generations. There is a
maximum of 150 markers per chromosome per family and 250 markers per chromosome. A variety
of marker types are available, most of which have up to 40 alleles with the exception of the ‘Allele
names alterable’ type, which has a limit of 150 alleles. Projects or families grouped by disease can
be stored in separate directories to allow separate definitions of disease loci and genetic markers.
A README.TXT file will be provided on the distribution disk if there have been any changes to the
program since this manual was printed. It will contain details of any new developments or
enhancements and may also contain supplementary information concerning the use of other
programs like MLINK.EXE, DLLs and technical notes. Please refer to this file for the latest
information concerning Cyrillic and for any modifications to the documentation.
Overview of Cyrillic
All new individuals in a pedigree apart from the first are assigned by selecting (clicking On) a symbol
for a first degree relative who is already in the drawing, and then selecting the relationship of the
new person or persons in a dialog box.
For example, to add a husband for person A, click on the symbol for A~ with the right mouse button.
Select ‘Husband’ from the dialog box and when the dialog disappears, click the left mouse button
with the pointer on the screen position where you want the husband’s symbol to appear. The
program will set up the individuals records to reflect your choice. Connections can be unmade using
buttons in the individual and spouse dialog boxes. Note that a distinction is made between the
accession number, which reflects the order in which individuals are entered, the Pedigree number,
which can be used to reflect the individual’s position within the pedigree, and the ID number, which
8
Cyrillic 2.1
Installing and starting Cyrillic
indicates their ordering within the pedigree file. Several numbering systems are available to indicate
the pedigree or other orders. These distinctions are made in order to protect the integrity of the data
Cyrillic is handling.
Every effort has been made to give the program as much control over valid options as possible, and
to protect the user against entering obviously impossible or invalid data, without affecting the
flexibility required by the user.
New in Version 2.1
•
•
•
•
•
•
•
•
•
Table view of family information
Symbol toolbar at left of window
Up to 7 diseases per family
Up to 7 quantitative loci per family
Markers for more than one chromosome per family
Update from MLINK or GEDCOM format files
Extensions to GEDCOM format
Keyboard shortcuts
Enhanced risk calculation facilities for cancer families
Cyrillic 2.1
9
Installing and starting Cyrillic
New in Version 2
•
•
•
•
•
•
•
•
•
•
•
•
•
Open up to 10 family files at one time
Copy and paste any part of drawing with clipboard
Faster creation of outline pedigrees the program draws parents and siblings
Better control of pedigree layout with improved handling of imported files
Extensive use of colour
Additional import/export facilities, with the GEDCOM format for Complete specification of all
information
Automatic generation of recombinations in haplotype bars
Batch printing
Print preview, with multiple or single page view
Circular drawings
Calculation of kinship coefficients and inbreeding coefficients
Automatic recognition of consanguinity for partners
Extended toolbars with status bar and floating help
-
Hardware and software requirements
Cyrillic 2.1.3 will run successfully on all recent versions of Windows (95, 98, NT, Millennium, 2000,
2000 Professional, XP, XP Professional). The software will also run on Windows 3.1 or higher.
Originally released in 1993, Cyrillic 2.1.3 hardware requirements are easily met by any modern PC.
The standard minimum Windows hardware requirements must be met for your version of Windows.
10
Cyrillic 2.1
Installing and starting Cyrillic
For people with older hardware we should point out the following requirements and suggestions:
•
•
•
•
•
•
A two-button mouse is required.
The program and associated files take up 4Mb of disk space.
A maths co-processor is only necessary if you intend to do much serious work with one of
the linkage packages and is not a requirement of the Cyrillic program itself.
A minimum of 2Mb of memory is required and 4Mb is recommended.
The more complex the display, with unusual fonts and symbols, the slower redrawing will be.
However, there are several things you can do to speed up interaction with the program, and
they are described in detail in the Cyrillic User Guide (page 64).
Cyrillic will work with Windows compatible printers and monitors. A colour monitor is helpful
but not essential to the operation of the program.
Keyboard Shortcuts
There are four types of keyboard shortcuts used in Cyrillic.
•
•
•
•
Shortcuts to some of the menu items
Shortcuts to aid in moving around the family
Shortcuts to the buttons in the dialog boxes
Shortcuts for symbol editing
Cyrillic 2.1
11
Installing and starting Cyrillic
<CTRL>+N
<CTRL>+O
<CTRL>+P
<F10>
<CTRL>+X
<CTRL>+V
<CTRL>+=
<CTRL>+ -
New family
Open family file
Print family
Output to MLINK
Cut selection to clipboard
Paste clipboard
Add space
Remove space
<CTRL>+S
<CTRL>+W
<ALT>+X
<CTRL>+Z
<CTRL>+C
<CTRL>+A
<CTRL>+F
Save family
Close family
Exit program
Undo symbol move
Copy selection to clipboard
Select all symbols
Find individual
The window can be moved around the family by using the arrow and page movement keys.
They have the following actions:
Page up
Page Down
Up Arrow
Down Arrow
<CTRL>=Left Arrow
<CTRL>=Right Arrow
Left Arrow
Right Arrow
Home
End
Escape
Insert
12
Move the window up by ¼ screen
Move the window down by ¼ screen
Select the next individual in the generation above
Select the next individual in the generation below
Select the next symbol to the left not in the same sibship
Select the next symbol to the right not in the same sibship
Select the next symbol to the left
Select the next symbol to the right
Move the selection to the leftmost symbol in the current generation
Move the selection to the rightmost symbol in the current generation
Clear multiple selected symbols
Popup menu for selected symbols
Cyrillic 2.1
Menu Shortcuts
Moving the
cursor around
the family
Installing and starting Cyrillic
Shortcuts for
editing symbols
If the <SHIFT> key is down when the arrow keys are used, the newly selected symbol is added to any
group of symbols already selected. Clicking on a symbol with the left mouse button and the <SHIFT>
key down has the same effect.
<CTRL>+A
<CTRL>+B
<CTRL>+D
<CTRL>+E
<CTRL>+G
<CTRL>+I
<CTRL>+J
<CTRL>+K
<CTRL>+L
<CTRL>+M
<CTRL>+Q
<CTRL>+R
<CTRL>+T
<CTRL>+U
Cyrillic 2.1
New individual(s) dialog
Date of birth and date of death
Dead / alive
First names
Age / gestation
Individual data dialog
Add relative
Genetic symbol
Change liability class(es)
Set marker phenotypes
Symbol type (pregnancy etc)
Proband / not a proband
Additional symbol types
Surname or last name
13
Installing and starting Cyrillic
3. Installing and starting Cyrillic
Cyrillic is supplied on a single CDROM. To install Cyrillic:
•
Insert the distribution disk in your CDROM drive
•
In Windows 3. 1x
Select File I Run... and type a \autorun.exe
•
In Windows 95/98/Millennium/NT/2000/XP
The software should start automatically when you put the CDROM into your
computer. If this does not happen:
• Select Run from the Start menu.
• In the run “open” dialog box type: D:\
D:\autorun.exe (where D is the
drive letter of your CDROM drive)
• Select “Install Cyrillic 2.1.3” and click “Open” in the file download
dialog box
SETUP will guide you through the installation process and create a Program Group called ‘Cyrillic 2.1
containing a number of program items. The default installation directory is C:\CYRILLIC.210, but
you can change this. The installation of Cyrillic requires less than 4Mb of disk space, including all
sample files. The minimum installation takes about 1.7Mb of disk space. The SETUP program will
check that your destination disk contains at least this before copying any files.
14
Cyrillic 2.1
Installing and starting Cyrillic
Upgrading Cyrillic
Cyrillic version 2.l.x is installed into a different directory from version 2.0.x :
(C:\CYRILLIC)
and version 1.x :
(C:\FAMTREES)
It is strongly recommended that you don’t change the install directory to that of a previous version.
Copy any existing family and data files into the new directory structure after installation and before
using the new version.
File type:
*.FAM files
*.DAT files
Copy to:
INSTALL DIR>\FAMTREES
INSTALL DIR>\DATA
where <INSTALL DIR> is by default CYRILLIC.2.1.0.
This is only a recommended method of organising Cyrillic files, for detailed information see chapter 8
Configuring Cyrillic and Keeping family files in different sub-directories in the Cyrillic User Guide.
NOTE: Once saved in the new version, files are incompatible with previous versions.
Cyrillic 2.1
15
Installing and starting Cyrillic
Default Installation
The full Cyrillic 2.1 installation creates the following Program items:
(Note: <lnstDir> is c:\CYRILLIC.210 in the default installation)
The main program item which uses the default working directory of <InstDir>, and should be used for Cyrillic 2.1
new files.
Sets the working directory to <InstDir>\TUTORIAL, and can be used to open family, disease and
marker data files used in the Tutorial section of the manual.
16
Cyrillic 2.1
Cyrillic 2.1
Tutorial
Installing and starting Cyrillic
Cyrillic 2.1
Breast Cancer
Example
Cyrillic 2.1
Examples
Cyrillic 2.1 Help
Cyrillic 2.1
Shortcuts
Read Me
Example Sets the working directory to <InstDir>\BRCANCER and can be used to open family, disease
and marker data file examples. It also automatically assigns Breast Cancer to newly created families,
enabling them to be analyzed using MLINK and the installed BrCa module.
Sets the working directory to <InstDir>\ EXAMPLES, and can be used to open the more general
example family, disease, and marker data files in this directory.
A comprehensive on-line help file.
Brief descriptions of Cyrillic’s keyboard shortcuts.
Important last minute information. Please do read it!
Remove Cyrillic An uninstaller that will remove the installed files, but not newly created files.
2.1
Cyrillic 2.1
17
Installing and starting Cyrillic
Cyrillic can be installed on and run from a network server, provided your system Manager ensures
that no more copies of the program are run simultaneously than there are licenses. Disease and
marker data files can be set to ‘feed only’ by the system manager and Cyrillic will read them and not
attempt to make any changes to them. However, there is no provision for handling multi-user readwrite access to the marker and disease files. If you wish to allow more than one user to maintain
copies of these files, it is important to ensure that the working directory is set to a location which will
not be accessed simultaneously by more than one user, for example the users home directory on
the file server, or the PCs hard disk. See ‘Keeping family files in different sub -directories‘ for details
of how to change the working directory.
Network
Installation
If a user has a family file open, it can be opened and read by other users but
they cannot change it.
Six files are essential to run the program CYRILLIC.EXE, CYRILLIC.HLP, MOUSETRK.DLL, SPIN.DLL, WINEXEC.DLL and TABLE.DLL.
All should be kept in the same directory.
18
Files Needed to
Run Cyrillic
Cyrillic 2.1
Tutorials
Part 3
Tutorials
Cyrillic 2.1
19
Guided Tour
4. Guided Tour
Starting a program with a blank screen is always a little daunting, so to familiarize you with Cyrillic’s
functions before you draw your own pedigrees, we will take you on a guided tour using a complete
pedigree before drawing one from scratch.
Step I - Look at a Family Tree
•
•
•
Windows 3.1:
Choose the Cyrillic 2.1 Examples icon from the Cyrillic 2.1 program group
Windows 95/98/Millennium/NT/2000/XP
Select from the Start menu: Start | All Programs | Cyrillic 2.1 | Cyrillic 2.1 Examples
In Cyrillic, open the file DEMOBARS.FAM by selecting File | Open...’
Toolbars
You should see that all of the toolbar buttons, shown above, are now available. Run your mouse
cursor over the toolbar (without pressing a button) pausing over each of the buttons - note the tool
tips, which briefly describe the function of each icon. Towards the left of the toolbar, the tools control
standard Windows functions such as Save, Copy and Paste. To the right of this are general settings
for the family such as Family Details and Markers. In the middle are display settings and zoom
controls. The remainder of the tools control the properties of an individual (e.g. the “proband” and
the other members of their pedigree).
20
Cyrillic 2.1
Guided Tour
Note: if you are using a VGA monitor (640 x 480 resolution), a truncated version of the toolbar is
displayed omitting: 1) the clipboard buttons (cut, copy, paste), 2) the button “Show Descendents
Only,” 3) the button “Hide Individual,” 4) the button “Show All” and 5) the “Help” button.
Display options
On the drawing, you will see that each individual (e.g. the “proband” and the other members of their
pedigree). Can have a lot of data associated with them. All this data can be shown or hidden from
the drawing, as you need. Clicking on the ‘Display Format’ button shows a dialog box where you can
control what is displayed on screen. Click on the ‘Haplotypes’ ‘Barcodes’ and ‘Markers’ check boxes
to deselect these (i.e. hide them from the display). Then click OK. You will see that the drawing is
simplified to show only the individuals with their identifiers.
Cyrillic
21
Guided Tour
Now look at how you can move the focus around the drawing and move individuals. Notice that one
individual on the drawing has a red box around it. This indicates that it is the active or currently
selected individual.
To select a group of individuals, use the left mouse button, and drag a box (a Selection Rectangle)
around the individuals you wish to select. They will now each have a box around them. Notice there
is still one individual, which has the main focus with the red box. The others have a brown box.
You can perform a sequence of operations on the selected group, including moving their position on
the drawing. To move the group, click the left mouse button over one of the selected individuals and
drag to the new position. You can do this repeatedly try it so you get used to how it works. Then use
the ‘Edit I Undo’ menu command to return to your starting point. If you have done several moves in
a row, you can undo each of them in turn. To deselect the group, click elsewhere on the screen, or on
an unselected individual.
-
22
Cyrillic 2.1
Selecting and
moving
individuals
Guided Tour
Experiment with the ‘Annotation’ tool. Just click anywhere on the drawing and a dialog box will let
you enter your text. You can set the colour, font and style of your text from the ‘Annotation’ dialog
box. You can move the text around the screen by dragging it with the left mouse button, and edit it
by double-clicking on it.
Zooming
Use the Zoom In and Zoom Out features by using the magnifying glass Button on the toolbar or View
menu items. Note that these settings do not affect the printed size of the drawing. They are simply to
show the family in more or less detail on the screen.
We will look at the print preview options later.
Step 2 - Data about Individuals
Cyrillic is also used for managing and reporting clinical and genetic information.
Using the same example file, double-click on an individual on the drawing, or click on the’ Individual
data’ toolbar button, with the individual highlighted. This opens a dialog box from which you can edit
all the information about that individual relevant to Cyrillic. This dialog box has two main sections; an
upper part which does not change and a lower part from which you can move through subsets of
data by use of the radio buttons (e.g. Sex is shown in the Identification pane).
Cyrillic
23
Guided Tour
24
Cyrillic 2.1
Guided Tour
The Individual ‘Data’ dialog box is like a form and through it you can use Cyrillic as a database for
individuals within a family or a collection of families. If you select a group of individuals and then edit
individual data ‘records’ you will find that you can cycle through a group of records using the ‘Next’
and ‘Previous’ buttons in the dialog box. This is a quick way of making a change to a group of
records. Enter some sample data for names and dates of birth in a group of individuals.
Cyrillic makes use of information that you enter in a variety of ways. When you enter data about an
individual (e.g. Names, Date of Birth, Genetic Symbol etc), some or all of this information can be
displayed on the drawing. Any genetic symbols will automatically be displayed. The display of all
other information can be controlled using the ‘Format I Display format.. .‘ menu option as mentioned
in Step 1 above, and checking the relevant boxes.
Step 3 Markers, Diseases and other kinds of Data
-
Displaying
marker data
Since we hid the marker data earlier, let’s now take a look at this information. Make sure the
‘Hap1otypes’, ‘Barcodes’ and ‘Markers’ boxes are checked in the ‘Display format’ dialog box. The
screen should now look more colourful with Cyrillics colour barcodes. Marker data should be
displayed to the side of the barcodes.
Cyrillic
25
Guided Tour
You can edit the data in one of several ways. You can either use the menus (choose Data I
Individual I…), the toolbar, or simply double-click any data below a symbol on the
drawing. You can set the marker phenotypes, set the crossovers on the barcodes, edit the
colours of the display and more. Explore the different dialog boxes for marker and haplotype
information.
26
Cyrillic 2.1
Guided Tour
You can also view the data in a spreadsheet-type format.
•
Click the ‘Table view’ toolbar button to display the Table Viewer.
Cyrillic
27
Guided Tour
• Click on the ‘Chrl4’ tab at the bottom of the table to switch to the marker info.
•
Close the Table Viewer by clicking the ‘Close table’ toolbar button.
Step 4 Printing
Printing options
-
Once you have entered and edited all your data, you may want to print your pedigree. The pedigree
will print exactly as you have it displayed on the screen, using whatever settings you have checked in
the ‘Format I Display formats’ dialog box. You can preview your drawing using the ‘File / Print
preview’ command, or’ Print Preview’ toolbar button.
When you select this, a new window will open showing the pedigree as it will appear on the printed
page. If your drawing is larger than a single page, it will display the number of pages required to print
at the current scaling using dotted lines to show page margins. You can set the scaling here, using
the toolbar option showing percentages.
You can shrink the drawing to fit on a single page or print a circular drawing by clicking on the
relevant toolbar button.
28
Cyrillic 2.1
Guided Tour
Note that genetic information is not shown on the circular drawing. The print and display settings can
be controlled from the Print Preview window. In the demo version, a banner will be displayed
across your printout.
Cyrillic
29
Pedigrees with Personal Data
5. Pedigrees with personal data
For the rest of the tutorial, you will open the program using either the ‘Cyrillic 2.l’program item when
creating your own files, or the ‘Cyrillic 2.1 Tutorial’ program item, if you want to open one of the
4 supplied tutorial files.
A New Pedigree
Now that you have an overview of Cyrillic, the remainder of the tutorial will take you
through pedigree drawing and data entry from scratch. The first half concentrates on
personal data entry and display and the second half on Genetic data entry and
display, as well as data import and export. If you aren’t interested in Cyrillic’s disease
and marker data handling capabilities you can skip the second half of the tutorial. If
you are, you should start here and complete the whole tutorial.
•
30
You can use different data
and family directories by
creating new program items
that point to different
Cyrillic.ini files. Look at the
properties for the installed
program items to see how
this works. For further
details, see chapter 8 of the
Cyrillic User Guide.
Click on the ‘New Family’ toolbar button. This will bring up the ’New Family’ dialog box.
Creating a new
Family
Cyrillic 2.1
Pedigrees with Personal Data
Just as the ‘Individual data’ dialog
box is the hub for all an individual’s
data, so the ‘Family Details’ dialog
box is the starting point for adding
family data such as diseases,
markers, family name etc. This is
explored further in section 3 of the
tutorials, Disease and Marker Data,
and later in the reference section of
the User manual
Cyrillic
31
Pedigrees with Personal Data
•
Click on the ‘OK’ button. You are now ready to place the first individual.
•
To add the first individual, click in the centre of the window: left mouse button for a male and
right mouse button for a female.
•
The Individual ‘Data’ dialog box appears. For now, click the ‘OK’ button to remove it.
The first
Individual
The immediate appearance of this dialog can get in the way if you want to quickly sketch out a
pedigree without adding any data. You can toggle this feature by choosing ‘Options I Display new
individual dialog’.
•
Do so now while we add some relatives to our lone individual.
•
Add the first individuals spouse by right -clicking the individual to display the ‘Relationship’
dialog box.
32
Adding relatives
Cyrillic 2.1
Pedigrees with Personal Data
When the ‘Relationship’
dialogue box is displayed,
many of the options are greyed
out. The available options are
those logistically permitted for the
particular individual chosen. Note
that the ‘Sibling’ and ‘Partner’
buttons are only active when you
have right clicked an individual
whose sex is unknown
•
Click the ‘Husband’ or ‘Wife’ button (depending on whether your first individual is female or
male). The dialog box is cleared and the cursor changes from a pointer to the ‘Relative Position’
cursor.
Cyrillic
33
Pedigrees with Personal Data
•
Click approximately 1 inch to the left or right of the first individual so that the male is on the left
(the conventional layout).
•
Now add a single male child by right-clicking either partner, clicking the ‘Son’ button
(‘Offspring’ panel), and clicking the ‘Relative Position’ cursor roughly 1.5 inches below the
new parents.
Crooked Lines
You may notice that the vertical line is crooked. This is because the parents are an odd
number of grid points apart, and the descent line starts at the child on one grid point, ending
at the center of the marriage line between grid points. This becomes more clear if you
choose ‘View I Show grid’. To correct this:
•
Select one of the parents, hold down the <CTRL> and <SHIFT> keys together, and press
either the left or right cursor key.
This moves the selected individual to the left or right by one grid point, and repositions the
descent line accordingly.
You can also reposition the top
of the descent line by grabbing
it near the top with the left
mouse button and dragging it
to the left or the right. Whilst a
useful tool for fine tuning
complex pedigrees, it isn’t
appropriate here.
34
Cyrillic 2.1
Pedigrees with Personal Data
When working with any software application, you should get into the habit of saving your changes
every five minutes or so.
•
Saving the
drawing
Save your work by clicking on the Save Family toolbar button.
The first time you press this button the ‘Save as’ dialog is displayed. The default filename is taken
from the family name, or Family ID number if no name is entered. Subsequent presses will update
the same file.
Choose ‘File I Save as... ‘ if you want to save a copy elsewhere or under a different name.
Relationships
Adding more
children
You can add further individuals to a sibship in the same way as you added the first offspring.
•
You can right-click either of the parents and choose an offspring
•
You can right-click one of the existing offspring and choose a sibling
In each case, you have to click on the drawing where you want the new individual to be place.
Cyrillic
35
Pedigrees with Personal Data
Sketching out a large pedigree one individual at a time can be very tedious. Cyrillic can add parents,
a spouse and children (up to 15), or parents and siblings (up to 15) in a single step.
•
Right-click the second offspring to display the Relationship’ dialog box, and click the ‘Children’
button (‘Family of...’panel) to display the ‘Adding Family’ dialog.
•
Enter 1 boy and 3 girls in the appropriate edit boxes and click the’ OK’ button. The new family,
including the spouse is drawn automatically.
•
You can add parents to the new spouse by right-clicking the spouse and choosing the ‘Both’
button from the ‘Parents’ panel.
Adding families
in one step
Now add a family of siblings to one of these new parents:
•
Right-click the parent and choose the ‘Siblings’ button (Family of...’ panel) to
display the ‘Adding Family’ dialog again.
•
Add some brothers and sisters, this time specifying a different order to the
boys first, girls second’ default by clicking the Specify Sexes>>>’button to
reveal an extended ‘Adding Family’ dialogue
•
Choose the sex of each individual in order, for example m,f,m,m,f for boy, girl,
boy, boy, girl, by clicking the appropriate radio button.
36
You can also add each
parent individually. If you do,
you will notice that the
decent line for an individual
isn’t drawn until the second
parent is added. The chief
use of adding parents
individually is to specify
existing individuals as
parents.
Cyrillic 2.1
Pedigrees with Personal Data
Multiple births
Cyrillic can accommodate multiple births up to sextuplets (6). The general scheme is to add an
offspring, and then add a twin, followed by successive multiplets up to the required number.
Note that it is possible to add
a female monozygous twin to
a male, and vice versa.
Whilst this isn’t technically
possible, it would otherwise
be impossible for Cyrillic to
switch the sex of a
monozygous pair.
•
•
Right-click the male in the lowest generation to display the ‘Relationship’ dialog and
choose one of the buttons from the Twins panel. Note that the Multiples panel is
inactive at this time.
•
Click roughly 1 inch to the left of the existing twin to place the new twin – left-click
for a male, right-click for a female
•
Now right-click one of the twins to display the ‘Relationship’ dialog again and click
the ‘Triplet’ button in the ‘Multiples’ panel.
Click roughly 1 inch to the left of the existing triplets to place the new triplet left-click for a
male, right-click for a female.
—
Now convert one of the other existing siblings into a member of this multiple birth:
•
Right-click one of the triplets to display the Relationship’ dialog box, and click the Quadruplet’
button.
•
Instead of clicking in free space, click on the sib closest to the other multiplets. Note that we
could have converted existing sibs at any stage of this process.
Cyrillic
37
Pedigrees with Personal Data
Twins (Monozygotic)
38
Triplets
Cyrillic 2.1
Pedigrees with Personal Data
Quadruplets
Cyrillic
39
Pedigrees with Personal Data
You can also build up larger pedigrees by copy and pasting from other family files, or even the same
file. The individuals and their data are transferred completely. It only remains for you to join the new
segment to the growing pedigree. We will illustrate this by replicating part of the pedigree within the
same drawing.
•
Drag a selection rectangle around part of the pedigree (e.g. a family unit within the group) and
click on the Copy symbols’ toolbar button.
•
Click the ‘Paste Symbols’ toolbar button and then click roughly 1 inch to the right of the
pedigree. The individuals you copied are pasted into the new drawing.
Copy and Paste
To join the new section to the main pedigree:
•
Right-click one of the two individuals who will form the new relationship to
display the 'Relationship’ dialog box
•
Choose the appropriate relationship and then click on the second individual.
Note: You need to add each
parent separately before the
relationship is drawn on the
screen.
When the ‘Relationship’ dialog is displayed, only valid relationships are available, so you can see that
what constitutes a valid new relationship for your key individuals requires some careful forethought.
40
Cyrillic 2.1
Pedigrees with Personal Data
Personal Data
Entering
Entering
personal
information
Cyrillic can store a range of personal data, such as names, addresses, birth dates etc. along with
individual and general annotation. To explore this, open the tutorial file ‘TUTOR1.FAM’
If you want further practice
drawing pedigrees, you can
draw this family yourself. If
you do, then before
continuing with this tutorial
you will have to choose the
‘Tools/Resequence’ menu
And then the ‘format /
display ‘Format’ menu and
check the ‘Identifier’,
‘Surname’, Forenames’,
‘Birth Date’, and ‘Death
Date’ check boxes.
This shows an outline sketch of the Jones family, into which we will add some personal information.
Cyrillic
41
Pedigrees with Personal Data
•
Double-click individual I:1 to display the Individual Data dialog box
•
Enter Jones in the ‘Surname:’(last name), and David in the forenames:’ edit
boxes respectively
•
Enter 16/5/19 and 12/8/93 in the Date of Birth’ and Date of Death’ edit
boxes respectively, then click OK’
Cyrillic detects which date
system your PC is using, and
accepts and formats dates
accordingly. For example, in
the USA, May 16th would be
entered 5/16/53. Note, if
you enter 53 for the year,
Cyrillic assumes1953 and
modifies the date
accordingly. Cyrillic uses full
dates to avoid the ‘Year
2000’ problem.
The data you entered is now displayed on the drawing. Note that the symbol for David Jones has
changed to include a slash, indicating Died.’
Double-clicking each individual in turn can get tedious, especially if you are entering data in the
same single field for a number of individuals.
•
Drag a selection rectangle around individuals 1:2, 11:1, and 11:2 and choose the ‘Individual
Data’ toolbar button.
Notice that the ‘Next’ button is now active (for Next Individual). You can enter data for an individual
and move to the next individual without leaving the dialog box.
42
Cyrillic 2.1
Pedigrees with Personal Data
•
Enter Helen Jones, 5/5/20 for the first individual (1:2) and click the ‘Next’ button. Note that the
‘Surname’ edit box is actually a list box from which you can choose previously entered surnames.
Note that the ‘Prev’ button is also now active, allowing you to review previously entered data.
The Table
Viewer
•
Enter Brian Jones, 2/3/44 for the second individual and click the ‘Next’ button.
•
Enter Jane Jones, 4/8/45 for the third individual and click ‘OK’.
Although this method of entry is productive, it doesn’t allow you to review data for many individuals
simultaneously. The Table Viewer lets you review and modify data for individuals in a spreadsheet
format.
•
Click the ‘Table view’ toolbar button to display the Table Viewer.
Cyrillic
43
Pedigrees with Personal Data
When you first open the
Table Viewer, all available
Cyrillic data fields are
shown. You can choose
which fields to show and
the order they are shown
using the Table Viewer’s
‘Table|Set upfields’ menu.
The field widths default to
the widest text in a
column, and can be
altered by dragging
between the column
header separators.
44
Cyrillic 2.1
Pedigrees with Personal Data
To enter more data, click the ‘Allow Editing’ toolbar button.
Enter data for the following individuals:
III:1
III:2
III:3
III:4
III:5
III:6
III:7
James David
Sarah
Gillian
Cathy
Brian
William
Bill (William)
Jones
Smith
White
Young
Smith
Young
Young
9-1-1968
4-8-1969
12-6-1970
6-11-1972
3-6-1968
8-11-1969
4-3-1970
Note that William Young is known as ‘Bill’, and Cyrillic has a separate field for this.
•
When all this data is entered, click the ‘Commit Changes’ toolbar button.
Depending on how the Table Viewer overlaps with the main Cyrillic window, you can see that the
drawing is updated as you commit the changes.
Close the Table Viewer by clicking the ‘Close Table’ toolbar button.
Cyrillic
45
Pedigrees with Personal Data
You can also add data to a pedigree with a data file (in GEDCOM or MLINK format).
The data file must have the same family structure and not have any additional
individuals.
•
Try this feature by reopening ‘TUTOR1.FAM’and choosing the ‘Data / Update >Update GEDCOM’ menu, choosing ‘TUTOR1.GED ’when prompted for an update
file
•
Choose ‘Data I Show table’ to review the newly imported data
•
Click the ‘Close Table’ toolbar button to return to the drawing window
A typical for this feature
could be a custom
database used to store
family data. The first
step for a new family
might be to export a
skeleton GEDCOM file
from the database,
which Cyrillic can import
to generate a new family
tree. As data is added to
the database, it can be
exported and used by
Cyrillic to update the
pedigree drawing.
Note that you can edit any displayed item of an individual’s data by double-clicking the item itself,
rather than the individual’s symbol.
46
Cyrillic 2.1
Pedigrees with Personal Data
Display and Presentation Part I
Additional The ‘Individual Data’ dialog box has an ‘Additional Info’ field (in the ‘Identification’ panel) for
Information miscellaneous data.
•
Double click an individual to display the Individual Data dialog, then select the Identification...
radio button.
Pressing the <Enter> key
will create new lines within
the Additional Info Field.
To exit the dialog from the
keyboard, <Tab> out of
the field and then press
<Enter>.
•
Click in the ‘Additional Information’ field and enter some text. Up to 5 lines can
be displayed on the drawing.
•
Click the ‘OK’ button to close the dialog.
•
To show this text on the drawing, click the Display Format’ toolbar button to bring up the ‘Display
Format’ dialog box, and check the ‘Additional Info’ check box.
•
Choose how many lines of additional info you want to display and then click ‘OK’ to close the
dialog box.
An example of how you could use this feature would be to show or hide confidential information,
depending on who was to see the pedigree.
Cyrillic
47
Pedigrees with Personal Data
You may have noticed when in the ‘Display Format’ dialog box that many features of the screen
display are listed here. Not only does it control which data items are displayed, but also the date
format, the symbol scaling and width, the format of the marriage lines, and the Identifier Type.
•
To avoid having to set these every time you enter a new pedigree, you can save the settings by
clicking the ‘->Default’ button.
•
You can also apply these default settings to an existing pedigree by clicking the Use ‘Default’
button.
You can change the fonts of different screen items by choosing ‘Format I Fonts’.
48
Display Format
More formatting
Cyrillic 2.1
Pedigrees with Personal Data
And finally, you can set line widths by choosing ‘Format I Line widths’.
Note that the fonts and line widths aren’t included in the user’s default settings mentioned above.
Rather, they are global settings applied to all opened or newly created pedigrees.
Annotations
You can add general text to the pedigree in the form of annotations.
•
Click the ‘Annotation’ toolbar button. Note that the cursor has changed to an I beam.’
•
Click on the drawing where you want to place the annotation. The ‘Edit Annotation’ dialog is
displayed, where you can enter text.
You can also format the annotation from this dialog box, setting, justification, font, and colour.
•
Try setting your text to Anal 48, Centred, in Red and then click ‘OK’
The annotation is now displayed on the pedigree. You can move it by grabbing it with the mouse and
dragging it. To edit the text double-click it, and to delete it click it once and press the Delete’ key.
Print Preview
Print Preview lets you control the final output prior to printing. For example, if you are printing a large
pedigree over many pages you can move the pedigree in relation to page breaks.
•
Click on the Preview Printout toolbar button. The screen changes to show a representation of the
pedigree as it will appear on paper and a new toolbar appears.
Cyrillic
49
Pedigrees with Personal Data
Four of the toolbar buttons control the way the pedigree is displayed.
•
Select the first and you see the pedigree spread across as many pages as are necessary to print
•
The second shows just the first page, and is intended to allow the various header options to be
placed as desired.
•
The third shrinks the pedigree so that it will fit on a single printed page.
•
The fourth displays the pedigree in a circular format.
These last two options only work sensibly on moderate size families.
The printed page can include several items of information which are not displayed on the screen.
This is controlled from the Print options toolbar button.
•
Click on the ‘Print Options’ toolbar button and add some Family Details and a main heading,
then print your drawing.
•
Click the ’Close’ button to clear the Print Preview window
50
Cyrillic 2.1
Pedigrees with Personal Data
Cyrillic and your
word processor
Earlier in the tutorial, we copied and pasted part of the drawing into the same Cyrillic window. You
can also copy and paste into other applications such as a word processor.
•
Drag a selection rectangle around part of the pedigree and click the ‘Copy’ toolbar button.
•
Switch to your word processor or spreadsheet (or load it, if not running), create a new document
and paste in the selected individuals.
•
To copy and paste the whole pedigree, select just one individual (the default state) and click the
Copy ‘toolbar button.
Only the drawing elements are transferred when pasting into other applications. You can copy and
paste the data by choosing ‘Edit I Copy text’ to display the Copy to clipboard’ dialog box.
Cyrillic
51
Pedigrees with Personal Data
52
Cyrillic 2.1
Pedigrees with Personal Data
You can choose exactly which data to copy, for selected or all individuals and can add a heading and
column headings. Note that in the above display the ‘Marker details’ are greyed because there are
no genetic markers set up for this family.
•
Try out this feature by opening the file ‘TUTOR4.FAM’and choosing ‘Edit I Copy’ text
•
Check the boxes for which data is entered and don’t forget to choose between the ‘Selected’ or
‘All’ radio buttons.
•
Switch to your word processor or spreadsheet and paste in the tab-delimited data.
Cyrillic
53
Pedigrees with Personal Data
Number
Forename
Surname
D.O.B.
D.O.D.
I:1
David
Jones
16-5-1919
12-8-1989
I:2
Helen
Jones
5-5-1920
II:1
Brian
Jones
2-3-1944
II:2
Jane
Jones
4-8-1945
III:1
James David
Jones
9-1-1968
III:2
Brian
Smith
3-6-1968
III:3
Sarah
Smith
4-8-1969
III:4
William
White
3-2-1970
III:5
Gillian
White
12-6-1970
III:6
William
Young
8-11-1969
III:7
Cathy
Young
6-11-1972
IV:1
John
Smith
2-2-1988
IV:2
James
Smith
4-9-1989
IV:3
Judy
Smith
9-6-1991
IV:4
Robert
White
3-6-1991
IV:5
Ralph
White
24-5-1992
IV:6
Richard
White
20-11-1993
IV:7
Timothy
Young
24-12-1992
IV:8
Thomas
Young
9-3-1994
IV:9
Anthony
Young
18-6-1996
Further display options are explored in a later part of the tutorial, Display and Presentation #2. These
deal with individual data display and hiding. They can be followed without having to follow the
disease and marker data entry sections.
54
Cyrillic 2.1
Disease and Marker Data
6. Disease and marker data
Now that you have drawn a pedigree and entered personal data, you can enter clinical or research
data in the form of disease and marker information and phenotypes. First you have to enter the
disease and marker information. Then you assign the disease and marker phenotypes to individuals.
Marker and disease information is held independently of any particular family, so any changes made
will affect all families which use it.
In the second half of the tutorial we will:
•
Enter marker information for X chromosome markers DXS296 and DXS297.
•
Enter disease information for Oto-palato-digital Syndrome, assigning the previously entered
markers to it.
•
Assign the disease to a family and enter the individual phenotypes.
•
Create colour chromosome bars and manipulate the display
•
Perform a linkage analysis using the above data.
Cyrillic
55
Disease and Marker
Marker Data
Markers Setup
•
Entering the
marker
information
Close Cyrillic and restart it from the ‘Cyrillic 2.l’ program item.
This will give you a fresh clean environment to set up your data. Examples of the data you will add
are given in the ‘Cyrillic 2.1 Tutorial’ environment which you can inspect later.
•
Select ‘Data I Markers...’ to display the ‘Select Chromosome’ dialog box.
•
Scroll down the list of chromosomes, select X and click the ‘OK’ button to display the Markers for
‘Chromosome X’ dialog box Click the ‘Yes’ button if asked to create a new file.
•
Click the ‘New’ button to display the Description of Marker’ dialog box.
56
Cyrillic 2.1
Disease and Marker Data
The first marker is DXS297, which is a CA repeat micro-satellite polymorphism.
Cyrillic
57
Disease and Marker
Marker Data
•
Type in the name DXS297 and select the ‘VNTR - entered as allele length’ radio
button.
You will notice that the ‘Allele Names’ and ‘Frequencies’ list box is now greyed out,
as no alleles can be defined for VNTRs.
•
Click the ‘OK’ button to close the ‘Description of Marker’ dialog box and return to
the Markers for Chromosome X dialog.
You may wish to enter
additional marker
information e.g.
‘Chromosome Band’,
‘Enzyme Used’ and
‘Probe Name’ – In this
case Xq27-Xq28, Msp I
and VK23AC – but this is
optional
The second marker is a Restriction Fragment Length Polymorphism (RFLP) with two alleles
•
58
Click the ‘New’ button to display the ‘Description of Marker’ dialog box.
Cyrillic 2.1
Disease and Marker Data
•
Enter ‘DXS296’ in the ‘Marker’ name box and choose the ’Allele names alterable’ radio button.
Cyrillic
59
Disease and Marker
Marker Data
The frequencies of the alleles a and b are 0.87, and 0.13 respectively.
•
Enter these names and values by clicking on the names in the ‘Allele names and Frequencies’
list box in turn to display the ‘Details of Allele’ dialog box.
•
Click the ‘Reposition’ button to display the ‘Marker Position’ dialog box
and select ‘DXS297’ from the list box to place the new marker after it
in the list. ‘The Markers for Chromosome X’ dialog box is now displayed
•
Click the ‘OK’ button to display the ‘Select Chromosome’ dialog box,
and finally, click the ‘Close’ button in this dialog to complete the marker
definition.
Note: if the 'Rel Pos’ Cursor is showing, press <ESC> to cancel the placement of an individual at this
stage.
60
Cyrillic 2.1
Disease and Marker Data
Diseases Setup
Entering the
disease
information
•
Select ‘Data I Diseases...’ to display the ‘Diseases’ dialog box and click the ‘New’ button to
display the ‘New Disease’ dialog box.
•
Enter ‘Oto -palato-digital Syndrome l’ and click ‘OK’ to display the ‘Disease Definition’ dialog box.
Cyrillic
61
Disease and Marker
Marker Data
The ‘Affection’ radio button is selected by default.
62
Cyrillic 2.1
Setting the allele frequency to
0.0002 ensures that for this
genetically lethal condition, the
LINKAGE/FASTLINK analysis
programs will compute the
probability of 0.666 that the
mother of a child with OPD I is a
carrier. This is not critical to the
analysis of this example but
would be to any risk calculation
Penetrances
•
Disease and Marker Data
Change the ‘Frequency of disease allele‘ value to 0.0002.
•
Click the ‘Markers’ button to display the ‘Select Chromosome’ dialog, choose
‘X’ from the list and click the ‘OK’ button to display the ‘Select Markers’ dialog.
•
<SHIFT> - click the DXS297 and DXS296 markers so that both are selected
and click the ‘OK’ button to display the Markers for ‘Oto-palato.digital
Syndrome l’ dialog box
•
Click ‘OK’ to return to the ‘Disease Definition’ dialog box
Now define a single penetrance class for ‘Oto-palato-digital Syndrome 1’
•
Click on the ‘Phenotypes’ button. The Table Viewer is displayed showing ‘Disease Penetrances’.
Cyrillic
63
Disease and Marker
Marker Data
•
Click on the ‘Allow Editing’ toolbar button and enter the following data for Class Number 1:
•
Click the ‘Close’ toolbar button and confirm that you wish to commit the changes, to return to
the ‘Disease Definition’ dialog box
•
Click the ‘OK’ button to return to the ’Diseases’ dialog box, then click its ‘Close’ button to finish
setting up the disease for the tutorial.
64
Cyrillic 2.1
Disease and Marker Data
Families, Diseases, and Markers
Entering the
family
information
Now that the Marker and Disease information has been entered, we can assign it to sample family.
•
Click on the ‘Open File’ toolbar button and open ’TUTOR2.FAM’ from the
‘CYRILLIC.210\TUTORIAL\ FAMTREES’ directory.
•
Click on the ‘Family Details’ toolbar button to display the ‘Family Details’ dialog box.
Cyrillic
65
Disease and Marker
Marker Data
•
66
Type in the family ID Number and name as above.
Cyrillic 2.1
Disease and Marker Data
•
Click on the Add ‘Family Disease’ button to display the ‘Add Loci’ dialog box
•
Select ‘Oto-palato-digital syndrome I’ from the list and click the ‘OK’ button.
Cyrillic
67
Disease and Marker
Marker Data
•
When prompted to use the default markers, click on the ‘Yes’ button
•
Add any other details you may want such as Creation date, Family drawn by, etc. before clicking
the ‘OK ’button to close the ‘Family Details’ dialog box. These details are available to print on
your drawing, and do not show on the screen.
Various individuals are affected in this family and some are carriers for the disease
.
• Select individual 111:1 and then <SHIFT>-click individuals IV:1, IV:2, IV:4, and IV:7 and click the
‘Affected’ button on the Symbol toolbar to the left of the pedigree. Note that the tooltip will
display ‘Oto -palato-digital Syndrome 1.’
•
Select individual 11:2 and then <SHIFT>-click the ‘Carrier’ button on the Symbol toolbar.
To assign a heterozygous affection status:
•
Select individual 111:3 and then <SHIFT>-click individuals 111:5 and 111:7.
•
Click the Individual ‘Data’ toolbar button to display the’ Individual Data’ dialog box, and click the
‘Genetic Status’ radio button.
•
Choose the Heterozygous genetic symbol for each individual in turn, cycling between them by
pressing the ‘-> Next‘ button.
•
Click the ‘OK’ button to close the ‘Individual Data’ dialog box.
68
Cyrillic 2.1
Affection status
Disease and Marker Data
Entering the
marker data
Now we will assign marker phenotypes to each of the individuals in the pedigree. The quickest way to
enter data manually is to use the Table Viewer.
•
Choose ‘Data I Show table’ to display the Table Viewer. You will notice that there are now two
sheets in the workbook.
Click the ‘Chr X’ tab to display the family markers for the X chromosome.
•
Click the ‘Chr X’ tab to display the family markers for the X chromosome.
Click the ‘Allow Editing’ toolbar button and enter the following marker data:
Cyrillic
69
Disease and Marker
Marker Data
ID Number
DXS297
DXS296
I:1
185
a
I:2
187 / 185
a/b
II:1
185
a
II:2
189 / 179
a/b
Whilst offering the
quickest means of data
entry, the Table Viewer
doesn’t have the level of
configuration of individual
phenotypes offered by the
‘Individual Marker Data’
dialog. See Chapter 12 of
the User manual for more
details
•
Click the ‘Commit Changes’ toolbar button and click the ‘Close’ button to return tp the pedigree
drawing.
•
To display the data on the pedigree, click the ‘Display Format’ toolbar button check the ‘Markers’
and ‘Marker Names... Left Individual Only’ check boxes, and click the ‘OK’ button
70
Cyrillic 2.1
Disease and Marker Data
The marker names and the genotypes you have entered for the first four individuals are now
displayed on the pedigree.
Importing
marker data
To save you entering data for the remaining 16 individuals manually, you can update your pedigree
from an MLINK file.
•
Choose ‘Data Update -> Update MLINK’ and choose the file TUTOR2.PRE’
•
You will be prompted for a second file choose ‘TUTOR2.DAT’
-
The marker data for the remaining individuals is now displayed on the pedigree.
Cyrillic
71
Disease and Marker
Marker Data
You’ve already seen how you can view the marker data in the Table Viewer. Let’s now explore some
other ways of viewing and editing the marker data for individuals.
•
Reviewing the
Data
Double-click directly on an individual~ phenotype to display the ‘VNTR fragment sizes’ dialog box
(DXS297) or the ‘Choose a marker phenotype’ dialog box (DXS296).
Note in particular the ‘Phenotypes’ panel, which lists the current, parental and possible phenotypes.
You can select an alleles individually or choose one of the calculated possible pair.
•
Click ‘OK’ to close the dialog.
•
Choose an individual and click on the ‘Individual Phenotypes’ toolbar button to display the
‘Individual marker data’ dialog box.
This dialog lists all the markers assigned to the family and the current
phenotypes for the selected individual.
•
Click on a marker to display the ‘VNTR fragment sizes’ dialog box
(DXS297) or the ‘Choose a marker phenotype’ dialog box (DXS296).
•
Click ‘OK’ to close the dialog box.
•
You probably haven’t saved your work for a while, so choose
‘File I Save as...‘ and save the file under a different name.
72
Note that you can also get to Note
that you can also get to this dialog
box by clicking on the ‘Markers’
button on the ‘Genetic Status …’
pane in the ‘Individual Data’ dialog
box. Note also that if more than one
individual is selected when the
‘Individual Phenotypes’ toolbar
button is clicked, you get the option
of cycling through the phenotypes of
all or selected individuals in turn.
This feature should be used with
care!
Cyrillic 2.1
Disease and Marker Data
Finally, to confirm that the data displayed is correct, here is a complete list of all phenotypes entered
for this family.
ID number
DXS297
DXS296
I:1
185
a
I:2
187 / 185 a/b
II:1
185
a
II:2
189 / 179 a/b
III:1
189
b
III:2
195
a
III:3
185 / 189 a/b
III:4
191
b
III:5
185 / 179 a/b
III:6
187
a
III:7
185 / 189 a/b
IV:1
189
b
IV:2
185
b
IV:3
195 / 189 a/b
IV:4
179
b
IV:5
185
a
IV:6
179
b
IV:7
189
b
IV:8
185
a
IV:9
187 / 185 a/b
Cyrillic
73
Disease and Marker
Marker Data
You can check this by looking at the Table View (Chr X tab).
•
Choose ‘Table I Sort by’ and select ‘Pedigree number’ to compare the values.
Display and Presentation Part 2
Now that all the disease and marker data has been entered we can create colour chromosome bars.
•
Open TUTOR3.FAM’or your last saved tutorial file
•
Choose ‘Tools I Form haplotypes’.
•
Select Brian Jones (11:1) and choose ‘Tools I Create bars’ to create coloured chromosome bars
for Brian and his parents.
74
Cyrillic 2.1
Chromosome
bars
Disease and Marker Data
•
Now select James Jones (111:1) and choose ‘Tools I Create bars’ to create bars for him, his
sisters and his mother.
•
Finally, choose John Smith (IV:1), Robert White (IV:4), and Timothy Young (IV:7) in turn, and
choose ‘Tools I Create bars’ to create bars for their respective fathers and siblings.
Cyrillic
75
Disease and Marker
Marker Data
This pedigree is saved in
the file’TUTOR4.FAM’
76
Cyrillic 2.1
Disease and Marker Data
Now that the bars have been created you can toggle their display in the ‘Display Format’ dialog box.
•
Click on the ‘Display Format’ toolbar button to show the ‘Display Format’ dialog box.
•
Uncheck the ‘Barcodes’ check box.
While you are in the ‘Display Format’ dialog box, you can further manipulate the display.
For example:
Hiding
individuals and
data
•
Uncheck the ‘Surname,’ ‘Forenames,’ ‘Birth Date,’ and ‘Death Date’ check boxes.
•
Change the Identifier Type to ‘0000 –9999’
•
Click the ‘OK’ button to close the dialog and see the effect of these changes.
•
Return to the ‘Display Format’ dialog box and check the ‘Barcodes’ check box again before
continuing the tutorial.
You can show or hide all data using the ‘Display Format’ dialog options, but sometimes it is useful if
groups of individuals or their data are hidden to focus on a subset, especially in larger pedigrees.
Here are a few ways this can be achieved:
To hide spouses from the display:
•
Choose Options Hide partners from display
Cyrillic
77
Disease and Marker
Marker Data
•
Repeat to show the partners again.
To hide the affection status for all individuals:
•
Choose ‘Options I Clear symbols displayed’.
•
Repeat to switch this option off.
To hide a group of individuals:
Drag a selection rectangle around 2003-2006 and their offspring, 1003-1008.
•
Click the ‘Hide Individuals’ toolbar button.
•
Choose ‘Tools I Even spacing’ to clean up the display.
•
Now reverse the process by choosing ‘Edit I Undo move’ menu and clicking the ‘Hide
Individuals’ toolbar button again.
To hide a group of individual’s data:
•
Drag a selection rectangle around individuals 2000-2002 and their offspring, 1000-1002, then
<SHIFT>-click individuals 2005 and 2006 and their offspring, 1006-1008.
•
Choose ‘Data I Individual -> Hide/show info’.
78
Cyrillic 2.1
Disease and Marker Data
Note that you can
hide or show an
individual’s data by
checking ‘Hide Info’
in the ‘Additional
Items…’ panel of the
‘Individual Data’
dialog box
Repeat the process, for some or all individuals to show the data again.
Cyrillic
79
Linkage Analysis
7. Linkage analysis
Running MLINK
It is now straightforward to perform a standard linkage analysis with MLINK. For more complex data,
you will have to have a full understanding of the LINKAGE package and alter the definitions of
markers and disease loci appropriately.
•
Open your last saved file, or ‘TUTOR4.FAM’
•
‘Select File I Export -> MLINK...’ to display the ‘Select loci for export’ dialog box.
80
MLINK is part of the
LINKAGE suite of
programs. See
chapter 13 of the User
Guide for details of
how to obtain and
correctly reference it
in any published work
involving it’s use
Cyrillic 2.1
•
•
Linkage Analysis
Select the disease locus and DXS297 and then click the ‘OK’ button to display the ‘MLINK
Export’ dialog box.
Change the directory to your LINKAGE directory, making sure it contains MLINK.EXE,
UNKNOWN.EXE, and MAKEPED.EXE.
Cyrillic
81
Linkage Analysis
• Enter the MLINK export file name. The default is MLINK.PRE.
•
Select the ‘Rewrite pedigree file’ radio button, check the ‘Run program’ ‘Rewrite
locus file’ and ‘View outfile.dat’ check boxes and Click the ‘OK’ button to display the
first in a series of MLINK parameter dialog boxes.
• When prompted, enter the following data:
Recombination fraction 1:
0.0 (default)
Increment for rec fraction:
0.1
Stop value for rec fraction:
0.4
•
When asked if you want to enter any more values, click the’ NO’ button (default).
The analysis now proceeds and the results are saved in the file ‘OUTFILE.DAT’ in the
LINKAGE directory. The file is opened automatically in NOTEPAD (Windows’ default text
editor).
•
After reviewing the results, quit from NOTEPAD.
•
To analyze the second marker against the disease locus, repeat the MLINK export
command.
82
If a file already exists
with your chosen
export file name, you
will be prompted to
check if you want to
overwrite it. If you
want to overwrite it
press ‘OK’ to continue
or ‘Cancel’ to enter a
new file name.
Cyrillic Creates a
batch file in the
working directory
called ‘RUNML.BAT’.
This runs the
MAKEPED.EXE,
UNKNOWN.EXE, and
MLINK.EXE programs
in turn. If you are
using LINKAGE v5.20
or greater, it also runs
the LOOPS.EXE
program. The
RUNML.BAT file
remains after the
analysis so you can
view it if you are
curious about it’s
operation
Cyrillic 2.1
Linkage Analysis
Next Steps
This completes the tutorial. There are many other options available for drawing and annotating
pedigrees or for preparing output to LIPED, CriMap. SIMWALK, or GEDCOM. However, you have
covered most areas in outline and should be able to confidently draw your own pedigrees and enter
disease and marker data. The reference section in the Cyrillic 2.1.3 User Guide (on the CDROM)
covers all aspects of the program in detail. Explore it at your leisure as you become more familiar
with Cyrillic, and refer to it when you aren’t sure of a feature. If you still cant do what you want, you
can post e -mail to the cyrillic-user©cherwell.com mailing list, which has many experienced
subscribers. You can also get technical support by sending e-mail to the addresses listed for your
region at the front of this manual.
Cyrillic
83