1
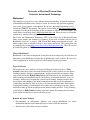
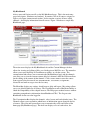
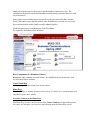
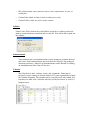
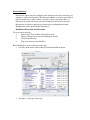
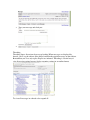
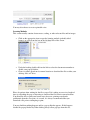
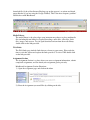
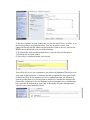
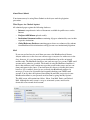
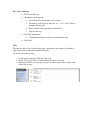
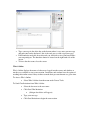
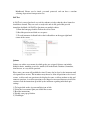
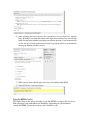
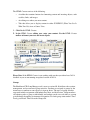
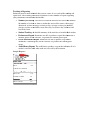
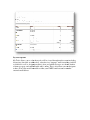
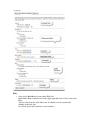
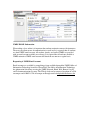
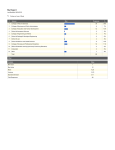
University of Maryland Eastern Shore
Center for Instructional Technology
STUDENT USER MANUAL
FOR BLACKBOARD
Created by Dr. Nicole A. Buzzetto
Buzzetto-More
More for, and in special partnership with, the UMES Center for
Instructional Technology.
June 18, 2008
University of Maryland Eastern Shore
Center for Instructional Technology
Welcome!
This manual was prepared to assist students in the understanding, orientation, and usage
of the Blackboard online course delivery system. If you have any questions regarding
your course, please contact your instructor. If you have any technical problems please
contact the UMES IT Department. They can be visited online at http://www.umes.edu/it/
or contacted via the phone by dialing x8324 on campus or 410-651-8324 off campus. The
email address for the help desk is [email protected]. Please be sure to review this
manual in its entirety before going forward.
The Center for Instructional Technology (CIT) at the University of Maryland Eastern
Shore assists faculty and students in e-learning. If you need assistance with the use of
Blackboard 6 feel free to stop by 1106 Wilson Hall during normal business hours. An
online request form is available to help us best satisfy your needs. The request form can
be completed by visiting http://www.umes.edu/webct/requesthelp.cfm. The CIT can also
be reached by phone at X7574
What is Blackboard?
Blackboard is the course management system that has been adopted by the University of
Maryland system. Blackboard enables the of multifaceted course websites. It is used as a
course supplement or for the creation of a totally online learning experience.
Types of Courses
The majority of course websites developed will help the instructor deliver a WebAssisted course that is fully classroom orientated with a course website used to deliver
learning materials, facilitate communications, and/or provide links to resources. Other
courses will follow the Hybrid Model which will blend face-to-face interaction with
online learning and customarily involve the delivery of curricular materials, access to
resources, submission of assignments, project based learning, learning activities that
foster higher order thinking, and online communications that may be asynchronous or
synchronous in nature. In order for a class to be considered hybrid some actual student
learning and learning assessment must occur online and a percentage of in-class time is
forfeited to make up for the weight put on the online learning activities. Using elearning
to the fullest are Fully-Online learning experiences where all learning and assessment
occurs online and the course does not meet in person.
Benefits of Course Websites
•
Dissemination of information- Students can consult Blackboard for course
information that they would normally have to retrieve from the instructor.
•
Students can work at their own pace and time.
•
Students can keep track of their grades and progress.
•
Extending Interactions- Faculty may use the Discussion Board or Chat feature to
encourage intellectual discourse, analysis, and group work. Students will be able to
interact with fellow students and instructors both publicly and giving students greater
access to instructors and fellow students.
•
Submission of Assignments- Students can submit assignments such as papers,
projects, portfolios, discussion postings, and WebPages. Grades can be checked
online. It is simple for both the student and the instructor to keep track of grades.
Assignments are easy to submit and students can be certain that the instructor has
received the assignment.
•
Assessment-Blackboard 6 supports multiple assessment regimes including portfolios
(to be added), quizzes, self tests, and surveys. Students can access their grades and
results regardless of time or place.
Before You Get Started
If you are working off campus or using a non-UMES computer:
Blackboard CE 6 is an environment that provides an online course management system
for the development of Web, Hybrid, and Web-assisted courses. Web browsers are used
as the interface for both the course designers and the course participants. Because
Blackboard utilizes browsers and the World Wide Web, it is platform independent and
accessible by a variety of hardware and software combinations. This feature allows you
to develop and modify your course from any Web-accessible location, making these
changes available to students immediately.
To access the Internet, you must have a computer and a designated Internet service
provider (ISP), providing dialup (phone modem) or broadband (DSL, cable, T1/LAN
services. Before access the course on Blackboard, you must determine whether or not
your browser will support the system. Not all browsers are supported for use with Bb
CE6; therefore, it is important that you make sure you are using a supported web browser
and it is configured properly to work with Bb CE6. The following are a list of browsers
that have been tested extensively and have been validated for use with Blackboard.
Microsoft Internet Explorer 7
Netscape 7.2
Netscape – earlier versions
AOL
Mozilla
Firefox 1.0.7 for Windows (US English)
Firefox 1.0.7 for Mac (US English)
Firefox 1.0. (Other versions)
Firefox 2 for Windows (US English)
Safari
Disable Pop-Up Blocker
Blackboard user a number of small browser windows that pop-up to deliver content and
in the building and delivery of courses.
Enable Cookies
Blackboard uses a cookie that track user sessions. It is important that users have cookies
enabled so that they can maintain their progress as they navigate through the course
website.
Enable Javascript
Blackboard 6 depends heavily on the use of Javascript and it is important to have Java
installed and enabled in order to do almost anything in Blackboard. Some versions of
Java are not validated for use with Blackboard 6.
Browser Check
Not all browsers are supported for use with Blackboard 6 and some browser setting may
need to be further enhanced and or changed.
To Check Your Browser’s Configuration
1). Go to your Blackboard Login Page
2). Before and after logging in, look for a Check Browser link which should be in
the top right corner of the browser window.
3). Click Check Browser
To Conduct A Browser Tune-Up Online visit the Blackboard Browser Tune-Up page at
http://www.Blackboard.com/tuneup. If browser problems persist visit the Tips and
Troubleshooting Page at
http://www.Blackboard.com/tuneup/viewpage?name=tuneup_browser_troubleshoot
Starting With Blackboard
Logging in to Blackboard
Blackboard is accessed from the UMES homepage at http://www.umes.edu click on My
UMES then select the blue box that says Blackboard Learning System. Clicking on the
icon takes you to the Blackboard help page. In the text boxes provided enter your UMES
user name and password.
My Blackboard
After a successful login you will see the My Blackboard page. This is the main entry
page for designers, instructors and students. It contains a list of all courses assigned to
login as a designer, instructor and student. It also contains a variety of boxes called
channels—that display information from all courses. Figure 1 illustrates a sample My
Blackboard page.
The main screen displays the My Blackboard tab and the Content Manager tab that
allows for viewing and editing of files saved in the private My Files area. The menu bar
allows you to enter the Help or Check Browser utilities, or exit the system. The
customization links allows you to customize the My Blackboard page and the channels
area allow you to view the custom content added to a channel, while the Edit icon allows
for the editing of the content of that channel. Click a course name to enter the course.
Icons appear below the name if new announcements, assessments, assignments,
discussion and mail messages since the last entry.
The Menu Bar displays my settings, check browser, help and logout. My settings allows
you to set global defaults for all courses. The Check Browser runs a Blackboard utility to
check the compatibility of the adopted browser. The Help opens another browser window
containing comprehensive information about Blackboard CE 6. The Log out exits
Blackboard for the user who logged in.
The Customization Bar displays the channels, color, layout, mail and calendar icons. The
Channels allows you to customize which boxes of information appear alongside the list
of courses. The color and layout allows you to customize the colors and layout of the
homepage (My Blackboard page). The mail icon displays a list of each course, the
number of mail messages for that course, and the number of unread messages. The
calendar icon displays a consolidated monthly calendar showing calendar entries for each
day of all courses.
Once you have successfully logged in you will see all your courses that have websites
listed. Click on the course that you wish to enter. From this area you can also see if you
have current calendar entries, and/or recently submitted grades.
On the left hand side of your Homepage is the Tool Menu
To expand the Tool Menu select the arrows
Basic Components of a Blackboard Course
Blackboard 6 has a number of useful features. It is unlikely that your instructor(s) will
use all of the features available.
Course Tools Map
Used to navigate to any section/ area of your course.
Home Page
The Home Page is starting point for your course. It clearly lays out the format and
contents for your course website.
Accessing Content on the Home Page
The Home Page screen is the first screen of the Course Content tool. Depending on how
the course was designed, you can access the following from the Home Page screen:
•
Files which contain course material, such as course requirements, lessons, or
reading lists.
•
Content Links which are links to items in other course tools.
•
Content Folders which are used to course content.
Syllabus
Under Course Tools click on the word Syllabus and choose to either open the file
from its current location or download and save the file. You will be able to print out
the syllabus.
Announcements
Your instructor may send announcements to alert students to pertinent due dates
and events. Some announcements may be delivered as Pop Ups (depending on
instructor preference), otherwise all announcements can be checked by clicking
on Announcements in the Course Tools area.
Calendar
The Calendar lists dates, readings, exams, and assignments. Links may be
provided to course content or external websites. It is your responsibility to check
the Calendar frequently. The calendar can be viewed by week or by month. You
can choose to either view a calendar with a key of all your courses or view by a
singular course.
Discussion Board
Discussions can be started by students or the instructor and can be viewed by all
students as well as the instructor. The Discussion Board is useful to get feedback
from the instructor, or other students, on topics you have questions about. A
Discussion is posted and anyone can add a comment to the board at any time.
Discussions are often a required part of your course participation and with
Blackboard 6 can be graded by the instructor(s).
Blackboard Discussion Area Directions
To create a new message
•
From Course Tools double click on Discussion
•
Choose a Discussion to enter by clicking on the title.
•
Click Create Message.
•
Type your message and click Post.
Read and Reply to a previously posted message.
• To read a discussion or enter a thread select the underlined subject
•
To reply to a message select reply
•
Type your message and click post
•
Threading
Threading shows discussions by message heading When messages are displayed by
threads, you’ll see the subject of the thread, and then the original message on that subject.
Beneath that you’ll see any replies. Replies are indented. Threading is a useful way to
view discussion posting because it helps organize postings in an outline format.
To view all messages in a thread select expand all
You may also choose to create a printable view
Learning Modules
This section usually contains lecture notes, reading, or other relevant files and/or images.
•
Click on the appropriate icon to open the learning module (probably titled
lectures) or select from the bar on the left hand side of the screen.
•
Under the heading double click on the link to select the document remember to
disable your pop up blocker.
Choose to either open from its current location or download the file to either your
desktop, disk, or F drive.
•
Please be patient when waiting for the file to open. If it is taking an excessive length of
time try refreshing the page or choosing to download the file from its current location.
You should be able to print your lecture notes; however, printing can often be
problematic from the view pane. As a result, it is always recommended that you
download a file prior to attempting to print..
You may find that nothing happens and/or a pop up blocker appears. If this happens
disable the pop up blocker by either clicking always allow pop ups from this site,
download file (if the yellow Internet Explorer pop up bar appears), or actions and check
popup blocker (if you are using the Google Toolbar). This is the most frequent “problem”
students have with Blackboard.
Media Library
The media library is the place where your instructor may choose to place multimedia
files including but not limited to Tegrity Recordings, audio files, video files, flash
files, images, and etcetera. To visit open/download an item from the media library
double click on the link provided.
Web Links
The Web Links page includes links that are relevant to your course. Please take the
time to visit this section and explore the links provided. To visit a URL double click
on the link provided.
Assignment Section
The Assignment Section is a place where you access assignment information, submit
completed assignments, and can check your assignment grades privately.
Blackboard Assignment Section Directions:
1) Open the assignment page and click on the inbox
2) Select the Assignment you would like by clicking on the title.
3) Do the assignment on your desktop and save the file in the F drive, on a disc, or on
the desktop giving it an appropriate name. You may be asked to insert your
submission directly into the submission box provided. If that is the case, activate the
HTML creator which will assist you with formatting.
4) To submit files-click attachment then browse select the file and click upload
5) Check the file and click submit.
6) You will get a confirmation that you can print
You will be able to see you assignment if you click on the Submitted Tab and to view
your grade and the instructor’s comments after the assignment has been graded click
on the Graded Tab. If you instructor has used a grading form then you will need to
open the grading form. It is also important to check to see whether the instructor has
returned the assignment to you for additional work and resubmission, or whether they
have uploaded an attachment of some form. Additionally, all grades throughout the
semester can be found under My Grades.
About Direct Submit
Your instructor may be using Direct Submit to check your work for plagiarism
prevention.
What Papers Are Checked Against
All submitted papers against the following databases:
•
Internet: comprehensive index of documents available for public access on the
Internet
•
ProQuest ABI/Inform updated weekly
•
Institutional document archives containing all papers submitted by users in their
respective institutions
•
Global Reference Database containing papers that were volunteered by students
from Blackboard client institutions to help prevent cross-institutional plagiarism.
Mail
If you can send and receive email then you can use the Blackboard mail feature.
Anyone with access to the class can send messages to anyone else with access to the
class; however, it is very important to note that Blackboard provides an internal
mailbox only. The Blackboard mail does not send messages to a persons UMES email
account unless otherwise specified. The benefit of using the Blackboard mailbox is
that is that mailboxes only contain messages that pertain to that course and are sent
from participants in the course. Your instructor may choose to disable this feature;
however, if it is enabled, please be sure to check your Blackboard mailbox for
messages. You are also responsible for frequently checking your UMES email
account. You also have the option of forwarding the mail that you receive in your
Blackboard mailbox to your personal email account by going into My Options.
The Mail screen will contain four folders: Inbox, Sent Mail, Drafts, and Deleted
Mail. Although the mail system is set up as an internal system, email can be
forwarded to an external email account.
To Create A Message
o Click Create Message
o Click Browse for Recipients
Select the names of individuals in the course
The name(s) will appear in either the “to”, “cc”, or “bcc” fields as
designated by the user
Enter a subject in the appropriately titled field
Type the message
o Click Add Attachments
Click this button only if you have an attachment to add
o Click Send
Chat
The chat area allows for real time discussions. An instructor may choose to schedule a
chat section with or without the whiteboard feature.
To start or join a chat session.
•
•
•
On the course homepage, click the ‘Chat’ icon.
On the ‘Chat’ page, choose a room in which to start a discussion.
In the new window, you can type messages for that everyone who is in the room
will be able to view.
•
•
•
Type a message in the white bar on the bottom where it says enter your message
and push enter on the keyboard. (this is the only way to send a typed message)
If the handraise mode has been activated you will need to raise your hand before
you can participate. The handraise button is located on the right hand side of the
screen.
To leave the chat room, close the screen
Who’s Online
Who’s Online displays the names of other users logged into the course and whether or
not they are available to start a conversation. Instructors and students have the option of
masking their online status if they wish not to make their presence known at a given time.
To Access Who’s Online
o Select Who’s Online from the menu under Course Tools.
To Send Chat Invitation from Who’s Online
o Select the box next to the user name
o Click Send Chat Invitation
(dialogue box below will appear)
o Type your message
o Click Send Invitation to begin the conversation
Additional Communications Tools Used in E-Learning
Blogs
Blogs are a running commentary on a particular subject or a form of journal/diary. They
often combine text, images, links to other blogs, Web pages, and other media. Many are
interactive enabling comments. Some types of blogs: Face book/MySpace/Friendster,
ArtLogs, PhotoBlogs, VideoBlogs (vlogs), PodCast Bogs (plogs), and social
bookmarking (sites like Delicious).
Wikis
Wikis are software or more commonly a Web page that gives users the ability to
collaboratively create, edit, link, build, and organize the content. Think collaborative and
community meaning making and Website design.
Social Bookmarking
Social Bookmarking involves collecting, organizing, storing, and sharing web links for
personal expression, referencing, and etcetera which can be an individual or collaborative
endeavor. When developed the collection creates new meaning for the links.
Vokis
Vokis are talking characters that individuals use to express themselves on the web
using their own voice. Users can customize their Voki to look like them or take on the
identity of lots of other types of characters… animals, monsters, anime etc.
Assessments
The assessment feature supports quizzes, self tests, and student surveys. Self tests are
assessments for which Students receive grades and feedback, though the grades are
not recorded in the Grade Book tool. Surveys are anonymous online evaluations for
which no grades are assigned. Quizzes are online assessments for which grades are
assigned. Quizzes can include multiple choice, matching, true false, fill in the blank,
or essay based questions. All questions with the exception of essay can be graded by
Blackboard. Exams can be timed, password protected, and can have a random
selecting of questions from question sets.
Self Test
A Self Test is created and used as a tool for students to judge what they have learned or
should have learned. They are used as study tools and are not graded but provide
immediate feedback. All Self Test Questions are multiple choice.
1) From the homepage double click on the self test icon
2) Read the question and click on a response
3) To read instructor feedback look to the feedback box on the upper right hand
corner of the screen
Quizzes
Quizzes are online assessments for which grades are assigned. Quizzes can include
multiple choice, matching, true false, jumbled, fill in the blank, calculated, formulaic,
short answer, or essay based questions.
Please note your exam will probably be timed. It may also be close by the instructor until
a designated date or time. The instructor may choose to allow all questions to be viewed
at once, to allow only one question to be displayed at once, to allow students to skip and
return to questions, or to allow questions to be skipped or answered but not revisited. Be
certain to read the instructions provided by the instructor regarding individual quiz
settings.
1) To begin click on the Assessment/Quiz icon or link.
2) Select the Assessment/ Quiz you would like to enter
3) Read the instructions
4) Disable your pop up blocker
5) Click Begin
6) After selecting the correct answer for a question be sure to click Save Answer/
Next. Warning if you click the button to the right only marked. Next you will skip
to the next question without answering your current question. Your instructor may
or may not give you the permission to return to questions. Please pay attention to
any pop up warning you may receive.
7) When you are done with the quiz select Save All and then click Finish
8) You will receive a success message
Using the HTML Creator
This feature may or may not be available to you. The HTML is a simple and easy to use
html editor that is not unlike Microsoft FrontPage. Depending on you institution’s
settings the HTML Creator may or may not be available to you.
The HTML Creator consists of the following:
•
A toolbar that contains buttons for formatting content and inserting objects, such
as tables, links, and images.
•
An editing area where you enter content.
•
Tabs that allow you to display content in either WYSIWYG (What You See Is
What You Get) view or Source View.
1. Click Enable HTML Creator.
2. In the HTML Creator editing area, enter your content. Use the HTML Creator
toolbar to format your text and insert objects.
Please Note: If the HTML Creator is not working with you then you either have JAVA
disabled or you are not running an updated version of JAVA.
Groups
The Blackboard CE Group Manager tool is new to version 6.0. It facilitates the creation,
management, and assessment of group activities. Students are assigned to groups by the
instructor or at random or can register via sign-up sheets. The types of group activities
supported include assignment work/submission, chats, and discussions. Group members
can submit work as a group or individually and students can be assessed either as a group
or individually depending on instructor designation. To check group status under Course
Tools go to Roster. Then select the Groups tab.
Tracking & Reporting
Instructors may be more informed then you are aware of as a result of the tracking and
report tools. The Tracking tool allows instructors to run a number of reports regarding
your performance and behavior that include:
•
Summary
mary of Activity
Activity:: an overview of student activities in a course that includes
the number of sessions or times a student has accessed the course, the average
duration of sessions, average sessions per day, average sessions per weekday,
average sessions on weekends, most ac
active
tive day, least active day, and most and
least active hour.
•
Student Tracking: A detailed summary of the activities of an individual student.
•
Performance Report: Instructors are able to produce a report that documents a
students grades for the semester. T
To
o produce the student grade report.
Grade Performance Report
Report: Instructors are able to produce a report that
documents a students grades for the semester. To produce the student grade
report.
Audit History Report: The audit history produces a report that indicates all of a
student’s activities with when work was assessed by the instructor.
•
•
Sample Reports:
My Tool Options
My Tools allows you to select how tools will be viewed throughout the course including
discussions
cussions (threaded or unthreaded), calendar view, language, mail forwarding (enabled
or disabled as well as designation choice), how and which messages are shown, number
of items per page, and enable/disable who’s online. This is also where you can designate
designa
to have all of your email forwarded to either your UMES email account or another
external email address
Help
•
Accesses the BlackBoard system online Help files.
In My Home Page usually located on the upper right hand side of the screen select
Help
You can select from the topic links some of which need to be expanded by
clicking on the plus sign
Or you can type in the search box a word of phrase
•
Searching for Keywords in Help Topics
o Click Help.
o In the Search text box, enter the keywords. If you are searching for
keywords, you can also use basic Boolean operators
You can combine operators and designate the order of search operations
by using parentheses ( ).
To search for exact phrases, use quotation marks (“ ”).
o Click the Submit Search icon. Search results appear in order of relevance.
o Click the help topic that you want to view.
o To return to the search results, click the Back icon.
The help tool is quite useful and should be used as a quick and easy reference; however,
it does not contain the illustrations or the details included within this text.
An Additional note about receiving help.
Mr. Kaye Pinhey with the Center for Instructional Technology serves as the University of Maryland Eastern
Shore Blackboard administrator. His office is in 1106 Wilson Hall and he is available during normal
business hours. Mr. Pinhey can be reached directly at [email protected] (preferred) or at x7574. If you
find that you are having technical problems not related to the use of Blackboard then you should contact the
UMES Department of Information Technology which is located in Waters Hall. You will also find their
staff to be accommodating.
Content Manager
You have two tabs in the My Home Page area: My Blackboard and Content Manager. All
of the activities we have discussed thus far have taken place in the My Blackboard area.
The Content Manager tool is extremely useful for file and folder management.
From here you can
•
•
•
•
•
•
•
•
•
•
•
•
Get Files.
Copy Files and Folders.
Move Files and Folders.
Create HTML Files.
Edit HTML Files.
Create Folders.
Rename Files and Folders.
Edit File Properties.
Download Files.
Zip/Unzip Files And Folders.
Delete Files and Folders.
Navigate Folders.
UMES EMAIL Information
When taking a class online it is important that students maintain contact with instructors.
The most expedient means of communication is email and it is expected that all students
use their UMES email account. All students, faculty, and staff of UMES are provided
with an email account available at no charge. It is required that all students enrolled at
UMES maintain a UMES email account and check the account on a regular basis.
Requesting A UMES Email Account
Email accounts are available by completing a form available through the UMES Office of
Information Technology located in Waters Hall. The Office of Information Technology
has information/ directions on using the UMES Network, Hawk Web, Remote Log In,
and Telecommunications Systems. The IT help desk can be contacted via phone at x8324
on campus and 410-651-8324 off campus or through email at [email protected]