1
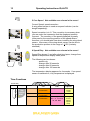
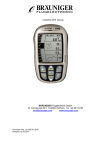
IQ-ALTO Bräuniger GmbH Dr. Karl Slevogt Str. 5 D-82362 Weilheim www.brauniger.com 1 Operating Instructions IQ-ALTO Contents Important advise see page 17 Operating Philosophy ................................................. 1 Operating Philosophy ................................................................................................. 2 Set-Mode .................................................................................................................... 2 Option-Mode ............................................................................................................... 2 Key Functions ............................................................................................................. 3 Elements of the Display .............................................................................................. 3 Switching the Instrument ON/OFF .............................................................................. 4 Switching Off .............................................................................................................. 4 Quick Operating Instructions ...................................................................................... 5 The Altimeter .............................................................................................................. 6 General ....................................................................................................................... 6 Direct functions ....................................................................................................... 7 Set-Mode ALT1 ....................................................................................................... 7 Option-Mode ALT1 .................................................................................................. 7 Set-Mode ALT2 ....................................................................................................... 8 Option-Mode ALT2 .................................................................................................. 8 Analogue Vario-Beam Display .................................................................................... 9 Direct functions ..................................................................................................... 10 Vario Set-Mode ..................................................................................................... 10 Vario Option-Mode ................................................................................................ 10 Sink Alarm ................................................................................................................ 11 Direct functions ..................................................................................................... 12 Sink Alarm Set-Mode ............................................................................................ 12 Sink Alarm Option-Mode ....................................................................................... 12 Time Functions ......................................................................................................... 13 Direct functions ..................................................................................................... 14 Set-Mode TIME ..................................................................................................... 14 Option-Mode TIME ................................................................................................ 14 Flight Recording and Logbook .................................................................................. 15 Logbook displays .................................................................................................. 15 Batteries ................................................................................................................... 15 Error messages ........................................................................................................ 15 Maintenance and Care ............................................................................................. 16 Water Damage ...................................................................................................... 16 Technical Data.......................................................................................................... 16 Guarantee Limitation: ............................................................................................... 17 Important advise see page 17 2 Operating Instructions IQ-ALTO Operating Philosophy Bräuniger GmbH’s philosophy is to produce user-friendly instruments. A quick press of each key lets you access the main functions of the instrument. Hold a key down for about three seconds to call up Set-Mode for that function. From there, a further three-second press will call up Option-Mode for that key. In Set-Mode and Option-Mode, the keys labeled START/STOP/RESET and CLEAR-ALT become Arrow Keys. With these you can change the display fields, which flash to indicate they are changeable. After making changes in Set-Mode, use a short press to return to Run-Mode or wait three seconds. Run-Mode During normal use the instrument is in Run-Mode. In this mode the instrument shows sink or climb rate, airspeed (if the optional sensor is plugged in) and/or temperature, altitude, altitude difference, time, battery condition and the activated acoustic signals. When in this mode, all the main functions can be called up by briefly pressing the keys. volume of the acoustic signal (main Variometer) ON/OFF of the sink warning alarm (main sink alarm warning) change of height displays (main altimeter) reset height difference (main altimeter) START/STOP of stop watch (main time functions) change between TIME-CHRONO and MEMO displays (main time functions) Set-Mode To enter Set-Mode for a given key, press and hold the key for about three seconds; SET will appear in the lower portion of the display. The relevant display field will flash and can be altered with the Arrow Keys. After making your changes, either wait three seconds or use a short press to return to Run-Mode. A three-second press when in Set-Mode will take you to Option-Mode. Option-Mode When in Set-Mode, press the same key again for three seconds to bring the instrument into Option-Mode; OPT will appear in the lower portion of the display. Here you can change the settings of various values (see more details below). Again, the relevant field will flash and can be altered with the arrow keys. Use a short press to keep your changes and go on to the next option; when you reach the last option a short press will cycle the instrument back to the first option. When you are finished setting the options, wait three seconds to return to Run-Mode. Attention! Even there is shown a speed display this function is not available as there is no speed port for an extern speed sensor! 3 Operating Instructions IQ-ALTO Key Functions Acoustics keys Change Value keys Height and Memo keys Elements of the Display Analogue vario Sink Warning On / OFF Integrated / digital Vario Barometric Height 1 or Height 2 only Temperature Active Recording Vario Volume Relative Height 3 Time Functions Condition of Battery 4 Operating Instructions IQ-ALTO Switching the Instrument ON/OFF Date The date and time are displayed when the instrument is off. To turn it on, press and hold the TIME/CHRONO/MEMO Key until you hear a beep, and then release it. After a short display test you will see the Start up Screen. Time t Battery condition 5= full 0= empty The Startup Screen shows the serial number, the battery condition and the Internal Serial number date. The analog scale on the left shows the battery charge. Day, month and year Switching Off To switch the instrument OFF without setting the time, Press and hold the TIME/CHRONO/MEMO Key for about seven seconds. During the shutdown process, the Set Menu for time will appear – unless a barogram was recorded for the current flight Continue to hold the key down while the instrument counts down from 3 to 1. You will hear a beep and see OFF appear on the display when the process is complete. 5 Operating Instructions IQ-ALTO Quick Operating Instructions Quick operating instructions – direct choice keys Quick touch in RUN Long hold in RUN mode mode CHRONO Reset CHRONO when Start -Stop running in CHRONO Functions in SET mode Change up Functions in OPTION mode Choice/change up Change down Choice/change down Clear ALT 3 Key 3s Key 3s Key short Audio keys Key Direct choice Audio change Volume Set Option A-Int Unit 6 levels Basic damping 1,2,3,4 VARIO m/s, ft/minx100 Sink alarm Audio Unit TEMP °C, °F On/Off Sink alarm setting Setting point with keys Choice of function ALT 1 ALT 2 Corr Temp Correct Sensor Audio Audio starting point 0.02...0.4 m/s Unit Speed km/h, kts, mph Audio Pitch Max. at about 3 to 11 m/s ASI On/Off StALL Stall speed Corr SPEED Correct Speed 50..100.. 150 -8.0 to +7.9 Key 3s Choice of function keys Key d-Int Integration time 1 to 30 s Key 3s Set Altitude setting ALT 1 Altitude setting ALT 2 SPEED diSP Change speed display Temp 4s, Speed 30s, 60s, 120s, Key short Option Unit Unit Corr Alti 1 m, ft Pressure units QNH hPa, inHg Sensor correction -47.9 to 47.9 Unit REL/AbS ALT2 (m/ft) Mode A2 6 Operating Instructions IQ-ALTO Key 3s Key 3s Key 3s when Only no recording is active On/Off Key Key Choice of function key TIME CHRONO MEMO Off Set Option Off with confirmation Time, Year, Date Date format 12/24 Off with confirmation Off with confirmation Clear Memo with confirmation CL The Altimeter General How does an altimeter function? An altimeter is really a barograph because it doesn’t directly measure height, but air pressure. Height is calculated from changes in air pressure. The pressure at sea level is used as zero height for the calculation of real height (after the international height formula). Why does pressure change with height? Pressure at any given point on the earth is created by the weight of air in the atmosphere above it. Therefore, pressure reduces with height – there is less air above you. A change in pressure of one millibar (mb) at 500 metres above sea level is a height difference of about 8 metres. In practice, it is not as simple as that because of the many other factors that influence air pressure. On a stable day, temperature induced differences of 1mb mean a height difference of +/-10 metres. Depending on the weather, air pressure at sea level (QNH) may vary from 950 mb to 1050 mb. In order to eliminate the influence of the weather, the altimeter has to be calibrated at certain intervals. This means the altimeter has to be set to a known height and show this height. During rapid weather changes e.g. the passage of a cold front, the air pressure can change by 5 mb during a day. This means a height difference of 40 metres! Another way to calibrate an altimeter is to set it to QNH. What is QNH? General air traffic needs a common zero point. This means that at a certain height all aircraft show the same height on the altimeter. The reference point for this is QNH. The QNH is the actual pressure calculated back to sea level (1hPa=1mb). It is calculated several times a day and can be taken from the weather forecast for aviation or it may be requested from airfields. 7 Operating Instructions IQ-ALTO Key 3s Setting options Key Key 3s Function keys Set ALT 1 Height ALT 1 ALT 2 Height ALT 2 Key short Option Unit Unit Corr Alti 1 m, ft QNH hPa, inHg Sensor correction -47.9 to 47.9 Unit REL/AbS ALT2 (m/ft) Mode A2 Direct functions The ALT1/ALT2 key changes the display between the ALT1 and ALT2 displays. With the Clear ALT3 key the height difference can be set back to 0. The ALT3 display shows the height difference occurring since the last reset or since the instrument was switched on. Set-Mode ALT1 Press the Altitude Key for three seconds during ALT1 display to bring the instrument into ALT1 Set-Mode. Now use the arrow keys to set your current altitude.. 3s When in ALT1 Set-Mode, the height within the QNH range can be set. The QNH range is the maximum or minimum height you can be at the prevailing pressure. 3s Option-Mode ALT1 Further long pressure on the Set-Mode key brings the instrument into Option-Mode. 1 Unit The units of height to be displayed are set here. 2 Unit For the ALT1 value hPa or inHg pressure units can be chosen. 8 Operating Instructions IQ-ALTO 3 Corr Pressure corrections can be made in this mode. This may become necessary when the pressure sensor, after several years use, is no longer exact. The maximum correction possible is +/- 47.9 hPa. A short press of the Altitude Key cycles you back to Option 1. Set-Mode ALT2 Long pressure on the ALT1/ALT2 key during the ALT2 display, brings the instrument into Altitude2 (Height 2) Set-Mode. 3s In ALT2 Set-Mode a reference height can be set (e.g. the relative height to a goal or waypoint). In order to do this ALT2 must be set to relative height. 3s Option-Mode ALT2 Further long pressure on the Set-Mode key brings the instrument into Option-Mode. 1 Unit The units of height to be displayed are set here. 2 Rel Relative height, ALT2 only For the ALT2 value, relative or absolute values can be chosen. If you would like to see height in meters and feet, change the display to absolute. In Run-Mode ALT1 and ALT2 are of equal size. You can set one of the values to feet. 9 Operating Instructions IQ-ALTO IMPORTANT: If you have chosen Abs for ALT2 in Option Mode, ALT1 and ALT2 are linked together. This means that there is only one Set-Mode for ALT1 and ALT2. Option-Mode remains separate. To leave this mode, change the setting „Rel“ ALT2 in Option Mode to „Abs“. To call up ALT2 in Option- Mode you have to switch, in Run-Mode, to ALT2 and long press the ALT1/ALT2 key twice. Variometer The Variometer, the most important instrument, can be adjusted to the pilots’ requirements. Key 3s Key 3s Short key Audio keys Key Direct choice Audio setting Volume 6 levels Set A-Int Basic damping 1,2,3,4 Option Unit VARIO m/s, ft/minx100 d-Int Integration time 1 to 30s Audio Audio starting point 0.02...0.4 m/s Audio Pitch Max. at about 3 to 11 m/s ASI On/Off Analogue Vario-Beam Display Each graduation on the beam scale equals 0.2 m/s. Up to 5 m/s the beam fills up from the centre. When the climb exceeds 5 m/s, the climb is displayed in reverse e.g. the display at 5 m/s is full and it begins to clear from the middle. Climb at 3.2m/s Climb at 5m/s Climb at 6.6m/s 10 Operating Instructions IQ-ALTO Direct functions The internal loudspeaker volume is set with this key. There are six levels ranging from zero volume to maximum and back to zero. The volume is shown in three stages in the display. Level 0 No Symbol Levels 1 and 2 Levels 3 and 4 Levels 5 and 6 When a new level is set there is a time lag of about 0.5 seconds before it activates. This also applies when switching off from level 6 to level 0. Vario Set-Mode 3s Press the Vario Key for three seconds to put the instrument into Vario Set-Mode. A-Int = Analogue Integrator The basic damping of the Variometer is set here. Four levels are displayed. The damping corresponds with the following times. Level Damping about 1 0.5s 2 1s 3 2s 4 3s This setting influences all further filters. It can also be used as a turbulence filter. Still air =1 Turbulent air = 3 to 4 Vario Option-Mode Further long pressure on this key in the Set-Mode brings the instrument into Option-Mode. 1 Unit Set units Set the required unit for the Vario display here. The options are m/s or ft/minx100. 2 d-Int Digital Integrator The digital integrator can be set from 1s to 30s. 11 Operating Instructions IQ-ALTO 3 Audio Audio threshold (dead band) The audio starting point for climbing is set here. The scale is logarithmic. The level can be set from 0.02 m/s to 0.4 m/s. The example on the left shows a setting of 0.06m/s. This means the acoustics start when a climb rate of 0.06 m/s is achieved. 4 Audio Pitch Audio Pitch The range of the peep frequency can be set to different climb rates. Maximum peep frequency Pee p frequency Start of audio output 5 m/s 5 ASI 10 m/s Vario Audio Scale Indication The audio scale indicator can be set to on or off (ON/OFF). The audio scale indicator switches the rate of the peep tone from 50%/50% to 65%/35%, each time the vario reaches an uneven number. 0 ... 0.99 m/s 1.00 ... 1.99 m/s 2.00 ... 2.99 m/s 3.00 ... 3.99 and so on ... Sink Alarm Key 3s 50%/50% 65%/35% 50%/50% 65%/35% Key 3s Key short Audio keys Key Direct choice Audiochanges Sink alarm On/Off Set Audio Sink alarm Setting of start level with keys Option Unit TEMP °C, °F Corr Correct temp sensor -8.0 to+7.9 Unit Speed km/h, kts, mph StALL Stall speed Corr SPEED Correct speed 50..100.. 150 SPEED diSP Display change Temp 4s, Speed 30s, 60s, 120s, 12 Operating Instructions IQ-ALTO Direct functions The sink alarm is switched on or off with this key. The sink alarm sounds when a certain sink speed is exceeded. 3s Sink Alarm Set-Mode Further long pressure on the sink key brings the instrument into Alarm Set-Mode. The speed at which the alarm activates can be set here. 3s Sink Alarm Option-Mode Further long pressure on this key in the Set-Mode brings the instrument into Option-Mode. 1 Unit The units of temperature can be set here. There is a choice between °C or °F. 2 Corr Correction Temperature deviation can be corrected here. The maximum correction values are approximately –8.0 to +7.9°C. This correction is necessary when it is felt the temperature sensor is wrong. However, remember how difficult it is to measure temperature exactly. The temperature display has a certain delay because the temperature sensor is measuring the temperature inside the instrument. 3 Unit ( not available for speed ) Units for the speed display are chosen here. The choices are km/h or kts and mph. 4 Stall Not available even shown in the menu ! The stall alarm sounds when flying too slowly results in an interruption to the laminar flow. 13 Operating Instructions IQ-ALTO 5 Corr Speed Not available even shown in the menu! Correct Speed, speed correction A wing wheel sensor is used as a speed indicator (can be bought separately). Speed correction is in %. This correction is necessary when you are under the impression that the displayed speed is incorrect. The accuracy of the speed displayed is greatly influenced by the mounting position of the speed sensor, therefore, you should take care when installing the wing wheel sensor. Inaccuracy of the wing wheel sensor can be due to the production process in the range of +2.5% (industry standard). 6 Speed Disp Not available even shown in the menu! Speed Disp shows if, and after what time lapse, change from speed to temperature display takes place. The following can be chosen: - speed only - change after 30 seconds - change after 60 seconds - change after 120 seconds The temperature display appears for 4 seconds. If no speed sensor is switched on, only temperature is displayed. Time Functions On/Off Key Key Function key Off Set Option TIME Off with confirmation Time, year and date Date format 12/24 CHRONO Off with confirmation Off with confirmation Recording interval Off, 1, 5, 15, Clear All, del. Baro Setting to record; height, speed, temp MEMO 14 Operating Instructions IQ-ALTO Direct functions Repeated pressing of the TIME/CHRONO/MEMO key (called TIME key in future), changes the time, stop watch and memory displays. When in Time or Chrono display, a short press on the START/STOP/RESET key starts the stop watch. A longer press on the same key resets the stop watch to zero. During the MEMO display you can change between the actual flight and stored flights using the arrow key. The actual flight is not disrupted. In MEMO display, when barograph recording is enabled [Model IQ-ONE+ only], the instrument will revert automatically after twelve seconds to TIME display. Set-Mode TIME 3s Further long pressure on the TIME key brings the instrument into Time-Set-Mode. The Time-Set-Mode is only active when no flight recording takes place. Please note, when switching off, the longer hold will take you into this menu, even if no flight recording was active. Time and date can be set here using the arrow keys. Pressing the TIME key briefly allows you to choose which values to set. This data is not visible on the startup page. Note: Starting to switch off the instrument will take you into Time Set-Mode. In order to switch off without setting the time, do not release the key, but continue to hold it down while the instrument counts down from 3 to 1. 3s Option-Mode TIME Further long pressure on the key in Set-Mode brings the instrument into Option-Mode. The choice is between 24h und 12h (am/pm) being displayed. 15 Operating Instructions IQ-ALTO Flight Recording and Logbook IQ-ALTO records up to 40 flights ( max./ min values only ) Logbook displays Graphic displays of maximum climb/sink Maximum change in climb/sink values Maximum height reached Flight number. A Small r indicates that a barogram was recorded for this flight too. Date of flight Flight time Battery, volume and sink alarm display (independent of record flight) To record the flight as valid, in the logbook and on a barogram, flight acceptance must be present. A flight will be accepted when a height difference of more than plus or minus 30m has been recognized and the recorded flying time is more than 2 minutes. Batteries 2 x Alkaline Type size AA, 1.5V or 2 x rechargeable NiCd or NiMh accu size AA1,2 V Error messages Lo Batt Battery voltage less than 2.1 V Please change batteries Lo Temperature is less than -50° C Hi Temperature is higher than 76° C Err Temperature sensor is faulty AdErr AD-converter for measuring pressure is faulty If the instrument is showing one of this error messages, send the instrument with a description of the fault, to your BRÄUNIGER dealer or direct to BRÄUNIGER GMBH. 16 Operating Instructions IQ-ALTO Maintenance and Care Water Damage Water damage invalidates the guarantee. If the instrument suffers water damage, proceed as follows. Remove the batteries at once. Rinse the instrument with fresh warm water. Dry the instrument (e.g. warm air, hair dryer). Send the instrument, as soon as possible, to your BRÄUNIGER dealer or direct to BRÄUNIGER GMBH for testing. Warning: NEVER dry the instrument in a microwave oven. Malfunction Should you have a problem when running the instrument, remove the batteries for five minutes. When the batteries are returned, the instrument carries out a self test. If the problem persists send the instrument, with a description of the problem, to your BRÄUNIGER dealer or direct to BRÄUNIGER GMBH. Technical Data Size: 138 x 74 x 23 mm ( 4-3/8 x 2-3/4 x 13/16 inches ) Weight: 178 grams ( 6.278 ounces ) with 2 alkaline batteries, without mountings Power Supply: 2 x AA alkaline batteries or NiMH batteries Battery Life: >250 hours with 2 alkaline batteries Altimeter: max 11,500 m (37,700 feet ), 1 m ( 3 ft ) steps Variometer: analog ± 10 m/s ( 2,000 ft/min ), 0.2 m/s, ( 40 ft/min) steps digital ± 96 m/s (19,200 ft/min), 0.1 m/s steps (10 ft/min ) Integrator (Vario Averager): adjustable from 1 sec to 30 sec Temperature Display: -50°C to 76°C ( -72.4°F to 168.8°F) display: °F or °C resolution: 0.1°C (0.1°F ) accuracy: ± 0.5°C, calibration possible Time Functions: real time clock (12h/24h) with date stop watch up to 99 hrs 59 min 59 sec automatic calendar, automatic logging Number of Logged Flights: 40 with date, start time, flying time, max. altitude and min/max vario Operating Temperature Range: 5°F to 140°F (-15°C to 60°C) Storage Temperature Range: -22°F to 158°F (-30°C to 70°C) The technical data may be changed at any time. 17 Operating Instructions IQ-ALTO Guarantee Limitation: In rare cases it may happen that the instrument does not provide any data at all, or the data is incorrect. Brauniger GmbH is not responsible for any damages due to the incorrect functioning of the instrument. Responsibility for ensuring safe flight lies with the pilot alone. Important advise using the flight recorder Sometimes it may happen the flight memory shows curious values after switching on the IQ-ALTO. During the boot and auto- test sequence it may happen that a wrong vario or altimeter value will be memorised at the flight memory. ( please check the memo mode ) This wrong values automatically will be erased during correcting ( setting ) the A1 ( height above sea level ) to the correct value. We highly recommend to correct A1 after every switching on the instrument. If A1 was corrected just some minutes before, but the unit was switched off meanwhile, it is sufficient to quit this value by a long term pressing the A1/A2 button. Now the flight memory was set to “zero” for the new flight. This procedure should be done before every flight!