1
Automatic Drip Irrigation
User Manual
The following is the user manual. It covers complete details on various parts of the product how to count
each part and how to assemble them. Also at the end of this we have given a video link which can be
viewed if there is any problem with the assembly.
Parts
Following parts are used with the system:
Part 1: Base Stand
Part 2: Connecting PVC pipe (1.5 feet / 1feet / 0.25feet)
Part 3: Elbow
Part 4: Valve
Part 5: Coupler
Part 6: Pipe
Part 9: T-Section
Part 7: Shower
Part 10: Pump
Part 8: 2 Way threaded nipple
Part 11: 1 side Threaded nipple
Part 12: Timer (initial Model)
Part 1: Base Stand: Every potted plant needs one such base. The pot is placed on the platform shown in
the picture. Each part has a T section attached permanently to it which is used to make the stand.
Part 2: Connecting PVC Pipe: These are the PVC pipes used to make the stand through which the water
pipe shall go. They are available in three different sizes 0.25feet, 1foot and 1.5feet.
Part 3: Elbow: This is used to make 90degree turn.
Part 4: Valve: This is used to control the amount of water flowing.
Part 5: Coupler: These are used to connect two pipes together.
Part 6: Pipe: This is used to flow the water. It is available in different lengths as per the user requirements.
Part 7: Shower: This is used to water the plants.
Part 8: 2 Way threaded Nipple: This is used to connect various parts together. It has threads on both the
sides.
Part 9: T-section: This splits the flow of water into two different directions.
Part 10: Pump: It is used to flow water with pressure.
Part 11: 1 side threaded Nipple: This is used to connect various parts together. It has one side threads and
other side is such that it can be directly put into pipes.
Part 12: Timer: It is used to control the on and off duration of the pump.
Part 13: Tank: This is used to supply the water. It shall be connected with automatic system to fill the tank
when empty.
Part Dimensions
S. No.
Part
1
2
3
Wooden Base Stand
T section on the base
Connecting pipes 1
(smallest)
Connecting pipe 2
(Medium)
Connecting pipe 3
(large)
Elbow
Valve
Coupler
Pipe
2 way threaded nipple
1 way threaded nipple
T section
4
5
6
7
8
9
10
11
12
Dimension
(mm)
458 X 305
ID 40
L 77
ID 40
L 305
ID 40
L 458
ID 40
ID 40
ID 15
ID 40
ID 10
ID 15
ID 15
ID 15
How to choose the parts?
Due to various parts one must first decide how many parts he/she needs for his/ her garden. Just follow the
following easy steps and you can find out the number of each part required.
1.) Count the number of pots in your garden.
2.) Calculate the length and breadth of the roof top covered by pots in feet.
(Assuming the pots are placed near the boundary only)
Steps to calculate each part?
a.) Base Stand = Number of Pots
b.) Connecting PVC Pipe = Height of plant (may vary from plant to plant, we assumed each plant
uses only 3, one each of 1.5feet, 1foot and 0.25feet)
c.) Elbow = 2 X Number of Pots
d.) Valve = Number of Pots
e.) Coupler = Number of connecting pipes(1feet +1.5feet) - 1
f.) Shower = Number of Pots
g.) 2 Way threaded Nipple = Number of pots
h.) T –section = Number of Pots
i.) 1 Way Threaded Nipple = 4 X Number of Pots
j.) Pumps: Number of Pots / 5 (Rounded off to nearest number)
k.) Pipe: As per the requirements {usually (Length + Breadth of terrace covered by pots) + (5X
number of pots) }
l.) Timer: To run the pump timely.
How to set the timer?
Timer basically turns the pump on/off based on the timing set by the user.
There are 4 buttons on the timer:
1.
2.
3.
4.
Reset Button: This button resets the timer and starts the setup process.
Enter Button: Confirming the time user specified.
Hours Button: Increase the hour input by 1 unit.
Minutes Button: Increase the minute input by 1 unit.
Procedure:
i.
The user first presses the reset button to enter setup mode.
ii.
Next, he/she specifies the time the pump should remain on (in hrs:min). This can be done by
pressing the hours and minutes button, which increases by 1 unit on each press, until the
required time is displayed.
iii.
Now, press the enter button to confirm the on timing.
iv.
Next, the user should set the off timing for the pump in a similar way as described in step (ii).
v.
Finally press the enter button to set the timer running.
vi.
The timer can be reset at any period by pressing the reset button.
How to connect each part?
Follow these simple steps and you get your system ready very quickly.
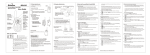
Making the Stand
1. Take one Base stand.
2. Connect the PVC pipe on to the T section on the Base Stand.
3. Connect a coupler to the on the top of PVC pipe and again connect the pipe to increase the
height.
4. Repeat the step 3 till desired height is achieved.
5. On the top of final Pipe connect the Elbow.
6. Connect the PVC pipe to the elbow horizontally.
7. Connect another elbow at the end of the PVC pipe.
8. Your stand is now ready. Make as many stand as required.
Complete Picture of Stand
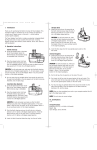
Pipe connection
1. Take pipe and cut it such that it is sufficient to reach top of the stand from inside the PVC pipes.
2. Attach 1 way threaded nipple on both the ends of the pipe after inserting the pipe into the
stand.
3. Now connect the shower to the nipple on the top portion.
4. Connect the valve to another end of the nipple which is at the bottom of stand.
5. Connect 2 ways threaded nipple to the value’s other end.
6. Connect that nipple to the T section. Also using two 1 way threaded nipple connect the T
section to the main line of water supply.
7. Your stand is now completely ready. Put the pot on the base plate and enjoy without worrying
about watering the plants.
Complete Assembly along with the pipe fitting.
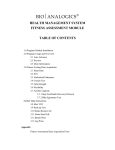
Final Assembly
Now place each pot on the base of each stand. And using the pipe which is left, connect all the T-sections in
series that is one after another using different sizes as per the distance between two plants.
For the first and the last pot we will be left with one end of the T section not connected. So, connect the
end of the first pot to the outlet of the pump from the tank.
For the end of the last pot using pipe connect it to the nipple which is at the top of the tank.
For using the timer, connect the timer input to a standard power supply socket and the timer output to the
pump.
How to set the value of the valve as per water requirements?
The given below is the table of amount of water required by the plant during various seasons. Also, while
connecting the valve set the knob of it according to the value given in the table as per the plant.
Water requirement of plants:
Type of plant
Hot weather *
Warm weather* Cold weather*
Low shrubs(2-3feet)
0.85
0.55
0.3
Shrubs(3-5 feet)
1
0.65
0.35
Flowers
0.7
0.45
0.2
Vegetables
1.3
0.85
0.45
Small plants
0.35
0.5
0.55
*Gallons per day
Valve Positions for different plants:
Type of plant
Valve position
Low shrubs(22
3feet)
Shrubs(3-5 feet)
3
Flowers
2
Vegetables
4
Small plants
1
Timer Settings for different weathers:
Weather
Hot
Warm
Cold
On Time
15min
10min
5min
Off Time
23hr45min 23hr50min 23hr55min
To watch the Video how to on how to assemble please follow the link given below:
Link: http://www.youtube.com/watch?v=tQAoTXG3Ie0