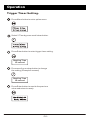
1
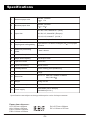
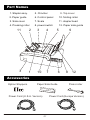
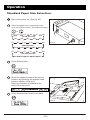
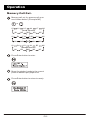
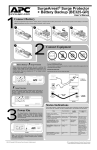
Instruction Manual
Contents
Introduction
P.2
Safety Precautions
P.3
Safety Precautions
P.4
Usage Precautions
P.5
Specifications
P.6
Part Names
P.7
Accessories
P.7
Control Panel
P.8
Installation
P.9
P.10-19
Operation
Standard Paper Size Selection.
P.10
Non Standard Paper Size Data Input.
P.11
Memory Call Out.
P.12
Trigger Timer Setting.
P.13
Correcting Folding or Stapling Misalignment.
P.14-15
Factory Default Setting.
P.16
Serial Number indication.
P.17
Booklet Making.
P.18
Counter Reset.
P.19
Emergency Stop.
P.19
Remove Jammed Staple From Stapler Head.
P.19
Error Message
P.20
Daily Care
P.20
P.1
Introduction
Thank you for your purchase of this Booklet Maker.
To ensure correct usage, please read this instruction manual thoroughly, especially the
section Safety Precautions. After reading, please keep this instruction manual handy
for future reference.
P.2
Safety Precautions
Always observe the cautions and warnings given below to prevent personal injury or property
damage.
The degree of danger and damage that could occur is indicated on two levels by the
following marks.
!
WARNING : Ignoring this mark could result in the possibility of serious injury or
even death.
!
CAUTION
: Ignoring this mark could result in the possibility of injury or physical
damage.
The following graphic symbols indicate the various types of action to be performed or
avoided.
This graphic symbol indicates a forbidden action.
means "Do not disassemble."
means "Do not touch."
This graphic symbol indicates actions that must be performed.
means "Disconnect the power plug."
! WARNING:
Do not place metal objects or vessels containing liquids on top of the unit. The entry of any
metal object or liquid could result in fire or electrical shock.
Do not insert any metal or easily-combustible object inside this unit. This could result in fire
or electrical shock.
Do not touch or insert foreign objects into any rotating part during operation. This could
result in injury.
Do not remove the cover or back panel. This unit contains high-voltage components that
could cause electrical shock.
Do not disassemble, modify or repair this unit. There is a danger of fire, electrical shock or
injury. Contact your dealer when repairs are necessary.
Use only the power supply voltage specified on the main nameplate. Using other voltages
could result in fire or electrical shock.
Keep this unit and the power cord away from heaters and heater vents. Excessive heat could
melt the cover or power cord covering, and result in fire or electrical shock.
(Continued on the next page)
P.3
Safety Precautions
(Continues)
Make sure that the combined power consumption of the appliances to be connected does not
exceed the capacity rating of the power outlets or plug receptacles. Exceeding the capacity
rating could cause the power outlets, plug receptacles, or power extension cords to overheat
and catch fire.
Remove any dust that accumulates on the power plug prongs and the surface of the plug from
which the prongs extend. Accumulated dust could result in fire.
If any foreign object such as metal or liquid should enter this unit, immediately turn the unit
off at the power switch and disconnect the power plug from the power outlet. Failure to do
so could result in fire or electrical shock. Contact your dealer immediately.
Do not damage the power cord or power plug. (Do not scratch, alter, bend, twist, pull or place
heavy objects on the power cord or power plug.)
This could result in damage, fire or electrical shock.
Always grip the plug when disconnecting the power plug from the power outlet. Forcibly
pulling the power cord could cause damage, resulting in fire or electrical shock.
Do not handle the power plug with wet hands. This could result in electrical shock.
Before cleaning this unit, turn the unit off at the power switch and disconnect the power plug
from the power outlet. Accidental operation of the unit during cleaning could result in injury.
Do not touch the power switch with wet hands. Otherwise electric hazards may occur.
Do not use flammable sprays inside or near the unit (e.g. when cleaning the unit). Such
flammable gas may ignite and cause fire or combustion.
! CAUTION:
Keep away long hair, ties, jewelry and loose clothing. This could result in injury.
Do not use solvent inside or near the unit (e.g. when cleaning the unit). Such solvents may
damage the rubber rollers and resin inside the unit, resulting in malfunctions.
Always disconnect the power plug from the power outlet when the unit is not to be used for
an extended period. Failure to do so could result in fire due to leakage current if the
insulation should deteriorate.
Install this unit on a level, stable stand or floor, with sufficient space around it. Failure to do
so could result in the unit overturning and causing injury.
Do not install this unit in a location where there is excessive humidity or where contact with
water is possible. Poor choice of location could result in deterioration of the insulation, fire
or electrical shock.
Disconnect the power plug from the power outlet before attempting to move this unit. Failure
to do so could result in power cord damage, fire or electrical shock.
P.4
Usage Precautions
Power Supply
This equipment shall be installed near the socket-outlet where the plug on the power supply
cord is easily accessible.
Make sure the power supply used is always within the following range.
220 - 240VAC, 50Hz in Europe.
110VAC, 60Hz in United State.
When you power other appliances from the same AC outlet, make sure that the combined
power consumption does not exceed the power supply capacity.
Rated power of this equipment: 75 W
For continued protection against risk of fire, replace only with same type and rating of fuse.
Operating Environment
Operate this unit in the following environment:
Where the temperature range is between 5 and 35 C.
Where the humid ity rang e is between 10 and 80% RH (no dew condensation).
Which is not subject to direct sunlight,
Where the equipment is not exposed to water.
P.5
Specifications
1
Maximum paper size
297mm x 432mm
11 x 17
2
Minimum paper size
182mm x 257mm
7
x 10
A3, B4, F4A, F4B and A4 (Asia)
3
paper size
A3, B4, LG, A4 and B5 (Europe)
LD, A3, LG, A4 and LT (U.S.A.)
4
Stapling method
Automatic Stapler Heads
5
Stapling and folding ability
Equivalent to 15 sheets of 80gsm ( 20 ) bond paper
or below
6
Maximum processing
speed
7 sets / minute
7
Number of stapler head
2
8
Staple head capacity
100 staples each
9
Operation mode
Automatic
10
Paper size setting
Button select
11
Fine adjustment
Button setting, auto positioning
12
Counter
4 digit
13
Dimension
W x D x H 560,mm x 455mm x 166mm
22 x 18 x 6
14
Weight
20 Kg / 44 lbs
15
Power consumption
80W
16
Power supply
220V/50Hz (Asia / Europe)
110V/60Hz (U.S.A.)
Specifications are subject to change without prior notice for improvements.
Paper size reference:
A3 = 297mm x 420mm
A4 = 210mm x 297mm
F4A = 216mm x 343mm
F4B = 216mm x 330mm
B4 = 257mm x 364mm
B5 = 182 mm x 257mm
P.6
Part Names
1. Stapler assy.
5. Clincher
2. Paper guide
6. Control panel
10. folding roller
3. Side cover
7. Scale
11. stapler head
4. Pressing roller
8. power switch
12. Paper side guide
9. Top cover
11
2
3
4
5
3
1
10
7
6
9
8
12
Accessories
Option Stoppers
Paper Side Guide
Power Cord (U.S.A. Version)
Press roller
Power Cord (Europe Version)
P.7
Control Panel
1
No
2
5
4
3
Name
Operation
Light up when power on
1
LCD Display
Selected paper size and counter indicate when
power on
Option menu indicate when press the Menu button
Error message indicate when error occur
Press the button to change the size of standard
paper
2
Scroll up button
Press the button to select the options of menu
Press the button to change the size of non standard
paper under option menu
Press the button to change the size of standard
paper
3
Scroll down button
Press the button to select the options of menu
Press the button to change the size of non standard
paper under option menu
Press the button to enter the revised setting
4
Enter button
Press the button to confirm the setting finished
Press the button to return to standby mode
Press the button to enter the option menu
5
Menu button
Press the button to escape from the option menu
P.8
Installation
FIGURE 01
Open the top cover and get rid off the
wire tie from the folding roller.
Lift up the stapler head lever. Then
remove the sponge pad under the
stapler head.
Open the cassette from the stapler
head and load staples.
FIGURE 02
Move the stapler heads to certain
position which are matching the
paper size.
Close the top cover and plug in the
power cord.
3
FIGURE 03
Europe
U.S.A.
Please check the power requirement of the machine from
the serial number tag before plug in the power cord.
P.9
Operation
Standard Paper Size Selection.
Switch the power on. (See fig. 04)
Select the paper size by pressing scroll
up or scroll down button. (Example LD paper)
or
A3
LG
M6
A4
LT
(U.S.A. Version)
M3
M5
M2
M4
B4
M6
F4A
F4B
A4
(Asia Version)
M3
M5
M2
M4
LD
M1
A3
M1
A3
B4
M1
FIGURE 04
LG
B5
M6
A4
(Europe Version)
M3
M5
M2
M4
Press Enter button.
Move the stapler heads to the correct
position by following the stapler head
position sticker. (See fig.5)
Reference sticker is located in the
back of the top cover.
STAPLER HEAD POSITION
Press Enter button to return to ready.
FIGURE 05
P.10
Operation
Non Standard Paper Size Data Input.
Press Menu button to enter option menu.
Select “1.Memo” then press enter button.
Select one of Memory from Mem1 to Mem6
by pressing scroll button then press Enter
button to enter paper size setting.
(For example Mem2)
Memory Size
Mem2: 297mm
Press down and hold scroll button to change
the size of the paper until the value is reach
to require value. (Example 250mm)
Memory Size
Memory Size
Mem2: 297mm
Mem2: 250mm
Press Enter button to input the data to
Memory No.2 and return to ready.
P.11
Operation
Memor y Call Out.
Memory call out by press scroll up or
scroll down button. (Example M3)
or
A3
LD
M1
A3
B4
M1
A3
LG
M6
A4
LT
(U.S.A. Version)
M3
M5
M2
M4
F4A
F4B
(Asia Version)
M2
B4
M1
M3
M4
M6
A4
M5
LG
B5
M6
A4
(Europe Version)
M3
M5
M2
M4
Press Enter button to enter.
M3
Move the stapler heads to the correct
position based upon paper size.
Press Enter button to return to ready.
P.12
Operation
Trigger Timer Setting.
Press Menu button to enter option menu.
Select 2.Time by press scroll down button.
Press Enter button to enter trigger timer setting.
Stapling Time
05 second
Press scroll up or down button to change
the setting.(Example 8 second)
Stapling Time
08 second
Press Enter button to rewrite the previous
value and return to ready.
P.13
Operation
Cor recting Folding or Stapling Misalignment.
Fold the book manually to make the center line on the book.
Check the staples aligning with the center line or not.
Fine adjustment by following the instruction below.
Align with
center line
Adjustment
Staple position
Staple located on the right
side of the center line.
Center line
1. Press
Key.
2. Press
shift to 4.S-Adj.
3. Press
Key.
4. Press
move the paper to left.
(Paper move left 0.14mm for 1 digit)
5. Press
return to Ready .
1. Press
Key.
2. Press
shift to 4.S-Adj.
3. Press
Key.
4. Press
move the paper to right.
No
Staple located on the right
side of the center line.
( Paper move right 0.14mm for 1 digit)
5. Press
Yes
return to Ready .
1. Go to next step 4.
Repeat Step 3. Until stapling align with center line.
P.14
Indication
Operation
Check folded position aligning with the center line or not.
Fine adjustment by following the instruction below.
Center line
Align with
center line
Adjustment
Staple position
Fold located on the right
side of the center line.
1. Press
Key.
2. Press
shift to 3.F-Adj.
3. Press
Key.
4. Press
move the paper to left.
Indication
Folding Adj
Folding Adj
(Paper move left 0.14mm for 1 digit)
5. Press
return to Ready .
1. Press
Key.
2. Press
shift to 3.F-Adj.
3. Press
Key.
4. Press
move the paper to right.
No
Fold located on the right
side of the center line.
( Paper move right 0.14mm for 1 digit)
5. Press
Yes
return to Ready .
3. Fine adjustment finished.
Repeat Step 6 until fold is aligned with center line.
P.15
Folding Adj
Folding Adj
Operation
Factor y Default Setting.
Press Menu button to enter option menu.
Select 5 Reset all by pressing scroll down button.
5.Reset all.
6.Show serial.
Press Enter button to reset all data to factory
default setting.
Warning! All the value in Memory will be restored
to factory default value (297mm)also.
Reset all data
Data restored
015 +005
Press Enter button to return to ready.
P.16
Operation
Serial Number Indication.
Press Menu button to enter option menu.
Select 6 Show serial by pressing scroll down button.
5.Reset all.
6.Show serial.
Press Enter button to check the serial number.
Machine Serial:
H XXXXXXXXX
Press Enter button to return to ready.
P.17
Operation
FIGURE 06
Booklet Making.
Select the required paper size and adjust
the stapler head position by reference
to page 11 to page 13.
For example LD paper selected.
Open the top cover and insert a set of
A3 paper. (See fig. 6)
Align the paper with the edge of the
scale.
FIGURE 07
Place the paper side guide by aligning
it the edge of the paper. (See fig.7)
Use optional magnetic stops if required.
(See fig.8)
Close the top cover. Then the machine
will start to work in 5 seconds.
Insert paper for next book.
(See fig. 9)
FIGURE 08
FIGURE 09
P.18
Operation
Counter Reset.
Remover all the paper from the machine.
Press Enter button to reset the counter
to “0000”
Ready 0000Set
Ready 0128Set
Emergency Stop.
Press any button on the panel to stop the
machine during the booklet making process.
or
or
or
Emergency stop!
Reset machine!
Switch off the machine then power on
the machine to return to ready.
Reset to Ready
Ready 0000Set
Remove Jammed Staple From Stapler Head.
Open the top cover and lift up the stapler head lever.
Open the cassette from the stapler
head and remove the jammed staple by
using tweezer.
P.19
Error Message
Error Message
Cover is open!
Cover is open
Reset?
Causes
Trouble shooting
Top cover opened in the ready
state.
Close the top cover.
Top cover opened during
booklet making.
Close the top cover.
Then press enter button.
Close the cover after
“Cover is open” indicated.
Press enter button
to reset the machine.
Over loading!
Take away paper
Remove all the paper from the
Too many paper loaded on the
machine. Then turn off power
machine cause motor overload. for 3 second.
Power on the machine to ready.
Emergency stop!
Reset machine!
One of key pressed during
booklet making.
Turn off power for 3 second.
Then turn on the machine.
Daily care
Use a soft clean cloth dampened with al cohol or neutral detergent when
cleaning. Before cleaning, be sure to turn off the power. The folding rollers
may cause paper slipping or smudging with paper dust or ink if they are dirty.
Always disconnect the power plug from the outlet after used.
P.20