1
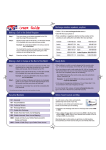
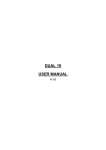
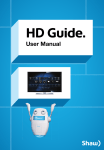
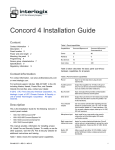
up to THE TRAVELER’S SAVE 80% on roaming International SIM Card Global connections, local rates 1 Activating the service A Did you purchase this SIM in North America? If you purchased this SIM in North America, it is pre-activated and ready to use everywhere. B SIM purchased outside of North America If you purchased this SIM outside of North America it is activated and ready to use everywhere, except North America. If you are traveling to North America with your SIM, you must activate it online at www.rechargeminutes.com. Sign into your account by entering your global phone number (+44 printed on SIM) and PIN (4 digit number also printed on SIM) and follow the prompts. 2 Managing your account 1. How to access your account? Download the FREE JT Travel App Manage your account, recharge credit, keep track of world times, currencies and more. OR Visit www.rechargeminutes.com Enter your global phone number (+44 printed on SIM) and PIN (4 digit number also printed on SIM) 2. Account services • Add credit Click on the ‘Recharge’ button and follow the prompts. Alternatively: - Dial 181 direct from your mobile phone (free of charge) - Call 24/7 Customer Service (charges apply) • Purchase a Data Bundle Bundle Price Data Credit Light $50 $65 Medium $70 $140 Heavy $120 $360 Great Value! 30% extra FREE 100% extra FREE 200% extra FREE • Check your balance, usage records & receipts • Get your +1 US phone number (more info below) 3 Two phone numbers, One SIM You receive a Global phone number and an optional US phone number. • Your Global phone number starts with +44 and is printed on the SIM Card. This number is based in the British Isles. • Your US phone number starts with +1. Your US number will be automatically sent to you via text message when you connect to a North American network for the first time. Alternatively you can go to ‘My Account’ section in the JT Travel App or visit www.rechargeminutes.com and click on ‘Get number’ in the top menu and follow the prompts. 4 Using this service When turning your phone on, a screen will appear asking you to select your current location from two options: • North America • Rest of world If you are in USA, Mexico or Canada select ‘North America’. If you are anywhere else in the world, select ‘Rest of world’. 5 Making a call Turn your phone on and when the phone registers with an available network it is ready for use. a) Dial ‘+’ , followed by the country code (1 for the US & Canada, 61 for Australia and 44 for the UK), area code and phone number. Example 1: To call 03 9010-0225 in Australia, you need to dial +61390100225 Example 2: To call (213) 337-5555 in the US, you need to dial +12133375555 You must dial the country code even if you are making a local or national call and drop the leading zero if the number you are calling has one. b) Press the call key and please wait. Ignore any messages shown on your screen. You will be disconnected for 10 to 30 seconds and then your phone will call back. Answer the call normally. Your call will be connected after a few seconds. c) If you are in USA or Mexico, you will not be disconnected and your call will connect normally. 6 Receiving a call Family & friends can call you at anytime, wherever you may be within our coverage area. 1. They can dial your Global (44) number (preceded by the international direct dialing prefix for the country they are calling from). 2. They can dial your US number (preceded by the international direct dialing prefix for the country they are calling from if they are outside the US). 7 Sending a Text Message or Menu Based SMS This service supports international text messaging. Simply compose your text message as normal, entering the number you wish to send the message to, remembering to include the country code and area code. You can also send a SMS for a cheaper rate using SIM Applications or Toolkit. With iPhones go to Settings, select Phone Settings, select SIM Applications and then select Send a SMS. With Android phones, locate and select the SIM Toolkit in your list of Apps (if you can’t find it, then your phone does not support this feature). Select Send a SMS. 8 Setting up Data (and Internet) Prepaid data allows you to access the internet, Instant Messaging and email from your phone. iPad & iPhone 1. Select Settings > Cellular Data (it may be under Network/Mobile and/or General) 2. Ensure Cellular Data is On and Data Roaming is ON. 3. Select APN Settings, and in the APN field enter ‘mobiledata’. Leave all other fields blank. 4. Press the menu button. 5. Launch the internet browser. Android Phones & Tablets 1. Select Settings > Wireless & Networks > Mobile Network 2. Check that Data enabled (or Use packet data) is On and that Data roaming is On 3. Select APN (Access Point Names). 4. Press the menu key, select + New APN, and in both the Name and APN fields, enter ‘mobiledata’ 5. Press back, select the new APN option titled ‘mobiledata’ 6. Press back until you reach the main menu 9 Customer Service If you require assistance, please contact us in one of the following ways: USA 1-888-310-4168 Australia 1-800-094-747 UK 0800-028-2402 Germany 0-800-182-7642 France 0805-113-721* Canada 1866-626-9724* * Press 0# to speak to Customer service EKT1291 JAN14 1. Send us an email to [email protected] 2. Dial 154 directly from your mobile phone 3. Dial the access number for the country you are calling from For a complete list of numbers refer to www.ekit.com/ekit/CustomerService Correct at January 2014. Refer to www.ekit.com/terms for full Terms and Conditions 2D + 4C User Manual Safety and Usage Information Safety and Maintenance Before use, please read this instruction manual carefully. • Do not switch on the mobile phone when use of a mobile phone is prohibited or when it may cause interference or danger. • Obey all local laws. Always keep your hands free to operate the vehicle while driving. Your first consideration while driving should be road safety. • Please keep your mobile phone turned off when you are on a plane. If functions that will automatically power on your mobile phone, such as alarm clock or calendar are setup, please check and cancel the configuration before boarding the plane. • While using the mobile phone, please keep it away from heat sources and high voltage appliances. Please use the mobile phone under normal temperatures. o o • Using it at temperatures above 55 C (131 F) or below 10oC (14oF) may damage the phone. Your device is not water-resistant. Keep it dry. • Standard battery, charger and accessories provided with your mobile phone should be used. The mobile phone user is responsible for any consequence caused by the use of third party accessories. i Safety and Usage Information • Mobile phones may cause interference to nearby electronic devices, such as TVs, radios, pacemakers, hearing aids etc. Do not place the mobile phone near a credit card or magnetic field. Switch off your mobile phone when regulations posted instruct you to do so, for example, in hospitals. • Do not drop, knock, or shake the device. Rough handling can break internal circuit boards and mechanics. • Do not disassemble the mobile phone. Only allow qualified personnel to service your device. Allowing nonqualified personnel to service your device may result in damage to your device and will void your manufacturer’s warranty. • Do not use benzene, thinner or alcohol to clean the cover of your mobile phone. Keep your mobile phone away from corrosive chemicals such as detergent. Use a clean and soft cloth instead and wipe gently. • Keep the mobile phone and battery dry. Precipitation, humidity, and all types of liquids or moisture can contain minerals that corrode electronic circuits. If your mobile phone gets wet, remove the battery, and allow the device to dry. • Do not use or store the mobile phone in dusty or dirty areas. Moving parts and electronic components can be damaged. ii Safety and Usage Information • Always switch the device off and disconnect the charger before removing the battery. When you unplug a charger or an accessory, hold and pull the plug, not the cord. • Reduce the risk of repetitive motion injuries. While using your device, hold the device with a relaxed grip, press the keys lightly, use special features that reduce the number of keys you have to press (such as templates and predictive text), and take frequent breaks. • Do not use the device if the screen is cracked or broken. Broken glass or acrylic could cause injury to your hand and face. Take the device to an authorized service center to replace the screen. Damage caused by careless handling will void your manufacturer’s warranty. While using the battery, please observe the following points: • Please charge the battery in a cool and well-ventilated room. High temperatures may lead to overheating, smoking, burning, distortion or even explosion of the battery. • Do not dismantle, cut, open, crush, bend, puncture, or shred cells or batteries. If a battery leaks, do not let battery liquid touch skin or eyes. If this happens, immediately flush the affected areas with water and seek medical help. iii Safety and Usage Information • Do not short-circuit. Accidental short-circuiting can occur when a metallic object such as a coin, clip, or pen causes direct connection of the positive (+) and negative (-) terminals of the battery. (These look like metal strips on the battery.) This might happen, for example, when you carry a spare battery in your pocket or purse. Shortcircuiting the terminals may damage the battery or the connecting object. • Please keep the metal contact points and battery clean. • Never use any charger or battery that is damaged. • The battery can be charged and discharged hundreds of times, but it will eventually wear out. When the talk and standby times are noticeably shorter than normal, replace the battery. Only replace with an approved battery. • Prevent the battery from exposure to the sun or places with excessive smoke or dust. • Avoid extreme temperatures. Extreme temperatures (above 55oC, 131oF or below -10oC, 14oF) may reduce the capacity and lifetime of the battery. A device with a hot or cold battery may not work temporarily. • Do not expose the battery to fire as it may explode. • Do not expose the battery to water as this may damage it and cause the battery to explode. • Dispose of batteries according to local regulations. Please iv Safety and Usage Information recycle when possible. Do not dispose as household waste. • A special charger should be used for this battery. You should not charge the battery for longer than 12 hours at a time. • Keep the battery out of reach of children. While using the battery charger, please observe the following points: • Do not disassemble or modify the charger or use it when the power cable is damaged as there could be a risk of electric shock or fire. • Do not touch the charger with wet hands. If the charger contacts water or other liquid, immediately cut off the power supply. • Do not short circuit the charger. Keep it away from mechanical vibrations or shaking. Do not expose the charger to direct sunlight. Do not use it in a damp environment, such as a bathroom. The battery charger is not waterproof; so keep it away from rain and moisture. • Do not use the charger near electric appliances such as a TV set or radio. • Keep the charger out of reach of children. v Safety and Usage Information Handle SIM cards and memory cards with care • Do not remove a card while the device is transferring or accessing information, as this could result in loss of data and/or damage to the card or device. • Protect cards from strong shocks, static electricity, and electrical noise from other devices. • Do not touch gold-colored contacts or terminals with your fingers or metal objects. If dirty, wipe the card with a soft cloth. FCC Statement This equipment has been tested and found to comply with the limits for a Class B digital device, pursuant to part 15 of the FCC Rules. These limits are designed to provide reasonable protection against harmful interference in a residential installation. This equipment generates, uses and can radiate radio frequency energy and, if not installed and used in accordance with the instructions, may cause harmful interference to radio communications. However, there is no guarantee that interference will not occur in a particular installation. If this equipment does cause harmful interference to radio or television reception, which can be determined by turning the equipment off and on, the user is encouraged to try to correct the interference by vi Safety and Usage Information one or more of the following measures: • Reorient or relocate the receiving antenna. • Increase the separation between the equipment and receiver. • Connect the equipment into an outlet on a circuit different from that to which the receiver is connected. • Consult the dealer or an experienced radio/TV technician for help. Properly shielded and grounded cables and connectors must be used to meet FCC emission limits. Ekit is not responsible for any radio or television interference caused by using other than recommended cables or connectors. Changes or modifications not expressly approved by the party responsible for compliance could void the user’s authority to operate the equipment. These devices comply with part 15 of the FCC Rules. Operation is subject to the following two conditions: (1) These devices may not cause harmful interference, and (2) these devices must accept any interference received, including interference that may cause undesired operation. vii Safety and Usage Information Specific Absorption Rate (SAR) certification information Your device conforms to international standards that limit human exposure to radio frequency (RF) energy emitted by radio and telecommunications equipment. These standards prevent the sale of mobile devices that exceed a maximum exposure level (known as the Specific Absorption Rate, or SAR) of 1.6 W/kg. For body worn operation, this model phone has been tested and meets the FCC RF exposure guidelines when used with an accessory designated for this product or when used with an accessory that contains no metal and that positions the handset a minimum of 1.5 cm from the body. During testing, the maximum SAR recorded for the 2D model was 1.452 W/kg and the 4C model was 1.063 W/kg. In normal use, the actual SAR is likely to be much lower than the allowable limit, as the device has been designed to emit only the RF energy necessary to transmit a signal to the nearest base station. By automatically emitting lower levels when possible, your device reduces your overall exposure to RF energy. Correct disposal of this product (Waste Electrical & Electronic Equipment) This marking on the product, accessories or literature viii Safety and Usage Information indicates that the product and its electronic accessories, such as batteries, chargers, headsets, or USB cables should not be disposed of with other household wastes at the end of their working life. To prevent possible harm to the environment or human health from uncontrolled waste disposal, please separate these items from other types of waste and recycle them responsibly to promote the sustainable reuse of material resources. Household users should contact either the retailer where they purchased this product or their local government office, for details of where and how they can take these items for environmentally safe recycling. Business users should contact their supplier and check the terms and conditions of the purchase contract. This product and its electronic accessories should not be mixed with other commercial wastes for disposal. Disclaimer Some content and services accessible through this device belong to third parties and are protected by copyright, patent, trademark and/or other intellectual property laws. Such content and services are provided solely for your personal, non-commercial use. You may not use any content or services in a manner that has not been authorized by the content owner or service provider. Without limiting the foregoing, unless expressly authorized ix Safety and Usage Information by the applicable content owner or service provider, you may not modify, copy, republish, upload, post, transmit, translate, sell, create derivative works, exploit, or distribute in any manner or medium any content or services displayed on this device. x Contents Safety & Usage Information Safety Warnings Usage Tips FCC statement Disclaimer Contents Setup Your Phone Unpack Install the SIM card and battery Charge the battery Charge the battery with the wall charger Charge the battery with the PC data cable Insert a memory card (optional) Get to Know Your Phone Switch on your phone Phone layout – front Phone keys and functions Display Icons Lock your phone Access menus Customize your phone Set the time and date xi i iii vi ix xi 1 1 1 3 3 4 4 5 5 6 8 9 11 12 12 Contents and time/date formats Set the display language Switch to silent mode Disable wireless functions Select a user profile Adjust the call volume Customize the display Adjust the display backlight time Lock your SIM card Communicate With the World Calling Select a SIM card for call functions Select a cellular network Place a call Answer a call Reject an incoming call Call an international number Return a missed call View call history Activate call waiting Activate call diverting Activate call barring Switch phone lines xii 12 13 13 13 14 14 14 15 15 16 16 16 16 17 17 18 18 18 18 20 20 21 21 Contents Specify a voicemail server Listen to voicemail Messaging Send a text message Send a multimedia (MMS) message Use message templates View a text or multimedia message Browsing the Internet Access the WAP browser Create bookmarks Access bookmarked web pages Manage bookmarks Specify network settings Manage Personal Data and Files Contacts Add a new contact Delete a contact Search for contacts Add contacts to caller groups Customize caller groups Manage contacts View phonebook memory status Change phonebook settings xiii 21 22 22 22 23 24 25 25 25 25 26 26 27 28 28 28 29 29 30 30 31 31 31 Contents File manager Open a file Create new folders Sort files or folders Rename folders Delete files or folders Copy or move files Format a memory location Use Multimedia Features Camera Capture photos Change camera options Video recorder Audio player Listen to music Access the music list Change play modes Change the equalizer Change visualizations Video player View videos Recorder 32 32 32 33 33 33 34 35 35 35 36 36 37 37 37 38 38 38 38 38 39 39 xiv Contents FM radio Listen to the FM radio Scan for radio stations Manually tune a radio station Edit radio station names Get Organized Alarm Set an alarm Cancel an alarm Calendar Change the calendar view Add events View events by date View all events Delete events Calculator Perform mathematical calculations World clock View the world clock STK Torch Settings Dual-SIM xv 40 40 40 41 41 42 42 42 43 43 43 43 44 45 45 45 45 46 46 46 47 47 47 Contents Call settings Phone settings Display settings Security settings Profiles Connection management 47 49 50 50 51 51 xvi Setup Your Phone Prepare your phone for its first use. Unpack The following items are included in your product’s box: ekit 4C or 2D mobile phone Battery Wall charger (US connector) USB cable User guide Note: The items supplied with your device may vary depending on the software and accessories available in your region or offered by your service provider. Additional accessories, such as travel adapters and headsets are available through your service provider Install the SIM card and battery To install the SIM card and battery, 1. If the device is on, press and hold off. 1 to turn it Setup Your Phone 2. Slide the battery cover in the direction of the arrow to remove it and remove the battery: 3. Insert one or more SIM cards. 4. Insert the battery. 5. Replace the battery cover. 2 Setup Your Phone Note: Your mobile phone accepts two SIM cards. You can control which SIM card is in use from the Settings menu (see p. 16). Charge the battery You can charge the battery by connecting the phone to either a PC USB port using the USB cable provided or, using the standard charger that is also provided. Note: In order to ensure normal operation of the phone, please ensure the designated charger is used. Charge the battery with the wall charger To charge the battery via a standard power supply, 1. Plug the small end of the wall charger into the USB port on the phone. 2. Plug the power socket into a standard power outlet. 3. When the battery is fully charged (the battery icon animation will stop), unplug the wall charger from the phone and then from the power outlet. Note: While charging, the battery may heat up. This is normal and should not affect the battery’s lifespan or performance. 3 Setup Your Phone Charge the battery with the PC data cable To charge the battery via a computer, 1. Plug the small end of the PC data cable into the phone. 2. Plug the large end (USB) into a USB port on a computer. 3. When the battery is fully charged (the battery icon animation will stop), unplug the PC data cable from the phone and then from the computer. Insert a memory card (optional) To store additional multimedia files, you must insert a TM memory card. Your device accepts microSD memory cards (4 GB maximum). To insert a memory card, 1. Remove the battery cover and battery. 2. Slide and lift the memory card door. 3. Insert a memory card with the gold-colored contacts facing down. 4. Close and slide the memory card door to lock it into place. 5. Insert the battery and replace the battery cover. 4 Get to Know Your Phone Learn about your phone’s features and input functions. Switch on your phone To switch on your phone, press and hold The phone will automatically search for and connect to a cellular network. To switch off your phone, press and hold . Note: Follow all warnings and directions from authorized personnel when in areas where the use of wireless devices is restricted, such as airplanes and hospitals. 5 Get to Know Your Phone Phone layout – front Earpiece speaker Display Navigation/ Dedicated key Right softkey Left softkey Power key Call key /End Call key Alphanumeric keys USB port 6 Get to Know Your Phone Phone layout – back Flashlight External speaker Camera (4C Only) Battery cover Microphone 7 Get to Know Your Phone Phone keys and functions Key Function (Left softkey) Press to perform the action listed on the bottom left of the display (Right softkey) Press to perform the action listed on the bottom right of the display Press the outer ring to navigate menus, move the cursor when entering text, or perform dedicated actions assigned in the phone settings menu (default actions): Up: write a message, Down: World Clock, Left: Calendar, Right: Inbox; Press the inner key to perform the action listed on the bottom left of the display or confirm an input; Press and hold the inner key to switch on or off the flashlight Press to open the log of dialed, received, missed, or rejected calls; Press to answer a call Press and hold to switch the phone on or off 8 Get to Know Your Phone Press to enter the number 1; Press and hold to connect to the voicemail server Press the corresponding key to enter numbers or text Press and hold to switch between general mode (sound on) and silent mode (vibrate) When dialing, press repeatedly to enter the plus sign (+) before an international dialing prefix, a soft pause (p) or an extension transfer (w); Press to enter a space (once) or the number 0 (twice) Press to switch text input modes; Press and hold to lock the phone Display Icons The following icons appear on the home screen of your phone’s display. Icon Description SIM 1 signal strength SIM 2 signal strength 9 Get to Know Your Phone No SIM card inserted SD card inserted GPRS network connected Silent mode activated Vibrate mode activated Missed call New text message New MMS message New voicemail message MMS memory full 10 Get to Know Your Phone Roaming Line 1 active Line 2 active Alarm activated Earphones connected Battery fully charged Battery low (needs charging) When the green bars are animated, the battery is being charged FM radio active Lock your phone Lock your phone to require a password when the phone is switched on. From the main menu, 11 Get to Know Your Phone 1. Select Settings > Security settings > Power-on password. 2. Enter a password and then enter the password again to confirm it. 3. Select a password option and press [OK] > [Exit]. Note: When the phone lock is activated, you must enter the password every time you switch on the phone. Access menus From the home screen, press the left softkey to access the main menu. Customize your phone Customize various phone settings to match your preferences. Set the time and date and time/date formats From the main menu, 1. Select Settings > Phone settings > Time and date. 2. Scroll to Set time and press [OK]. 3. Press the up/down and left/right navigation keys to set the time, and then press [OK] > [Exit]. 4. Scroll to Set date and press [OK]. 12 Get to Know Your Phone 5. Press the up/down and left/right navigation keys to set the time, and then press [OK]. 6. Scroll to Time format and press [OK]. 7. Select a time format and press [OK] > [Exit]. 8. Scroll to Date display type and press [OK]. 9. Select a date format and press [OK] > [Exit]. Set the display language From the main menu, 1. Select Settings > Phone settings > Select language. 2. Scroll to a language and press [OK] > Exit. Switch to silent mode To switch between general mode (sound on) and silent mode, from the home screen, press and hold . Disable wireless functions When on an airplane or in other locations where the use of wireless devices is restricted, you can switch your phone to flight mode. This mode disables all wireless functions. From the main menu, 1. Select Flight mode. 2. Select and option and press [Back]. 13 Get to Know Your Phone Note: If you select when power on, you will be prompted to select the flight mode status every time you turn on the phone. Select a user profile From the main menu, 1. Select Settings > Profiles. 2. Scroll to a user profile and press [OK] to activate the profile. Note: You can also select Options > Customize to edit the profile or Options > Rename to rename it. Adjust the call volume While calling or during a call, press the up or down navigation buttons to adjust the call volume. Customize the display Customize the phone’s display by choosing wallpaper, idle display, contrast, backlight, keypad backlight, and animation options. From the main menu, 1. Select Settings > Display settings. 2. Scroll to a display setting and press [OK]. 3. Customize the option to match your preferences. 4. Press [Back] to return to the previous menu and make additional changes. 14 Get to Know Your Phone 5. When you are finished making changes, press to return to the home screen. Note: To use custom images for wallpaper or the screen saver, you must first capture an image with the camera (4C only) or transfer an image to the phone via the PC data cable. Adjust the display backlight time From the main menu, 1. Select Settings > Display settings > Backlight. 2. Scroll to a backlight option and press [OK] > [Exit]. Note: The duration of the display backlight will affect how quickly your phone consumes battery power. Lock your SIM card You can lock your device with the PIN or PIN2 supplied with your SIM card. From the main menu, 1. Select Settings > Security settings > PIN or PIN2. 2. Select a security option and enter the password. 3. Press [OK] > [Exit]. Note: Once the PIN lock is enabled, you must enter the PIN each time you switch on the phone. If you enter an incorrect PIN more than three times, your SIM card will be 15 blocked. You must enter a PIN unblock key (PUK) to unblock the card. See your service provider for details. Communicate With the World Use your mobile phone to communicate with the world via voice calls, text and multimedia messages (4C only), text chat, and the Internet. Note: The 2D model does not support multimedia messaging and internet connectivity. Calling Your phone supports two SIM cards, which allows you to place and receive calls via two phone numbers. Select a SIM card for call functions From the main menu, 1. 2. Select Settings > Dual SIM > Standby mode. Select which SIM card to use in standby mode (the other SIM card will be active). Select a cellular network By default, your phone will automatically search for available cellular networks and attempt to connect to the appropriate network for each of your installed SIM cards. 16 Communicate With the World However, you can also manually specify setting for network selection. From the main menu, 1. Select Network Selection. 2. Select your desired option. 3. Press [OK] > [Exit]. Place a call From the home screen, 1. Press the corresponding alphanumeric keys to enter a phone number. 2. Press 3. To end the call, press 4. Note: To add a number to your phonebook, press [Options] > Add new contact and enter the contact information. For more information about adding contacts, see p. 28. . . Answer a call When a call comes in, press To end the call, press to answer. . 17 Communicate With the World Reject an incoming call When a call comes in, press . The caller will hear a busy tone or the call will be diverted to voicemail. Call an international number From the home screen, 1. Press and hold * to enter the + character. 2. Enter the complete number to dial, including country code, area code, and phone number, and then press 3. . To end the call, press . Return a missed call When you have missed a call, a missed call icon will appear on the display. Press [Options] > View to view the caller’s number, and then press View call history From the main menu, 1. Select Call logs. 18 to return the call. Communicate With the World 2. To view history data, scroll to an option and press [OK]. Option Dialed calls Received calls Missed calls Rejected calls Delete all Call timers Call cost Function View numbers of dialed outgoing calls View numbers of received incoming calls View numbers of missed incoming calls View numbers of rejected incoming calls Erase call logs View times for the last call, all dialed calls, and all received calls or reset call timers View costs for the last call or all calls or reset the cost counter, set a maximum cost limit, or set the price per unit. Note: Your PIN2 code is required to reset cost counters, set cost limits, and set price per unit. 19 Communicate With the World Activate call waiting If your SIM card supports the call waiting feature, you can activate it through your service provider. From the main menu, 1. Select Settings > Call settings > Call waiting. 2. Scroll to Activate and press [OK] to send the activation request to your service provider. 3. If prompted, enter your phone password and press [OK] to send the activation request to your service provider. Activate call diverting If your SIM card supports the call diverting feature, you can activate it through your service provider. From the main menu, 1. Select Settings > Call settings > Call divert. 2. Scroll to diverting option and press [OK]. 3. Scroll to Activate and press [OK] to send the activation request to your service provider. 4. If prompted, enter your phone password and press [OK] to send the activation request to your service provider. 20 Communicate With the World Activate call barring If your SIM card supports the call barring feature, you can activate it through your service provider. From the main menu, 1. Select Settings > Call settings > Call barred. 2. Scroll to a barring option and press [OK]. 3. Scroll to Activate and press [OK] to send the barring request to your service provider. 4. If prompted, enter your phone password and press [OK] to send the activation request to your service provider. Switch phone lines If your SIM card supports multiple phone lines, you can select which line to use for calls. From the main menu, 1. Select Settings > Call settings > Select line. 2. Scroll to either Line 1 or Line 2 and press [OK]. Specify a voicemail server Specify a voicemail server to receive and store voicemail messages. From the main menu, 1. Select Messages > Options > Voicemail server. 2. Scroll to a voicemail server location and press [OK]. 21 Communicate With the World Note: To change the voicemail number, select Number settings and enter a new number. Press [OK] to save your changes. Listen to voicemail When you have new voicemail, a notification will appear on the home screen. To access the voicemail server, press and hold . Follow the audible instructions to listen to and manage your stored voicemail. Messaging Your phone supports text messaging (SMS) & multimedia messaging (MMS) [4C Model only]. Send a text message From the main menu, 1. Select Message > Write message. 2. Select New SMS and press [OK]. 3. Press the corresponding alphanumeric keys to enter your message content. Note: To switch text input modes, press enter symbols, press . To use text 22 . To Communicate With the World templates, enter contact names and numbers, insert emoticons (“phiz”), or save a draft message, press [Options]. 4. Enter a recipient’s phone number or press *Conta…+ to locate a number in your Phonebook. 5. Press [Send] to send the text message. Note: You can specify multiple recipients for a text message in the Options menu. Send a multimedia (MMS) message (4C Model only) From the main menu, 1. Select Message > Write message. 2. Select New MMS and press [OK]. 3. Press [Edit] and enter a delivery address or phone number of press *Conta…+ to select contact details. 4. Repeat step 4 as needed to add additional recipients or CC and BCC recipients. Scroll to the subject line and press [Edit]. 5. If desired, press the corresponding alphanumeric keys to enter text. When you are finished entering text, press [OK] to return to the MMS message. 6. Scroll to the text body line and press [Edit]. 23 Communicate With the World 7. If desired, press the corresponding alphanumeric keys to enter text. When you are finished entering text, press [OK] to return to the MMS message. 8. If desired, attach multimedia slides to your message. Otherwise, skip to step 10. a. Scroll to the add item icon and press [Add]. b. Select an item type and customize or locate the item as required. c. Press [OK] to attach the item to your message. 9. When you are finished composing your MMS message, press [Options] > Send. Note: ekit service does not support MMS. Use message templates When sending text messages, you can use message templates to quickly insert frequently used text. From the main menu, 1. 2. Select Messages > Write message. Select New SMS and press [OK]. 3. Press [Options], scroll to Templates, and press [OK]. 4. Scroll to a template and press [OK]. 24 Communicate With the World View a text or multimedia message When you have a new message, a notification appear on the home screen. From the main menu, 1. Select Messages > Inbox. 2. Scroll to a message and press [OK]. will Browsing the Internet (4C Model only) Your phone allows you to connect to the Internet via the wireless access protocol (WAP). Note: Accessing data via the Internet can result in additional fees. Contact your service provider to learn about pricing details for connecting to the Internet and downloading or streaming content. Access the WAP browser (4C Model only) From the main menu select Internet. The browser attempts to connect to the homepage automatically. To access a specific webpage, press [Options] > Open > Go to URL. Enter a web address and press [OK]. Create bookmarks 1. From the main menu, select Internet. 25 Communicate With the World 2. Press [Options] > Bookmarks. 3. Scroll to Add bookmark and press [OK]. 4. Press [Edit], enter a title for the bookmark, and press [OK]. 5. Scroll down, press [Edit], enter a web address for the bookmark, and press [OK]. 6. Press [Save] to save the bookmark. Access bookmarked web pages 1. From the main menu, select Internet. 2. Press [Options] > Bookmarks. 3. Scroll to a bookmark and press [Open]. The web browser will attempt to load the bookmarked page. Manage bookmarks 1. From the main menu, select Internet. 2. Press [Options] > Bookmarks. 3. Scroll to one of the following options and press [OK]: Option Open webpage Delete Send connection Function Load the bookmarked web page Delete the bookmark Send the bookmark as an SMS or MMS attachment 26 Communicate With the World Edit View details Mark Edit the bookmark View details about the bookmark Select an option to mark or unmark one or all of the bookmarks Specify network settings You can specify a few network settings for either WAP or MMS accounts. From the main menu, 1. Select Settings > Connection management. 2. Scroll to Network account or GPRS settings and press [OK]. 3. For network accounts, scroll to an account and press [Options]. 4. Choose an account option and press [OK]. If the account can be edited, you can specify the following settings with the [Edit] option: - Auth type - Username - Password - Access point - Gateway IP - Gateway port - Rename 27 - Set homepage - Advanced settings (DNS address and Network type). Note: See page 47 for detailed descriptions of settings. Manage Personal Data and Files Your phone is equipped with applications for managing contacts, files, and personal data. Contacts With Contacts, you can add and manage contact information, create caller groups, and access numbers for various services. Add a new contact From the main menu, 1. Select Contacts. 2. Press [Options] > New. 3. Select a memory location and press [OK]. Note: When saving contacts to a SIM card, you can only store name and phone numbers. To input additional contact information, such as multiple numbers, email addresses, and caller groups, save the contact to the phone memory. 28 Manage Personal Data and Files 4. Enter the contact information as desired. At the minimum, you must enter a name and phone number. 5. If desired, assign a caller picture, distinctive ringtone, or caller group to the contact. 6. When you are finished entering contact information, press [Save]. Delete a contact From the main menu, 1. Select Contacts. 2. 3. Scroll to a contact name and select [Options] > Delete. Press [OK] to confirm the deletion. Search for contacts To find a contact, 1. 2. From the main menu, select [Contacts]. Select [Options] > Search. 3. Enter a few letters of the contact’s name and then press [OK]. 4. Once you have located the contact, select the contact and press [Options] to edit, delete, or send 29 Manage Personal Data and Files a message to the contact. To call the contact, press . Add contacts to caller groups Caller groups allow you to categorize your contacts. To add an existing contact to a caller group, edit the contact. From the main menu, 1. Select Contacts. 2. Locate and select the contact. 3. Press [Options] > Edit. 4. Scroll to the user group and press [Edit]. 5. Scroll to a new user group and press [OK]. Customize caller groups You can customize the names of some caller groups (not including All, Unclassified, SIM1, and SIM2). From the main menu, 1. Select Contacts. 2. Scroll right or left to an editable contact group. 3. 4. Press [Options] > Change group name > [OK]. Edit the group name as desired. 5. Press [OK] to save your changes. 30 Manage Personal Data and Files Manage contacts Move your contacts from one group to another to keep them organized. From the main menu, 1. Select Contacts. 2. Scroll right or left to a contact group. 3. Scroll to a contact. 4. Press [Options] > Change group. 5. Select a new group and press [OK]. View phonebook memory status View the number of contacts you have stored and the number of empty slots remaining. From the main menu, 1. Select Contacts. 2. Press [Options] > Others. 3. Scroll to Memory status and press [OK]. Change phonebook settings To change the phonebook listings to use a single line display, instead of a 2-line display, from the main menu, 1. Select Contacts. 2. Press [Options] > Others. 3. Scroll to Single line display and press [OK]. 31 Manage Personal Data and Files File manager With the file manager, you can organize and manage files and folders. Open a file From the main menu, 1. Select File manager. 2. Scroll to a memory location and press [Options] > Open. 3. Scroll to a folder and press [Options] > Open. 4. Scroll to a file and press [Options] > Open, View, or Play, depending on the file type. Create new folders From the main menu, 1. Select File manager. 2. Scroll to a memory location and press [Options] > Open. 3. Scroll to New folder and press [OK]. 4. Enter a name for the new folder and press [Options] > Done. 32 Manage Personal Data and Files Sort files or folders From the main menu, 1. Select File manager. 2. Scroll to a memory location and press [Options] > Open. 3. Press [Options] > Sort by. 4. Scroll to a sort option and press [OK]. Rename folders From the main menu, 1. Select File manager. 2. Scroll to a memory location and press [Options] > Open. 3. Scroll to a folder and press [Options] > Rename. 4. Enter a new name for the folder and press [Options] > Done. Delete files or folders From the main menu, 1. Select File manager. 2. Scroll to a memory location and press [Options] > Open. 33 Manage Personal Data and Files 3. To delete a folder, scroll to a folder and press [Options] > Delete. When prompted, press [Yes] to confirm the deletion. 4. To delete a file, open a folder, scroll to a file, and press [Options] > Delete. When prompted, press [Yes] to confirm the deletion. Copy or move files From the main menu, 1. Select File manager. 2. Scroll to a memory location and press [Options] > Open. 3. Scroll to a folder and press [Options] > Open. 4. Scroll to a file and press [Options] > Copy or Move. Note: Copying a file will place a new copy in the destination folder. Moving a file will transfer the original file to the destination folder. 5. Scroll to a memory location, press [Options], and then choose one of the following options: - Select: Copy or move the file to the selected memory location. The file will not be placed in a folder. - Open: Copy or move the file to a folder or subfolder that you select. 34 - New folder: Copy or move the file to a new folder. You must first give the folder a title and save it before the file will be copied or moved. Format a memory location CAUTION: Formatting a memory location will erase all stored data. Backup any important data before formatting a memory card. It is not recommended to format the phone memory. Contact your retailer or service provider for more details. From the main menu, 1. Select File manager. 2. Scroll to a memory location and press [Options] > Format. 3. Press [Yes] to format the memory location and erase all data. Use Multimedia Features Your phone is equipped with numerous multimedia features for your enjoyment, such as an audio player, camera, FM radio, video player, and sound recorder. Note: The 2D model does not have an FM radio or camera. Camera (4C Model only) With the camera, you can capture photos and specify camera and image settings. 35 Use Multimedia Features Capture photos From the main menu, 1. Select Multimedia > Camera. 2. Align your subject in the viewfinder and press the middle navigation button to capture the photo. 3. Press the left softkey to save the photo. Change camera options While capturing photos, press the left softkey to access camera settings. Scroll to the following options and set your preferences: Option Camera settings Image settings Scene mode Storage Function Set an anti-flicker rate (50Hz or 60Hz) or a delay timer (3 or 10 seconds) Set a preferred image size (176x220, 320x240, or 640x480) and image quality (Normal, High, or Low) Set a scene mode (Normal or Night) Set a storage location for captured photos (Phone or Memory card, if a memory card is installed) 36 Use Multimedia Features Video recorder (4C Model only) With the video recorder, you can record videos on your mobile phone. To use this feature, you must insert a memory card. Audio player With the audio player, you can listen to audio files (MP3, AWR, WAV, or MIDI) you have downloaded or transferred to your phone memory or an optional memory card. Listen to music To listen to music with the audio player, you must first download music files from the web or transfer files to your phone’s memory or a memory card. From the main menu, 1. Select Multimedia > Audio player. 2. Press [Options] > Music list to browse for an audio file. 3. Scroll to a music list and press [Browse]. 4. Scroll to an audio file and press [Play]. 5. Control playback with the navigation keys: - Left: press to skip to the beginning of the file or skip to the previous file; press and hold to scan backward in a file. 37 Use Multimedia Features - Right: press to skip to the next file; press and hold to scan forward in a file. - Middle: press to stop or resume playback. Access the music list While listening to music with the audio player, press [Options] > Music list to view a list of music files. Change play modes While listening to music with the audio player, press [Options] > Play mode. Select an option and press [OK]. Change the equalizer While listening to music with the audio player, press [Options] > Settings > Equalizer. Change visualizations While listening to music with the audio player, press [Options] > Settings > Display settings. Scroll to a visualization option and press [OK]. Video player (4C Model only) With the video player, you can view downloaded videos on your mobile phone. The video player supports AVI, MP3, and MP4 files. To use this feature, you must insert a 38 Use Multimedia Features memory card. Video files must be stored in the Video folder to be viewed with the Video player. View videos From the main menu, 1. Select Video player. 2. Press [Options] > Play list. 3. Scroll to a Video and press [OK]. 4. Scroll to a file and press [Options] > Play. 5. During playback, control the video with the navigation buttons: - Left: rewind - Right: fast forward - Up/Down: adjust the volume - Middle: press to pause or resume playback To stop the video, press [Back]. Recorder With the recorder, you can record audio on your mobile phone. To use this feature, you must insert a memory card. 39 Use Multimedia Features FM radio (4C Model only) With the FM radio, you can listen to local broadcasts and record audio. Listen to the FM radio The optional headset functions as a radio antenna. You must connect the headset to listen to the FM radio. 1. 2. Connect the headset to the headphone port at the bottom on your phone. From the main menu, select Multimedia > FM radio. 3. Control the radio with the navigation buttons: - Left/Right: press to scan for stations - Up: search for stations - Down: stop or start audio playback Scan for radio stations Automatically scan for radio stations to add all available stations to the channel list. 1. While listening to the radio, press [Options] > Auto search and save. 2. Press OK to begin scanning for radio stations. When the scan is complete, all radio stations with a 40 Use Multimedia Features strong enough signal to be recognized will be added to the channel list. Manually tune a radio station 1. While listening to the radio, press [Options] > Manual search. 2. Press the corresponding alphanumeric keys to enter a radio station. Note: Press 3. to enter a decimal (.) character. Press [OK] to tune the station. Edit radio station names Before you can edit radio station names, you must add radio stations to the list either manually or with the preset auto search function. 1. While listening to the radio, press [Options] > Channel list. 2. Scroll to a station and press [Options] > Edit. 3. Scroll to the station name and press the middle navigation key. 4. Enter the new station name and press OK. 5. If desired, scroll to Frequency and edit the station frequency. 41 6. Press Save to save your changes. Get Organized Your phone is equipped with several productivity tools to help you organize and manage your personal activities. Alarm With this tool, you can customize up to five alarms. Set an alarm From the main menu, 1. Select Tools > Alarm. 2. Scroll to an alarm location and press [Edit]. 3. Edit the following options as desired: Option Message Time Ringtone Repeat Function The name of the alarm The time of the alarm Select a sound for the alarm Set whether or not the alarm should reoccur 42 Get Organized Cancel an alarm When an alarm sounds, press [Stop] to cancel the alarm immediately. Calendar With the calendar, you can add and view events, such as reminders, meetings, or instructional courses. Change the calendar view To switch the calendar from weekly to monthly view or vice-versa, 1. From the main menu, select Tools > Calendar. 2. Press [Options] > Weekly or Monthly. Add events From the main menu, 1. Select Tools > Calendar. 2. Press [Options] > Add new schedule. 3. Scroll down to enter the following event information: Option Subject Date Function Enter a description of the event Set the date for the event 43 Get Organized Time Ringtone Type 4. Enter the time of the event Enter an alarm sound for the event reminder Enter a reminder frequency (Remind once, Daily, Weekly, Monthly, Yearly, or No reminding) When you are finished editing options, press [Save] > [Yes] to save the event. In the calendar, a highlight will appear on any day that includes an event. If you have set an alarm for the task, the phone will emit a tone and display a reminder on the home screen based on the setting you specified. View events by date From the main menu, 1. Select Tools > Calendar. 2. Scroll to any highlighted day in the calendar. 3. Press [Options] to see a list of events scheduled for that day. 4. Scroll to an event and press [Options] to view the event details. 44 Get Organized View all events From the main menu, 1. Select Tools > Calendar. 2. Press [Options] > All schedules to see all scheduled events. Delete events From the main menu, 1. Select Tools > Calendar. 2. Press [Options] > All schedules. 3. Scroll to an event and press [Options] > Delete. 4. Press [OK] to confirm deletion. Calculator With the calculator, you can perform basic mathematical calculations. Perform mathematical calculations From the main menu, 1. Select Tools > Calculator. 2. Enter a number. 45 Get Organized 3. Press the navigation key in the direction that corresponds to the desired function or press [Options] and select an operator. 4. Press [Equal] to view the result. World clock View the world clock to see the time in other countries. Note: The world clock calculates the time in other countries based on the time setting in your phone. Ensure that you have entered the correct time and date for your current location before using this tool. View the world clock From the main menu, 1. Select Tools > World clock. 2. If desired, press [Options] > Set daylight saving system. 3. Scroll left or right to view the current time and date in various countries. Note: To set the world clock time as your local time, press [Options] > Set as local. SIM Toolkit The SIM Toolkit (STK) menu allows you to access valueadded services offered by your network service provider. 46 To use these features, you must insert a SIM card and the services must be supported by your service provider. Contact your service provider for more details. Torch Your phone has a flash light (torch light) to help you see in dark areas. From the main menu, 1. Select Tools > Torch. 2. Select an option and press [OK]. Settings Customize various functions and options from the settings menu. From the main menu, select Settings. Dual-SIM Standby mode: Select one or both of your SIM cards to be used in standby mode. Reply by original SIM: Set to return calls and respond to MMS messages with the active SIM card. Set SIM name: Change the name of the SIM card. Call settings Network selection: Set the method for selecting mobile networks (automatic or manual). 47 Setting Call divert: Set the phone to forward incoming calls to voicemail or another number. Call barred: Prevent incoming or outgoing calls based on specified conditions. This feature is available only if supported by your service provider. You must enter the password given by your service provide to use this feature. For more details, contact your service provider. Call waiting: Set to receive a notification when receiving an incoming call, if you are already on another call. This feature is available only if supported by your service provider. For more details, contact your service provider. Hide ID: Set to block your caller ID from being shown or to display your ID from your phone or from the network. Select line: Set the active phone line to use. Flight mode: Activate or set flight mode to activate automatically when powering on the phone. Others: Set additional call settings: 48 Setting - 50 secs warning: Set to receive a notification when your call has reached 50 seconds in duration. - Vibration when connected: Set to receive notification when your device connects to a wireless network. - Answer/reject mode: Set to reply automatically by SMS when a call is rejected and whether or not to answer a call by pressing any key. - Auto redial: Activate or deactivate auto redial. Phone settings Time & Date: Set the time and date and the time and date formats. Select language: Select a display language (English, French, Spanish, Italian, or German). Shortcut settings: Change the navigation key shortcuts. Auto power on/off: Set times to automatically power on or power off the phone. Power management: View the current battery charge. 49 Setting Restore factory defaults: Restore all settings to their factory default values. Power on/off ringtone: Select a startup or shutdown ringtone. Display settings Wallpaper settings: Select a wallpaper. Idle display settings: Select items to show on the idle display. Contrast: Adjust the display contrast. Backlight: Adjust the backlight duration. Keypad backlight time: Adjust the duration of the keypad backlight. Animation effect: Select animations to show when powering on or powering off the phone. Security settings PIN: Set a PIN code (or use the one provided by your service provider) to restrict access to your SIM cards. If you enter an incorrect PIN three times in a row, you must enter a Pin Unlock Code (PUK) to unlock your phone. 50 Setting PIN2: Set a PIN2 code (or use the one provided by your service provider) to restrict access to your SIM cards. If you enter an incorrect PIN three times in a row, you must enter a Pin Unlock Code (PUK) to unlock your phone. Privacy: Set a privacy password to restrict access to your phone. Auto keypad lock: Set this lock to prevent unintentional inputs. Specify the duration that the phone will wait before locking the keypad. Lock screen by end-key: Set this feature to lock the phone by pressing and holding backlight is on. when the Profiles Select or edit a sound profile to control how your phone behaves when it needs to emit sounds. Connection management (4C Model only) Network account: Select, add, or edit network accounts. GPRS settings: Set when to connect to a GPRS network. 51 EKT1081 NOV12