1
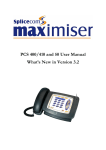
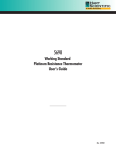
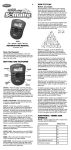
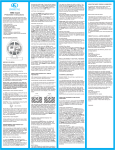
BlingClock User’s Manual
Table of Contents
Introduction
1
Screen Elements
2
Visualizer
4
Preferences
8
Keyboard Shortcuts
11
Install / UnInstall / Register
12
Why create a visual timer?
13
Introduction:
Easy by threes
It’s easy to use
If you can click on buttons and resize a window, you’ve already
got BlingClock mastered. A rich collection of settable preferences
and a variety of useful on-screen controls make BlingClock a
breeze to work with.
It’s easy to see
Big, clear digits, different color options, and several graphic
schemes clearly represent the passage of time. Flexible layout
designs let you change BlingClock‘s appearance every time you
use it—or pick a look you like and stick with it. Particularly
lustrous on large displays or projectors.
It’s easy to scale
No matter what mode you’re in, or which visualization you’ve
selected, BlingClock knows how to reshuffle the size and
placement of time, controls and graph to suit the space you have
in mind.
Three timekeeping modes
Clock
Need a time display that’s easy to read from across the room? Or
a tiny reminder in the corner of your screen? BlingClock’s display
offers optimal viewing for every situation.
Stopwatch
Click on
and watch the seconds tick away. Pick a graphic
combination and orientation to suit your screen real estate.
Countdown Timer
Many display options give you different graphic representations of
elapsed time. Keyboard entry to start, stop and reset a new
starting time is easy and convenient.
BlingClock User’s Manual
Screen elements
Since the screen elements can move around, here’s what they’re
for and where you’re likely to find them. They can fade away to
black, but will reappear once the cursor re-enters the window.
Standard layout
Compact layout
1 Time display
Now matter how you resize it, there’s always room for hours,
minutes, seconds and 100ths of a second - even days!
2 Controls
Start ( ), Pause ( ) and RESET buttons can be resized in Window
Tweaks (see below). Flanking the digit headings are (+) and (-)
signs: Click on these to add or subtract time, even while a timer
or stopwatch is running!
3 Preferences and display options
PREF
set a variety of Preferences (see below).
MINI
Convert to miniature display (Countdown Timer only).
FULL
NORM
Convert display to full-screen, as set up by Preferences
Reverts full-screen display to normal size.
VIZ
Changes display to next Visualization option.
See Visualizations, below.
Toggles between Standard and Compact button layouts.
Hides the window’s title bar.
Shows the window’s title bar.
-2-
BlingClock User’s Manual
4 Display toggles
These controls appear brighter when turned on, darker when off.
MUTE
TOP
100s
Toggles sound on and off.
When on, keeps BlingClock visible atop other windows.
Toggles display of 100ths of a second.
5 Time mode, continuation and tweaks
TIME / COUNT / STOPW
One click changes the mode from Time Mode to Countdown
Mode to Stopwatch Mode, etc.
OVER / STOP / LOOP / STICKY
In Countdown Mode, when BlingClock reaches zero, the alarm
sounds and the timer:
OVER—continues counting, showing time elapsed.
STOP—stops at zero, display flashes a few times.
LOOP—is reset and starts again.
STICKY—stops at zero and flashes until you click the window.
Window Tweaks:
Make quick window adjustments. The current setting appears in
the window, click to select the next.
Hover Help: as the cursor hovers over
controls, explanatory text shows.
Layout Titles: displays titles for mode
and visualization.
Fade Buttons: whether controls fade
to black, after a short time.
Color Theme: try ’em all: Default, Red, Green, Blue, Theme1,
Theme2.
Refresh Rate: how quickly the numbers/dots update.
Digit Headings: shows labels like “MINUTES” or “SECONDS.”
Close Buttons: change the size of the Window Controls 6
from small to large.
Digit Gamma: make the colors stand out from the
background.
Digit Ratio: FREE will try to fit digits into the available
window, FIXED imposes some non-distortion limits.
6 Window controls
Close, mimimize, maximize or resize BlingClock when the title
bar isn’t showing. Maximize is a one-monitor full-screen display.
Resize is extremely flexible, and may be restricted somewhat by
the Window Tweak: Digit Ratio FIXED setting.
-3-
BlingClock User’s Manual
Visualizer
Visualizers are graphic ways to represent the passage of time.
Dots fill the available space. Counting up, if more time is needed,
the dot size decreases to make space for more dots. When
counting down, dots grow to fill the available space. Unlike Bar or
Pie displays, the time isn't displayed as a fraction of a whole.
The Bar and Pie appear only in the Countdown Timer. The width
of the Bar, like the whole Pie, represents the “Reset” value of the
Countdown Timer. As time counts down, the shape of the brighter
color shows the remaining time as a shrinking fraction of the
whole Pie, or the decreasing left side of the Bar.
Time Mode: There are three visualizer layouts available in Time
Mode. The Digits can appear alone, or with Dots on the bottom or
Dots on the left of the layout.
Time: Digits
Time: Digits-Dots
Time: Dots-Digits
-4-
BlingClock User’s Manual
Countdown Timer: Digits appear alone or with one of the other
graphics, or with a tiny Bar in the Mini layout.
Countdown Timer: Mini
Countdown Timer: Digits
Countdown Timer: Digits-Dots
Countdown Timer: Dots-Digits
-5-
BlingClock User’s Manual
With the Bar or Pie graphics, you see the elapsed time in relation
to the original Reset time. Move the cursor over the bar and
BlingClock will compute and display the cursor position as a
percentage of the Reset time. Reposition either of two vertical
bars by clicking the cursor at the desired percentage.
Countdown Timer: Digits-Bar
Countdown Timer: Bar-Digits
Countdown Timer: Digits-Pie
Countdown Timer: Pie-Digits
-6-
BlingClock User’s Manual
Stopwatch Mode: There are three visualizer layouts available in
Stopwatch Mode. The Digits can appear alone, or with Dots on the
bottom or Dots on the left of the layout. Note that the blocks
representing hours appear larger than the minute dots, and
minutes count up for each hour.
Stopwatch: Digits
Stopwatch: Digits-Dots
Stopwatch: Dots-Digits
-7-
BlingClock User’s Manual
Preferences
Click on PREF to see the top Preferences menu. Click on the green
text to see and change a submenu:
Preferences - Main
Setting Time (Stopwatch or Countdown Timer Modes):
The easiest way to reset the
time on the Stopwatch or
Countdown Timer is to type in
a new time using the keyboard
(see Keyboard Shortcuts,
below). But if Dots are
showing, you can shorten the
time by a mouse-click in the
dot grid, and the timer will
change to reflect the cursor’s
position in the grid.
Another way to add or subtract time is to type a “+” or “-“ on the
keyboard. This preference pane lets you set how many seconds
will be added or subtracted to the time with each press of the
appropriate key. Choose between 1, 5, 10, 30 and 60 seconds.
Window Settings: Most of
these toggles are pretty selfexplanatory: leaving an option
checked will remember the
last window position, bring the
window to the front when an
alarm rings, hide a stationary
cursor or include the time in
the window title. Unchecked
options... won’t.
-8-
BlingClock User’s Manual
Using the FullScreen API may make for faster transitions. For
systems with multiple monitors, it will blank all displays and
activate BlingClock on the primary monitor. Otherwise, only the
current screen will be affected.
You have the options to change the window title, and insert text at
the top of the window (in Countdown Timer and Stopwatch
Modes), by inserting text in the two text boxes. Some title
suggestions: “Out to Lunch, due back,:” “Meeting Starts in...,”
or “PROJECT DUE!!!.”
Check for new version?
Depending upon your setting
here, BlingClock will check
automatically for new versions
every day, every week or not at
all.
Timer Display: You get a lot of
display flexibility here, with a 24hour clock, blinking separators or
flashing digits when Countdown
Timer, set to “Overrun,” passes
zero. This pane is also where you
select which Timer Mode you
want to see every time
BlingClock starts up.
Mini Timer Bar: There’s not
much screen real estate to
change for the Mini Countdown
Timer, but this preference pane
lets you show the remaining time
as a Bar representing the
fraction of the Reset time, or as
Dots representing the remaining
minutes and seconds.
-9-
BlingClock User’s Manual
Alarm Sound Settings: Unless
you’ve turned on the MUTE
display toggle, you’ll hear all the
alarm sound options as you
select them here. Feel free to
tailor your alarm sound to your
particular timer situation!
Reset to default settings:
Select the window and confirm
your selection with a final
mouseclick, or cancel by clicking
on “<<Back.”
Registration: This pane shows
your registration information.
About: Version, copyright and
site information.
- 10 -
BlingClock User’s Manual
Keyboard Shortcuts
Action
Shortcut
Add [increment] time to timer
Subtract [increment] time from timer
[increment] set in Preferences: Setting Time
+
-
Start or stop the timer
Reset the timer (if currently stopped)
SPACE
ENTER / RETURN
Visualizer - next mode
Visualizer - previous mode
-> arrow
<- arrow
Enter a new time (in Countdown and
Stopwatch Modes)—no punctuation needed
... confirm
... cancel
0-9
- 11 -
ENTER / RETURN
ESC
BlingClock User’s Manual
Install / Uninstall / Register
Install: To get the latest version of BlingClock, visit the website:
www.blingclock.com/
and follow the links to download the Windows or Mac versions.
The installation process is automatic.
Uninstall: The Windows download comes with an UnInstall app,
and Mac users need only throw the application in the Trash.
Register: The trial version of BlingClock includes most options,
and is limited to a small number of uses. Return to the website’s
home page, and near the download buttons, click the link to the
“online store” to register via PayPal. Individual, family, extended
family and organisation licenses are available.
D3Bug honors a 30-day Money Back Guarante. If you are unhappy
for any reason, just email [email protected] and your
money will be refunded.
Comments and suggestions for future versions are always
welcome!
- 12 -
BlingClock User’s Manual
Why create a visual timer?
"From an early age I've been fascinated by clocks and watches.
Since I've been about 5 years old I don't think I've ever been
without a watch, usually a digital one, and my house is chock-ablock with clocks of one sort or another.
BlingClock came about because of three things that happened
about the same time.
The first was having children! It struck me how the concept of 10
minutes to a child was so hard to grasp. I wanted a timer to show
them when 10 minutes was up. I tried various timers - kitchen
timers weren't much good because just showing the time in digits
was a little abstract. Egg timers were the best solution I found for
showing the time visually but not a very flexible approach without
a whole load of them!
The second was in my own work. I'm a computer programmer by
trade. When I'm working at client sites there are many
distractions to deal with and it can be quite difficult to settle down
and get focused on coding. The other problem with programming
is time can fly away from you! If you're really concentrating on
something an hour can fly by before you know it!
I was after a simple timer I could set to 15 minutes and would pop
up when the time had ticked away.
Having looked around at other timers (both hardware and
software) I was frustrated that I couldn't really find what I
wanted. Some were quite functional but looked awful, others were
quite simple but not that discreet. A few actually looked quite
good but again not quite what I wanted.
So I decided I'd write a simple to use, visual timer that wasn't
ugly! BlingClock was the result (a name suggested by a
colleague who saw me using my early versions!). Its something I
use myself every day in my working life for staying on task and
trying to get things done quickly. It represents man months of
development effort focusing on a simple usable timer."
—Paul McGuire, founder
- 13 -
BlingClock User’s Manual
Website: www.blingclock.com
Email: [email protected]
Manual: Question Authority, Inc.
2008-2010 © D3BUG Software Ltd - All rights reserved
- 14 -