1
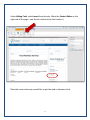
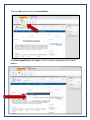
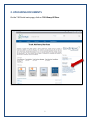
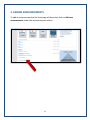
User’s Manual:
Inserting Links, Uploading Documents
and Adding Information
WAC December 2013
Table of Contents
Section 1. Adding Links…………………………………………………..3
Section 2. Uploading Documents……………………………………7
Section 3. Adding Announcements……………………………….12
Section 4. Adding Calendar Events……………………………….15
2
1. ADDING LINKS
To insert links to websites or documents, click on the menu arrow at the top right
corner of the links section and select Edit Web Part.
Double click somewhere inside the web part to open the page editing menu at the
top of the page. (See next page)
3
Under Editing Tools, select Insert from the tabs. (Note the Content Editor on the
right side of the page—you do not need to utilize this function.)
Place the cursor where you would like to put the web or document link.
4
Click on Link and then click on From Address.
The Insert Hyperlink box will appear. Fill in the link or document title and web
address.
5
Click ok and the link will be in the web part. When you are finished, select the
Page tab and click on Stop Editing to save and return to the normal view of the
TAS Portal.
You have now inserted a live link to a web page or document.
6
2. UPLOADING DOCUMENTS
On the TAS Portal main page, click on TAS Library All Docs.
7
When in the All Documents Library, choose the folder or section to which you
would like to add a document.
8
When in the folder or section to which you’d like to add a document, click on Add
document under the last folder in that section.
9
The Upload Document screen will pop up. From here you can browse folders for
documents and files that you can upload. (NOTE: Unclick the Add as new version
to existing files box.)
To drag and drop documents and folders from one file to the portal library, you
can click on the Upload Multiple Files link.
10
From here it is easy to drag and drop files quickly into the portal folder that you
have chosen.
When you have finished, click OK.
You have now uploaded documents and/or folders to the TAS Library files.
11
3. ADDING ANNOUNCEMENTS
To add an announcement to the front page of the portal, click on Add new
announcement under the announcements section.
12
Once the announcement text box opens up, double click somewhere inside the
box. The Editing Tools tabs will appear. To attach a file to your announcement,
click on the Edit tab and then Attach File.
13
Make sure your text is formatted consistently; click on the Format Text tab and
select the proper text features for your announcement. Type a summary of the
announcement in the Body section—this will appear on the home page. The full
announcement can be typed into the Body: Long section. Click save when you
are done.
You have now added an announcement to the TAS Portal home page.
14
4. ADDING CALENDAR EVENTS
To add a meeting or event to the TAS Portal Calendar, hover your mouse over the
date of the event. The word Add will appear in the bottom right corner of that
date section. Click Add and a Calendar- New Item box will pop up.
15
Fill in the event or meeting information in the appropriate fields. This cannot be
used to invite attendees; the event will only appear on the TAS main page
calendar.
When you have completed your entry, click save.
You have now added an event to the TAS Portal calendar.
If you have any questions, issues or comments regarding the TAS Portal,
please contact Ben Barber or Missy Van Epps in the WAC.
16