1
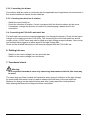
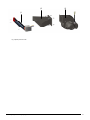
SIMCO (Nederland) B.V. Postbus 71 NL-7240 AB Lochem Telefoon + 31-(0)573-288333 Telefax + 31-(0)573-257319 E-mail [email protected] Internet http://www.simco-ion.nl Traderegister Apeldoorn No. 08046136 AEROSTAT HP-N-Ex Ionising Air Blower User’s Manual 1180 BAS00ATEX2162X II 2G Ex smb IIB T4 (Bar) II 2G c T4 / T3 (Blower) II 2G Ex e II T4 / T3 (Motor) HP-N-Ex_UM_9752060810_GB_V2_0 UK CONTENTS 1. Introduction .............................................................................................................................. 3 2. Safety ....................................................................................................................................... 3 3. Use and operation .................................................................................................................... 3 4. Technical specifications ........................................................................................................... 4 5. Installation ................................................................................................................................ 6 5.1. Checks .............................................................................................................................. 6 5.2. Installation of the HP-N-Ex Aerostat ................................................................................ 6 5.2.1. Summary..................................................................................................................... 6 5.2.2. Mounting ..................................................................................................................... 6 5.2.3. Installation of the HP-N-Ex .......................................................................................... 6 5.3. Installation of the blower .................................................................................................... 6 5.3.1. Summary..................................................................................................................... 6 5.3.2. Connecting the blower ................................................................................................ 7 5.3.3. Checking the direction of rotation................................................................................ 7 5.4. Connecting the P-Sh-N-Ex anti-static bar .......................................................................... 7 6. Putting into use ........................................................................................................................ 7 7. Functional check ...................................................................................................................... 7 8. Maintenance ............................................................................................................................ 8 8.1. General maintenance ........................................................................................................ 8 9. Faults ....................................................................................................................................... 8 9.1. Anti-static bar .................................................................................................................... 8 9.2. Blower ............................................................................................................................... 8 10. Repair .................................................................................................................................... 9 10.1. Replacing the anti-static bar ............................................................................................ 9 10.2. Replacing the air guide .................................................................................................... 9 11. Disposal ................................................................................................................................. 9 12. Spares.................................................................................................................................... 9 HP-N-Ex_UM_9752060810_GB_V2_0 2 USER'S MANUAL FOR HP-N-Ex IONISING AIR BLOWER 1. Introduction Read this manual completely before you install and put this product into use. This manual is intended as guideline for mounting, installing, and maintenance for skilled technical people. It should be read in combination with the additional manuals supplied separately for the P-Sh-N-Ex anti static bar and the radial fan (blower). Follow the instructions set out in these manuals to ensure proper operation of the product and to be able to invoke guarantee. The guarantee terms are stated in the General Conditions for the Sale and Delivery of Products and/or Performance of Activities by SIMCO (Nederland) B.V. 2. Safety - - The Simco-Ion HP-N-Ex Aerostat is only intended for neutralizing electro statically charged parts and/or surfaces. When used in potentially explosion hazardous environments: only use the HP-N-Ex Aerostat when the zone classification allows to use equipment as classified through the marking on the 3 labels on the H-P-N-Ex (classification on page 1 only for reference). Check the conditions for safe use in the ATEX certificate(s). Electrical installation shall be performed by a skilled electrical engineer. Make sure that the equipment is properly earthed. Earthing is needed to ensure proper operation and to avoid electrical shocks upon contact. No changes, adjustments, etc. are allowed. When changes, or no original parts have been used for repairs CE approval and Ex classification for the equipment will be withdrawn and the equipment will no longer be under guarantee. 3. Use and operation The Simco-Ion HP-N-Ex Aerostat is used to neutralize electro statically charged products and/or surfaces, also at longer distances (1.5 m max.). The ionizing air blower consists of a motor, a radial fan and an anti-static bar. The ambient air is drawn on one side and blown off along the anti-static bar. The power unit is integrated in the anti-static bar. The blower produces an air flow which is rich on positive and negative ions. When this air flow is pointed to an electro statically charged product or surface, electrons will be exchanged. This causes the product or material to be neutralized. The effective ionizing width is 380-580 mm. The HP-N-Ex Aerostat is suited for use in a potentially explosion hazardous environment, check if the zone where the equipment is going to be used complies with the equipment class. HP-N-Ex_UM_9752060810_GB_V2_0 3 4. Technical specifications Aerostat HP-NEx Voltage Frequency Blower Voltage / Current Power out Protection Power cable ATEX category ATEX Certificate Anti static bar Voltage Current Frequency Power cable ATEX category ATEX Certificate HV signal OK System HP-NEx Working distance: Working Width Weight: Noise level @ 1m Protection Ambient temperature Air velocity 230/400V 50Hz 230/400V 60Hz 254/440V 60Hz 277/480V 60Hz ∆ 230V AC 0.73A Υ 400V AC 0.42A 90W IP55 5m II 2 Gc T4/Ex e II T4 PTB02ATEX3114 ∆ 230V AC 0.76A Υ 400V AC 0.44A 90W IP55 5m II 2Gc T3/Ex e II T3 ∆ 254V AC 0.76A Υ 440V AC 0.4A 90W IP55 5m II 2Gc T3/Ex e II T3 ∆ 277V AC 0.7A Υ 480V AC 0.37A 90W IP55 5m II 2Gc T3/Ex e II T3 400V AC 50mA 50Hz 5m II 2 G Ex smb IIB T4 BAS00ATEX2162X 230V 10mA max 400V AC 50mA 60Hz 5m 440V AC 50mA 60Hz 5m 480V AC 50mA 60Hz 5m 50 - 1500mm 380 mm – 580mm 12.5kg 60dB(A) (See diagram) IP40 0 - 40°C see diagram HP-N-Ex_UM_9752060810_GB_V2_0 4 Fig. 1 Air flow HP-N-Ex HP-N-Ex_UM_9752060810_GB_V2_0 5 5. Installation 5.1. Checks - Check if the equipment is undamaged and that you have received the correct version. Check if the data on the packing slip corresponds with the data shown on the product received. Check if the voltage shown on the rating plates corresponds with the (mains) voltage you are going to use. Check if the equipment may be used in the environment (Ex-zone). Check if there are requirements or instructions in the additional manuals from the attached ionizing bar, blower and motor. If you have any problems and/or in the case of ambiguity: Please contact Simco-Ion or your regional agent. 5.2. Installation of the HP-N-Ex Aerostat 5.2.1. Summary The air flow from the blower must be in a direction between perpendicular to, and at an angle of approx. 45° in relation to the material. For maximum ionization the air flow must cover as large a surface as possible. The air flow direction must preferably be opposite to the material flow direction. In places where the material is going to be neutralized, it should have a free layer of air. The blower-neutralizing efficiency will drop dramatically when it blows along metal parts towards the area to be neutralized, as the ionizing function will be lost. The effectiveness of the blower depends on the distance to the material, the air flow and the material speed. The correct position and airflow direction should be established by experiment. 5.2.2. Mounting Fit the HP-N-Ex, using the extra mounting holes between the blower and the air guide. 5.2.3. Installation of the HP-N-Ex Warning: - Electrical installation shall be carried out by a skilled electrical engineer. - Earth the Aerostat properly: Earthing is required to ensure proper operation of the equipment and to avoid unpleasant electrical shocks upon contact. Earthing is provided through both line cords from blower and anti-static bar. 5.3. Installation of the blower 5.3.1. Summary Each blower motor must be fitted with a suitable protective motor switch. Adjust this switch to the rated motor current. The switch must be explosion proof or it must be mounted outside the explosion hazardous zone. For additional instructions see the manual from the blower: Operating instructions for radial fans for use in potentially explosive atmospheres. HP-N-Ex_UM_9752060810_GB_V2_0 6 5.3.2. Connecting the blower Connections shall be made in conformity with the applicable local regulations and instructions in this and the additional manual for the radial fan. 5.3.3. Checking the direction of rotation Switch the motor briefly on. Check the direction of rotation. It must correspond with the direction shown by the arrow. If necessary, change the direction of rotation by interchanging 2 phase wires in the connection. 5.4. Connecting the P-Sh-N-Ex anti-static bar The anti-static bar must be connected separately (not through the blower). Check for the mains voltage on the marking from the P-Sh-N-Ex. The connecting line of the anti-static bar should contain a fuse. A 230V neon lamp can be fitted as a high-voltage present indicator. Also a relay can be fitted which triggers an alarm signal if the high voltage fails. Check for the detailed instructions in the manual supplied with the P-Sh-N-Ex bar. 6. Putting into use Switch on the mains voltage from the anti-static bar. Switch on the mains voltage from the blower. 7. Functional check Warning: In an explosion-hazardous zone only measuring instruments suited for this zone may be used. The neon lamp you fitted (outside the hazardous area) gives an indication of the high voltage. An electrostatic field meter must be used to measure the efficiency of the anti-static bar. Measure the charge on the material before and after it has passed the ionising blower. After passing the blower the charge should be neutralised. HP-N-Ex_UM_9752060810_GB_V2_0 7 8. Maintenance Warning: When carrying out work on the equipment: de-energise the equipment. Follow instructions belonging to the Ex zone you are working in. 8.1. General maintenance Keep the Aerostat clean and dry. Clean fouled emitter points with a hard non-metallic brush. Attention: Do not damage the emitter points. 9. Faults 9.1. Anti-static bar Problem No/poor ionization No high voltage on emitter points Cause Remedy Anti-static bar is fouled Clean anti-static bar Emitter points are covered Remove the cover Emitter points are damaged Return anti static bar for repair No mains voltage on bar Restore mains voltage Line-side fuse is defective Anti-static bar is defective Replace the fuse Return anti-static bar for repair Table 1 Anti-static bar faults 9.2. Blower Problem Fan does not operate Cause No mains voltage Mains voltage on 2 phase wires only Protective motor switch is off Fan operates in wrong direction Fan does not come up to speed No remedy helps Fan incorrectly connected Mains voltage on 2 phase wires only Remedy Restore mains voltage Restore mains voltage on 3rd phase wire Turn on/reset protective motor switch, check why it has switched off Interchange connection of 2 phase wires Restore mains voltage on 3rd phase wire Return complete Aerostat Table 2 Blower faults HP-N-Ex_UM_9752060810_GB_V2_0 8 10. Repair Warning: When carrying out work on equipment: de-energise the equipment. Repairs shall be made by a skilled electrical engineer. 10.1. Replacing the anti-static bar 1. Disconnect the anti-static bar. 2. Dismount the four screws in the profiles from the bar which connects the bar with the air guide. 3. Dismount the anti-static bar. 4. Mount a new anti-static bar by fitting the four screws through the profile to the air guide. 5. Route and connect the connection lead. 10.2. Replacing the air guide 1. 2. 3. 4. 5. 6. Dismount and remove the Aerostat. Dismount and remove the anti-static bar. Dismount and remove the air guide from the blower. Mount a new air guide. Fit the anti-static bar. Fit the Aerostat, using the extra mounting holes between the blower and the air guide. For other repairs, Simco-Ion advises you to return the HP-N-Ex Request an RMA form by sending an e-mail to [email protected]. Pack the HP-N-Ex properly and clearly state the reason for return. 11. Disposal Adhere to the applicable local environmental and other rules when disposing of the equipment. 12. Spares Item No. Pos. Description 1590010000 1590010010 1590010710 1590010810 3610300000 6605314860 6605314850 6605314900 6605314910 (1) (1) (1) (1) (2) (3) (3) (3) (3) Anti-static bar P-SH-N-Ex, 400 V 50 Hz HP-N-Ex Anti-static bar P-SH-N-Ex, 400 V 60 Hz HP-N-Ex Anti-static bar P-SH-N-Ex, 440 V 60 Hz HP-N-Ex Anti-static bar P-SH-N-Ex, 480 V 60 Hz HP-N-Ex Air guide Blower 230/400 V 50 Hz 3 ph HP-N-Ex Blower 230/400 V 60 Hz 3 ph HP-N-Ex Blower 440 V 60 Hz 3 ph HP-N-Ex Blower 480 V 60 Hz 3 ph HP-N-Ex HP-N-Ex_UM_9752060810_GB_V2_0 9 (2 (3 (1 Fig. 2 Spare parts HP-N-Ex HP-N-Ex_UM_9752060810_GB_V2_0 10 EC Declaration of Conformity Manufacturer: Simco (Nederland) B.V. We declare under our sole responsibility that the product as described, is in conformity with the following standards. Product description: Ionising Air Blower consisting out of: Ionising bar P-Sh-N-Ex and blower DNG-47/S Type HP-N-Ex Applicable Directives: EC- Low Voltage Directive (2006/95/EC) EC- Machinery Directive (98/37/EC) EC- Electromagnetic compatibility (89/336/EEC) EC- Potential Explosive Atmospheres ATEX (94/9/EC) Classified Area: II 2G Ex smb IIB T4 (Bar) 1180 II 2G c T4 / T3 (Blower) II 2G Ex e II T4 / T3 (Motor) 0102 Notified Body + Certif. nr : Baseefa PTB Used Harmonized Standards: DIN EN 292-1 / DIN-EN292-2: DIN EN 60204-1: EN 50081-2: EN 61000-6-2 EN 60079-0: DIN EN 60079-10: EN 60079-18: DIN EN 1127-1: DIN EN 13463-1: DIN EN 13463-5: DIN EN 14986: Used National Standards: CSA C22.2 No. 60950-00/UL60950 Third edition CAN/CSA-C22.2 No. 60950-1-03/UL 60950-1 First edition SFA 3009: 1985 Place, Date, Signature: Lochem, 02 March 2009, Position and name: TSQ Manager, HP-N-Ex_UM_9752060810_GB_V2_0 1180 BAS00ATEX2162X (blower in var. 4.5) 0102 PTB02ATEX3114 2000 1998 1993 2001 2006 1996 2004 1997 2002 2001 2007 B.W. Bel 11