1
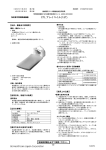
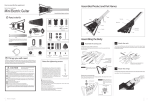
Instructions for Assembling and Operating
Takes about 20
Theremin mini
minutes for assembling
(The circuit board is already set.
Термен= (Theremin in Russian)
Parts in the Kit
antenna holder A
No need of soldering.)
leg (4)
switch lever
antenna holder B
small screw
(7)
large screw
(1)
back body
screw with collar
(4)
Things you will need
lower
body
Phillips screwdriver (#1) 4 newsize AA
alkaline or manganese batteries
※ Do not use nickel batteries, oxyride
batteries, or rechargeable batteries
such as nickel cadmium batteries to
avoid the risk of dissolution of parts or
ignition in case of a short circuit and
other mistakes.
Note for screwing
The screws in the kit are
the type of screws that
carve a slot in the plastic
when driven in. A #1 Philips
screwdriver is the right size
to use. When screwing,
press a screwdriver to a
screw vertically and turn
firmly. The right proportion
of the power is 70 % for
press and 30% for turn. A
actual size
precision screwdriver is
of a #1
difficult to turn, so use a
small screwdriver that has a screwdriver
grip with a diameter of
about 2cm.
upper body
Remove transparent protection films on
the lower body before assembling.
speaker
(covered with
a cardboard)
battery box lid
tuning stick
antenna
circuit board (already set)
CAUTION
Please read the following instructions before assembling
this kit
●Use caution when handling some pointed parts. Improper use may cause injury.
●To avoid the risk of suffocation, use caution not to swallow small parts such as screws.
●The point of the antenna is shaped like a hook. Use caution not to scratch your fingers with it
and be injured. Also, use caution not to prick eyes with it.
Four size AA batteries are required. Improper use of the batteries may cause the generation of
heat, explosions or leaks. The following precautions should be taken:
●Do not use rechargeable batteries such as nickel cadmium batteries, cadmium batteries, or
oxyride batteries to avoid the risk of dissolution of parts or ignition in case of the short circuit
and other mistakes.
● Ensure that the positive and negative terminals on the batteries are facing the right way.
● If liquid that leaked from batteries gets in an eye, rinse it well in a lot of water immediately and
consult a doctor. When liquid stick to skin or clothes, wash it up with water immediately.
●Remove batteries after an experiment.
★レPlease read the assembly instructions and cautions carefully before using the kit.
★レInstructions and cautions in this booklet should always be followed for safety. Do not use any
materials that have become damaged or deformed while in use.
★レRemove batteries after using the kit and keep these away from babies and children.
The plastic materials used in this kit
●body (rear upper lower), battery box
lid, legs: ABS (red)
●antenna holder A and B, switch lever,
tuning stick: POM (black)
●circuit board: phenol resin
☆Vinyl chloride resin is used for the
covers of the lead wires.
The metallic materials used in this kit
●antenna: stainless steel
●screw, metal contact: iron
Instructions for Assembling and Operating
1
The Structure of the
Theremin mini
The theremin is an electronic
instrument which makes sound by
drone of two frequencies.
a hand of the player
antenna
circuit (This
makes two
frequencies.)
speaker
switch lever
(This is used to
switch on and off
and to change
the sound level.
It cannot change
the volume while
playing.)
batteries (four size
AA batteries)
volume for tuning
(Used to adjust
two frequencies.)
When you bring your hand close to the
antenna, you can play high sound and when
you bring your hand away, you can play low
sound. The sound changes continuously, not
stepwise.
本体を組み立てよう
本体を組み立てよう
Assembling
the Body
本体を組み立てよう
1.脚をつける。
Attach the Put legs into the lower body and
1.脚をつける。
1
fix with small screws.
legs.
1.脚をつける。
※ For easy handling , stick a
screw to the magnetized tip of
the driver.
How to magnetize the driver
2.回路を組み込む。
2.回路を組み込む。
2 Install the circuit board.
2.回路を組み込む。
driver
1.Set the circuit board into the
lower body and fix with small
screws.
small screw
small screw
small screw
small screw
※Take the
connector out
of this part.
small screw
※he wires of the
speaker come off
easily. Pay
attention not to
pull too much.
Use caution
not to touch
the
transparent
cone part
since it is a
delicate part
small screw to make
sounds by
vibration.
circuit board
※See the
figure carefully
and pay
attention to the
direction of the
circuit.
small
screw
lower body
lower body
A strong magnet is used in
the speaker. Rub the tip of
the driver against the
magnet at the back of the
speaker a couple of times to
the same direction, and the
tip of the driver is
magnetized to stick the
screws. Let’
s try!
※ Be careful of the wires of the
speaker since it comes off
easily. Use caution not to touch
the transparent cone since it is
dented easily.
2
Otona no Kagaku
leg
※ Screw the
legs after
putting into
the lower body
completely, or
the legs are
fastened
loosely and
cause rickety
legs.
2.Insert the connecter of the battery box into the circuit board.
leg
connector
leg
leg
※Pay attention to the
direction and insert
completely.
black
red
3.Fit
the speaker in the back
3.スピーカーを本体(後)に
3.スピーカーを本体(後)に
body
and fix with screws
つば付きネジでとめる。
つば付きネジでとめる。
with
collar.
back body
screws with collar
3.スピーカーを本体(後)に
※Pay
attention
to the
direction.
circuit board
つば付きネジでとめる。
3.スピーカーを本体(後)に
つば付きネジでとめる。
※Fasten the screws
minding not to
touch the speaker
terminal.
3.本体(上)を本体(下)にはめて
3.本体(上)を本体(下)にはめて
3.①Set the switch lever on the switch on the circuit
ネジ(大)でつける。
ネジ(大)でつける。
board.
②A Put the upper body on the lower body and fix
3.本体(上)を本体(下)にはめて
hole
with the large screw. ネジ(大)でつける。
①
switch lever
projection
3.本体(上)を本体(下)にはめて
ネジ(大)でつける。 switch
②
upper body
Put the projection of the
switch into the hole in the
switch lever.
4.Fix the antenna and
the metal contact to
the lower body with a
screw with collar.
circuit board
screw with collar
antenna
gap
lower body
metal
contact
Set the antenna in the
gap.
large screw
Hold the upper and lower
bodies firmly with fingers and
screw tight.
wire
4.Set batteries in the battery box at the lower body and fit
lower body
the lid on.
3.本体を組み立てる。
3.本体を組み立てる。
3.本体を組み立てる。
3
Attaching the upper
※Make sure that the
positive and negative
terminals on the
batteries are facing
the right way.
※Pay attention not to be
with the hook at the
3.本体を組み立てる。injured
tip of the antenna.
1.Attach the
antenna
holders to the
antenna.
※Press and
snap them in.
lid of the battery box
antenna
antenna
holder B
antenna
holder A
2.①Put the antenna
through the hole in the
upper body.②Put the
antenna holder
in.③Slide the back body
in the groove of the
groove
upper body.
※Hold the antenna
holder with these
projections.
antenna
①
※Either side of
the antenna
holder can come
to the outer side.
②
③
upper body
back
body
Cut a mini
musical score on
the p.67 and put
it on.
※Pay
attention not
to bend the
antenna.
groove
lower body
※Put the back body in the groove
and slide to fit in completely.
Remove the
tuning stick
from the lid.
Complete!
Instructions for Assembling and Operating
3
ーニングする。
Tuning
1 1 What is tuning?
チューニングしよう
Aチューニングしよう
theremin is easily influenced by the circumstance
チューニングしよう
including
the player. So every time before playing a
チューニングしよう
2
Tuning
1.Pull out the switch lever
Tu n i n g i s v e r y
fine work. Be
patient to tune!
from the body. It beeps.
(Don’
t mind if it doesn’
t beep.)
2.チューニングする。
2.チューニングする。
There
are
two
sound
levels,
2.チューニングする。
large
and small.
2.チューニングする。
theremin, the player needs to tune the theremin for
1.チューニングとは
1.チューニングとは
himself.
Concretely speaking, tuning means to set メ
1.チューニングとは
1.チューニングとは
the zero
pointモ that is, the condition that sound of the 2.チューニングする。
チューニングしよう
theremin becomes lower and lower to be soundless, to
the normal position. The ideal zero point is the position
1.チューニングとは
about
20cm away from the antenna like the figure
below but it is playable if the point goes forward about
high sound
about 20cm
low sound
写真の手
soundless
zero point
antenna
player’
s hand
※If the sound is
too large, cover
the holes of the
speaker with
some adhesive
tape or tissue to
adjust.
sound level
large small
switch lever
Tune the theremin at the place where you
actually plays. Play it on a flat and stable
place like on a wooden desk. A steel desk is
not suitable since it may influence the sound.
adhesive tape
2.Turn the left volume with the tip of the tuning stick to
tune.
Don’
t move your left hand since it plays an important role
in tuning.
※Tuning doesn’t go
well if there are
something moving
around the
theremin. Keep
these things off the
body as far as
possible.
Turn the volumes to tune
A チューニングのポイント
theremin produces sound by the resonance of
チューニングのポイント
チューニングのポイント
two
frequencies.
The two volumes on the body are
チューニングのポイント
チューニングのポイント
to change each one of two frequencies. Turn the
volumes with the tuning stick.
※ B a s i c a l l y,
do not turn
this volume.
Hint on turning the tuning stick
At the last stage of the fine tuning, don’
t really move
the stick but just put power to the direction. Such
subtlety is needed to fine tune.
volume
Put in the hole
firmly.
※Put your
forefinger on
the uppermost
place of the leg.
tuning stick
音を出してみよう
3.Turn large the left volume
to right and left with the
tuning stick and make sure
the sound becomes high and
low. Also make sure there is
a soundless part.
※In case there are no soundless parts, turn the right volume a little to right
or left. Then turn the left volume again to make sure if there is a soundless
part. If there are no soundless places yet, turn the right volume larger.
4.Turn the left volume to the rightmost and then turn to
the left little by little. The sound becomes lower as
shown in the right figure below. When it becomes
soundless, reverse the volume a little. Stop at the point
where the sound beeps faintly.
※Reverse a little bit.
sound
high
low
※When the beep stops, reverse
the volume a little and stop with
the small beep sound. Pay
attention not to reverse too far.
4
Otona no Kagaku
音を出
0
beep
※When you turn
the left volume
from right to left,
the sound
changes from
high, to low, to
soundless, to low,
to high.
volume
Stop the left volume
at this point.
5.Bring your playing
zero point
hand to the point about
20cm away from the
antenna, that is, the
point you want to make
it the zero point. At the
moment, the theremin
still beeps.
about 20cm
playing
hand
Let's Try to Play!
Move your right hand and play C, D, E, F, G, A, B, C
with your left hand fixed.
about two octaves
!
ep
be
Move your playing
hand as horizontally
as possible.
antenna
playing hand
※Keep the
playing hand at
that point and do
the next step of
tuning.
※Don’
t move
the left
hand.
6.Bring down the left
hand that holds the
root of the leg slowly
and stop it at the point
where the theremin
becomes soundless.
※Keep the playing
hand at the point
where you want to
make it the zero
point.
Put your elbow on the
table to stabilize.
The sound is continuous and it changes when the hand
moves even if it is only 1mm move. Look for the
scales patiently and carefully.
Swing the antenna and
enjoy making vibrato
sound.
Twang twang!
Swing the antenna while
playing. Then the sound
becomes unstable and
sounds like vibrato.
If the sound doesn’
t stop though you bring your
away, turn the left volume to the left a
写真の手 hand
little bit and redo from 5. Use caution not to
turn the volume too much.
Tuning is finished!
写真の手
f the volume is
adjusted
appropriately, you
don’t have to hold
the theremin
with your
left hand
while
tuning. Try
to make your left
hand free!
Keep the left
hand
stationary.
about 20cm
※In case the sound
doesnt stop when you
bring down your left
hand,
Tuning is
finished!
Keep your left
hand at the
position where
the tuning is
finished.
ng!
Twa
The point of the antenna is shaped like a
hook. Use caution not to scratch your
fingers with it and be injured.
Mini
Scale
Oh, My Beloved Father
Puccini
Cut theses
scale along
the line and
put these on
the music
stand of the
theremin!
the extent of
the musical
performance
a-1
From the New World mvt Ⅱ Largo
Dvorak
※It may be difficult to
tune right after
switching on since the
condition of the
theremin is not stable.
In such a case, leave it
a few minuets after
switching on and then
start tuning.
a-2
El Condor Pasa
Robles / Milchberg
5
b-1
c-1
Oh, My Beloved Father
Puccini
From the New World mvt Ⅱ Largo
Dvorak
El Condor Pasa
Robles / Milchberg
Theremin mini
Circuit
Diagram
Q:My theremin doesn’t make sound.
A:
Check the assembly process.
Is the switch lever attached to the right place?
Are the antenna and wires attached correctly?
Is the connecter of the battery box set in the circuit completely?
Q&A
A:
Check the cone of the speaker.
The transparent part of the speaker oscillates to make sound.
If it is pushed with fingers and dented, it may not make clear sound.
A: Check if the batteries are new.
If the batteries are dead, change these with new batteries. Be careful of
the direction of the batteries.
A theremin consumes batteries as long as the switch is on even if it
doesn’t make sound. Turn off the switch when not in use and remove
batteries.
A:
Check the wires of the speaker
If the wires come off of the speaker, solder these up.
Q:I can’t tune it well.
A:
Tuning needs fine adjustment.
Turn the tuning stick more slightly. See メHint on turning the tuning stickモ
at the lower left of the p.4 and tune patiently.
Q:The zero point doesn’t become stable after
tuning.
A:
Check if there is something moving around the
theremin.
If something that conducts electricity is moving around the theremin, the
sound changes. Keep these things at a distance while tuning.
a-3
a-4
A:
A theremin is easily influenced by temperature and
humidity.
Leave the theremin a few minuets after switching on until it becomes
stable, and then start tuning one more time.
ゥCopyright by Edward B. Marks Music Company
c-2
b-2