1
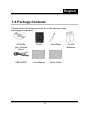
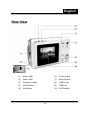
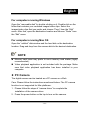
English FCC STATEMENT This device complies with Part 15 of the FCC Rules. Operation is subject to the following two conditions: (1). This device may not cause harmful interference, and (2). This device must accept any interference received, including interference that may cause undesired operation. Note: This equipment has been tested and found to comply with the limits for Class B digital devices, pursuant to Part 15 of the FCC rules. These limits are designed to provide reasonable protection against harmful interference in a residential installation. This equipment generates uses and can radiate radio frequency energy and, if not installed and used in accordance with the instructions, may cause harmful interference to radio communications. However, there is no guarantee that interference will not occur in a particular installation. If this equipment does cause harmful interference to radio or television reception, which can be determined by turning the equipment off and on, the user is encouraged to try to correct the interference by one or more of the following measures: Reorient or relocate the receiving antenna Increase the separation between the equipment and receiver Connect the equipment into an outlet on a circuit different from that to which the receiver is connected Use of shielded cable is required to comply with Class B limits in Subpart B of Part 15 of the FCC rules. -1- English Do not make any changes or modifications to the equipment unless otherwise specified in the manual. If such changes or modifications should be made, you could be required to stop operation of the equipment. Product Information 1. Product design and specifications are subject to change without 2. 3. 4. 5. notice. This includes primary product specifications, software, software drivers, and user’s manual. This User Manual is a general reference guide for the product. The product and accessories that come with your camera may be different from those described in this manual. This is due to the fact that different retailers often specify slightly different product inclusions and accessories to suit their market requirements, customer demographics, and geographical preferences. Products very often vary between retailers especially with accessories such as batteries, chargers, AC adapters, memory cards, cables, carrying cases/pouches, and language support. Occasionally a retailer will specify a unique product color, appearance, and internal memory capacity. Contact your dealer for precise product definition and included accessories. The illustrations in this manual are for the purpose of explanation and may differ from the actual design of your camera. The manufacturer assumes no liability for any errors or discrepancies in this user manual. For driver updates, you can check the “Download” section of our website, www.geniusnet.com.tw. -2- English Warnings Do not disassemble, change or repair the camera. This might cause fire or electric shock. For repair or internal inspection, ask the store of purchase. Do not use the camera in areas near water. This might cause fire or electric shock. Take special care during rain, snow, on the beach, or near the shore. Do not place the camera on inclined or unstable surfaces. This might cause the camera to fall or tilt over, causing injury. Keep the batteries out of the reach of children. Swallowing batteries might cause poisoning. If the battery is accidentally swallowed, immediately consult a physician. Do not use the camera while you are walking, driving or riding a motorcycle. This might cause you to fall over or result in traffic accident. Cautions Insert the batteries paying careful attention to the polarity (+ or –) of the terminals. Inserting the batteries with its polarities inverted might cause fire and injury, or damage to the surrounding areas due to the battery rupturing or leaking. Do not fire the flash close to anyone’s eyes. -3- English This might cause damage to the person’s eyesight. Do not subject the LCD monitor to impact. This might damage the glass on the screen or cause the internal fluid to leak. If the internal fluid enters your eyes or comes into contact with your body or clothes, rinse with fresh water. If the internal fluid has entered your eyes, consult a physician to receive treatment. A camera is a precision instrument. Do not drop it, strike it or use excessive force when handling the camera. This might cause damage to the camera. Do not use the camera in humid, steamy, smoky, or dusty places. This might cause fire or electric shock. Do not remove the battery immediately after long period of continuous use. The battery becomes hot during use. Touching a hot battery might cause burns. Do not wrap the camera or place it in cloth or blankets. This might cause heat to build up and deform the case, resulting in fire. Use the camera in a well-ventilated place. Do not leave the camera in places where the temperature may rise significantly, such as inside a car. This might adversely affect the case or the parts inside, resulting in fire. -4- English Before you move the camera, disconnect cords and cables. Failure to do this might damage cords and cables, resulting in fire and electric shock. Notes on Battery Usage When you use the battery, carefully read and strictly observe the Safety Instructions and the notes described below: Different battery types and surrounding temperatures may affect the battery performance. Avoid using batteries in extremely cold environments as low temperatures can shorten the battery life and reduce camera performance. If you are using the new rechargeable battery or rechargeable battery that has not been used for an extended period of time (batteries that pass the expiry date are exceptions) might affect the number of pictures that can be taken. Therefore, to maximize their performance and lifetime, we recommend that you fully charge the batteries and discharge them for at least one complete cycle before use. The battery may feel warm when using the camera for an extended period of time or using the flash continuously. This is normal and not a malfunction. The camera may feel warm when being used continuously or for an -5- English extended period of time. This is normal and not a malfunction. If you will not be using the batteries for an extended period of time, remove them from the camera to prevent leakage or corrosion. Always keep the terminals in a clean state. Never use manganese batteries. Risk of explosion if battery is replaced by an incorrect type. Dispose of used batteries according to the instructions. -6- English CONTENTS Chapter 1 Attention 9-12 3-6 Function Key 3-7 Set Button 1-1 Safety Precautions 3-8 Playback Hotkey 1-2 Before Using Your Camera 3-9 Macro Button 1-3 Operation Caution 1-4 Package Contents Chapter 4 Navigating Modes and Menus 23-30 Chapter 2 Getting to Know Your Camera 13-17 4-1 Caputer Mode 4-2 Playback Hotkey 2-1 Names of Parts 4-3 Movie Mode 2-2 Specifications 4-4 Setup Mode 2-3 System Requirements 4-5 PC Mode . Chapter 3 Controls, Operation, and Display 18-22 3-1 LED Indicators 3-2 LCD Monitor Display 3-3 Power Supply 3-4 Shutter Button 3-5 Mode Button Chapter 5 Preparing Your Camera 5-1 Attaching the Strap 5-2 Loading Batteries 5-3 Loading and Removing the Memory Card 5-4 -7- 31-35 Setting Up the English Driver OSD Language 5-5 Setting Up the Date/Time Chapter 6 Getting Started 7-1 Setup Mode 6-2 Caputer Mode 6-3 Playback Hotkey6-4 Movie Installing the Camera Driver in PC 35-44 6-1 Chapter 8 Installing the Application Mode 6-4 44-46 8-1 PC Mode Installing the Application in PC Chapter 7 Installing the Camera -8- 47-51 English Chapter 1 - Attention Please read through this manual carefully before using the camera and follow the instructions to avoid damages caused by improper operation. 1-1 Safety Precautions z The software CD-ROM packaged with the camera is designed for PC only. Using a stereo or CD player may damage the CD-ROM. z This camera is a precision electronic device. Do not attempt to service this camera yourself, as opening or removing covers may expose you to dangerous voltage points or other risks. z Do not expose this camera under direct sunlight to avoid causing a fire. 1-2 Before Using Your Camera z Take some test shots before you perform the formal recording. Before taking pictures with this camera in any important occasion (such as a wedding ceremony or an overseas trip), do test the camera beforehand to ensure that it functions well. Any additional loss caused by the malfunction of this product (such as costs of -9- English photography or any loss of benefit generated by the photography) is not the responsibility of our company and no compensation will be given for it. z Copyright information Unless agreed by the right owner, all the pictures taken with this digital camera cannot be used in violation of copyright law. Moreover, when "No Photography" restriction is placed on site, one cannot record any live performance, improvisation or exhibits even for personal purpose. Any transfer of pictures or memory card with data must be conducted under the constraints of copyright law. z Notes on the LCD (Liquid Crystal Display) monitor Please be extra careful with the liquid if the LCD monitor is damaged; also please abide the stated procedures, if the followings occur: 1. If the liquid makes contacts with the skin: Please wipe the skin dry with a cloth and wash thoroughly with water. 2. If the liquid gets in the eye: Please rinse with water immediately for at least 15 minutes and then consult a physician to receive treatment as soon as possible. 3. If the liquid is accidentally swallowed: Please rinse the mouth with water, drink large amount of water and induce vomiting. And then consult a physician to receive treatment as soon as possible. -10- English 1-3 Operation Caution This product consists of intricate electrical parts. To ensure the performance normality, do not drop or hit the camera when taking pictures. z Avoid using or placing the camera in the following locations: 1. Damp and dusty places. 2. Sealed vehicles, direct sunlight exposure areas, or places with extreme high temperatures or heat. 3. Violent turbulent environment. 4. Locations full of smoke, oil fumes or steams. 5. Locations subject to strong magnetic field. 6. Rainy or snowy environment. z Do not open the battery cover when the power is on. z If water has gotten into the camera, turn the power OFF and remove the batteries immediately. z How to maintain your camera: 1. If the lens, LCD monitor or viewfinder surface is dirty, please use lens brush or soft cloth to wipe clean instead of touching the lens with you fingers. 2. To avoid scratching the lens, LCD monitor or viewfinder surface, do not use any solid object to hit the camera. 3. Do not use any detergent or volatile solution, which will subject the camera case and the paint to solving or distortion. Use soft cloth only. -11- English 1-4 Package Contents Please check if the following items are in the package when purchasing this product. CD-ROM (incl. Camera Driver) Pouch Wrist Strap USB CABLE User Manual Quick Guide -12- 2x AAA Batteries English Chapter 2 Getting to Know Your Camera 2-1 Names of Parts Front View (1) Shutter (2) Power Switch (3) Self-timer LED (4) Flash Light (5) Lens (6) Strap Holder (7) Tripod Socket (8) Memory Card Slot (9) -13- Battery Cover English Rear View (1) Macro LED (6) Function Key (2) Status LED (7) Macro Button (3) Playback Hotkey (8) USB Cover (4) Mode Button (9) USB Port (5) Set Button (10) LCD Monitor -14- English 2-2 Specifications z Lens: f=8.34mm z Image Sensor: 1/2" CMOS with 3.3 mega pixel z Focus: F / 3.0 z Sensitivity: ISO 100 z White Balance: White Balance: Auto, Sunny, Tungsten, Fluorescent. z Shutter: Electrical z Shutter Speed: 1/4 sec. ~ 1/2000sec. z Storage Medium: 32MB Internal Flash Memory SD Card Slot (support 8MB~512MB) z Image File Format: Still Image for JPEG Motion Image for JPEG z Image Resolution: Fine: 2976 x 2232 (firmware Interpolation Technology), 2048 x 1536, 1600 x 1200, 1280 x 960 z Digital Zoom: 10-Step 4X Digital Zoom z Focal Range – Standard: 1.2m ~ Infinity z Focal Range – Macro: 17 ~ 22cm z Self-timer: 10 sec. delay z PC-CAM Mode: QVGA (320 x 240) 15 fps/ VGA (640 x 480) 15fps z Flash Mode: Auto, Off z PC Interface: USB (Ver. 1.1) z Movie File: Recording movie files for 83 seconds continuously with320 x 240 format -15- English (32MB internal memory) z Recordable Image Numbers (32MB): 1280x960 32MB 1600x1200 2048x1536 2976x2232 Fine 138 94 59 30 Normal 179 119 78 39 z Power Supply: 2 x AAA Alkaline Batteries or supports USB 5V (PC-CAM Mode) z Dimensions: 87 x 57 x 19 mm (without protruding parts) z Weight: About 75g (without the battery & SD card) 2-3 System Requirements When operating the digital camera, we strongly recommend you to use a better computer system for optimal performance. The minimal system requirement for digital camera is as follows: (For Macintosh computers, only removable disk is applicable) System requirements (Windows) System requirements (Macintosh) CPU Pentium II 400 MHz processor or higher PowerPC G3/G4 OS Windows 98/98SE/Me/2000/XP OS 9.0 or later Memory 64MB RAM 64MB RAM Free Space on 128MB hard disk space 128MB hard disk -16- English space Hard Disk Required Devices Display A CD-ROM drive, An available USB port A CD-ROM drive, An available USB port Color monitor (800x600, 24-bit or higher recommended) Color monitor (800x600, 24-bit or higher recommended) -17- English Chapter 3 Controls, Operation, and Display 3-1 LED Indicators The meanings of the LED indicators located on the top of the LCD monitor are: Macro LED (Green LED) Standby/Busy (Red LED) Macro (Left Green LED) The green LED will be on when the Macro key on the left hand side of the camera is switched to Macro mode. Busy (Right Red LED) The red LED will be on when the camera is recording or when the batteries for the flash light are charging. The LED would blink every 10 seconds under normal standby mode. -18- English 3-2 LCD Monitor Display (1) Current working mode (2) Memory Status (3) Number of pictures (4) Remaining battery power (5) Zoom lever (6) Flash light status 3-3 Power Supply z To turn on the camera, press and hold the power button until you hear a long beep. z To turn off the camera, press and hold the power button until you hear a long beep. -19- English z Press the power button on the top to turn on/off the camera. When the power is on, the red indicator will be blinking and the LCD monitor turns on. NOTE This camera has power saving design. If no operation on camera for 60 seconds, the power is turned off to prevent battery wear. Please power on camera again. The following features will automatically save the configuration before the camera is turned off unless the "Reset Default" has been selected to restore its factory anticipated settings. 1.Resolution 2.Image Quality 3.Language 4.White balance 5.EV value 6.Frequency 7.PC MODE 3-4 Shutter Button This camera is designed for 2-step shutter function. A "[ ]" mark will appear in the center of the LCD monitor when the Shutter button is pressed and held half way down. The camera will beep after the Shutter button is pressed down fully; then release the Shutter button to take a picture. -20- English 3-5 Mode Selection z Please press and hold ” ” button for 2 seconds to enter mode selection menu including “Play Mode” “Movie Mode” “Play Mode” “Capture Mode" “Setup Mode” “Capture Mode" “Setup Mode” "PC Mode” . “Movie Mode” "PC Mode” 3-6 Function Key z You can perform different operations in the different mode by using the Function Key, e.g. select, go up/down and move. -21- English 3-7 ”SET” Button z This key is used for SELECTION/SET UP under selection menu This key is also flash button under capture mode. 3-8 Playback Hotkey 1. Press this (quick view). button you can change to the Playback Mode 2. Capture Mode → Playback Mode → Capture Mode 3. Press Shutter Key to play the video and Press again to pause the video play or Press Key to Stop the video play. 3-9 Macro Button You can select between Standard and Macro mode under Capture mode and Movie mode by the switch on left side of the camera. When you have selected the Macro mode, the green LED will be on at the back of the camera. Standard Mode Macro Mode -22- English NOTE If you have selected the Macro Mode when using the camera, the flash off function will be enabled automatically. Chapter 4 Navigation Modes and Menus 4-1 Capture Mode For more information, please refer to the "3-2 LCD Monitor Display". Index for Quick Menu: -23- English ▲ ▲ ▼ ▼ ▲ ▲ ▼ ▼ ▲ ▲ ▼ ▼ ▲ ▲ ▲ Press MODE to enter -24- English 4-2 Playback Hotkey (1) Number of pictures Index for Quick Menu: 1. Delete Pictures 2. Slideshow Press Mode again to Exit Start Auto Play -25- English 3. DPOF (Digital Print Order Format) Settings z There are three options when printing images with DPOF: Printing one image, printing all images and the option of printing the recorded date or not. z DPOF function can only be operated when the printer settings of the memory card is inserted, and not active with the internal memory of the camera. NOTE If the memory card is not inserted, the DPOF function is disabled even if there are images stored in the internal memory. -26- English 4-3 Movie Mode (1) Movie Mode (2) Recorded Movie Time (seconds) (3) Recording (4) Remaining Battery Power 4-4 Setup Mode 1. Image Resolution 2976x2232 2048x1536 1280x960 1600x1200 -27- English 2. Image Quality (Fine Quality) (Normal Quality) 3. White Balance (Auto) (Fluorescent) (Sunny) (Tungsten) 4. EV Compensation -28- English 5. OSD Language 6. Date/Time 7. Light Frequency Select the correct frequency type (50Hz or 60Hz) according to your region. -29- English 8. Format Media NOTE If the memory card has been inserted, it would only format the memory card, and not the internal memory. 9. Reset to Default Factory Anticipated Settings 4-5 PC Mode -30- English Chapter 5 Preparing Your Camera 5-1 Attaching the Strap z Insert the thin end of the strap into the strap holder. . z Pass the other end of the strap through the loop. z Pull the strap tightly. -31- English 5-2 Loading Batteries ●Turn the camera off first. ●Insert 2 x AAA alkaline batteries or rechargeable batteries. Please make sure the batteries are fully charged. If the batteries are low power, please change the batteries as soon as possible to maintain operation normality. NOTE If the battery power indicator only shows one black block, the flash light would be disabled: If lower than 1.8V (when the battery power indicator turns red) the camera would automatically turn off. z Slide the battery cover open in the direction indicated by the arrow. z Insert the batteries according to the indication on the inner side of the cover. -32- English z Close and lock the battery cover. NOTE Do not open the cover roughly to avoid damaging the battery compartment cover. If the battery power indicator only shows one black block, the flash light would be disabled. When the battery indicator turns red, recording of still pictures and movies would be disabled. The Date/Time would be stored for approximately 3 minutes during battery change. However, double-check the correct Date/Time after the new batteries have been inserted. 5-3 Loading and Removing the Memory Card z Turn off the power of the camera first. Loading the Memory Card z Memory card insertion diagram. z Insert the memory card according to the indicated arrow. Removing the Memory Card -33- English z Press the memory card down gently first. z The memory card would pop up automatically. Remove the memory card according to the indicated arrow. Attention z Before using the camera, please remember to insert the memory card into the slot. If the memory card is full or contains other images, you can press the Mode Button to Format of the Setup Mode to format the memory card. z There is 32MB internal memory built-in in the digital camera for Image Storage. If the memory card is inserted, it will be the top priority for saving data. NOTE The specification of memory card applicable for this camera is SD or MMC (8MB~512MB). Please turn off the camera first when inserting/removing the SD memory card. Please don’t take out SD card while shooting or playback images to avoid damage risk on SD card or camera. -34- English z If the memory card is inserted from the wrong direction, it would not be fitted in. Do not force the insertion to avoid memory card damage. z If the camera does not detect the memory card, please gently wipe the metal interface of the card with a soft cloth and reload the card again. 5-4 Setting Up the OSD Language Before using the camera, please select "Language" to set the OSD language by pressing the Mode Button for 2 seconds to . Setup Mode 5-5 Date/Time Before using the camera, please select "Date/Time" to set the date for 2 seconds to Setup and time by pressing the Mode Button Mode . Chapter 6 Getting Started -35- English 6-1 Setup Mode By using the Setup Mode, you can adjust the basic camera settings, including: Image Size, Image Quality, White balance, and EV Compensation. General setting format and factory default setting. Setup for language, date/time and light frequency is as follows: 1. Press the power button on the top to turn on the camera. 2. Press Mode Button for 2 seconds to enter Setup menu and use Function key move to to . Button to get 3. Press the into Setup Mode screen, the LCD monitor will display the menu. 4. Use the “” of the Function key to move between selections; Use “” to toggle between selections. 5. Use Button to enter the menu. and confirm function selections with “” and ””. 6. Lastly, use the Button to confirm selections. -36- English 6-2 Capture Mode Capture Mode offers you a quick and easy way to take your ideal pictures. 1. Press the power button on the top to turn on the camera. You can also enter into Capture Mode through Mode Button for 2 seconds to enter Setup menu and use the Function key move to to , and select . Upon entering, images will appear on the LCD monitor. 2. Press and hold the Shutter button down half way to select the photography location, and a yellow “[ ]" will appear in the center of the LCD monitor. Select the AE, and press the Shutter button down fully and release it to complete the recording. 3. You can use to select two flash light modes when using the camera: Auto, and Off. 4. Using the Mode Button to set the details settings for recording images, e.g., Image Resolution, Image Quality, Self-timer, and White Balance settings. The menu will appear on the LCD is pressed. Use “” of the monitor when Mode Button Function key to move between selections. -37- English 5. Using “” and ”” of the Function key to adjust the digital zoom. The adjustment ratio of the digital zoom will appear on the left hand side of the LCD monitor, from 1.0 time to 4.0 times, with 0.5 times increase at each adjustment. 6. The green LED will be on when the Macro key on the left hand side of the camera is toggled to Macro Mode. NOTE If the icon appears on the LCD Monitor for low battery power, please change the batteries immediately to maintain operation normality. The countdown for the Self-timer is 10 seconds. There are 4 types of resolutions offered by the camera: 2976x2232 ,2048x1536, 1600x1200 and 1280x960 Please pay attention to the distance between the camera and the object when using the Flash Light. The internal built-in Flash Light of this camera is effective within 1.5 meter. If the Macro Mode is selected, the flash off function will be enabled automatically. If the "Memory Full" warning messages appear on the LCD Monitor, it means the memory card is full. Please remove the memory card and insert a new one in immediately. 6-3 Playback Hotkey -38- English In Play Mode, users can review the recorded still and movie pictures. To review the pictures, perform the following: 1. Press the power button on the top to turn on the camera. 2. Press Mode Button for 2 seconds to enter Setup menu and use Function key to . move to Button to get into 3. Press the Setup Mode screen, the LCD monitor will display the menu. 4. Use””and”” of the Function key to go to “previous” and “next” of the picture display. 5. You can select Delete Picture and Auto play when using the Button to enter the function menu. 6. Use “” of the Function key to move between selections; Use “” to toggle between selections. 7. Use Button to enter the menu. 8. Use exit to end the function menu, and return to Play Mode menu. NOTE DPOF function can only be operated when the memory card is inserted. -39- English If there is no image stored in the internal memory or memory card, a “No photo” message will pop up on the LCD Monitor in the Play Mode. 6-4 Movie Mode You can use Movie Mode to record movie pictures (not including audio). To record the movie pictures, perform the following: 1. Press the power button on the top to turn on the camera. 2. Press Mode Button for 2 seconds to enter Setup menu and use Function key to move to 3. Press the . Button to get into the Setup Mode screen, the LCD monitor will then display the menu. 4. The top left hand corner will display the recorded time in red while you are recording the movie pictures. 5. The green LED will be on when the Macro key on the left hand -40- English side of the camera is toggled to Macro Mode. NOTE When the LCD monitor displays “Memory full", the recording will be stopped because the memory card is full. When recording the movie pictures, the maximum recording time will depend on the free spaces of the memory card. The digital zoom function will be disabled when recording movie pictures. 6-5 PC Mode z Mass Storage The digital camera offers removable disk function such as a card reader device. You can treat this digital camera as an SD device; just follow the instructions mentioned below: 1. Please follow the steps of “camera driver” to complete the installation of the camera driver. -41- English 2. Press the power button on the top to turn on the camera. 3. Press Mode Button for 2 seconds to enter Setup menu and use Function key to move to . 4. You will see “Mass storage” and “PC camera” upon entering the menu screen when the Button is pressed. to move to “removable disk” and 5. Please use the Function key press Function key to confirm storage. 6. Please connect the USB cable to the camera and the PC when the diagram USB Connection pops up the screen. 7. A new item – removable disk will be added into my computer after the system installation is completed. 8. You may start to operate with the newly added removable disk (SD device) offered by the digital camera. -42- English For computers running Windows Open the “removable disk” by double-clicking on it. Double-click on the folder that contains your recorded images/video clips. Select the images/video clips that you prefer and choose “Copy” from the “Edit” menu. After that, open the destination location and choose “Paste” from the “Edit” menu. For computers running Mac OS Open the “untitled” disk window and the hard disk or the destination location. Drag and drop from the camera disk to the desired destination. NOTE Memory card users may prefer to use a memory card reader (highly recommended). Video playback application is not included with the package. Make sure that video playback application has been installed in your computer. z PC Camera The digital camera can be treated as a PC camera or a Web Cam. Please follow the instructions mentioned below: The PC camera function is not supported for Mac platforms. 1. Please follow the steps of “camera driver” to complete the installation of the camera driver. 2. Press the power button on the top to turn on the camera. -43- English 3. Press Mode Button for 2 seconds to enter Setup menu and use Function key to move to . 4. You will see “PC Camera” and “PC camera” upon entering the menu screen when the Function key is pressed. 5. Please use the Function key to move to “PC Camera” and press Function key to confirm storage. 6. Please connect the USB cable to the camera and the PC when the diagram USB Connection pops up the screen. 7. You may operate the PC camera through the software that comes with the CD-ROM or other software. Chapter 7 Installing the Camera Driver -44- English 7-1. Installing the Camera Driver in PC You can use the "Mass Storage" and "PC Camera" functions of the camera in the PC. To install the proper camera driver, perform the following: 1. Insert the Software CD supplied by the package into the CD-ROM drive. 2. The Auto-run program will be executed and the welcome screen will appear the following message: (If your CD-ROM drive doesn't support the auto-run function, please double click on the "My Computer" icon on the desktop. Then double click the CD-ROM drive icon and click the " Driversetup\Setup.exe " file in the root directory.) 3. Please select the desired language of setup program you want to install. 4. Please click on the "Driver > Install", the following screen will appear: 5. Select the desired language, and then press "OK". -45- English 6. Entering the application setup screen, press "Next" to continue. 7. After the installation is complete, the following screen will appear, press "installation is complete" to complete application installation. -46- English -47- English Chapter 8 Installing the Application 8-1 Installing the Application in PC NewSoft application installation (In case of MP38) 1. Insert the Software CD supplied by the package into the CD-ROM drive. 2. The Auto-run program will be executed and the welcome screen will appear the following message: (If your CD-ROM drive doesn't support the auto-run function, please double click on the "My Computer" icon on the desktop. Then double click the CD-ROM drive icon and click the "MP38\Setup.exe" file in the root directory.) 3. Please select the desired language of setup program you want to install. 4. Please click on the "New Soft Video works > Install", the following screen will appear: 5. Select the desired language, and then press "OK". -48- English 6. Press "Yes" to accept the conditions of Legal Disclaimer and continue the installation. 7. Please select the area of language, then press "Next" to continue. -49- English 8. Entering the application setup screen, press "Next" to continue. 9. Press "Yes" to accept the conditions of Software License Agreement and continue the installation. -50- English 10. Please follow the installation wizard to select the folder location. 11. Please select the program folder name. 12. After the installation is completed, the following screen will appear. Press "installation is complete" to complete the application installation. -51- English 13. After the Multimedia Software is complete, the following screen will appear, press "Ok" to continue. 14. Entering DirectX9 setup screen, press "Ok" after the content is confirmed. -52-