1
DIGITAL CAMERA KIT
5.18 MEGAPIXELS
© 2003 Medion®. All rights reserved. Microsoft®, MS-DOS®, and Windows®
are registered trademarks of Microsoft Corporation in the U.S. and other
countries. Pentium® is a registered trademark of Intel Corporation. The
names of actual companies and products mentioned herein may be the
trademarks of their respective owners.
This product incorporates copyright protection technology that is protected
by method claims of certain U.S. patents and other intellectual property
rights owned by Macrovision Corporation and other rights owners. Use of
this copyright protection technology must be authorized by Macrovision
Corporation, and is intended for home and other limited viewing uses only
unless otherwise authorized by Macrovision Corporation. Reverse engineering or disassembly is prohibited.
Information in this document is subject to change without
notice.
Table of Contents:
SAFETY AND SERVICE ................................................. 1
Safety Notes ............................................................... 1
Operating safety................................................................. 1
Set-up location................................................................... 1
Connecting ........................................................................ 2
FCC Compliance Statement.................................................. 3
Repair ............................................................................... 4
Cleaning ..................................................................... 4
Data security ..................................................................... 4
Batteries and proper treatment ..................................... 5
INTRODUCTION .......................................................... 6
Notes on these instructions ........................................... 6
Quality .............................................................................. 6
Contents..................................................................... 7
System requirements ................................................... 7
Specifications .............................................................. 8
EXAMINING YOUR CAMERA ......................................... 9
QUICK START ............................................................ 12
1. Insert batteries and memory card .............................12
2. Turn the camera on.................................................13
3. Select still mode .....................................................13
4. Frame your subject .................................................13
5. Set auto focus and exposure ....................................13
6. Take the picture .....................................................13
Checking the battery level ...........................................14
Using the AC power adapter.........................................14
Attaching the strap .....................................................15
LCD menus ................................................................15
ii
SET UP MODE .............................................................16
Selecting the language................................................ 16
Setting automatic shut off ........................................... 17
Setting the camera sound ........................................... 17
Setting the date and time............................................ 17
Setting the LCD brightness .......................................... 17
Formatting the memory card ....................................... 18
Setting start up screen................................................ 18
Setting start up sound ................................................ 18
Resetting your camera ................................................ 18
Default settings.......................................................... 19
STILL MODE ...............................................................20
Using the LCD display ................................................. 20
Icons .............................................................................. 21
LCD modes ...................................................................... 22
Zooming in or out....................................................... 23
Optical zoom.................................................................... 23
Digital zoom .................................................................... 23
Taking a picture using auto focus ................................. 24
Using focus lock ............................................................... 25
Using scene modes..................................................... 26
Long exposures (yellow hand icon) ..................................... 27
Taking a quick series of pictures................................... 27
Setting exposure compensation.................................... 28
Using the self-timer .................................................... 29
Using the built-in flash ................................................ 30
Still mode menu......................................................... 31
Setting image size (resolution)...........................................
Setting image quality ........................................................
Setting white balance........................................................
Setting exposure area .......................................................
Setting focus area ............................................................
Setting focus mode ...........................................................
Setting light sensitivity......................................................
Setting exposure mode .....................................................
Setting sharpness .............................................................
Adjusting saturation..........................................................
Style ...............................................................................
32
32
33
34
35
35
35
36
37
37
38
iii
RECORDING VIDEO CLIPS ......................................... 39
REVIEWING IMAGES AND VIDEO CLIPS .................... 40
Using the LCD display .................................................40
Playback mode ...........................................................41
Using index display .....................................................42
Activating digital enlargement ......................................43
Using the playback menu.............................................44
Recording audio clips for still images .............................45
Displaying a slide show ...............................................46
Deleting all pictures ....................................................46
Setting DPOF (Digital Print Order Format)......................47
Rotating the images ....................................................47
Folders ......................................................................47
Protecting pictures and video clips ................................48
Copy/move images & video clips...................................48
Selecting a start-up screen photo .................................49
Displaying images on a TV ...........................................49
TRANSFERRING IMAGES TO A PC .............................. 50
Software installation ...................................................50
Installing the camera software ........................................... 51
Connecting the digital camera to a PC ...........................51
Transferring images .......................................................... 52
TIPS AND TRICKS...................................................... 53
Using camera batteries and rechargeable batteries ........53
Using the memory card ...............................................53
Care of the LCD display ...............................................54
Using the digital camera ..............................................54
CUSTOMER CARE ....................................................... 55
Troubleshooting..........................................................55
Driver support ............................................................57
Additional support.......................................................57
Warranty ...................................................................58
Making copies of this manual .......................................60
iv
SAFETY AND SERVICE
SAFETY NOTES
This manual contains important information about how to
safely and properly set up, use, and care for your digital
camera. Read this manual carefully and follow all of the instructions given. Keep these instructions with your camera at
all times. The proper set up, use and care can help extend
the life of your camera.
OPERATING SAFETY
• DO NOT take the camera apart. Do not attempt to service or repair the camera yourself.
Refer all servicing to qualified service personnel.
• DO NOT allow children to use electrical appliances without supervision. Failure to follow
safety precautions can result in serious injury
from electric shock or fire.
• DO NOT expose the camera to liquids or
moisture.
• DO NOT drop your camera or subject the
camera to harm. This camera is NOT designed
for use within industrial environments.
SET-UP LOCATION
Keep your camera and all connected equipment away
from moisture at all times.
Avoid exposing your camera to dust, heat, and direct
sunlight.
Place and operate all components on a stable, level, and
vibration-free surface to prevent the camera from falling.
Provide for a suitable ambient temperature (see below).
SAFETY AND SERVICE
1
AMBIENT TEMPERATURE
The camera can be operated at an ambient temperature
between 32°–104° F (0°C – 40°C) and a relative humidity
of 20-80%. When powered off the camera can be stored at
a temperature range between -4°–158° F (-20°C-70°C)
and a relative humidity of 20-90%.
After transporting your camera wait until it has
reached room temperature before powering on.
Drastic variations in temperature and humidity
can create condensation within the camera and
may cause the unit to short-circuit.
ELECTROMAGNETIC COMPATIBILITY
When connecting the camera to a PC or other electrical
appliance, follow the guidelines for electromagnetic
compatibility (EMC).
Use only the USB cable supplied.
Maintain a distance of at least three feet from sources
of high frequency and magnetic interference (e.g.,
television sets, loudspeakers, mobile telephones, etc.) in
order to avoid camera malfunction and/or data loss.
CONNECTING
Observe the following precautions when connecting your
camera to a PC or other electrical appliance:
Route the cable so that to no one can step on it or stumble over it.
Do not place objects on the cable or in such a manner
that they may interrupt or damage the cable connection.
2
FCC COMPLIANCE STATEMENT
This equipment has been tested and found to comply with the
limits for a Class B digital device, pursuant to Part 15 of FCC
Rules. These limits are designed to provide reasonable protection against harmful interference in a residential installation.
This equipment generates, uses, and can radiate radio frequency energy and, if not installed and used in accordance
with the instructions, may cause harmful interference to radio
communications. However, there is no guarantee that interference will not occur in a particular installation. If this equipment does cause harmful interference to radio or television
reception, which can be determined by turning the equipment
off and on, the user is encouraged to try to correct the interference by one or more of the following measures:
Reorient or relocate the receiving antenna.
Increase the separation between the equipment and receiver.
Connect the equipment into an outlet on a circuit different from that to which the receiver is connected.
Consult the dealer or an experienced technician for help.
Changes or modifications not expressly approved by the party
responsible for compliance could void the user’s authority to
operate the equipment. Shielded interface cables, if any, must
be used in order to comply with the emission limits.
SAFETY AND SERVICE
3
REPAIR
Please contact our service center if you have problems with
your camera. Have repairs serviced only by authorized service dealers.
Contact your service dealer when...
Liquid has gotten inside of the camera.
The camera does not operate properly.
The camera falls and the housing is damaged.
CLEANING
Avoid exposing the camera to dirt or dust.
Ensure that the camera and lenses are not dirty and are
covered when not in use.
Clean the camera with a soft, moist cloth.
Do not use any type of solvents, caustic or gaseous
cleaning agents.
DATA SECURITY
Every time you update your data make back-up
copies on an external storage medium. Medion
does not assume liability for data loss or damage
to data storage units.
4
BATTERIES AND PROPER TREATMENT
Batteries may contain combustible materials. By misuse, this may
cause battery leakage, heat, explosion or ignition, bringing about
injury or damage to the device.
Please observe strictly the following matters:
KEEP CHILDREN AWAY from batteries.
If by any chance, the batteries are swallowed, consult a doctor
immediately.
DO NOT CHARGE batteries (except rechargeable batteries).
DO NOT FORCIBLY DISCHARGE batteries.
DO NOT SHORT-CIRCUIT batteries.
DO NOT HEAT or DISPOSE OF IN FIRE.
DO NOT DISASSEMBLE or DEFORM batteries.
Your hands and fingers may be injured, or the liquid of the battery
may get into your eyes or adhere to your skin. If this happens, rinse
with a large quantity of water immediately and consult a doctor.
DO NOT expose batteries to strong impact by dropping or throwing the batteries.
DO NOT reverse the positive (+) and negative (-) terminals
to avoid short-circuit.
Do NOT MIX used and new or different types of batteries together.
Your equipment may not operate properly.
In addition, the battery exhausted first may be excessively drained
(over-discharged).
REMOVE PROMPTLY the used batteries from the device.
REPLACE ALL BATTERIES with new batteries of the same type
at the same time.
INSULATE THE TERMINAL parts with tape or the like at the
storage or disposal of the batteries.
DO NOT throw rundown batteries in the domestic refuses!
Respect the environment and throw them in the specific containers for separate collection. If necessary, turn to your reseller or to our service assistance. Thank you!
SAFETY AND SERVICE
5
INTRODUCTION
NOTES ON THESE INSTRUCTIONS
These instructions are arranged by subject to help you
quickly find information regarding your camera.
Help with application programs and your PC’s operating system (e.g., Microsoft Windows®) can be found within those
programs. Generally, help functions are available by pressing
a key (usually F1) or by selecting “Help” from a menu.
QUALITY
In selecting the components for this digital camera we focused
on maximum functionality, simple handling, safety, and reliability. The balance struck between ease of use and depth of
features has allowed us to offer you an advanced camera design that will provide you a great deal of enjoyment.
6
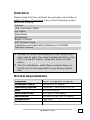
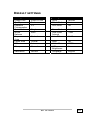
CONTENTS
Please check that the contents are complete and notify us
within 14 days of purchase if any of the following components are missing:
Camera
USB Connection Cable
A/V Cable
Wrist Strap
AC Adapter
Battery Charger
SDTM Memory Card
Installation and Application Software on CD-ROM
This User Manual
 In order to install the software for your camera you
may need to enter the serial numbers printed on the
CD or on the CD sleeve. Keep this code in a safe
place.
 Prior to installation, write these numbers down as
the CD will not be accessible to you during installation.
SYSTEM REQUIREMENTS
Computer
Processor Power
Operating System
RAM
Hard Disk Drive
Installation
Connections
Hardware
PC/AT compatible computer
Pentium II or higher
Windows® 98SE/ME/2000/XP
32 MB or more
110 MB of free space
CD-ROM drive (4x or higher)
USB port
VGA color monitor
INTRODUCTION
7
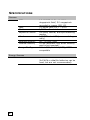
SPECIFICATIONS
Camera
CCD
Lens
Shutter
Exposure Control
Monitor
External Memory
Internal Memory
Image File Type
1/1.8” CCD (4:3) with 5.18
megapixels total, 5.0 megapixels
recorded in image, ISO 100
3 x zoom lens; f/2.7 – f/4.9
1/2000 – 2 seconds
Full area, central, and spot metering
modes
1.5” TFT color LCD (measured diagonally)
SD™ or MMC card
16 MB (available only when memory
card is not inserted).
24-bit RGB, Exif 2.1 (DCF), DPOF
compatible
Energy Sources
Batteries
8
2 AA NiMH rechargeable batteries
(AA NiCd or alkaline batteries can be
used, but are not recommended)
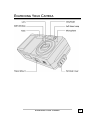
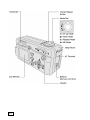
EXAMINING YOUR CAMERA
EXAMINING YOUR CAMERA
9
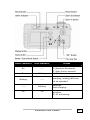
10
Green Indicator
Red Indicator
On
-----
On
Blinking
Blinking
-----
----On
Blinking
On
Status
The camera works normally.
AE (Aperture Exposure),
AF (Auto Focus) success.
AE, AF fail.
The camera is busy (process
recording, loading) and can
not be operated.
Warnings.
Flash charging.
Errors such as failure in
operation.
AE, AF processing.
EXAMINING YOUR CAMERA
11
QUICK START
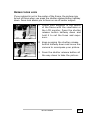
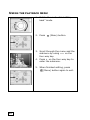
1. INSERT BATTERIES AND MEMORY CARD
This camera uses two 1.5V batteries (type AA). Be careful
when removing batteries from the camera as the batteries
generate heat when the camera is running.
1. Turn the camera upside down with
the front of the camera facing you.
2. Open the battery / memory card
door by pushing it upwards.
3. Insert two AA batteries.
(Please follow the battery us guidelines on page 5.)
4. Insert a SD/MMC card and make
sure it is firmly in place.
5. Close the battery/ memory card
door by pushing it downwards.
12
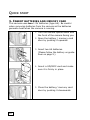
2. TURN THE CAMERA ON
Press the on/off switch to turn the
camera on. (Press the on/off switch
again to turn off the camera.)
3. SELECT STILL MODE
Rotate the mode dial on the top of the
.
camera to still mode
4. FRAME YOUR SUBJECT
Use either the optical viewfinder or the LCD display to make
sure your subject is framed correctly.
5. SET AUTO FOCUS AND EXPOSURE
Press the shutter release button halfway down to set the focus and exposure. The focus brackets on the LCD
display will turn green when auto focus
and exposure have been set.
6. TAKE THE PICTURE
Press the shutter release button all the
way down to take the picture.
QUICK START
13
CHECKING THE BATTERY LEVEL
If batteries or rechargeable batteries have been placed in the
camera, the camera automatically checks the level and displays it on the LCD screen.
Indicator Message
The batteries are fully charged.
The batteries are no longer fully charged, but
the camera is completely functional.
The batteries are exhausted.
To help extend battery life, the camera automatically shuts
down if left unused for several minutes (see page 15).
USING THE AC POWER ADAPTER
If you have access to an AC outlet, using the
AC adapter will let you use the camera without draining the batteries. If you connect the
camera to a computer, you should use the AC
adapter.
•
Plug the adapter into the connection
point (DC IN) on the camera.
 Always turn off your camera’s power before taking
the AC adapter out of the AC outlet. As with all electronic devices, safety is important. Ensure that neither the camera nor the adapter comes into contact
with water or metallic materials.
14
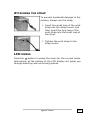
ATTACHING THE STRAP
To prevent accidental damage to the
camera, always use the strap.
1. Insert the small loop of the wrist
strap into the strap mount, and
then insert the long loop of the
wrist strap into the small loop of
the strap.
2. Tighten the wrist strap to the
strap mount.
LCD MENUS
Press the
button to access the menu for the current mode.
Instructions at the bottom of the LCD display will guide you
through selecting and confirming options.
QUICK START
15
SET UP MODE
1. Switch the Camera ON.
2. Rotate the mode dial to S (Setup).
3. Scroll through the menu by using
on the four-way key and
move to desired item.
4. Enter the submenu by pressing on the four-way keys as described
on the bottom line of the display.
SELECTING THE LANGUAGE
This allows you to set the language for camera menus.
1. Enter set-up up mode.
2. Select “Language”. This is the first menu item.
3. Select the language you prefer and then press "OK" to
confirm the setting.
16
SETTING AUTOMATIC SHUT OFF
To save battery power, the camera turns off automatically
when it is not in use.
1. Enter set-up up mode.
2. Select “Auto Off”.
3. Select the amount of time that you would like the camera to wait before it shuts off automatically.
4. Press the “OK” button to confirm the setting.
SETTING THE CAMERA SOUND
This allows you to choose whether the camera should produce a beep when you press the buttons.
1. Enter set-up up mode.
2. Select “Beep”.
3. Select “On” or “Off” and then press “OK” to confirm
the setting.
SETTING THE DATE AND TIME
1. Enter set-up up mode.
2. Select “Date/Time”.
3. Move to the item you want to adjust by using on the
four-way key, and adjust the value of the item by pressing on the four-way key
4. Press "OK" to confirm the setting.
 Note: Date and time do not appear when you print
your pictures. They are saved in the file properties.
SETTING THE LCD BRIGHTNESS
1. Enter set-up up mode.
2. Select “LCD Brightness”.
3. Adjust the brightness to the level you prefer and then
press “OK” to confirm the setting.
SET UP MODE
17
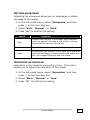
FORMATTING THE MEMORY CARD
Formatting your memory card will delete all of the images,
data, information and folders in your memory card or built-in
memory, including protected images.
1. Enter set-up mode.
2. Select “Format”.
3. Select “Internal” to format the camera’s internal
memory or “Card” to format the memory card in the
camera.
4. Select “Yes” and then press “OK” to confirm the setting.
SETTING START UP SCREEN
1. Enter the set-up mode.
2. Select “Start-up Screen”.
3. Select “Default 1”, “Default 2”, “User Define” or
“Off” and then press “OK” to confirm the setting.
For more information about setting a user-defined start up
screen, please see page 49.
SETTING START UP SOUND
1. Enter the set-up mode.
2. Select “Start-up Sound”.
3. Select “On” or “Off” and then press “OK” to confirm
the setting.
RESETTING YOUR CAMERA
This function restores your camera’s settings to the factory
defaults.
1. Enter the set-up mode.
2. Select “Reset”.
3. Select “Yes” and then press “OK” to confirm the setting.
18
DEFAULT SETTINGS
Setting
Default
Image Size
Quality
Exposure
Compensation
Drive Mode
White
Balance
Exposure
Area
Focus Area
ISO
Sharpness
Central
Auto
Normal
Saturation
Normal
Setting
Default
2048 x 1536
Best
0.0
Style
Flash Mode
Self-timer
Normal
Auto
Off
Single
Auto
Focus Mode
Slide Show
Interval
Auto Off
Auto
3 Sec
Beep
Video Out
LCD
Brightness
Language
Off
NTSC
5
Central
SET UP MODE
10 Min
English
19
STILL MODE
USING THE LCD DISPLAY
When you turn the camera on, the LCD display turns on
automatically.
You can use the LCD display to frame photographs that you
want to capture, view menus, or review the photographs that
you’ve taken.
When menus are shown on the LCD, instructions at the bottom of the display will guide you through making selections.
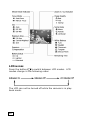
The following figure explains the icons that appear on the
LCD display.
 Note: To save battery power, use the viewfinder
instead of the LCD display to frame pictures.
 Note: You may not see the LCD display clearly
when using the camera under intense light, such as
direct sunlight. You can adjust the LCD brightness
to improve the visibility.
20
ICONS
STILL MODE
21
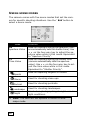
LCD MODES
Press the button
to switch between LCD modes. LCD
modes change in the following order:
The LCD can not be turned off while the camera is in playback mode.
22
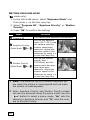
ZOOMING IN OR OUT
The camera has 3x optical zoom and 2x digital zoom.
OPTICAL ZOOM
1. Press "W/T" buttons to zoom out
and zoom in.
2. You can see the zoom in/ out indicator and the ratio (from 1.0 ~ 3.0)
on the LCD screen.
DIGITAL ZOOM
1. Press the "T" (Tele) button until it
reaches its maximum setting (3x).
2. Press the "T" (Tele) button again to
activate the digital zoom. Press
“W” (Wide) button to deactivate
the digital zoom.
 The digital zoom functions only with the LCD screen
turned on.
STILL MODE
23
TAKING A PICTURE USING AUTO FOCUS
Pressing the shutter release button halfway down sets the
focus and exposure. The camera will automatically focus on
the subject in the center of the frame.
1. Rotate the mode dial to still mode
.
2. Frame your subject so it is completely visible in the viewfinder or the
LCD screen. Press the shutter release
button halfway down and hold it to
set the focus and exposure.
3. Press the shutter release button all
the way down to take the picture.
Some circumstances may cause the auto focus to fail to capture the image sharply:
When you shoot from behind a sheet of glass
When you shoot subjects that have low contrast in color
(ex: sky, white walls and so on)
When shooting two subjects that are far apart (the camera might focus on the wrong subject)
When there are horizontal lines in the frame
Note : Different colors of focus brackets stand for different focus condition.
 Yellow: Auto Exposure and Auto Focus in progress
 Green:
Auto Exposure and Auto Focus successful
 Red:
Auto Exposure and Auto Focus failure
24
USING FOCUS LOCK
If your subject is not in the center of the frame, the picture may
be out of focus when you press the shutter release button halfway
down. Focus lock allows you to focus on an off-center subject.
1. Frame your subjects in the center
of the frame with the viewfinder or
the LCD monitor. Press the shutter
release button halfway down and
hold it to set the focus and exposure.
2. Keep pressing the shutter release
button halfway down and move the
camera to recompose your picture.
3. Press the shutter release button all
the way down to take the picture.
STILL MODE
25
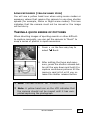
USING SCENE MODES
The camera comes with five scene modes that set the cam" button to
era for specific shooting situations. Use the "
select a scene mode.
Mode
Av
Aperture Value
Tv
Time Value
Sports
Macro
Portrait
Landscape
Night
Function
Used for manually setting the aperture (camera automatically sets the shutter time). Use
on the four-way key to adjust the aperture value while in this mode. Equivalent
to “Aperture Priority”.
Used for manually setting the shutter time
(camera automatically sets the aperture
value). Use on the four-way key to adjust the time value while in this mode.
Equivalent to “Shutter Priority”.
Used for capturing subjects in motion.
Used for shooting close-ups.
Used for shooting portraits.
Used for shooting landscapes.
Used when photographing at night or in low
light conditions.
 Note: The flash will not operate in macro or landscape mode.
26
LONG EXPOSURES (YELLOW HAND ICON)
You will see a yellow hand icon when using scene modes or
exposure values that require the camera to use slow shutter
speeds (for example, Macro or Night scene modes). This icon
indicates that the camera must not be moved or the image
will be blurry.
TAKING A QUICK SERIES OF PICTURES
When shooting images of sporting events or other difficultto-capture moments, you can set the camera to "Burst" to
snap a series of photos in rapid succession.
1. Press on the four-way key to
Burst.
select
2. After setting the focus and exposure, press the shutter release button all the way down and hold it to
capture continuous pictures till the
memory card is full or till you release the shutter release button.
 Note: The flash is set to “Off” in Burst mode.
 Note: A yellow hand icon on the LCD indicates that
the camera should not be moved until it has completed capturing the photograph.
STILL MODE
27
SETTING EXPOSURE COMPENSATION
In some difficult lighting conditions, the automatic exposure
may give incorrect readings. Exposure compensation allows
you to adjust the exposure value manually.
1. Press
and select "EV".
2. Then press on the four-way key.
3. Use on the four-way key to
adjust the exposure value (from 2.0 ~ +2.0).
 Note: When you are in still mode and the camera is
set to auto focus, you can use on the four-way
key to adjust the exposure value without entering
the menu.
 Note: EV setting goes back to default (0.0 EV) after
you turn off the camera.
28
USING THE SELF-TIMER
The self-timer allows you to take pictures 3 or 10 seconds
after you press the shutter release button all the way down.
Be careful to place the camera on a tripod or a steady surface when using the self-timer.
1. Press on the four-way key until
appears on the LCD display.
2. After locking the focus and pressing the shutter release button all
the way down, the self-timer lamp
blinks slowly first and then quickly
for 3 or 10 seconds.
3. The camera takes the picture
automatically.
 Note: A yellow hand icon on the LCD indicates that
the camera should not be moved until it has completed capturing the photograph.
STILL MODE
29
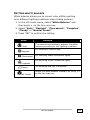
USING THE BUILT-IN FLASH
The camera has five built-in flash settings. While in still
mode, switch among the flash settings by usingon the fourway key.
Mode
Auto Flash
Auto Flash with
Red-eye Reduction
Fill in Flash
Slow Sync
Flash Off
30
Function
Flash fires automatically when the subject is dark.
Reduces the "red-eye" effect results
from the flash.
Flash fires whenever you take a shot,
regardless of the lighting condition.
Flash fires with slow shutter speed to
get natural exposure.
Flash is turned off.
STILL MODE MENU
Use the still mode settings to change the way your camera
takes pictures. Follow the instructions below to navigate the
still mode menu and make selections.
(Menu) button to enter
1. Press
the still mode menu.
2. Scroll through the menu and the
submenu by using on the
four-way key.
3. Press on the four-way key to enter the submenu.
4. Press "OK" to confirm the setting.
STILL MODE
31
SETTING IMAGE SIZE (RESOLUTION)
(
mode only). Choose the size, in pixels, that you want
your pictures stored in the memory card. This camera captures images at four different sizes. A larger image size
means a higher resolution. A high resolution image has more
detail than a low resolution (smaller) image. However, a high
resolution image will also take up more space on your memory card.
1. In the still mode menu, select "Image Size" and then
press on the four-way key.
2. Select 2560 x 1920, 2048 x 1536, 1280 x 960 or 640 x 480.
3. Press "OK" to confirm the setting.
SETTING IMAGE QUALITY
Images are compressed to save space on your memory card.
However, compression leads to the loss of image quality. The
less you compress the image, the better the image quality,
and the fewer pictures you can store in the memory card.
1. In the still mode menu, select "Quality" and then press
on the four-way key.
2. Select "Best", "Fine", or "Normal".
3. Press "OK" to confirm the setting.
32
SETTING WHITE BALANCE
White balance allows you to correct color shifts resulting
from different lighting conditions when taking pictures.
1. In the still mode menu, select "White Balance" and
then press on the four-way key.
2. Select "Auto", "Daylight", "Fluorescent", "Tungsten”,
"Cloudy" or "Manual Preset".
3. Press "OK" to confirm the setting.
Mode
Auto
Daylight
Fluorescent
Function
The camera automatically adjusts the white
balance according to the lighting condition.
For shooting in natural light.
For shooting under fluorescent lights.
For shooting under household lights.
Tungsten
Cloudy
Manual Preset
For shooting the sky is overcast.
Adjust the white balance manually by using on the four way key.
STILL MODE
33
SETTING EXPOSURE AREA
This camera provides you with three exposure-metering
modes to get proper exposure.
1. In the still mode menu, select "Exposure Area" and
then press on the four-way key.
2. Select "Full Area", "Central" or "Spot".
3. Press "OK" to confirm the setting.
Mode
34
Function
Full Area
Meters the exposure value from the whole picture area. You can use this mode in most cases.
Central
Measures the exposure value the large area in
the center of the whole picture area. You can use
this mode in most cases.
Spot
Meters the exposure value from a circular area (about
in 3-5mm) in the middle of the LCD monitor. Use this
mode to shoot pictures with a specific exposure area.
SETTING FOCUS AREA
(
mode only).
1. In the still mode menu, select "Focus Area" and then
press on the four-way key.
2. Select "Central" or "Spot".
3. Press "OK" to confirm the setting.
SETTING FOCUS MODE
(
mode only).
1. In the still mode menu, select "Focus Mode" and then
press on the four-way key.
2. Select "Auto Focus" or "Manual Focus".
3. Press "OK" to confirm the setting.
4. When using manual focus, press on the four-way key
to adjust the focus.
SETTING LIGHT SENSITIVITY
ISO value affects the camera’s sensitivity to light. The default ISO setting is "Auto", but you can also adjust the setting manually. Use a low ISO value in bright conditions, and
a high ISO value when light is insufficient.
1. In the still mode menu, select "ISO" and then press on the four-way key.
2. Select "Auto", "ISO 200", or "ISO 400".
3. Press "OK" to confirm the setting.
 Note: A high ISO value may lead to noise in the
picture.
 Note: ISO speed resets to default "Auto" after you
turn off the camera.
STILL MODE
35
SETTING EXPOSURE MODE
(
mode only).
1. In the still mode menu, select "Exposure Mode" and
then press on the four-way key.
2. Select "Program AE", "Aperture Priority" or "Shutter
Priority".
3. Press "OK" to confirm the setting.
Mode
Function
The camera sets exposure automatically
Program AE
Aperture Priority
(Flash Mode:
or
Shutter Priority
(Flash Mode:
or
You set the aperture
value (F2.7~F6.7) and
the camera sets the
shutter speed auto) matically. Adjust the
aperture value in the
submenu by using on the four-way key.
You set the shutter
speed (2sec ~
1/2000sec) and the
camera sets the aper) ture value automatically. Adjust the
shutter speed in the
submenu by using on the four-way key.
 Note: The value on the LCD monitor becomes yellow when the picture is overexposed and red when
the picture is underexposed.
 Note: Aperture Priority and Shutter Priority modes
can also be accessed using the scene mode. Use the
"
" button to select a scene mode. “Av” sets the
camera to Aperture Priority and “Tv” sets the camera to Shutter Priority.
36
SETTING SHARPNESS
Adjusting the sharpness allows you to emphasize or soften
the edge of the image.
1. In the still mode menu, select "Sharpness" and then
press on the four-way key.
2. Select "Soft", "Normal", or "Hard".
3. Press "OK" to confirm the setting.
Mode
Function
Soft
Softens the outline. If you want your subjects
(such as people) to have a soft outline, we recommend that you use this mode.
Normal
Suitable for ordinary shots.
Hard
Emphasizes the outline. If you want your subjects
(such as buildings) to have a clear and sharp outline, we suggest that you use this mode.
ADJUSTING SATURATION
Saturation is the intensity and purity of color. This option
allows you to adjust the saturation of the image.
1. In the still mode menu, select "Saturation" and then
press on the four-way key.
2. Select "More", "Normal" or "Less".
3. Press "OK" to confirm the setting.
STILL MODE
37
STYLE
The style option allows you to take pictures in normal color,
sepia or black and white.
1. In the still mode menu, select "Style" and then press on the four-way key.
2. Select "Normal", "Sepia", or "Black & White".
3. Press "OK" to confirm the setting.
Mode
Normal
Sepia
Black & White
38
Function
No special effect.
Produces sepia-toned photos for a weathered
look.
Produces black & white photos.
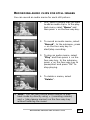
RECORDING VIDEO CLIPS
Movie mode allows you to record video clips.
1. Rotate the mode dial to
.
2. Adjust the zoom using "W/T".
3. Press the shutter release button
half way down and hold it to set
the focus and exposure.
4. Press the shutter release button all
the way down to start recording.
5. Press the shutter release button
again to stop recording.
RECORDING VIDEO CLIPS
39
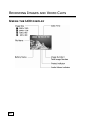
REVIEWING IMAGES AND VIDEO CLIPS
USING THE LCD DISPLAY
40
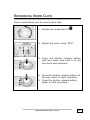
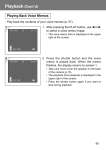
PLAYBACK MODE
Playback mode allows you to review the still images and
video clips.
1. Rotate the mode dial to "Playback"
mode.
2. The last still picture you take and
the properties of that picture appear on the LCD display.
3. Use on the four-way key to
move forth and back through the
still pictures.
4. Use on the four-way key to
start/stop playing video clips.
REVIEWING IMAGES AND VIDEO CLIPS
41
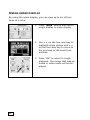
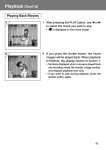
USING INDEX DISPLAY
By using the index display, you can view up to six still pictures at a time.
1. Press "Wide" button and switch
single display to index display.
2. Use on the four-way key to
highlight single picture and on the four-way key to move to
the previous or the next three
pictures.
3. Press "OK" to return to single
playback. The image that was selected in index mode will be displayed.
42
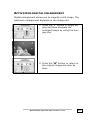
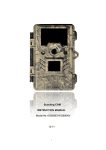
ACTIVATING DIGITAL ENLARGEMENT
Digital enlargement allows you to magnify a still image. The
maximum enlargement depends on the image size.
1. Press the "T" button in single display and then navigate the
enlarged image by using the fourway key.
2. Press the "W" button to return to
the original image size step by
step.
REVIEWING IMAGES AND VIDEO CLIPS
43
USING THE PLAYBACK MENU
1. Rotate the mode dial to "Playback" mode.
2. Press
(Menu) button.
3. Scroll through the menu and the
submenu by using on the
four-way key.
4. Press on the four-way key to
enter the submenu.
5. When finished setting, press
(Menu) button again to exit.
44
RECORDING AUDIO CLIPS FOR STILL IMAGES
You can record an audio memo for each still picture.
1. First, select a picture that you want
to add an audio clip to. In the playback menu, select "Memo" and
then press on the four-way key.
2. To record an audio memo, select
"Record". In the submenu, press
on the four-way key to
start/stop recording.
3. To play an audio memo, select
"Play" and then press on the
four-way key. In the submenu,
press on the four-way key to
pause/start and press "OK" to
stop playing.
4. To delete a memo, select
"Delete".
 Note : You can also record audio memos in playback mode by directly using (recording memos)
and (play/pause memos) on the four-way key
without entering the menu.
REVIEWING IMAGES AND VIDEO CLIPS
45
DISPLAYING A SLIDE SHOW
Your camera can be set to automatically display pictures one
by one on the LCD display.
1. In the playback menu, select "Slide" and then press on the four-way key.
2. Select "Start", "Interval", "Direction" or "Repeat".
3. Press "OK" to confirm the setting.
Mode
Start
Interval
Direction
Repeat
Function
Begins the display.
Adjusts the interval (3sec~30sec) between
each picture during the display.
Decides in which direction ("Forward" or
"Backward") to display the pictures.
Plays the slide show in a continuous loop.
DELETING ALL PICTURES
This function allows you to delete all of the still pictures and
video clips.
1. In the playback menu, select "Delete All" and then
press on the four-way key.
2. Select "No" or “Yes".
3. Press "OK" to confirm the setting.
 Note: To delete a single picture, choose the one
you want to delete and then press
. Choose
"Yes" or "No" and then press "OK".
 Note: If the image or video clip is protected, you
have to remove the protection first and then delete it.
46
SETTING DPOF (DIGITAL PRINT ORDER FORMAT)
DPOF allows you to set the print order format of still images.
1. In the playback menu, select "DPOF" and then press on the four-way key.
2. To decide which picture to print and the number of
copies, select "Standard" and then press "OK".
3. Use on the four-way key to select the pictures and
on the four-way key to adjust the numbers of copies.
4. To print index of pictures, select "Index".
5. To cancel all of the settings for printing, select "Delete".
ROTATING THE IMAGES
This option in the playback menu allows you to rotate the
images. Each time you press "OK", the image rotates 90°
clockwise.
1. In the playback menu, select "Rotate" and then
press on the four-way key.
2. Press "OK" to rotate the image again or "Menu" button to
return to the playback menu.
FOLDERS
You can view pictures in different folders of the memory card. The
camera creates a new folder when the file number is over 9999.
1. In the playback menu, select "Folder" and then press on the four-way key.
2. Choose among the folders and select the one that you
would like to view.
3. Press "OK" to confirm the setting.
REVIEWING IMAGES AND VIDEO CLIPS
47
PROTECTING PICTURES AND VIDEO CLIPS
The protect function prevents pictures and video clips from
being modified or deleted.
1. In the playback menu, select "Protect" and then press
on the four-way key.
2. Select "Set One", "Remove One", "Set All" or "Remove All".
3. Press "OK" to confirm the setting.
Mode
Set One
Function
Protects the current picture you’re viewing.
Remove One
Cancels the protection on the current picture.
Set All
Protects all the pictures.
Remove All
Cancels protection on all pictures.
 Note:
appears on the LCD monitor when you
protect the picture.
 Note: ALL images, INCLUDING PROTECTED
ONES, are PERMANENTLY DELETED when you
format the memory card.
COPY/MOVE IMAGES & VIDEO CLIPS
1. In the playback menu, select "Copy" or “Move” and
then press on the four-way key.
2. Select "Internal to Card" or "Card to Internal" and
then press on the four-way key.
3. Choose “Select” and then select the pictures you want
to copy by pressing "OK". (Press "OK" again to cancel
the selection.) Press "Menu" button to continue.
4. Or select "All On" to copy/move all of the images and
then press "OK".
5. Select "Start" or "Cancel".
48
SELECTING A START-UP SCREEN PHOTO
1. Select a picture in playback mode.
2. In the playback menu, select “Start-Up Screen” and
then press on the four-way key.
3. Select "No” or “Yes".
4. Press "OK" to confirm the setting.
 Note: Only use still pictures for the startup screen.
You must have the Startup screen setting in Setup
mode set to User Define.
DISPLAYING IMAGES ON A TV
You can use your camera to view images as a slideshow or
play audio/video clips on your TV.
1. Make sure that the correct TV format is selected in Set Up mode, under “Video Out”. NTSC is used in
North America and Japan; PAL is
used in Australia, China, and most of
Europe.
2. Connect the A/V (audio/video) cable supplied with your camera to
the A/V inputs of the TV. The audio terminal is red and the video
terminal is yellow.
3. Connect the A/V cable to the A/V
port on the camera. When you
connect your camera to a TV, the
LCD monitor turns off automatically.
REVIEWING IMAGES AND VIDEO CLIPS
49
TRANSFERRING IMAGES TO A PC
 Note: When you put the memory card in your PC’s
card reader, you can access your images directly.
You do not need to connect the camera.
 Note: Some older card readers may not be able to
read the included SD card. If you experience this
problem, contact the manufacturer of your card
reader for an updated firmware or driver.
This section explains how to connect your digital camera to a
PC. Remember to install your image processing software
first. Do not connect the camera until installation is successfully completed.
SOFTWARE INSTALLATION
 Note: Should your operating system be configured in
such a way that software and drivers cannot be installed unless signed (released by Microsoft), then a
relevant dialog box will appear. Though exact wording
may differ depending on your operating system (e.g.
“the driver to be installed ... has not passed the test”)
this does not mean that the driver is defective, but indicates only the absence of the Microsoft signature.
You may ignore this message. Click Next to install
the driver.
Only PCs running Windows® 98SE require installation of the
driver. Windows® ME, 2000, and XP support the camera without the driver included on the CD-ROM.
50
 Caution: Important files may be overwritten and
altered during the installation of programs or drivers. Make a backup copy of your hard disk before
installation in case of problems with the installation,
or if you should need to access the original files.
INSTALLING THE CAMERA SOFTWARE
Following is a description of a typical software installation.
Once you insert the CD-ROM, the installation menu launches
automatically.
Note: If the installation menu does not appear automatically,
the “Autorun” function has likely been deactivated. Read the
respective chapter in the Windows Help file on how to activate this function.
An example of manual installation (without the autorun function) is as follows:
1. Open the “Start” menu and select “Run.”
2. Enter the letter of the CD-ROM drive containing the installation disk, followed by a colon and the program
name SETUP. (Example D:SETUP, where “D” is the
CD-ROM drive on your PC)
3. Click on “OK.”
4. Follow the program instructions.
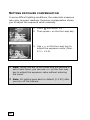
CONNECTING THE DIGITAL CAMERA TO A PC
 If you have not already done so, you must first
install the driver software as described above if you
are using Windows® 98SE.
TRANSFERRING IMAGES TO A PC
51
1. Please refer to the notes in the “Safety and Service”
section (beginning on page 1).
2. Position the computer and the camera so that they
are secured and safe to operate.
3. Switch on the computer and all the peripherals connected (monitor, printer, external modem, etc.) and
wait until the operating system has fully started.
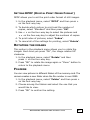
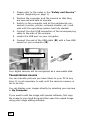
4. Connect the slim USB connection of the accompanying
cable to the side of the camera.
5. Locate the USB port on your computer.
6. Connect the end of the USB cable (n) with a free USB
socket on your computer (o).
USB connection
o
n
Your digital camera will be recognized as a removable disk.
TRANSFERRING IMAGES
You can transfer pictures you have taken to your PC at any
time. It is not necessary to wait until the camera memory is
full to do this.
You can display your images directly by selecting your camera
in My Computer.
If you want to edit the image with special software, first copy
the image to your hard drive and then open the copied image
using your image editing software.
52
TIPS AND TRICKS
USING CAMERA BATTERIES AND
RECHARGEABLE BATTERIES
•
•
•
•
Battery power is reduced at low working temperatures.
For cold environments we recommend keeping a stock
of new batteries and storing them in a warm place.
We recommend NiMH rechargeable batteries since
their capacity decreases at a slower rate. Even in cold
environments these batteries will return to normal capacity after warming.
Remove the batteries from the camera if you do not
expect to use the camera for longer periods of time.
Leaking batteries may damage the battery compartment and your camera.
Caution! Batteries can heat up when the camera is in
use. Be careful when removing or changing batteries.
Turn the camera off and wait a few minutes until the
batteries have sufficiently cooled.
USING THE MEMORY CARD
The following scenarios may increase the risk of data loss or
damage to your camera’s memory card:
• Incorrect use of the card.
• Electrostatic discharges or interference fields in the
vicinity of the card. Keep the card away from fields of
electrical disturbance and static charges.
• Removal of the card or interruption of power supply while
the camera is accessing the card (reading, deleting).
• Non-use of the card over long period of time. Data
stored on the MMC/SD™ card begin to break down after a certain time. Data on cards that are left unused
for long periods of time may be irretrievable.
TIPS AND TRICKS
53
•
•
Formatting the card wipes out all data irreversibly.
The storage capacity of the MMC/SD™ card is reduced
on extreme use. Purchase a new card if this occurs.
•
•
Bending the card, or exposing the card to hard impact.
Touching the card’s electrical contacts with your fingers or with a metal object.
Exposing the card to moisture, heat, dust, or direct
sunlight.
Exposing the card to magnets (e.g., loudspeaker boxes).
Not storing the card in its protective sleeve.
•
•
•
CARE OF THE LCD DISPLAY
•
•
•
•
Do not subject the surface of the LCD monitor to any
pressure as this may result in permanent damage.
The LCD monitor display may temporarily darken at
low temperatures. The normal display returns once
the camera warms up.
If the LCD monitor surface is dirty, first blow the dust
and sand away then wipe with a soft, dry, clean cloth.
The monitor must be replaced if the LCD monitor is
constantly flickering or simply no longer functions.
USING THE DIGITAL CAMERA
•
•
•
•
•
•
54
The camera is sensitive to shock and must be handled
with utmost care.
Turn the camera off and remove the batteries when in transit.
The camera is not watertight.
Inserting and removing batteries or memory cards
with wet hands can cause damage.
Careless use of the camera on the beach and near
water may result in damage to the camera.
Do not leave the camera in direct sunlight for long periods of time. Never point the lens directly towards
the sun as this may damage the CCD sensor.
CUSTOMER CARE
TROUBLESHOOTING
The camera doesn’t switch on.
•
•
The batteries are low. Insert fresh batteries.
AC power adapter is not connected. Connect the power
adapter.
The camera powers down while in use.
The batteries could be exhausted.
The auto shut off function has activated because the
camera has been idle.
• Adapter plug is not connected securely.
•
•
Batteries drain quickly
•
•
Camera has been used in low temperatures.
Old and new or different battery types have been mixed
together.
Camera does not take photos when the shutter button
is pressed.
•
•
•
•
•
•
The
The
The
The
The
The
MMC/SD™ card is not inserted.
MMC/SD™ card has not been formatted.
MMC/SD™ card is full.
camera power is off.
batteries are exhausted.
mode dial is positioned incorrectly.
The images are unclear.
•
The focus mode is not correct.
The flash does not fire.
•
Flash off mode has been selected.
CUSTOMER CARE
55
•
The camera is in a mode in which the flash is disabled
(e.g., Macro mode).
Incorrect date and time is displayed
•
The data and time have been set incorrectly or the
camera has adopted the default settings.
The camera buttons do not operate.
•
Remove/re-insert the batteries and switch the camera on.
MMC/SD™ card error.
•
•
Incorrect MMC/SD™ card format. Re-format MMC/SD ™ card.
If formatting the card with a PC, use only a PC that uses the
FAT16 filesystem.
Photos have a color cast.
•
White balance setting is incorrect.
Images are too bright.
•
Exposure is excessive.
The playback display is not very clear.
•
The lens or the LCD monitor is smudged or dirty.
No image on external monitor.
The external monitor has not been connected properly
with the camera.
• There are incorrect files in the MMC/SD™ card.
•
When using the PC’s explorer, Removable Drive file
does not show.
•
•
•
•
•
Cable connection is incorrect.
The camera is off.
There is no power supply for the camera.
The PC does not support USB.
The mode dial is not set on PC mode.
The digital camera is not recognized or receives no response.
•
56
Check all cable connections.
DRIVER SUPPORT
This camera has been extensively tested in our laboratories
with a large number of different devices. It fulfils all required
standards and complies with the standard “Designed for Windows”, which certifies utmost compatibility. However, device
drivers are updated from time to time. One reason for this is
because of potential compatibility problems with other components (programs, equipment) that have not yet been tested.
Driver updates and the latest information on your product are
available on the Internet.
Visit Medion on the Web at
www.medion.com
ADDITIONAL SUPPORT
Medion offers additional customer support information on our
website, including a Knowledge Base and e-mail support. In
addition, our friendly and professional call center staff are
ready to help you via telephone at 1-866-633-4660. Before
you call, however, please have the following information
available:
•
•
•
•
•
•
•
•
The model of your computer
A list of all peripherals (e.g., printers, external mice)
that are attached to the computer
A list of the software that is installed on the computer
The software that you were using when the issue occurred
Any error messages that may have appeared
Is the issue repeatable? Can you make it happen
again?
What troubleshooting steps have you taken before
contacting customer support?
If you have been given a customer number previously, please have this available.
CUSTOMER CARE
57
WARRANTY
PLEASE READ THIS LIMITED WARRANTY CAREFULLY
TO UNDERSTAND YOUR RIGHTS AND OBLIGATIONS.
MEDION warrants to our customers that this product is free from defects in
materials and workmanship as follows: for a period of one (1) year from the
date of original purchase, defective parts or a defective product returned to
a MEDION repair facility or a MEDION Authorized Service Facility ("ASF") for
such product, as applicable, and proven to be defective upon inspection, will
be exchanged for new or comparable rebuilt parts, or a refurbished product,
as determined by the MEDION repair facility or the ASF.
Limited warranty repair or replacement shall not extend the original limited
warranty period of the defective product. This limited warranty does not
cover any supplies or accessories, including but not limited to: software,
blank media, user-installed drives, etc.
EXCLUSIONS: this limited warranty does not apply, and you will have no
remedy hereunder with respect to (a) products that have been modified,
opened, repaired or otherwise altered, except by MEDION or an ASF, (b)
products that have been damaged or destroyed after delivery to the customer, (c) any third party software, interfaces, parts, supplies, peripherals
or other products or any defects resulting from use of the product in connection with such third party products, (d) defects resulting from improper or
inadequate maintenance, calibration or site preparation, (e) defects resulting
from any misuse, abuse, accident, neglect, negligence or any use other than
in accordance with the handling or operating instructions provided by
MEDION, (f) defects resulting from exposure to unusual physical or electrical
stress or from any operation other than in accordance with the published
environmental specifications for the product.
TO THE EXTENT ALLOWED UNDER APPLICABLE LAW, THE ABOVE
WARRANTIES ARE EXCLUSIVE AND NO OTHER WARRANTY OR CONDITION,
WHETHER WRITTEN OR ORAL, IS EXPRESSED OR IMPLIED AND MEDION
SPECIFICALLY DISCLAIMS ANY IMPLIED WARRANTIES, INCLUDING ANY
IMPLIED WARRANTY OF MERCHANTABILITY OR FITNESS FOR A PARTICULAR
PURPOSE AND NO IMPLIED WARRANTY APPLIES TO THE PRODUCT AFTER
THE APPLICABLE PERIOD OF THE EXPRESS LIMITED WARRANTY STATED
ABOVE. Some countries, states or provinces do not allow exclusions or limitations on the duration of an implied warranty, so the above limitation or
exclusion might not apply to you. This limited warranty gives you specific
legal rights and you might also have other rights that vary from country to
country, state to state, or province to province.
MEDION´s limited warranty is valid in any country or locality where MEDION
has a support presence for this product and where MEDION has marketed
this product. The level of warranty service you receive may vary according
to local standards. MEDION will not alter form, fit or function of the product
to make it operate in a country for which it was never intended to function.
58
TO THE EXTENT ALLOWED UNDER APPLICABLE LAW, THE REMEDIES IN
THIS LIMITED WARRANTY STATEMENT ARE YOUR SOLE AND EXCLUSIVE
REMEDIES. EXCEPT AS INDICATED ABOVE, IN NO EVENT WILL MEDION OR
ITS SUPPLIERS BE LIABLE FOR LOSS OF DATA OR FOR INDIRECT, SPECIAL,
INCIDENTAL, CONSEQUENTIAL (INCLUDING LOST PROFIT OR DATA), OR
OTHER DAMAGE, WHETHER BASED IN CONTRACT, TORT, OR OTHERWISE.
IN NO EVENT SHALL RECOVERY OF ANY KIND AGAINST MEDION BE
GREATER IN AMOUNT THAN THE PURCHASE PRICE OF THE PRODUCT SOLD
BY MEDION WHICH CAUSED THE ALLEGED DAMAGE. WITHOUT LIMITING
THE FOREGOING, YOU ASSUME ALL RISK AND LIABILITY FOR LOSS,
DAMAGE OR INJURY TO YOU AND YOUR PROPERTY AND TO OTHERS AND
THEIR PROPERTY ARISING OUT OF USE OR MISUSE OF, OR INABILITY TO
USE THE PRODUCT NOT CAUSED DIRECTLY BY THE NEGLIGENCE OF
MEDION. Some countries, states or provinces do not allow the exclusion or
limitation of incidental or consequential damages, so the above limitation or
exclusion may not apply to you.
THE WARRANTY TERMS CONTAINED IN THIS STATEMENT, EXCEPT AS
LAWFULLY PERMITTED, DO NOT EXCLUDE, RESTRICT OR MODIFY AND ARE
IN ADDITION TO THE MANDATORY STATUTORY RIGHTS APPLICABLE TO THE
SALE OF THIS PRODUCT TO YOU.
Please note the following:
Be sure to keep your purchase receipt in a safe place. MEDION, at its option,
may require a copy of the receipt to validate the warranty period effective
date (i.e. date of purchase). Warranty liability only applies to material or
factory faults. It does not apply to damage due to breakage, for example, a
crack in the housing. Our service includes unit exchange or send-in repair:
Unit Exchange
In locations where Unit Exchange is available, MEDION will send you a replacement unit. You must return the defective unit to MEDION (using the
shipping carton that the new one came in.)
Send-In Repairs
In locations where Send-In Repair Service is available, repair service can be
obtained by shipping your unit to the MEDION Repair Center. The unit will be
repaired and returned to you.
For either Unit Exchange or Send-In Repairs, you must have an authorized
RMA number from Medion support before shipping your defective product.
Replacement products may be either new or equivalent in performance to
new. MEDION replacement or repaired products may contain remanufactured parts equivalent to new in performance or may have been subject to
incidental use.
Out-of-Warranty Support
In addition to providing free technical support during the warranty period,
MEDION is also available to support your product after the warranty period
has ended. This out-of-warranty support will be provided on a fee basis.
CUSTOMER CARE
59
MAKING COPIES OF THIS MANUAL
This manual contains information protected by law. All rights
reserved. Duplicating this information in mechanical, electronic, or any other form, without the written approval by the
manufacturer, is prohibited by copyright law.
60