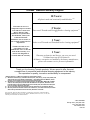
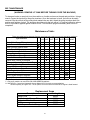
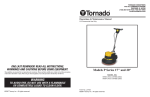
1
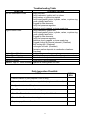
TORNADO® INDUSTRIES
333 Charles Court
Unit 109
West Chicago, IL 60185
(800) 822-8867 FAX (817) 551-6507
www.tornadovac.com
Tornado
Operation and Maintenance Manual
For Commercial Use Only
Pro-Glazer Model PG K17-21, K17-24, 17-24-C, 17-28
Catalog No.
97560T, 97570T, 97571T, 97572T, 97575T, 97577T
For Parts List see L7575HDP
Effective 1/1/2010
Form No. L7575ID Revised 01/10 ©2010 Tornado® Industries All rights reserved.
This illustrated instruction book covers:
MODEL
PAD SIZE
CATALOG NO.
SERIES
ENG. TYPE
CLUTCH
ENGINE SIZE (CC)
ENGINE (HP)
Pro-Glazer PG K17-21
21”
97560T
E
KAWASAKI
NONE
585
17
Pro-Glazer PG K17-24
24”
97570T
E
KAWASAKI
NONE
585
17
Pro-Glazer PG K17-24-C
24”
97571T
E
KAWASAKI
YES
585
17
MODEL
PAD SIZE
CATALOG NO.
SERIES
ENG. TYPE
CLUTCH
ENGINE SIZE (CC)
ENGINE (HP)
Pro-Glazer PG K17-24
24”
97572T
E
KAWASKAI
NONE
585
17
Pro-Glazer PG K17-28
28"
97575T
E
KAWASAKI
NONE
585
17
Pro-Glazer PG K17-28
28"
97577T
E
KAWASAKI
NONE
585
17
All specifications are subject to change without notice.
TABLE OF CONTENTS:
Tornado Warranty Statement
Limited Warranty for Kawasaki Modified Engines
Safety Instructions
Operating Instructions
Starting Procedure
Mounting Pad & Other Attachments
Buffing Information
Maintenance Table
Troubleshooting Table
Daily Inspection Checklist
2
3
4-5
6-7
8
8
9
9-10
10
11
11
Tornado® Standard Warranty Program*
10 Years:
All plastic tanks and rotationally-molded bodies 1) 2)
Warranties do not cover
components subject to normal
wear and tear or abuse and
misuse, and have other
limitations not specified here.
For full details, contact your
Authorized Tornado
Distributor, Service Center, or
the Tornado Technical Service
Department.
Tornado sales and services
representatives are not
authorized to waive or alter the
terms of this warranty, or to
increase the obligations of
Tornado under the warranty.
2 Years:
Parts on all Tornado and Tornado/Karcher cleaning equipment 1)
2) 3)
1 Year:
Labor on all Tornado and Tornado/Karcher cleaning equipment2)
1 Year:
Warranty on batteries and charges, one year pro-rated.
**6 Month warranty on Gel batteries
All battery warranties are handled by the battery manufacturer,
please call customer service for more information.
Thank you for choosing Tornado products. We are proud to offer the most
complete line of commercial and industrial cleaning equipment in the industry.
Our reputation for quality, innovation and durability is unsurpassed.
* Effective January 1st, 2005. Terms subject to change without notice.
1) Windshear™ Blower-Dryer, Insulation Blowers, T191, T201, T12/1, CV 30, CV 38, CW 50, CW
100, Pro PAC Vacs, Duo-Upright Carpetkeepers™, Gas & Electric Pressure Washers, and all
chargers are warranted for 1 (one) year for both parts and labor.
2) Warranties on all riding sweepers including the ICC1, KM 100/100 R, KMR 1250, and KMR
1700 are 24 months parts/6 months labor OR 1000 hours of operation, whichever comes
first. Warranties on the 75/140 & 90/140 are 24 months parts/12 months’ labor OR 1,000
hours of operation whichever comes first.
3) All non-wear item parts purchased after warranty expiration are warranted for 90 days.
4) Warranty starts from the date of sale to the consumer or, at Tornado’s discretion, 6 months
after dealer purchased the unit from Tornado, whichever comes first.
Note: Tornado, The Latest Dirt, Floorkeeper, Carpetkeeper, Carpetrinser, Carpetrinser/Dryer,
Headmaster, Taskforce, PAC-VAC, T-Lite, Glazer, Windshear, Max-Vac, CV 30, CV 38, and
Trot-Mop are trademarks of Tornado Industries.
1-800-VACUUMS
Chicago area: (630) 818-1300
Fax: (817) 551-6507
333 Charles Court
Unit 109
3
West Chicago, IL 60185
BREUER ELECTRIC MFG., dba TORNADO INDUSTRIES, INC.
LIMITED WARRANTY FOR KAWASAKI MODIFIED ENGINES
CALIFORNIA AND FEDERAL
EMISSION CONTROL SYSTEMS
SMALL OFF-ROAD ENGINES
Your Warranty Rights And Obligations
The California Air Resources Board (CARB), the Environmental Protection Agency (EPA), and Tornado Industries, LLC are pleased
to explain the Emissions Control Systems Warranty on your Tornado Industries, LLC small off-road engine.
In California and other states, new small off-road engines must be designed, built and equipped to meet stringent anti-smog standards.
Tornado Industries, LLC must warrant the emission control system on your small off-road engine for a period of time listed below
provided that there has been no abuse, neglect or improper maintenance of your small off-road engine. Your emission control system
may include parts such as the carburetor or fuel-injection system, the ignition system, and catalytic converter. Also included may be
hoses, connectors and other related assemblies. Where a warrantable condition exist, Tornado Industries, LLC will repair your small
off-road engine at no cost to you including parts and labor.
Owners Warranty Responsibilities:
The following obligations must be fulfilled by the owner to maintain the validity of the Tornado Industries, LLC, California Air
Resources Board (CARB) / Environmental Protection Agency (EPA) Emissions Systems Warranty:
a.) As the small off-road engine owner, you are responsible for the performance of the required maintenance listed in your owner’s
manual. Tornado Industries, LLC recommends that you retain all receipts covering the maintenance on your small off-road
engine, but Tornado Industries, LLC cannot deny for the lack of receipts or for your failure to ensure the performance of all
scheduled maintenance.
b.) You are responsible for presenting your small off-road engine emissions related warranties to an authorized Tornado Industries,
LLC small off-road engine dealer as soon as possible exists. The warranty repair should be completed in a reasonable amount of
time, not to exceed 30 days.
c.) As a small off-road engine owner, you should also be aware that Tornado Industries, LLC may deny you warranty coverage if
your small off-road engine or a part failed due to abuse, neglect, improper maintenance or unapproved modifications.
d.) If you have any questions regarding your warranty rights and responsibilities, you should contact Tornado Industries, LLC, 7401
West Lawrence Avenue, Harwood Heights, Illinois 60706, (708) 867-5100.
1.) Manufacturers Warranty Coverage
Tornado Industries, LLC warrants to the initial owner and each subsequent purchaser that the emissions control system of that small
off-road engine is free of defects in materials and workmanship which cause a failure of a warranted part for a period of two years. If
any emissions related part in your engine is defective, the part will be repaired or replaced by Tornado Industries, LLC. This warranty
time period shall begin on the date the small off-road engine is delivered to the initial purchaser, or on the date the small off-road
engine is first placed into service.
Warranty defects shall be remedied during customary business hours at any authorized Tornado Industries, LLC small off-road engine
dealer located in the United States of America. Any manufacturer-approved replacement part may be used in the performance of any
warranty or repairs on emission-rated parts, and must be provided without charge to the owner if the part is still under warranty. Any
part or parts replaced under this warranty shall become property of Tornado Industries, LLC.
2.) Limitations
This Emissions Control System Warranty shall not cover any of the following:
a.) Repair or replacement required as a result of (i) misuse or neglect, (ii) lack of required maintenance, (iii) repairs improperly
performed or replacements improperly installed, (iv) use of replacement parts or accessories not conforming to Tornado
Industries specifications which adversely affected and/or durability, (v) alterations or modifications not recommended or
approved in writing by Tornado Industries, LLC
b.) Replacement of parts and other services and adjustments necessary for required maintenance at and after the first scheduled
replacement point.
3.) Limited Liability
4
a.) The liability of Tornado Industries, LLC under this Emissions Control Systems Warranty is limited solely to the remedying of
defects in material and workmanship by an authorized Tornado Industries, LLC small off-road engine dealer at its place of
business during customary business hours. This warranty does not cover inconvenience or loss of use of the small off-road engine
or transportation of the small off-road engine to or from the Tornado Industries, LLC dealer. TORNADO INDUSTRIES, LLC
SHALL NOT BE LIABLE FOR ANY OTHER EXPENSE, LOSS OR DAMAGE, WHETHER DIRECT, INCIDENTAL,
CONSEQUENTIAL (EXCEPTION LISTED UNDER COVERAGE) OR EXEMPLARY ARISING IN CONNECTION WITH
THE SALE OR USE OF OR INABILITY TO USE THE TORNADO INDUSTRIES, INC. SMALL OFF ROAD ENGINE FOR
ANY OTHER PURPOSE.
b.) NO EXPRESS EMISSION CONTROL SYSTEMS WARRANTY IS GIVEN BY TORNADO INDUSTRIES, INC. WITH
RESPECT TO THE TORNADO INDUSTRIES, INC. SMALL OFF-ROAD ENGINE EXCEPT AS SPECIFICALLY SET
FORTH HEREIN. ANY EMISSION CONTROL SYSTEMS WARRANTY IMPLIED BY LAW, INCLUDING ANY
WARRANTY OF MERCHANTABILITY OR FITNESS FOR A PARTICULAR PURPOSE, IS EXPRESSLY LIMITED TO
THE EMISSION CONTROL SYSTEMS WARRANTY TERMS SET FORTH HEREIN. THE FORGOING STATEMENT OF
WARRANTY ARE EXCLUSIVE AND IN LIEU OF ALL OTHER REMEDIES.
c.) No dealer is authorized to modify this Tornado Industries, LLC Limited Emission Control Systems Warranty.
d.) Tornado Industries, Inc. is not liable for parts that are not genuine Tornado Industries, LLC parts except when genuine Tornado
Industries, LLC parts cause damage to non-Tornado Industries, LLC parts.
4.) Legal Rights
THIS WARRANTY GIVES YOU SPECIFIC LEGAL RIGHTS, AND YOU MAY ALSO HAVE OTHER RIGHTS.
5.) THIS WARRANTY IS IN ADDITION TO THE TORNADO INDUSTRIES, INC. LONG-TERM
BUYER PROTECTION WARRANTIES.
5
IMPORTANT SAFETY INSTRUCTIONS
READ ALL INSTRUCTIONS BEFORE USING THIS APPLIANCE
WARNING:
Keep hands, feet, shoestrings, and neckties away from all moving parts while the machine is in
operation. The exhaust system gets very hot, so keep hands, clothing and any combustible items
away from the engine while it is hot.
Tornado machines are built tough and durable, but do not abuse the machine or mechanical damage
and/or personal injury could result. With proper care and maintenance this unit will give you troublefree operation for years to come.
WARNING:
LETHAL EXHAUST GASES
Engine exhaust gases contain poisonous carbon monoxide. Carbon monoxide is odorless, colorless,
tasteless, and can cause death if inhaled. Although NFPA 58 Sec.11.13. (2008 Edition) permits these
machines to be used in buildings frequented by the public, the Tornado Co. suggests avoiding
inhaling exhaust fumes and to never run the engine in a closed building or confined area without
proper ventilation.
Although LPG burns more efficiently and emits less carbon monoxide than gasoline, some carbon
monoxide is produced. Avoid inhaling exhaust gases - especially over prolonged periods of time. Do
not allow engine to run unattended.
WARNING:
TO REDUCE THE RISK OF FIRE OR INJURY
If the handle throttle lever is moved suddenly, high starting torque will cause the machine to move,
and may cause damage or injury. Don’t wear loose-fitting clothing while near the machine, and take
care not to accidentally move the throttle lever.
The machine must not be running while:
• Leaving machine unattended
• Changing pads
• Attempting any maintenance or adjustment
These machines should not:
• Be used by unqualified or untrained personnel
• Be used unless they are properly maintained and adjusted
• Be used in areas with obstructions such as thresholds, etc.
• Be used in areas with loose tiles
• Be used in rooms without proper ventilation
6
WARNING:
Do not put hands under base - rotating parts could cause injury. Always keep hands, feet, and loose
fitting clothing away from moving parts to prevent possible injuries. Use care to keep any electrical
supply from contacting moving parts such as floor brushes or pads.
•
•
•
•
•
•
•
•
Do not use machine in areas where flammable and/or explosive vapors or dust are present.
Never use a device to lock the switch lever in the “ON” position.
Do not add weight to this machine - this will upset the balance and may cause motor overload.
Pad holders and brushes must be properly maintained to insure maximum cleaning results.
To avoid fire, do not use with a flammable or combustible liquid to clean a floor.
Risk of explosion. Floor sanding can result in explosive mixture of fine dust and air. Use this
machine only in a well-ventilated area, free from any flame or match.
Do not store with brush, pad holder or pad on floor.
Refer to this manual for additional instructions.
SAVE THESE INSTRUCTIONS
Machine Specifications:
Machine
Pad Size
Pad Speed
Width
Length
Engine
Starter Voltage
Deck Material
Machine
Pad Size
Pad Speed
Width
Length
Engine
Starter Voltage
Deck Material
97560T
Pro-Glazer Model PG
DC Start K17-21
97570T
Pro-Glazer Model PG
DC Start K17-24
97571T
Pro-Glazer Model PG
DC Start K17-24-C
21
1850 RPM
22.44”
43.56
Kawasaki FH541V-BS06
12 Volts
Cast Aluminum Alloy
24
1850 RPM
25.31”
50.79”
Kawasaki FH541V-BS06
12 Volts
Cast Aluminum Alloy
24
1850 RPM
25.31”
50.79”
Kawasaki FH541V-BS06
12 Volts
Cast Aluminum Alloy
97572T
Pro-Glazer Model PG
AC Start K17-24
97575T
Pro-Glazer Model PG
DC Start K17-28
97577T
Pro-Glazer Model PG
AC Start K17-28
24
1850 RPM
25.31”
50.79”
Kawasaki FH541V-BS06
110 Volts
Cast Aluminum Alloy
28
1850 RPM
29.44”
52.85”
Kawasaki FH541V-BS06
12 Volts
Cast Aluminum Alloy
28
1850 RPM
29.44”
52.85”
Kawasaki FH541V-BS06
110 Volts
Cast Aluminum Alloy
7
OPERATING AND MAINTENANCE INSTRUCTIONS
OPERATION OF THE MACHINE
Your Tornado® Floor Machine is ready for operation as soon as it is unpacked. Remove the machine from the
pallet and discard bolts.
Before beginning any operation, please read your Kawasaki Owners Manual.
The unit comes shipped without fuel in the tank. Be careful not to overfill the tank. The best method for filling
the tank is to have the full tank weighed at the filling station. The steel tank should weigh no more than 43
pounds. Also, adjust the handle to a comfortable position and insert the locking pins. Then, with two 3/4”
wrenches tighten the two main bolts in the handle support to 40-50 ft/lbs.
Check the engine oil level. The unit will come shipped with oil. Always keep the engine oil level between the
full and add marks on the dipstick. Replace the oil by performing the following steps :
- Park your Pro-Glazer on a level surface and make sure the engine is stopped.
- Turn the oil cap counter clockwise and then lift from the fill tube.
- Wipe the dip stick clean and push it back into the oil fill tube until the cap seats, and then withdraw
it to check the oil level. (Do not screw in to check level.) Oil level should be between the “ADD” and
“FILL” marks. Add oil if necessary.
- Replace oil cap and tighten.
- If the oil is low, add API Service Classification SF, SG, SH, or SJ oil having a SAE viscosity grade
appropriate for the expected temperatures as indicated in the Kawasaki Owners Manual.
The machine is shipped with the battery connected.
Inspect all fuel hoses and fittings for leaks. Repair any leaks immediately.
Check the carb filter and air filter for debris. Clean and replace if necessary.
Connect fuel hose to tank by (hand tightening) the hose fitting to the tank. Make sure the connection is tight to
prevent leaks.
PRO-GLAZER STARTING PROCEDURE
The Pro-Glazer PG K17-28 is equipped with a 12-volt starter and key switch.
1. Tilt machine back so the floor pad is off the floor.
2. Turn the fuel tank knob slowly until you hear the flow of the fuel into the fuel system.
3. Turn the key switch fully counterclockwise to the “Start” position and hold it there until the engine starts. Do
not crank more than 5 seconds at a time, and wait at least 15 seconds between tries when cranking. See
Trouble Shooting Table if the engine does not start after several tries.
4. After the engine starts, move the throttle to the slow position. Do not operate buffer until the engine has
warmed up sufficiently, recommended as 3-5 minutes at idle.
5. Lower pad to floor slowly, and operate at full throttle.
8
STOPPING ENGINE
1. Lower the engine speed to an idle, and allow the engine to idle for about one minute.
2. Turn fuel valve on tank to the closed position and allow the engine to continue running until it runs
out of fuel.
3. Turn the key to the off position.
Caution:
In an emergency, turn the key to the off position, and close the fuel valve. Backfiring may occur
when using this method.
MOUNTING PAD AND OTHER ATTACHMENTS
(WARNING: TURN OFF UNIT BEFORE STARTING PAD INSTALL)
(WARNING: REMOVE LP TANK BEFORE TURNING OVER THE MACHINE)
To mount or remove a pad, tilt the machine back until it rests on the back wheels. Unscrew the padlock nut while gripping the pad and pad driver. Position a new pad concentric with the pad driver and
retighten with the pad-lock nut.
To remove the pad driver, tilt the machine on its side. Use a 3/4” wrench to hold the main shaft which
is located between the four bolts in the front and on the top of the machine. Then, rotate the pad
driver counterclockwise to unscrew it from the main shaft.
For long life and best results always use genuine TORNADO® accessories.
MAINTENANCE OF THE PAD HOLDER
Remove the pad holder when the machine is not in use, and hang on wall peg or similar holder.
POLISHING
Use 3/4” to 1” thick BEIGE high speed burnishing pads. Floors should be dry mopped to remove grit.
SPRAY BUFFING
Use 3/4” to 1” thick HOG HAIR high speed burnishing pad. The spray buff solution should be applied
to the floor ahead of the machine. Do not run the machine into the spray or mist of the spray buff
solution.
DAMP BUFFING
Use 3/4” to 1” thick BEIGE high speed burnishing pad. Use a well-wrung out mop to apply damp
buffing solution. Go over dampened surface with machine until surface is dry and has a high glaze.
STORING
Store with pad off the floor by tilting machine back on the support wheels.
9
BELT MAINTENANCE
(WARNING: REMOVE LP TANK BEFORE TURNING OVER THE MACHINE)
To change a broken or worn belt, turn the machine on its side and remove the pad and pad driver. Using a
wrench, loosen the hex bolt for the pulley tensioner. Once the tensioner is loose, the belt can be easily
removed. Slip the old belt off the pulleys and reattach the new belt. Attach the pulley tensioner back into
position and retighten its bolt. The tensioner should provide the belt with a 0.16 inch belt deflection when a
force of 2 pounds is applied against outside of belt. Turn machine upright immediately after service is
completed.
Maintenance Table:
These are typical service intervals. Service more frequently under more severe operating conditions.
Daily First Every Every
Every
Every
Every
Every
Type of Service
8 Hrs. 25 Hrs. 50 Hrs. 100 Hrs. 200 Hrs. 300 Hrs. 500 Hrs.
Check Oil for Proper Fill Level
Check Bonnet Air Filter for Obstruction
Check Cleaning Pad for Wear
Check Drive Belt Tension
Inspect for Loose Bolts & Connections
Change Engine Oil ++
Clean Air Cleaner Foam Element
Clean Air Cleaner Paper Element
Tighten Nuts, Screws, & Brackets
Clean and Adjust or Replace Spark Plug
Clean Engine Cooling Fins
Change Oil Filter
Replace Air Cleaner Paper Element
Adjust Engine Valve Clearance
Clean and Lap Valve Seats
Clean Cylinder Heads of Deposits
Recertify Emission Control System
++
•
•
•
•
•
•
•
•
•
•
•
•
•
KD
KD
KD
^^
KD = Have an authorized Kawasaki Engine Dealer perform these services.
^^ = Re-certify machine to meet EPA and CARB SORE Regulations
++ MOTOR OIL: Consult the Kawasaki Owners Manual for oil viscosity recommendations.
General capacity of engine oil is 1.9 US quarts. Oil level must be checked when engine is tilted forward.
Replacement Items
Description
Bonnet Filter
Pre-Carburetor Sponge Filter
Carburetor Filter
Oil Filter
Steel Propane Tank w/Gauge
Catalog #
99552
99551
99550
99553
30396
10
Troubleshooting Table:
SYMPTOM
Will Not Start/Hard to Start
POSSIBLE CAUSES
Empty fuel tank.
Faulty carburetor, ignition coil, or valves.
Faulty battery or ignition key switch.
Faulty head gasket, piston, cylinder, valves, or piston ring.
Loose cylinder head bolts.
Clogged air filter elements.
Faulty fuel pressure regulator.
Defective, poorly gapped, or loose spark plug.
Engine Lacks Power
Faulty carburetor, ignition coil.
Faulty head gasket, piston, cylinder, valves, or piston ring.
Loose cylinder head bolts.
Clogged air filter elements.
Faulty fuel pressure regulator.
Defective, poorly gapped, or loose spark plug.
Clogged cooling air (bonnet) element. (Overheat)
Dirty cooling fins. (Overheat)
Low engine oil level. (Overheat)
Excessive carbon deposits in combustion chambers.
(Overheat)
Engine Speed Won’t Increase
Faulty cable connection, or engine governor.
Engine Stops Running
Out of fuel. Severe condition causing engine to overheat.
Smell of Burned Rubber
Drive belt out of adjustment.
Machine Vibrates
Loose bolts. Pad not centered.
Machine "Digs In" While Running Operator is bearing down too hard.
Daily Inspection Checklist:
ITEM
CHECK
BOX
- Check condition of pad (Replace if torn or dirty)
- Wipe entire unit down with cleaning solution (engine must be cool)
- Verify pad retainer is still in place
- Store Propane tank outside of building
- Store Pro-Glazer back on casters, so the pad is off the floor
- Store the Pro-Glazer in a clean dry place
- Report any problems with unit
11