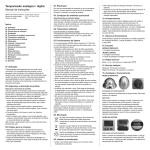
1
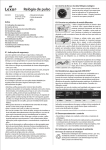
Mit Ausnahme von Aldi Süd
verwenden alle anderen Länder das
Sempre Logo mit „R“.
User Manual
Spend a little Live a lot.
OPED I
N
VEL
DE
nse
om
my
ha
NY
RMA
GE
MANUA
L
RADIO-CONTROLLED
BATHROOM CLOCK
c o n t ro
l.c
User-friendly
Manual
ID: #05007
Overview................................................................ 3
Use........................................................................... 4
Product contents/device parts............................. 6
General information............................................... 7
Reading and storing the instruction manual.......7
Explanation of symbols............................................7
Safety.......................................................................8
Proper use.................................................................. 8
Safety notes............................................................... 9
First use................................................................. 13
Checking the clock and product contents........... 13
Installing/setting up the clock............................. 14
Mounting the clock with the suction cups........... 14
Mounting the clock with the hanging loop......... 15
Setting up the clock with the support foot.......... 16
Functions of the analogue/digital clock.............. 16
Function keys........................................................ 17
Start-up................................................................. 19
Manual setting of the time................................... 21
Manual synchronisation (analogue clock)..........24
Changing the battery........................................... 25
Cleaning.................................................................26
Storage.................................................................. 27
Troubleshooting................................................... 27
Technical data.......................................................29
Declaration of conformity...................................... 29
Disposal.................................................................30
Disposing of the packaging.................................. 30
Disposing of old devices........................................ 30
Warranty card....................................................... 33
Warranty conditions............................................ 34
Dok./Rev.-Nr. 93025_20150327
Contents
GB
IRE
3
A
1
M.SET
REC
RESET
SIZE AA 1.5V
2
3
3
4
5
4
B
GB
IRE
5
C
6
13
15
SIZE AA 1.5V
12
11
EIN
N
EU
T
STELLEN
10
14
REC
RESET
SIZE AA 1.5V
7
FUNK
M.SET
S TA R
8
6
9
D
3
SIZE AA 1.5V
N
EU
E
T
16
S TA R
1
GB
5
IRE
F
23
22
21
20:36
D
M
28 6 58
28 8
S
17
18
19
20
G
24
DST
20:36
28 6
58
22
20
D
M
17
18
23
21
288
H
25
RADIO CONTROLLED
TEMPERATURE
19.8
20
6
GB
IRE
Product contents/device parts
1
Housing
14
REC button
2
Hanging loop
15
M.SET button
3
Suction cup, 4x
16
Housing cover
4
Support foot
17
Current time
5
LR 6/R 6/AA 1.5 V battery
18
Radio tower symbol
6
Battery compartment
19
Current seconds
7
button
20
Current temperature
8
button
21
Current week day
9
RESTART button
22
Current date
10
Support foot holder
23
Current month
11
RADIO SIGNAL button
24
12
SET button
DST/daylight saving time
symbol (this is the equivalent to British Summer
Time)
13
RESET button
25
Hands
The product contents include one type
LR6 1.5 V battery.
General information
IRE
GB
General information
Reading and storing the instruction
manual
This instruction manual accompanies this radiocontrolled bathroom clock. It contains important information on installation, set-up and use.
For improved readability, the radio-controlled bathroom
clock will be referred to below simply as the “clock”.
Before using the clock, please read through the instruction manual carefully. This particularly applies for the
safety notes. Failure to observe this instruction manual
may result in severe injury or damage to the clock.
The instruction manual is based on the standards and
rules in force in the European Union. When abroad, you
must also observe country-specific guidelines and laws.
Store the instruction manual for future use. If you pass
the clock on to third parties, please be absolutely sure to
include this instruction manual.
Explanation of symbols
The following symbols and signal words are used in this
instruction manual, on the clock or on the packaging.
WARNING!
This signal word designates a hazard with moderate
degree of risk which may lead to death or severe injury if
not avoided.
AFTER SALES SUPPORT
GB
IRE
00800-98887000
[email protected]
7
GB
IRE
Safety
CAUTION!
This signal word designates a hazard with low risk that,
if not avoided, may result in minor or moderate injury.
NOTICE!
This signal word warns against potential damages to
property.
This symbol provides you with useful additional information.
With protection against solid particles with a
diameter of 12.5 mm or more and protected
against water splashes on all sides.
IP24
Declaration of conformity (see chapter “Declaration of conformity”): Products marked
with this symbol meet all applicable Community regulations for the European Economic Area.
Safety
Proper use
The clock is exclusively designed for use as a clock with
additional temperature, month, day and date information. The clock is only intended for private use and not
suitable for commercial purposes.
8
GB
IRE
00800-98887000
[email protected] AFTER SALES SUPPORT
Safety
IRE
GB
Only use the clock as described in this instruction manual. Any other use is considered improper and may result
in damage to property.
The manufacturer or vendor accepts no liability for damage caused by improper or incorrect use.
Safety notes
Carefully read through this chapter and observe all
notes herein. This will ensure that the clock operates in a
reliable manner.
WARNING!
Danger for children and persons with
impaired physical, sensory or mental capacities (e.g. partially disabled persons,
older persons with reduced physical and
mental capacities) or lack of experience
and knowledge (e.g. older children).
−− This clock may be used by persons with
impaired physical, sensory or mental
capacities or those lacking experience
and knowledge if they are supervised
or have been instructed in how to safely
use the clock and have understood the
risks associated with using it.
AFTER SALES SUPPORT
GB
IRE
00800-98887000
[email protected]
9
GB
IRE
Safety
Children may not play with the clock.
Cleaning must not be performed by
children.
−− Keep children away from the clock.
WARNING!
Danger of suffocation!
If children swallow packaging or small parts,
they may choke.
−− Keep packaging parts and small parts
away from children.
WARNING!
Danger of explosion!
If you dispose of batteries in an open fire or
change them incorrectly, they may explode
and emit toxic vapours.
−− Only replace the batteries with the same
or an equivalent battery type.
−− Do not dispose of batteries in open fire
and do not expose them to excessive
heat (like direct sunlight).
−− Dispose of the batteries as described in
the chapter “Disposal”.
−− Do not immerse the clock in water.
10
GB
IRE
00800-98887000
[email protected] AFTER SALES SUPPORT
Safety
IRE
GB
WARNING!
Risk of poisoning!
If children swallow damaged batteries, the
batteries could leak and result in poisoning
or even death.
−− Store the batteries in an area that is not
accessible for children.
−− If it is no longer possible to securely close
the battery compartment, dispose of the
clock as described in the chapter “Disposal”.
−− If you suspect that a battery has been
swallowed or otherwise incorporated,
promptly consult a physician.
CAUTION!
Risk of injury!
Using different types of batteries for the clock
may increase the risk of the batteries leaking. Contact with damaged and leaky batteries may result in injury or chemical burns.
−− Do not touch leaky batteries. If you do
happen to come into contact with battery acid, wash the affected area thoroughly with plenty of clean water.
AFTER SALES SUPPORT
GB
IRE
00800-98887000
[email protected]
11
GB
IRE
Safety
−− To prevent the battery from leaking, do
not charge it, do not disassemble it and
do not short circuit it.
−− Take the battery out of the clock as soon
as it is empty.
−− Only use batteries with the same output
(see chapter “Technical data”).
−− If necessary, clean the battery contacts
as well as the contacts in the device.
NOTICE!
Risk of damage!
Improper handling of the clock may cause
malfunctioning and damage the clock.
−− Do not place any objects on the clock.
−− Do not apply pressure to the glass.
−− Keep edged objects away from the clock
glass.
−− Do not expose the clock to moisture other than that normally occurring in the
bathroom.
−− Do not expose the clock to temperatures
below 10 °C and above 40 °C for prolonged periods of time.
12
GB
IRE
00800-98887000
[email protected] AFTER SALES SUPPORT
First use
IRE
GB
−− Keep the clock away from dust, heat,
direct sunlight and strong percussions
as well as magnetic fields.
−− Do not open the housing, instead contact the manufacturer at the service
address provided on the warranty card
for repairs.
−− When you are not using the clock, cleaning it or if a fault occurs, always switch
the clock off by removing the battery.
−− Never store the clock at temperatures
below 0 °C or above 40 °C.
First use
Checking the clock and product
contents
NOTICE!
Risk of damage!
The clock can be damaged if you incautiously open the packaging with a sharp knife or
another pointed object.
−− Be careful when opening.
1.Take the clock out of the packaging.
2.Remove the packaging material.
AFTER SALES SUPPORT
GB
IRE
00800-98887000
[email protected]
13
GB
IRE
Installing/setting up the clock
3.Check whether the delivery is complete (see fig. A).
4.Check whether the clock exhibits any damages.
5.If the delivery is incomplete or if the clock exhibits
damage, do not use it; instead contact the manufacturer at the service address provided on the warranty card.
Installing/setting up the clock
You can choose from various possibilities for positioning
the clock:
• Mounting the clock with the suction cups 3
(see fig. A),
• Mounting the clock with the hanging loop 2 ,
• Setting up the clock on the support foot 4 .
Mounting the clock with the suction cups
Observe the following notes when mounting the clock
with the suction cups 3 (see fig. A):
• Make sure that the base which you set the clock
up on is free of dust and grease. If necessary, use a
cleaner to clean the surface in advance.
• Set up your clock in a location where it cannot be
damaged. If the clock comes loose on its own and
falls down, please keep in mind that broken glass
is not covered by warranty!
• Avoid fixing one of the suction cups directly over a
tile joint as it will not be possible to create a vacuum
here and the suction cup will not hold (see fig. E).
14
GB
IRE
00800-98887000
[email protected] AFTER SALES SUPPORT
Installing/setting up the clock
IRE
GB
• The suction cups only stick to smooth surfaces.
• From time to time, fix the clock again and check
how secure it is as the suction cups may come
loose after a while.
• Do not mount the clock in the shower area as the
clock is only protected against moisture. Excessive
exposure to water could cause it to malfunction.
• Do not pull directly on the clock to loosen it. This will
avoid defects affecting the device or the surface.
The clock’s suction cups are suitable for attachment to
smooth surfaces, e.g. tiles (the tiles must be glossy, the
suction cups will not stick to mat tiles), mirrors and glass
surfaces etc.
−− Wet the suction cups somewhat before pressing
them into place to ensure they are firmly attached.
Removing the suction cups
−− Lift up the edge of the suction cups 3 one by one to
let air in (see fig. A).
You can now take the suction cups off of the surface.
Mounting the clock with the hanging
loop
If you are unable to mount the clock with suction cups,
you can use the hanging loop 2 on the back of the
cover (see fig. A).
−− Hang the clock on a nail or a screw in a suitable location on the wall.
AFTER SALES SUPPORT
GB
IRE
00800-98887000
[email protected]
15
GB
IRE
Functions of the analogue/digital clock
Setting up the clock with the support
foot
You can also set up the clock with the support foot. It is
located on the inside of the housing cover.
1.Unscrew the housing cover 16 by turning it counterclockwise (see fig. D).
2.Take the support foot 4 out (see fig. A).
3.Close the housing cover.
4.Now insert the solid part of the support foot in the
support foot holder 10 under the housing cover
(see fig. B).
Functions of the analogue/digital
clock
Analogue clock
• 2 function buttons (see fig. C):
M.SET button 15 , RESET button 13 , REC button 13
• Time (radio time) 17 (see fig. F and G)
• Current temperature in °C 20
Digital clock
• 5 function buttons (see fig. B):
FUNK (RADIO SIGNAL) 11 , STELLEN (SET) 12 ,
8 , NEUSTART (RESTART) 9
• RCC version: DCF 77
16
GB
IRE
00800-98887000
7 ,
[email protected] AFTER SALES SUPPORT
Function keys
IRE
GB
• Current week day 21 in 9 languages (see fig. F and G):
Preset to German, other languages: English, French,
Spanish, Italian, Dutch, Danish, Slovenian, Hungarian
• Current time displayed with 6 digits 17 : Hours, minutes, seconds 19
• Calendar 2000 – 2099, current month displayed with
2 digits 23 , current date displayed with 2 digits 22
• Switch between 12/24-hour format
• Temperature (°C/°F) 20
• Current indoor temperature displayed with 3 digits,
temperature range: -9.9 °C – +50 °C, measurement
interval: 30 sec.
• Time zone setting, -12/+12 hours can be set
• Daylight saving time (DST) 24
Function keys
Analogue clock
(see fig. C)
M.SET button 15
Manual setting of the time
RESET button 13
Restart
REC button 14
Starts receiving radio signals
AFTER SALES SUPPORT
GB
IRE
00800-98887000
[email protected]
17
GB
IRE
Function keys
Digital clock
(see fig. B)
Button
Function
STELLEN
(SET) 12
• Menu for setting the time (press and
hold the button in normal mode).
• Select the settings menu (press the
button once when setting the time).
7
• One step forward (press the button
once/several times when setting
the time).
• 8 steps/seconds forward (press and
hold the button when setting the
time).
8
• °C-/°F switch (press the button once
in normal mode).
• One step back (press the button
once/several times when setting
the time).
• 8 steps/seconds back (press and
hold the button when setting the
time).
FUNK (RADIO • OFF/ON RCC (press the button once
SIGNAL) 11
in normal mode).
• Access the RCC reception menu
(press the button once when setting
the time).
18
GB
IRE
00800-98887000
[email protected] AFTER SALES SUPPORT
Start-up
IRE
GB
Start-up
The radio-controlled clock should be at least
1.5 to 2 m away from interference sources
like computer screens or television sets.
Avoid placing the clock directly up against
or near metallic window frames.
In rooms with reinforced concrete walls (cellars, tower buildings etc.) the radio signal
will become unavoidably weaker. In extreme cases, place the clock near a window
and/or align it so that the front or back side
points towards Frankfurt/M.
Analogue clock
1.Insert the battery 5 as described in the chapter
“Changing the battery” (see fig. A).
2.The clock will switch to the express setting, that is,
the hands 25 will move quickly and will line up at 12
o’clock position. The clock will now search for a radio
signal (see fig. H).
3.If a radio signal is found, the hands will automatically
be set to the correct time completing the process.
This process may take up to 15 minutes.
4.If it is not possible to receive a radio signal, the hands
will stay in the 12 o’clock position.
AFTER SALES SUPPORT
GB
IRE
00800-98887000
[email protected]
19
GB
IRE
Start-up
Digital clock
1.Insert the battery 5 as described in the chapter
“Changing the battery” (see fig. A).
2.After you have inserted the battery, LCD mode will
appear and the clock will start looking for radio
signals; this is indicated by the blinking radio tower
symbol 18 (see fig. F and G).
Attention: No other settings can be performed during this time. This process may take approx. 2 – 5
minutes.
3.Once a radio signal is received, the date and time will
be set automatically. The radio tower symbol 18 is
permanently visible (see fig. F and G).
4.If it is not possible to receive the radio signal, the radio tower symbol will not be shown.
If you fail to receive a signal, observe the notes at the
beginning of this chapter.
−− As there are fewer atmospheric disturbances at
night, the radio-controlled clock will in most cases
receive a radio signal then. Generally speaking, synchronising the clock once a day is enough to keep
the exact time.
To start searching for a radio signal again, proceed as
follows:
1.Press the “FUNK” (RADIO SIGNAL) button 11
(see fig. B).
2.Press the “NEUSTART” (RESTART) 9 button.
If that doesn’t work, remove the battery, wait approx. 30
seconds and then insert it again.
20
GB
IRE
00800-98887000
[email protected] AFTER SALES SUPPORT
Manual setting of the clock
IRE
GB
Now the clock will start looking for the radio signal
again; once a signal is received, the hands/display will
automatically move to the correct time. This process may
take up to 15 minutes again.
Manual setting of the clock
Setting the time on the digital clock
If your clock is not able to receive the radio signal, you
can set the time manually.
1. Make sure that the radio tower symbol 18 is not visible (see fig. F and G).
2. If necessary, switch radio reception off.
3. Press and hold the “STELLEN” (SET) button 12 for
approx. 3 seconds to access the menu for setting the
time (see fig. B).
4. Press the “STELLEN” (SET) button step by step to switch
between the following menus: 12-/24-hour display,
time zone setting, hours, minutes, year, month, language. Your settings will be automatically confirmed
when you switch to the next menu.
7 or
8 to increase or de5. Press the button
crease the value shown by 1.
6. Press and hold the button or to increase or decrease the value faster.
AFTER SALES SUPPORT
GB
IRE
00800-98887000
[email protected]
21
GB
IRE
Manual setting of the clock
The following two tables provide the days of the week
as they appear on the clock’s display.
GE
EN
IT
FR
SUNDAY
SO
SU
DO
DI
MONDAY
MO
MO
LU
LU
TUESDAY
DI
TU
MA
MA
WEDNESDAY
MI
WE
ME
ME
THURSDAY
DO
TH
GI
JE
FRIDAY
FR
FR
VE
VE
SATURDAY
SA
SA
SA
SA
DU
SP
HU
SO
SUNDAY
ZO
DU
VA
NE
MONDAY
MA
LU
HE
PO
TUESDAY
DI
MA
KE
TO
WEDNESDAY
WO
MI
SE
SR
THURSDAY
DO
JU
CS
CE
FRIDAY
VR
VI
PE
PE
SATURDAY
ZA
SA
SO
SO
Changing the language (digital clock)
You can adjust the language to display the current day
in different languages
1. Make sure that the radio tower symbol 18 is not visible (see fig. F and G).
2. If necessary, switch radio reception off.
22
GB
IRE
00800-98887000
[email protected] AFTER SALES SUPPORT
Manual setting of the clock
IRE
GB
3. Press and hold the “STELLEN” (SET) button 12 for
approx. 3 seconds to access the menu for setting the
clock (see fig. B).
4. Press the “STELLEN” (SET) button 7 times to reach the
language setting. The selected item will blink. The
current week day will change to display the currently
selected language (see table in chapter “Setting the
time on the digital clock “).
7 or
8 to switch between
5. Press the button
the available languages.
6. Press and hold the button or to increase or decrease the values faster.
7. Press the “STELLEN” (SET) button to confirm the setting.
Your settings will be automatically confirmed when
you switch to the next menu or wait for approx.
30 seconds
Changing the temperature format (digital clock)
You can adjust the temperature format to display the
current temperature in °C or °F.
1. Make sure that the radio tower symbol 18 is not visible (see fig. F and G).
2. If necessary, switch radio reception off.
8 to switch between °C
3. Press and the button
and °F.
Reception of radio signals
Please consider the following with radio reception:
• The clock will start receiving radio signals automatically as soon as a battery has been inserted.
AFTER SALES SUPPORT
GB
IRE
00800-98887000
[email protected]
23
GB
IRE
Manual setting of the clock
• If your clock is not able to receive the radio signal,
you can restart the attempt to receive a signal by
pressing the “FUNK” (RADIO SIGNAL) button 11
(see fig. B).
• The radio signal will be automatically received at 1:00,
2:00, 3:00, 4:00 and 5:00 o’clock in the morning. If the
signal is successfully received once a day, other radio
signals present on the respective day will be ignored.
The process will be repeated every day.
• Up to 15 minutes are required to receive the radio
signal in the event of poor coverage. The clock will
stop receiving signals once approx. 4 minutes have
passed and the attempt to receive a signal extends
beyond the signal coverage. The clock will stop
attempting to receive radio signals after approx. 3
minutes in areas with strong signal coverage.
• Only the “FUNK” (RADIO SIGNAL) button may be
pressed while receiving signals.
• If the clock fails to receive signals, the next attempt to
receive signals will start at 1:00 a.m. the following day.
• If the daylight savings signal is received, daylight
savings time and the DST symbol 24 will automatically appear (see fig. G).
Radio-controlled clock time
As described in the chapter “Start-up”, the hands/display
of the clock automatically move to show the correct time
once the battery has been inserted. This process may
take up to 15 minutes.
24
GB
IRE
00800-98887000
[email protected] AFTER SALES SUPPORT
Manual setting of the clock
IRE
GB
Current temperature
If the clock is mounted on a wall, the temperature shown may be affected by cold or
heat radiated from the wall.
Once the battery has been inserted, the temperature
will be shown. However, it will take a short time to display the exact ambient temperature.
Setting the time on the analogue clock
The clock will automatically attempt to receive the radio signal several times a day. If
this is not possible, the clock will continue to
operate with the manually configured time.
If it is not possible to receive the radio signal, you can set
the time manually. To do so, proceed as follows:
1.Press and hold the M.SET button 15 for approx. 5 seconds to access the manual settings mode (see fig. C).
2.Press the M.SET button to move the minute hand in
an increment of one minute. Alternatively, you can
press and hold the M.SET button to quickly move the
hands ahead.
The clock will now continue to operate like a quartz clock.
AFTER SALES SUPPORT
GB
IRE
00800-98887000
[email protected]
25
GB
IRE
Manual setting of the clock
Manual synchronisation (analogue clock)
You can only manually synchronise the radio clock time
when the clock is operating (configured either as a radio
clock or manually).
1.Press and hold the REC button 14 for approx. 3 seconds (see fig. C).
2.The clock will switch to the express setting, that is,
the hands will move quickly and will line up at the 12
o’clock position. The clock will now search for a radio
signal.
3.If a radio signal is found, the hands will automatically
be set to the correct time completing the process.
This process may take up to 15 minutes.
4.If it is not possible to receive the radio signal, the
clock will continue to display the previously set time.
Use
Electromagnetic or atmospheric disturbances may interfere with the radio signal.
Changing the battery
Indications for a low battery are:
• The hands of the analogue clock stop moving.
• The display of the digital clock is dim or completely
blank.
26
GB
IRE
00800-98887000
[email protected] AFTER SALES SUPPORT
Cleaning
IRE
GB
Proceed as follows to change the battery:
1.Unscrew the clock’s housing cover 16 (see fig. D).
2.Open the battery compartment 6 (see fig. B and C).
3.Insert a new battery 5 in the clock according to the
specifications of the chapter “Technical data”. Make
sure the polarity is correct. (see fig. A).
4.Close the battery compartment again.
5.Place the housing cover on the clock and turn the
housing cover clockwise.
You can now continue using the clock.
Cleaning
NOTICE!
Risk of short circuit!
Water that has penetrated the housing may
cause a short circuit.
−− Never immerse the clock in water.
−− Make sure that no water penetrates the
housing.
NOTICE!
Risk of damage!
Incorrectly cleaning the clock may result in
discolouration or damage to the surface of
the clock.
AFTER SALES SUPPORT
GB
IRE
00800-98887000
[email protected]
27
GB
IRE
Storage
−− Do not use any gaseous or aggressive
cleaners, brushes with metal or nylon
bristles, sharp or metallic cleaning utensils such as knives, hard scrapers and
the like.
1. Remove the battery 5 before you clean the clock
(see fig. A).
2. Wipe the clock off with a soft, damp, lint-free cloth.
3. Dry the clock and, in particular, the glass thoroughly.
Storage
Prerequisite: You have removed the batteries.
−− Store the clock in a dry, protected area at 0 °C to 40 °C.
−− Refer to the chapter “Safety notes” with respect to
storage.
Troubleshooting
Before you return the clock, check the battery and, if
necessary, replace it with a new one.
The clock fails to receive a radio signal
If the clock does not receive a signal, try another location
with better reception. Structures or natural obstructions
(e.g. mountains) may disrupt the reception of radio signals or make it impossible to receive radio signals. Electromagnetic or atmospheric disturbances may also interfere
with the radio signal. In most cases, such disturbances
can be resolved by selecting a different location. Please
also observe the notes listed in the chapter “Start-up”.
28
GB
IRE
00800-98887000
[email protected] AFTER SALES SUPPORT
Troubleshooting
IRE
GB
Current temperature incorrect
Direct sunlight may affect the current temperature displayed. Please set the clock up in a location that is not
exposed to direct sunlight. Heat/cold radiated from the
wall may also affect the temperature shown.
Low battery
Replace the battery if the clock stops or if the display is
too dim or completely blank. Always make sure that the
polarity is correct when inserting the new battery. Once
you have changed the battery, proceed as described in
the chapter “Start-up”.
Suction cups do not stick
The surface which the clock is mounted on must be
smooth and free of dust and grease. It is recommended
that you use a cleaner to clean the surface beforehand.
Observe the notes in the chapter “Mounting the clock
with the suction cups”.
Incorrect time shown
−− Restart the clock by taking the battery out and putting it back in.
−− Alternatively, you can press the “RESET” button 13
or the “NEUSTART” (RESTART) button 9 on the back
of the clock (see fig. B and C). The analogue clock
will switch to the express setting, that is, the hands
will move quickly and will line up at the 12 o’clock
position. With the digital clock, all current data will
appear and the radio symbol will blink.
AFTER SALES SUPPORT
GB
IRE
00800-98887000
[email protected]
29
GB
IRE
Technical data
Now the clock will start looking for the DCF signal and
if a signal is successfully received, the hands/display
will automatically move to the correct time
(see fig. F, G and H). This process may take up to 15
minutes.
Technical data
Model:
Power supply:
Accuracy of the temperature
reading:
Measurement range for
temperature:
Temperature resolution:
Article number:
BU03/BU04/BU06/BU07
1x 1.5 V DC , AA
+/-1 °C from 0 °C to
+40 °C
-10 °C to +45 °C
0.1 °C
92350
Declaration of conformity
R&TTE Directive 1999/5/EC
Short text for the declaration of conformity:
R. Schmidtmeister e. K. hereby declares
that the Radio-controlled Bathroom Clock
04/05/06/07 complies with the fundamental requirements and other applicable provisions of the Directive 1999/5/EC. You can
access the full text for the declaration of
conformity on the www.schmidtmeister.eu
website under PRODUCT INFORMATION.
30
GB
IRE
00800-98887000
[email protected] AFTER SALES SUPPORT
Disposal
IRE
GB
Disposal
Disposing of the packaging
Dispose of the packaging separated into
single type materials. Dispose of cardboard and carton as waste paper and
foils via the recyclable material collection
service.
Disposing of old devices
(Applicable in the European Union and other European
states with systems for the separate collection of reusable waste materials)
Old devices must not be disposed of with
household waste!
If at some point it is no longer possible to use
the clock, each consumer is required by law
to dispose of old devices separately from
their household waste, e.g. at a collection point in their
community/borough. This ensures that old devices are
recycled in a professional manner and also rules out
negative consequences for the environment. For this
reason, electrical equipment is marked with the symbol
shown here.
AFTER SALES SUPPORT
GB
IRE
00800-98887000
[email protected]
31
GB
IRE
Batteries and rechargeable batteries may not be disposed of with household waste!
As the end user you are required by law to
bring all batteries and rechargeable batteries,
regardless whether they contain harmful substances* or not, to a collection point run by the
communal authority or borough or to a retailer,
so that they can be disposed of in an environmentally
friendly manner. Hand in the batteries at your collection
point in a discharged state only!
* labelled with: Cd = cadmium, Hg = mercury, Pb = lead
32
GB
IRE
00800-98887000
[email protected] AFTER SALES SUPPORT
IRE
GB
WARRANTY CARD
BATHROOM RADIO-CONTROLLED CLOCK
Your details:
Name
Address
E-mail
Date of purchase *
* We recommend you keep the receipt with this warranty card.
Location of purchase
Description of malfunction:
Model example
Return your completed warranty card
together with the
faulty product to:
Sertronics UK
AFTER SALES SUPPORT
GB
IRE
00800-98887000
Model: BU03/BU04
BU06/BU07
[email protected]
Product Code:
92350
06/2015
45 Regal Drive
Walsall Enterprise Park
Wallsall
WS2 9HQ
UNITED KINGDOM
Free hotline
YEARS
WARRANTY
GB
IRE
Warranty conditions
Dear Customer,
The ALDI warranty offers you extensive benefits compared
to the statutory obligation arising from a warranty:
Warranty period: 3 years from date of purchase.
Costs:
Free repair/exchange or refund.
No transport costs.
Hotline:
Free hotline.
ADVICE:
Please contact our service hotline by
phone, e-mail or fax before sending
in the device. This allows us to provide
support in the event of possible operator errors.
In order to make a claim under the warranty, please
send us:
• together with the faulty item the original receipt and the warranty card properly completed.
• the faulty product with all components included in the packaging.
The warranty does not cover damage caused by:
IRE
GB
• Accident or unanticipated events (e.g. lightning, water, fire).
• Improper use or transport.
• Disregard of the safety and maintenance
instructions.
• Other improper treatment or modification.
After the expiry of the warranty period, you still have the
possibility to have your product repaired at your own expense. If the repair or the estimate of costs is not free of
charge you will be informed accordingly in advance.
This does not affect your statutory rights.
Spend a little Live a lot.
Great care has gone into the manufacture of this product and it should therefore provide you with years of good service when used properly. In the event
of product failure within its intended use over the course of the first 3 years after date of purchase, we will remedy the problem as quickly as possible once it
has been brought to our attention. In the unlikely event of such an occurrence,
or if you require any information about the product, please contact us via our
helpline support services, details of which are to be found both in this manual
and on the product itself.
GB
IRE
PRODUCED IN CHINA FOR:
ALDI STORES LTD. PO BOX 26, ATHERSTONE
WARWICKSHIRE, CV9 2SH
ALDI STORES (IRELAND) LTD.
PO BOX 726, NAAS, CO. KILDARE.
visit us at www.aldi.com
AFTER SALES SUPPORT
GB
IRE
0800-98887000
Model: BU03/BU04
BU06/BU07
[email protected]
Product code: 92350
06/2015
3
YEARS
WARRANTY