1
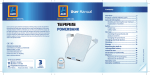
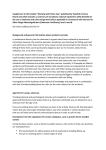
User Manual
Spend a little Live a lot.
OPED I
N
VEL
DE
nse
om
my
ha
NY
RMA
GE
MANUA
L
Scaffold and Ladder System
c o n t ro
l.c
User-friendly
Manual
ID: #05007
Contents
Overview......................................................................................................... 3
Use.................................................................................................................... 4
Scope of delivery/device parts...................................................................... 6
General information....................................................................................... 7
Reading and storing the instruction manual...................................................7
Explanation of symbols.........................................................................................7
Safety............................................................................................................. 10
Proper use..............................................................................................................10
Safety notes...........................................................................................................10
Unpacking and checking the ladder system...............................................13
Setting up the ladder system....................................................................... 14
Screwing on the support feet............................................................................ 14
Setting up the scaffold system.......................................................................... 15
Setting up the leaning ladder............................................................................ 15
Setting up the free-standing ladder................................................................ 16
Taking down the ladder system.................................................................. 16
Cleaning the ladder system......................................................................... 16
Storing the ladder system.............................................................................17
Disposing of the packaging and old ladder system....................................17
Technical data............................................................................................... 18
Warranty........................................................................................................ 19
Warranty Card....................................................................................................... 19
Warranty conditions............................................................................................ 20
3
GB
Overview
IRE
A
1
2
3
6
4
7
5
9
10
11
Dok./Rev.-Nr. 92765 20141006
8
4
GB
Use
IRE
B
C
1.
2.
3.
Use
GB
D
1.
2.
1.
2.
E
IRE
5
6
GB
IRE
Scope of delivery/device parts
Scope of delivery/device parts
1
Safety strut, 4x
2
Screw, 4x
3
Washer, 4x
4
Nut, 4x
5
Support foot, 2x
6
Rung
7
Rail
8
Hook
9
Ladder section, left (with hook)
10 Work platform
11
Ladder section, right (without hook)
General information
GB
IRE
7
General information
Reading and storing the instruction manual
This instruction manual accompanies the scaffold and ladder system.
It contains important information on assembly and handling. For
improved readability, the scaffold and ladder system will be referred to
only as the ladder system below.
Carefully read through the instruction manual, particularly the safety
instructions, before you use the ladder system. Failure to follow this
instruction manual may result in severe injury or damage to the ladder
system.
The instruction manual is based on the standards and rules in force in
the European Union. When abroad, you must also observe countryspecific guidelines and laws!
Store the instruction manual for future use. Make sure to include this
instruction manual when passing the ladder system on to third parties.
Explanation of symbols
The following symbols and signal words are used in this instruction manual, on the
ladder system or on the packaging.
WARNING! This signal word designates a hazard with moderate degree
of risk which may lead to death or severe injury if not avoided.
CAUTION! This signal word designates hazard with low risk, which may
result in minor or moderate injury if not avoided.
NOTE! This signal word warns of possible damage to property or
provides you with useful additional information regarding assembly or
operation.
Check the ladder system for visible damages before you use it.
MAX. 150 kg
150 kg
Do not exceed the ladder system's load bearing capacity of 150 kg.
8
GB
IRE
General information
4x
Set up the leaning ladder at a leaning angle of 60 to 75 degrees (1:4).
1x
Only place the ladder system on dry surfaces; otherwise, there is a
risk of slipping and injury.
Only set up the ladder system on flat, level surfaces.
Do not use the ladder system to perform work under electrical
voltage. The ladder system is made of conductive material.
When working, do not lean too far away from the ladder system; the
centre of your body should always be located between the rails of
the ladder sections or over the work platform.
Face the ladder while climbing up and down it.
Do not use the ladder system to bridge distances.
Do not step onto the ladder system if you have consumed alcohol or
are under the influence of other drugs or medication.
General information
GB
IRE
9
Stand with both feet on a rung and hold on with one hand.
Only use the ladder alone and not with multiple persons at the same
time. Children may not play with the ladder system.
Only set up the ladder system on flat, level surfaces. The support feet
must not be able to sink into the ground.
Take additional measures to secure the upper/lower end of the
ladder.
MIN.
1m
Set up the ladder system so that it is at least 1 m away from the
ceiling.
Do not set up the ladder system in front of a wall in an angled
position. There must be no risk of it wobbling or tipping.
Do not climb off the ladder system to the side. Do not use the ladder
system to climb up to other levels.
Do not place part or the entire ladder system on steps.
10
GB
IRE
Safety
Deploy the ladder system completely and engage the safety strut
before you climb onto it.
Wear suitable footwear when using the ladder system. Flat, dry and
non-slip shoes are considered suitable footwear.
Safety
Proper use
The ladder system is designed exclusively for use as a climbing aid in the home,
garden and for hobbies. With the ladder system, you can perform simple tasks at
heights that can only be reached with a ladder. The ladder system is only intended for
private use and not suitable for commercial purposes. It is not a children's toy.
Only use the ladder system as described in these operating instructions. Any other
use is deemed improper and may result in damage to property or even personal
injury.
The manufacturer or vendor accepts no liability for damage caused by improper or
incorrect use.
Safety notes
WARNING!
Risk of injury!
Failure to use the ladder properly could result in injury.
−− After purchase and before each use, check the condition of the
ladder system and that all parts are functional. Do not use the
ladder if it is damaged.
−− Do not exceed the ladder system's load bearing capacity of
150 kg.
−− Only climb the ladder system if you are in good health. Some
health conditions such as pregnancy may pose an increased
risk to your health. If applicable, ask your doctor before stepping onto the ladder system.
Safety
GB
IRE
11
−− Do not step onto the ladder system if you are under the influence of alcohol or medicine or if you have taken other drugs
before.
−− Make sure that the ladder system is suitable for the intended
use.
−− Do not set up the ladder system on steps.
−− Do not set up the ladder system on icy or otherwise slippery
surfaces.
−− If necessary, take additional measures to secure the stability of
the ladder system.
−− If you are working at an elevated height, take additional steps
to secure the ladder system.
−− Only use the ladder system on a clean, flat, level and solid base
that does not move.
−− Do not use the ladder system to climb up to other levels.
−− Do not use the ladder system to perform work under electrical
voltage. The ladder system is made of conductive material.
−− Set up the ladder system so that it is always freely accessible.
−− Check to make sure that there are no lines or pipes, unlocked
windows, doors and buttresses in the surroundings before
you climb onto the ladder system.
−− Check the surroundings for sources of danger such as exposed
high-voltage lines or other electrical equipment before you set
up the ladder system and climb onto it.
−− Always set up the ladder system on both support feed and do
not set it up on treads.
−− Make sure that the ladder system has been set up properly
before you climb onto it. The safety struts must be properly
hooked in place.
−− To the extent possible, keep doors and windows in the work area
locked while you are on the ladder system providing they are not
emergency exits.
−− If you would like to use the ladder system on grass or another
uneven surface, place a stable, clean,flat and horizontally
aligned base under both support feet. The support feet may
not sink into the ground.
12
GB
IRE
Safety
−− Do not use the ladder system if one or more non-slip rubber
caps for the support feet are missing or visibly damaged.
−− Always climb up the ladder with your face towards it and make
sure you have a firm hold on the treads or rails.
−− Do not lean too far out from the ladder system. Both feet should
always be positioned on the same rung. The middle of your
body (belly button) should only move between the rails.
−− When climbing up and down the ladder system, always firmly
hold onto it with both hands.
−− Climb the ladder system one rung at a time and do not skip
multiple rungs.
−− Do not slide down the rails.
−− Do not use the ladder system as a bridge and do not use it to
move to other levels.
−− Only transport the ladder system when it has been folded up.
−− When transporting the ladder system, make sure that it is
adequately secured on the roof rack or loading area.
−− Do not climb the ladder in the event of strong wind or storms.
−− Do not move the ladder system when you or another person is
on it.
−− Do not place any tools or other objects on the rungs and do not
hang anything on the ladder system.
−− Avoid work resulting in a one-sided load such as drilling
through a material like concrete sideways.
−− Only transport light, manageable objects when climbing onto
the ladder system.
−− When working on the ladder system, always firmly hold onto
the ladder system with one hand or use additional safety
features.
−− Only climb the ladder system with sturdy, clean, dry shoes.
−− Only wear tightly fitting clothing when you climb onto the
ladder system. If you are wearing a long scarf or similar, you
could catch yourself and fall off the ladder system.
−− Remove any contamination such as oil, snow or wet paint
from the rungs and on or under the ladder system before you
continue to use the ladder system.
−− Only use the ladder system for tasks that are quickly completed.
Unpack and check
GB
IRE
13
−− Climb down the ladder system immediately and step off it if
you feel tired.
−− Do not extend the ladder system in a makeshift manner and
also do not modify its shape and function in any manner.
−− Keep children away from the ladder system.
−− To make sure that children do not play with the ladder system,
do not leave the ladder system unsupervised when it has
been set up.
NOTE!
Risk of damage!
Improper handling of the ladder may damage it.
−− If you apply lubricant, make sure that it does not come into
contact with the rungs, the platform or the rails.
−− Only have the ladder repaired by a qualified person.
−− Only use original or equivalent spare parts for repairs.
−− If you set up the ladder on a soft surface and want to prevent
depressions, use a non-slip base.
Unpacking and checking the ladder system
WARNING!
Danger of suffocation!
Children can become trapped in the packing film when
playing and suffocate.
−− Ensure that children do not play with the packing
film.
NOTE!
Risk of damage!
The surface of the ladder system can be damaged if you
incautiously open the packaging with a sharp knife or another pointy object.
−− Be very careful when opening.
−− Take the ladder system out of the packaging and check that the product contents
are complete and whether the individual parts exhibit damages (see Fig. A and
B). If this is the case, do not use the ladder system. Contact the manufacturer
using the service address specified on the guarantee card.
14
GB
IRE
Unpack and check
Setting up the ladder system
The ladder system is designed exclusively for use as a climbing aid in the home,
garden and for hobbies. It can be set up in three different versions:
• as a scaffold system (see Fig. C),
• as a leaning ladder (see Fig. D) and
• as a free-standing ladder (see Fig. E).
The connection system allows for variable height adjustments. Thus, you can also use
the ladder system in stairwells for example. The extra wide support foot ensures that
the ladder system is adequately secured if used properly.
Screwing on the support feet
WARNING!
Risk of injury!
Incorrect use may result in injury.
−− Only use the enclosed support feet and no other
similar products.
−− Before each use, check to make sure that the support
feet are securely positioned.
−− Crushing hazard: Pay attention to your fingers and
hands.
You must screw on the support feet before you use the ladder system for the first time.
To screw on the two support feet (see Fig. A and B):
1.Clean all parts of the ladder system before first use (see chapter “Cleaning”).
2.Place a ladder section 8 flat on the ground.
3.Place a support foot in a central position at the bottom end of a ladder section.
4.Insert two screws 12 from below in each of the pre-drilled holes of a support foot.
5.Place a washer 9 on each of the screw ends.
6.Use a spanner to tighten the screw nuts 8 (see Fig. B).
You have successfully screwed the support foot on.
7.Repeat steps two to six with the second support foot.
You have successfully screwed the support feet on and can now use the ladder
sections.
Setting up the ladder system
GB
IRE
15
Setting up the scaffold system
1.Hold the left ladder section 9 at any angle so that you can hook the work
platform 10 into place from below (see step 1 in Fig. C).
This way, the left ladder section will be supported by the work platform.
2.Use a safety strut 1 to secure both sections.
3.Raise the left ladder section with the work platform hooked into place.
4.Hook the right ladder section 11 into the work platform (see step 2 in Fig. C).
The scaffold system has now been set up.
5.Secure the work platform and the right ladder section with the second safety strut
(see step 3 in Fig. C).
You have successfully set up the ladder system and can now use it.
Setting up the leaning ladder
WARNING!
Risk of injury!
Incorrect use may result in injury.
−− Do not stand on the top three rungs.
−− Only step onto the ladder if you
• have set it up properly, in a suitable location and in
accordance with guidelines,
• are wearing sturdy shoes,
• and carefully read through and understood the
chapter “Safety”.
−− Only set up the leaning ladder at the correct leaning
angle of 60 to 75 degrees. Make sure that there are no
children in the room where the leaning ladder is set
up if they are not supervised. Children may not play
with the leaning ladder.
1.Position the right ladder section 11 in an upright position.
2.Turn the left ladder section 9 so that the support foot 5 is pointing up.
3.Place the left ladder section on the right ladder section so that they overlap by at
least two rungs.
4.Use the hooks 8 to secure the left ladder section on a rung of the right ladder
section (see step 1 in Fig. D).
You have successfully set up the leaning ladder (see step 2 in Fig. D).
16
GB
IRE
Taking down the ladder system
Setting up the free-standing ladder
WARNING!
Risk of injury!
Incorrect use may result in injury.
−− Do not stand on the top two rungs.
−− Every time you reposition the free-standing ladder,
make sure that the free-standing ladder is still properly secured.
1.Place the left ladder section 9 at a slight angle so that the hooks 8 are
pointing in or to the right (see step 1 in Fig. E).
2.Hook the ladder section 11 with the uppermost rung 6 into the two hooks 8
(see step 1 in Fig. E).
3.Use the two safety struts 1 to secure the free-standing ladder
(see step 1 in Fig. E).
You have successfully set up the free-standing ladder (see step 2 in Fig. E).
Taking down the ladder system
−− Reverse the steps required for setting up the ladder.
Cleaning the ladder system
NOTE!
Risk of damage!
If you use unsuitable cleaning agents or utensils, you
could damage the surface of the ladder system.
−− Do not use any aggressive, abrasive, solvent-, acid- or
chlorine-based cleaners.
−− Do not use any brushes with metal or nylon bristles,
sharp or metallic cleaning utensils such as knives,
hard scrapers or similar.
1.Wipe the ladder system off with a damp cloth.
2.Let the ladder system dry completely.
You have successfully cleaned the ladder system. You can now close the ladder
system or continue to use it.
Storing the ladder system
GB
IRE
17
Storing the ladder system
NOTE!
Risk of damage!
Storing the ladder system in a damp area will allow rust
to form. This may permanently and irreparably detriment
the functionality or load bearing capacity of the ladder
system.
−− Protect the ladder system against moisture, exposure
to sunlight and frost.
−− Only take down the ladder system and put it away once it is clean and completely
dry.
−− Store the ladder system in a dry area.
Disposing of the packaging and old ladder
system
−− Dispose of the packaging separated into single type materials.
Dispose of cardboard and carton as waste paper and foils via the
recyclable material collection service.
−− Dispose of the old ladder system in accordance with the disposal
regulations and laws in force in your country.
18
GB
Technical data
IRE
Technical data
Product name:
Model:
Total height when closed (H x W x D):
Total height when open:
Number of rungs:
Permissible load:
Scaffold and ladder system
S&LS14
approx. 159 x 44.5 x 11.5 cm
approx. 145 cm
six each
max. 150 kg
Weight:
Product code:
Maximum number of persons:
approx. 18.5 kg
91944
1
Platform material:
Wood
Rung material:
Aluminium
Frame material:
Aluminium
Warranty
GB
IRE
19
Warranty Card
Scaffold and Ladder System
Your details:
Name
Address
E-mail
Date of purchase*
* We recommend you keep the receipt with this warranty card.
Location of purchase
Description of malfunction:
Return your completed warranty card
together with the faulty product to:
Sertronics Ltd.
Walsall Enterprise Park
Unit 45
Regal Drive
WS29HQ Walsall - West Midlands
UNITED KINGDOM
after sales support
GB
+01827 438 013
[email protected]
IRE
+0124 695 20
[email protected]
Model: S&LS14
Product code: 91944
Phone lines available
Calls cost 10p per minute from a landline,
calls from mobiles may
vary.
04/2015
Years
warranty
20
GB
Warranty
IRE
Warranty conditions
Dear Customer,
The ALDI warranty offers you extensive benefits compared to the statutory obligation arising from a warranty:
Warranty period: 3 years from date of purchase.
Costs:
Free repair/exchange or refund.
No transport costs.
ADVICE:
Please contact our service hotline by phone, e-mail or fax
before sending in the device. This allows us to provide
support in the event of possible operator errors.
In order to make a claim under the warranty, please send us:
• together with the faulty item the original receipt and the warranty
card properly completed.
• the faulty product with all components included in the packaging.
The warranty does not cover damage caused by:
• Accident or unanticipated events (e.g. lightning, water, fire).
• Improper use or transport.
• Disregard of the safety and maintenance instructions.
• Other improper treatment or modification.
After the expiry of the warranty period, you still have the possibility to have
your product repaired at your own expense. If the repair or the estimate of costs
is not free of charge you will be informed accordingly in advance.
This does not affect your statutory rights.
Spend a little Live a lot.
Great care has gone into the manufacture of this product and it should therefore provide you with years of good service when used properly. In the event
of product failure within its intended use over the course of the first 3 years
after date of purchase, we will remedy the problem as quickly as possible
once it has been brought to our attention. In the unlikely event of such an occurrence, or if you require any information about the product, please contact
us via our helpline support services, details of which are to be found both in
this manual and on the product itself.
Produced in china for:
Aldi Stores ltd. po box 26, Atherstone
Warwickshire, cv9 2SH
Aldi stores (ireland) LTD.
Po box 726, naas, co. Kildare.
visit us at www.aldi.com
GB
IRE
AFTER SALES SUPPORT
GB
IRE
+01827 438 013
+0124 695 20
Model: S&LS14
[email protected]
[email protected]
Product code: 91944
04/2015
years
Warranty