1
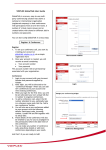
NLTVC USER MANUAL FOR CRYSTALVIEW HD SERIES Version 1.1 TABLE OF CONTENTS 1. System Starts up ………………………………………………………………………….…………..1 2. System Configuration …………………………………………………………………….………..3 2.1 2.2 2.3 2.4 3. General ……………………………………………………………………………….……….…….4 Audio & Video ……………………………………………………………………..……….…...5 Date & Time ……………………………………………………………………………..………..6 Network ……………………………………………………………………………………….….…7 Video Conference System ……………………………………………………………..………...9 3.1 H.323 Client ………………………………………………………………………….…….……..9 3.1.1 Address Book ……………………………………………..……………….……………..9 3.1.2 Settings ………………………………………………………………………..…………..10 3.1.2.1 General …………………………………………………………………………….10 3.1.2.2 Audio …………………………………………………………………..………..….11 3.1.2.3 Video …………………………………………………………………..……………12 3.1.3 Call ………………………………………………………………………………..……….....12 3.1.4 On-screen Keyboard ……………………..……………………………………………13 3.1.3 Quit ……………………………………………………………………..……….………..….13 3.2 NLTVC HD Client ……………………………………………………………………………….14 3.2.1 Option ……………………………………………………………………………………...14 3.2.2 Login ………………………………………………………………………………………...15 3.2.3 Call …………………………………………………………………………………………..16 3.2.3.1 Directory ……………………………………………………………………….17 3.2.4 Multiparty …………………………………………………………………………………18 3.2.5 Conference Info …………………………………………………..…………………..19 3.2.6 Mute Microphone ……………………………………………………..…………….21 3.2.7 Mute Speaker …………………………………………………………,……….………21 3.2.8 End the call ………………………………………………………………………..……..22 3.3 SkypeTM 3.3.1 Using Skype ………………………………………………………………………..…….24 3.3.1.1 Make Call …………………………………………………………………………..24 3.3.1.2 Make Video Call …………………………………………………………………24 3.3.1.3 Answer Call ……………………………………………………..………………..24 3.3.1.4 Answer Call with Video …………………………………….……………….25 3.3.1.5 Decline ……………………………………………………………………………....25 3.3.2 Sound Test ……………………………………………………………………………..….26 3.3.3 Camera Test ………………………………………………………………………..……28 1 1. System Starts up 1) The system starts up with six (6) main buttons on the screen: 2) The usability of each icon is described in the following table. 1 Icon Name Description H. 323 Client Interconnect with other H.323 based video conferencing system or MCU. E.g. Polycom, Tandberg, Vidyo, Cisco, Spranto etc. NLTVC HD client Skype™ System Configuration Proprietary RSW protocol for multipoint HD client with real time document conferencing. Proprietary Skype™ protocol. Use for: I. System diagnosis II. Network Configuration Reboot To reboot the system Turn Off To turn off the system 2 2. System Configuration 1) Click the System Configuration button: 2) The following page will be shown 3 2.1 General a) General page will show the current condition of the system. Note: The Summary above shows the good condition of the system. The system is working perfectly. 4 2.2 Audio & Video a) Audio & Video page will be used for audio and video testing. b) Click “Test Speaker” button to test the speaker. c) Say something to test the microphone. The responding spectrum shows the device is working. d) Click “Test Camera” to test the camera. The camera display will be shown. 5 2.3 Date & Time a) By default the date will be following the date of the system. b) To change the date or time, simply adjust the date and time of your time zone and click “Update Date” / “Update Time” button. c) The changes will be saved immediately. 6 2.4 Network Important: 1) DHCP network a) Select “Obtain IP address automatically”. b) IPv4 address will be allocated to the system automatically. c) Check the Internet Status: i. Connected to Internet Important: Good configuration ii. No Internet Bad configuration. Please check with the network admin. 7 2) Non-DHCP network a) Select “Use the following IP address” b) Insert the given IPv4 address, Subnet Mask, Default Gateway and DNS. c) Click Apply. d) Check the Internet Status: iii. Connected to Internet Important: Good configuration iv. No Internet Bad configuration. Please check with the network admin. Important: Please ensure you are connected to Internet before closing the system configuration. 8 3. Video Conference System 3.1 H.323 Client Insert IP address Address Book Call Settings Quit On-screen Keyboard 3.1.1 Address Book Add new user Call Delete user Edit User 9 3.1.2 Settings Note: The settings are set to default. Do not change if not required to. 3.1.2.1 General Set the suitable bandwidth in your environment Uncheck to disable auto answer 10 3.1.2.2 Audio Microphone is set to default (auto detected by the system) Speaker is set to default (auto detected by the system) 11 3.1.2.3 Video Camera is set to default (auto detected by the system) Video Resolution: 4CIF – High quality CIF - Medium quality QCIF – Low quality 3.1.3 Call Click the call button after the IP address is inserted. 12 3.1.4 On-screen Keyboard 3.1.5 Quit Quit the H.323 Client 13 3.2 NLTVC HD Client Click on to launch NLTVC HD Client. To get started, option page has to be configured (One time configuration) 3.2.1 Option Important: Username and default password come with the registered license To change your password Enter the server name or IP address Server port is set to default Joining to the conference anytime Use for local video conference (No internet connection required) For non-DHCP client For DHCP client. Check your internet setting in system configuration Set the number of active conference parties Set the quality of the video Not used. For advance technical purposes. 14 3.2.2 Login Login to NLTVC server Exit the client Network indicator Option page Network Indicator: Connected to network Identifying the network No network / disconnected/ cable unplugged Limited connectivity Important: Please check the network setting in System Configuration page if the network is unavailable. 15 3.2.3 Call Point to point calling. A directory will be shown, with the available users. Please refer to the Directory section. 16 3.2.3.1 Directory Important: a) Select by available user by ticking or double clicking on the name. b) Click “INVITE” button c) Conferencing session has been started d) The person who initiated the conference will be referred as Chairman. While others are referred as Participants. 17 3.2.4 Multiparty Multipoint video conferencing session with 1 active or 2 actives users. See section [3.2.1 Option] for the configuration. a) Click the “MULTIPARTY” button. b) A directory will be shown. See section [3.2.3.1 Directory] to invite the users for conference. 18 3.2.5 Conference Info Information of each invited user Local view Remove the user from conference Put the user ON AIR Put the user ON QUEUE Mute the microphone Mute the speaker Speaker volume controller End the conferenc e Invite more users Switch off the local view Video quality ON AIR – User will be able to speak and see each other ON QUEUE – User is put on queue before ON AIR JOINED – Invited users joined in the conference INVITED – Invited users 19 A user has joined The chairman can click “ACTIVATE” button to put the joined user ON AIR The chairman can click “DROP” button to remove the user from conference A screenshot that shows a user has joined to the conference User is put ON AIR The chairman can click “DE ACTIVATE” button to put the user ON QUEUE A screenshot that shows an ON AIR user 20 3.2.6 Mute Microphone By default the microphone is on (un-muted). Un-muted Muted A notification with microphone is muted. icon will be shown on the screen if the 3.2.7 Mute Speaker By default the speaker is on (un-muted). Un-muted Muted A notification with speaker is muted. icon will be shown on the screen if the 21 3.2.8 End the call Click to end the conference. Once the conference ended successfully, the following screen will be shown: 22 3.3 Skype™ Click to launch Skype™. Individual Skype Name and Password are required to sign in to Skype™. 23 3.3.1 Using Skype 3.3.1.1 Make Call Step1: Select a user in Contacts Step2: Click Call 3.3.1.2 Make Video Call Refer to section [3.3.1.1 Make Call] and click on “Video Call” button. 3.3.1.3 Answer Call This option will not turn on your video. 24 3.3.1.4 Answer Call with Video This option will turn on your video. 3.3.1.5 Decline This option will end the call from remote party. 25 3.3.2 Sound Test Step1: Select Echo / Sound Test Service The following page will be shown and you will be required to speak. Your own voice will be played back. This indicates you have good microphone. 26 Important: If you did not hear your own voice, please check your microphone: 1) Is the microphone plugged into the correct port? 2) Is the microphone muted? 3) Is the microphone powered by battery? The battery might be drained from time to time. If none of the 3 options could help, please get a new microphone. 27 3.3.3 Camera Test Click on Tools: Select Options… 28 Go to Video settings: Good configuration of the camera 29