1
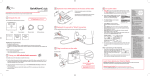
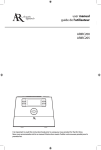
Controls
QuickStartGuide
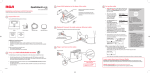
3 Optional: Insert AAA batteries in the base of the radio
ARIR201
www.arinfiniteradio.com
Follow the polarity markers in the battery
compartment.
Congratulations on purchasing your new Acoustic Research Wi-Fi Infinite Radio.
Please follow these instructions to set up and start using the radio.
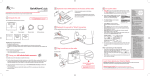
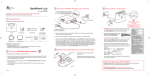
1 Unpack the unit
You should find the following items in the box:
The batteries (not included) power the clock and
alarm whenever the radio loses electricity.
To Exit DEMO mode, press and release preset 1,
then SLEEP/SNOOZE, then preset 6.
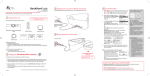
6 Set up the radio
A. NOTE: When you turn on the radio for the first time, it will be
in “DEMO” mode. To exit this mode, press and release preset 1,
then SLEEP/SNOOZE, then preset 6 on top of the radio.
B. After exiting the DEMO mode, the radio
displays the Select Language screen.
Choose your preferred language.
C. The Network Setup screen displays
connection options:
•
4 Optional: For use with a “Wired” connection
•
–
Use the supplied Ethernet cable if you do not have a wireless (Wi-Fi) access point.
–
Radio
Power adapter
Ethernet cable
AM loop antenna
–
LAN
LAN
Quick Start
Guide (this
leaflet)
Setup
Information
Card
Broadband modem or
Ethernet router/hub/switch
–
Press to show “DONE”
and SELECT to confirm.
LAN
Press
or
to highlight,
SELECT to confirm.
Additional requirements
•
•
•
Broadband Internet service
Broadband (cable/DSL) modem, usually supplied by your Internet service provider
An 802.11 b or g (Wi-Fi) wireless home network or Ethernet router/switch/hub with available LAN
port
For Wi-Fi connections, you may also need:
• Your wireless network’s SSID
• Your access password (for secure networks)
5 Plug in and turn on the radio
D. The radio should now connect to the Internet. If the radio does
not connect refer to the troubleshooting section in your user
manual.
Only use the power adapter which is included with your product.
After connecting to the Internet
•
Electrical outlet
2 Set up your AR Infinite Radio accounts
!
To simplify setup on the radio please complete these steps:
•
A. Find the Setup Information Card that contains your radio’s MAC address number (MAC: 00-21-2AXX-XX-XX) and activation PIN # (PIN: XXXX). (This number is also found in the Device Info screen
under the Settings menu in your radio.)
B. Using any Internet-connected computer, go to www.arinfiniteradio.com/setup and follow the
online instructions.
• You will need to input your radio’s MAC address and PIN # to associate your radio with your
personal settings.
v1.0 (1.0.1.0) (EN)
Select Wired to connect using an
Ethernet cable and proceed to step D.
OR
Select Wireless, then choose from setup options displayed:
Detect Networks allows you to search for available networks,
then choose your network.
Use WPS allows you to select from Push Button Mode or PIN
Mode to pair up with open WPS router.
Enter network SSID allows you to manually enter a known
network name (SSID). See tips to the right.
If the network is secure, select security type and/or enter your
password in the Network Security screen.
If you did not activate your Infinite
Radio accounts, or if the radio cannot
get your details from the Infinite Radio
server, the radio may ask for your
country. Input your country. Select
your country and then input your ZIP code (US), Postal code
(Canada)or city (Mexico) accordingly.
If your radio has successfully connected to the Internet you will
hear a welcome message streaming from the Internet.
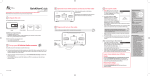
Use the
navigation
controls to
make choices
and input
information:
− move highlight up
– move highlight down
– move selection/navigate
left
– move selection/navigate
right
SELECT - confirm selected
option or character
When inputting characters,
press or to choose among
uppercase, lowercase, numeric,
or special characters.
To insert spaces or correct
mistakes, press to display the
Commands list and then press
or
to choose the desired
command.
About passphrase:
•
This radio supports secured
access points using the
Wireless Equivalent Privacy
(WEP) keys or Wi-Fi Protected
Access (WPA and WPA2)
standards.
•
WEP keys are either 10 or
26 characters long (e.g.
6E78214A52). Note that
some Wi-Fi routers support
passphrase generation for
WEP security. However, there
is no industry standard for
WEP passphrase generation
and this radio does not
support WEP passphrases.
•
If you are using a WEP
secured access point, enter
the WEP key (HEX format)
instead of the passphrase.
Learn more about your Infinite Radio
Exit the DEMO mode after
turning on
Press and release preset 1, then
SLEEP/SNOOZE, then preset 6.
Visit www.arinfiniteradio.com to download the user manual for your radio. Read the user
manual for more information on the player’s features, safety and warranty information, and
answers to Frequently Asked Questions (FAQ’s).
Need more help? Do not return this product to the store.
Visit www.arinfiniteradio.com to get the latest firmware updates and FAQ’s.
Sleep timer/
snooze
Station presets
On/standby
Audio source
Volume
Alarm set/
alarm off
Clock set
WEATHER
Weather
Home/Main
menu
Heart
Ban
Record
Tag
Play/pause
Display
Menu up
Next/scan/fast
forward/menu
forward
Previous/scan
back/reverse/
menu back
Menu down
Menu select
Rear panel connections
AM loop
antenna socket
FM antenna
LAN port
DC IN
Headphone/
audio line-out
Power adapter
input socket
USB 2.0 port
You can connect USB devices to the USB port:
The radio can play open MP3, WMA, and RealAudio
audio files stored on the connected USB device.
RealAudio is a trademark or a registered trademark of RealNetworks, Inc.
Using the radio
General procedures
Turn on/off (standby) the radio
Choose an audio source
Choose a preset radio station
Assign the current radio station to a
preset
Display the menu while listening
Record the current AM/FM/Internet
radio station
Start the sleep timer
Add time or cancel the sleep timer
Display the time
Set the time
Set the alarm
Press ON/STANDBY.
Press SOURCE to cycle through the audio sources (Slacker
Radio, Pandora Radio, Internet Radio, MP3tunes, USB Input,
Recordings, or FM/AM Tuner).
Press SOURCE to choose the radio source (Slacker Radio,
Pandora Radio, Internet Radio, FM, or AM), then press a preset
button (1–6).
Press and hold a preset button (1–6) until the radio beeps.
Press .
Press .
Press again to stop recording.
Press SLEEP/SNOOZE.
Press SLEEP/SNOOZE repeatedly.
Press CLOCK.
Press and hold CLOCK.
Press to choose Manual and then press SELECT.
Press or to choose hours, minutes or AM/PM.
Press or to change the time.
Press SELECT to set the time.
Press ALARM once. Then press or to choose Turn On, Turn
Off, Set Alarm Time, or Select Sound and then press SELECT.
Listening to Slacker™ radio
Choose a Slacker™ station
Start playing the selected station
Pause playback
Skip to the next song
Mark the current song as a favorite
Create a custom station based on the
current artist
Ban the current song from the station
Ban the current artist from the station
Use the current station as the alarm
sound
Listening to Pandora™ radio
Listening to MP3tunes
Choose a Pandora™ station
Set up MP3tunes Locker
Refer to the MP3tunes section of the user manual.
Play an audio file from MP3tunes Locker Press SOURCE to choose MP3tunes. Press or to exit or
enter categories. Press or to highlight a file and press
SELECT or to start playback.
Press . Press again to resume.
Pause playback
Press .
Skip to the next audio file
Press within the first 3 seconds of the current file.
Skip to the previous audio file
Start playing the selected station
Pause playback
Skip to the next song
Thumbs Up current song
Bookmark current song
Bookmark current artist
Create a custom station based on the
current song or artist
Thumbs down current song
Delete current station
Use the current station as the alarm
sound
*Note that Slacker and Pandora may not be available in all countries, please check availability in your
country.
Playing recordings and audio files
Play a recording
Press SOURCE to choose Recordings.
Press or to highlight a recording. Then press or to
choose PLAY and press SELECT.
Play an audio file from a connected USB Press SOURCE to choose USB.
device
Press or to exit or enter folders. Press or to highlight a
file and press SELECT to start playback.
Pause playback
Press . Press again to resume.
Skip to the next recording/audio file
Press .
Skip to the previous recording/audio file Press within the first 3 seconds of the current recording/file.
Listening to Weather Forecasts
Listening to FM/AM radio
Tune in an FM/AM radio station
Press SOURCE to choose Slacker Radio.
Press or to move up and down the
menu options and press SELECT to
choose the desired genre and station.
Press SELECT.
Press . Press again to resume.
Press .
Press .
Press and hold or press and choose Create Station and
then press SELECT.
Press .
Press and hold .
Press to display the options menu. Press to choose Send
to Alarm and then press SELECT.
Press SOURCE to choose Pandora
Radio. Press or to move up and
down the menu options and press
SELECT to choose the desired genre
and station.
Press SELECT.
Press . Press again to resume.
Press .
Press .
Press to display the options menu. Press to choose
Bookmark Song and press SELECT.
Press to display the options menu. Press to choose
Bookmark Artist and press SELECT.
Press to display the options menu. Press to choose Create
Station. Press or to choose This Song or This Artist and
then press SELECT.
Press .
Press and hold .
Press to display the options menu. Press to choose Send
to Alarm and then press SELECT.
Step through the radio frequencies
Use the current station as the alarm
sound
Press SOURCE to choose FM or AM radio.
Press and hold or to seek. Once released, the radio will
auto-tune to the next available station.
Press or .
Press to display the options menu. Press to choose Send
to Alarm and then press SELECT.
Listen to today’s local forecast
Listen to 3-day local forecast
Listening to Internet radio
Choose an Internet radio station
Start playing the selected station
Mark the current station as a favorite
Remove the current station from My
Favorites
Use the current station as the alarm
sound
Press SOURCE to choose Internet Radio.
Press or to move up and down the
menu options and press SELECT to
navigate to the desired station.
Press SELECT.
Press or press to display the options menu. Press
choose Add to Favorites and then press SELECT.
Press .
Press to display the options menu. Press
to Alarm and then press SELECT.
to
to choose Send
Audiovox Electronics Corp.
150 Marcus Blvd., Hauppauge, NY 11788
© 2010 Audiovox Electronics Corp.
Trademark Registered
Printed in China
Press WEATHER once.
Press WEATHER twice.