1
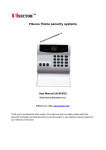
PSTN Alarm System PH-SD55
(Six Zone Wireless Alarm System)
User's Manual
http://www.phoenixhomesecuritysystems.com/
1
Table of contents
No.
Topic
Page
I Features of PSTN alarm system PH-SD55
3
II Technical parameters and components
4
III Explanation of the alarm system operation
6
IV Installation of the alarm control panel
7
V Programming the alarm system
8
VI Installation of door/window sensors
15
VII Alarm operation with either the remote control, or the alarm panel buttons
16
VIII Receiving a call from the alarm panel
17
IX Remote operation via telephone
18
X Use of remote controls
19
2
I. Features:
- Anti-interference function. The alarm can be programmed so that when someone interferes with the alarm on the
same frequency, the alarm panel will activate the siren.
- Supports anti-decode mode of the remote control.
- Six programmable defense zones available, with status LED's for each zone. The control panel can register 99
sensors and detectors.
- User can start the alarm to “HOME” or “AWAY”, easily by pressing one key on remote control
-The alarm can sound a reminder when the user exits the home, indicating the alarm needs to be set.
- The alarm can be programmed to dial 6 various phone numbers when there is an alarm trip. A recorded message
will play when the dialed telephone is answered.
- The alarm can arm/disarm with a remote control or the keypad on the control panel
- The alarm can be armed/disarmed/ or room listened to, by calling the host phone number (The phone number of
control panel outside line).
- Alarm can alert user if the telephone line is cut or shorted out.
- Internal battery backup can continue to work for 8-10 hours when AC electrical power is lost.
- The siren can be set to sound from 0 minutes (no sound) to 30 minutes.
3
II. Technical Parameters and Components:
Operating voltage: Provided with power supply with input of 100-240VAC, 50/60Hz, and output of 9VDC, 300ma
cont., 1A max.
Wireless receiving distance (typical): ≥ 80m
Operating Frequency: 433.92 MHz
Operating voltage: 9VDC provided by power adaptor with an input of 100-240VAC
External Alarm Siren Volume: 110 dB
Working Condition: Temperature –10 Deg C to +40 Deg C
Humidity ≤ 90%
Maximum Number of Wireless Sensor Devices: 99
Wireless Door Sensor
Power Supply: 12V battery, type 23A
Static Current: ≤20 uA
Transmission Current: ≤15mA
Transmission Frequency: 433MHZ±0.5MHZ
Transmission Distance: No obstacles-80m
Magnet to Sensor Gap Distance: 10 mm
Working Condition: Temperature –10 Deg C to +40 Deg C
Humidity ≤ 90%
Wireless PIR Motion Detector
Power Supply: 9V battery
Static Current: ≤100 uA
Transmission Current: ≤20mA
Transmission Frequency: 433MHZ±0.5MHZ
Transmission Distance: No obstacles-80m
Detect Speed: 0.3~3m/s
Detect Distance: 5~12m
Detect Range: Horizontal 110° Vertical 60°
Working Condition: Temperature –10 Deg C to +40 Deg C
Humidity ≤ 90
4
Remote Control
Power Supply: DC12V (inner DC12V battery, type 23A)
Static Current: 0
Transmission Current: ≤15mA
Transmission Frequency: 433MHZ±0.5MHZ
Transmission Distance: No obstacles-80m
Working Condition: Temperature –10 Deg C to +40 Deg C
Humidity ≤ 90
Please Note: PSTN Alarm System PH-SD55 comes as a standard package with limited accessories. More
sensors/detectors, if needed, are to be bought separately.
The standard package components are:
1 alarm control panel
1 wireless infrared motion detector
1 wireless door magnet detector
1 indoor home alarm siren
2 remote controls
1 power supply 9v dc
1 instruction manual
The following sensors can be added by the user:
Additional wireless products available commercially include:
Remote controls, wireless PIR motion sensors, wireless door/window sensors with magnets, wireless gas detectors,
wireless smoke detectors, panic buttons, glass break detectors, and water detectors, according your specific needs.
All sensors should work on 433 MHz with 5211, 2262, or 1527 encoding.
5
III. Explanation of the alarm system operation:
a) Working elements:
This alarm system contains two main parts—a control panel and some sensors. When a sensor detects a breach, it
will send a radio signal to control panel. When control panel receives the signal, the ALARM LED and the LED for
the zone of the sensor will illuminate, the control panel will activate the 110dB siren to alert you or neighbors as to an
entry. (The siren may also be turned off or disconnected if so desired, as to not alert the intruder that he has
tripped an alarm.) The alarm panel also dials up to 6 phone numbers and plays a recorded message when
answered. Each of the phone numbers will be called in the order it was programmed. The alarm will repeat the
sequence a total of 3 times, if the alarm is not disarmed by the user. After the alarm is disabled, the alarm and
zone LED's will continue to flash, indicating the breach. This will continue until the alarm is armed again.
b) Functions of different sensors/detectors and remote controls that are commercially available:
1. Window/door sensors: detect the opening of doors or windows. When the magnet is moved away from the
sensor, it will send signal to control panel.
2. PIR Sensors: detect the motion of objects with infrared heat, such as the human body.
3. Smoke/gas detectors: detect smoke or gas leak. When detecting smoke or gas, it will send a signal to control
panel. These type sensors should be placed in a zone that operates in a panic mode, thus tripping the alarm
whether is armed or not. There are two types of smoke detectors that are readily available. The photoelectric
type is best for detecting smoldering fires. The ionization type is best for detecting flash fires with flames. For
maximum protection, both should be used.
4. Water sensors are available to detect either broken pipes or flooding conditions.
5. Panic buttons are available.
6. Remote controls that are similar to an automotive keyless remote, allow remote control of the alarm system.
6
IV. Installation of the alarm control panel
a) Insert the siren connector into the "siren" port of control panel, connect incoming telephone line to the "out line"
port of the control panel, and connect a telephone handset to the "telephone" port of the control panel.
b) Connect the power supply DC plug to the "power" port on the alarm panel. Plug the power supply into a wall
outlet. Press the "power" button to turn the system on. The power status light will be blinking and sound a “beep”
which indicates the control panel is working normally. The panel will sound a “beep beep beep” every 30 seconds,
which indicates the alarm phone numbers have not been set up. The beeping will disappear after a number for the
alarm to dial is entered.
Note: While registering sensors disconnect the siren to avoid activating the siren while registering sensors.
Attention:
a) Try to install the alarm control panel in the center of all the alarm sensor locations. Extend the antenna of the
control panel, positioned vertically. This will give the greatest range and strongest signal reception from all
sensors.
b) The installation position of the main panel should be far away from metal objects and wireless devices.
c) Always insure the incoming telephone line is connected to the control panel so that it can dial out when there is an
alarm.
d) The alarm panel should be located in a dry interior area, hidden from view.
outside use.
7
This alarm is NOT designed for
V.
Programming the alarm system
Before programming, enter the passwords and #. (The factory default is 1234). Two beeps will indicate that the
password entry was successful. Four short beeps indicate a failed entry, in which the password must be entered
again. To exit the programming state, press #. If no programming entry is made in 30 seconds, the panel will
automatically exit the programming state. To get rid of the beep, beep, beep, every 30 seconds when you first get
the alarm, program at least one telephone number.
a) Programming telephone numbers that will be dialed when there is an alarm:
While in the programming mode, use the following commands to program each number:
31* the 1st User phone number #
32* the 2nd User phone number #
33* the 3rd User phone number #
34* the 4th User phone number #
35* the 5th User phone number #
36* the 6th User phone number #
Note: To remove a phone number, reprogram and leave the number blank.
33*#
For example for the third number, enter
b) Recording an alarm message:
After entering the programming state, input 6 # to record a 10 second message that is played when the alarm panel
calls a number. During this message, place your mouth about 15cm (6 inches) from the panel when you speak.
When the recording time ends you will hear two beeps. The zone lights also count down near the end of the record
time. Every recorded message will replace a previously recorded message. The message should be short and
clear. For example: “There is burglary in progress at (your address). To listen to the recorded message, pick up
the attached telephone handset, and press 6*.
8
c) Registering sensors or detectors with control unit:
Please collect all sensors or detectors including door sensors, PIR detectors, and gas/smoke detectors and place
near the control panel. Make sure each has a good battery installed. Switch on control panel (power LED is on).
Each detector has its unique ID. Some sensors/detectors will have jumpers to set a unique code for the device. If
you have more than one of these in the system, the jumpers should be set differently. Some sensors automatically
generate a code. With this type, you do not need to set jumpers. When a sensor is tripped, it will send a signal to
control panel. For the alarm to recognize the sensor, it must be registered.
To trigger sensors while registering them with the control panel, use the following procedures:
-Door sensors: Just remove the two parts of door sensor and remove back, panel will beep and the status LED
flashes, which shows successful.
-PIR Sensors: You can turn the switch to “on” and the system will beep, which shows registering was successful.
Then turn it to “off” to avoid registering it again.
-Remote controls: You can press any key on the remote to register it. The alarm panel will also beep.
-Gas and smoke detectors: There is usually a test switch which you can press to register it with control panel.
-Glass break sensors: You can put it on a desk and then shake the desk, it will send a signal to control panel. The
control panel will respond with a beep, which indicates successful registration.
While in the programming state, the below commands will allow access to each zone. The alarm will beep two
times and the ALARM LED will start flashing, indicating that you have entered the registering mode. The LED of the
zone you are registering sensors in will also be illuminated. Momentarily trigger each sensors or detectors you are
going to register for the zone it will be used in. If you register a sensor in two zones, the panel will only register it for
the last zone in which it was registered.
9
Enter 7# to gain access sensor registration. The panel will default to Zone 1.
Zone 1: trigger sensors for this zone. (Enter 01# if later you need to return to Zone 1 for additional sensors)
Zone 2: Enter 02 # and trigger sensors for this zone.
Zone 3: Enter 03 # and trigger sensors for this zone.
Zone 4: Enter 04 # and trigger sensors for this zone.
Zone 5: Enter 06 # and trigger sensors for this zone.
Zone 6: Enter 05 # and trigger sensors for this zone.
Note: When registering the remote controls, you may wish to register all in a single zone dedicated for the remotes.
Keeping these separate from other zone sensors will allow you to determine that an alarm initiated by the panic
button on a remote. This can be done by looking at the LED zone indicator on the control panel after an alarm
event has taken place.
When finished, enter # to exit sensor registration. Enter # again if you are done and wish to exit programming or
wait 30 seconds for the control panel to automatically exit.
Defense Zone Configurations:
Each zone can be configured to have special features. Below are the configuration options.
While in the programming mode, the below command sequence will permit changes to the configuration of a zone.
Command:
* Zone number (01-06) + 2 +X + [#]. (Example: To put a delay on Zone 1 the command is *01+2+2+#)
X will be:
1. Immediate: When a sensor is tripped in a zone with an immediate configuration, the alarm panel will immediately
activate the siren and dial the telephone numbers programmed.
2. Delay: When a sensor is tripped in a zone with a delayed configuration, the alarm panel will delay the siren
activation and telephone dialing sequence until after 30 seconds have passed. This is a useful feature if you do not
have a remote control for everyone and the alarm protection has to be turned off at the control panel. Delayed
configuration sensors would typically be used on a main entry in this case. The control panel will beep about every
second during the 30 second delay.
10
3. Panic: When a sensor is tripped in a zone with a panic configuration, the alarm panel will immediately activate the
siren and dial the telephone numbers programmed regardless of whether the control panel is armed or disarmed.
This configuration should be used for panic buttons, fire/smoke detectors, gas detectors, flooding detectors, or any
other detector requiring an immediate response at all times, whether the alarm is armed or not.
4. Home: A sensor configured for home will allow users to pass by motion detectors, open internal doors (such as a
door to an attached garage) without tripping the alarm. Perimeter sensors will still be active when the alarm panel
is armed with the Home button. This is typically used at night when your family is in the house and you wish to
secure the perimeter doors and windows of the house.
5. De-activated: This feature allows a sensor to be made inactive. This might be helpful if you have a motion
detector in a room or garage where an animal has been temporarily placed.
Configuration programming example:
If you want the second defense zone to be a Home configuration, you can input: *0225#.
Factory configuration settings:
Usually, we setup the door/window sensors installed in windows, or doors as “Immediate”. The detectors in this area
will activate alarm in either the Away or Home modes.
The wireless PIR detector is set in a Home configuration.
Away mode, but does not work in the Home mode.
It will be active when the alarm panel is armed in the
Deleting all coded information to register a new set of sensors
Under the status of registering, input 7*. It will sound “beep, beep” two times to confirm that all coded information
has been deleted.
11
Enable/disable the reminder to set the alarm:
If you program a reminder for a defense zone, the control panel will beep for three times to remind users to set the
alarm when a sensor in the zone it tripped. Example of usage would be on the front door to your building. When
you open the door, the three beeps will remind you to set the alarm. It can also be used to know when someone is
coming in a door or room when the alarm is not set, provided the user is in close proximity to the alarm panel.
When used on a zone that is configured for HOME, the sensors in the zone will cause the control panel to beep 3
times when tripped. The reminder will also sound when a HOME configured sensor is tripped, while the alarm is
armed in the HOME mode.
Command (while in programming mode):
Enable reminder: * Zone No. + 71 #
Disable reminder: * Zone No. + 70 #
Enable/disable the anti-interference function:
If enabled and someone attempts to jam the control panel with a radio transmitter on the same frequency, the
control panel will activate the siren, but it will not dial the phone numbers programmed in the alarm.
Command (while in programming mode):
Enable: 17 * 1 #
Disable: 17 * 0 #
Enable/disable remote control anti-decode:
If there is a risk of someone using an automated decoding system to disarm your system, the remote control disarm
buttons can be disabled to increase security. Once this feature is enabled, the alarm panel will ignore DISARM
signals from all remote controls. Only the keypad in the control panel button can disarm the system. The AWAY,
HOME, and PANIC, buttons of the remote controls will still operate. This feature may also be useful if a remote
control has been lost. Just remember, the only way to disarm will be at the alarm panel.
Command (while in programming mode):
Enable: 18 * 1 # (This setting disables the remote control DISARM button.)
Disable: 18 * 0 # (This setting allows normal operation the remote control DISARM button.)
12
Enable/Disable telephone line connection check:
When enabled, the alarm panel will beep three times, every 10 seconds if the phone line is cut or shorted. When the
alarm is armed in AWAY mode, the siren will also sound if the phone line is cut or shorted. In HOME mode only the
panel will beep.
Command (while in programming mode):
Enable: 22 * 1 #
Disable: 22 * 0 #
Alarm panel answer, number of rings:
You can setup the number of rings before the control panel answers an incoming call.
Command (while in programming mode): 12 *XX #.
XX shows number of rings, from “00--12”. When set to "00" an incoming call will not be answered by the alarm
panel.
Siren alert time:
You can setup the siren to sound for 00 to 30 minutes. When set to 00, the siren will not sound.
Command (while in programming mode): 29 * XX #.
XX is 00-30 minutes.
Siren notification for arming/disarming:
a) To provide a chirp of the siren during arming and disarming:
Command (while in programming mode): 8#
b) To disable the chirp of the siren during alarming and disarming:
Command (while in programming mode): 8*
13
Reset of all programmed information:
You can delete all registered information including the password and ALL sensor programming, in order to return the
original status before leaving the factory. You will hear two long beeps confirming deletion of all data.
Command: 0000 #.
To change the password:
While in the programming mode enter 10* new password (four numbers) # This will change the password to the four
new numbers you just selected. To exit the programming mode, press # again. The password is used for remote
control via telephone, programming, and turning off the alarm at the control panel. The users should keep it
confidential.
14
VI. Installation of door/window sensors:
Door/window sensors are used for detecting the opening of a window or door. When it detects the opening, it will
send a signal to alarm panel. Attach the transmitter box to the door casing (antenna vertical) and the magnet to the
door. Avoid mounting the antenna directly next to a metal door or metal surface. Place the transmitter at the top
of the door casing, if the door is metal. If the sensor is in an area where warm temperatures are common, the
double sided sticky tape used to mount the transmitter may release. It is recommended that you use other non
metallic hardware to mount the transmitter and screws to mount the magnet.
Caution:
A. Magnets should be mounted as close as possible (10mm or less) to the transmitter box side, opposite of the
antenna. The magnetic switch in the transmitter is located on that side.
B. In order to insure a strong signal at the panel, the antenna should be pulled out and positioned vertically.
C. If the indicator light of door sensor is blinking, this indicates a low battery condition. The battery should be
replaced as soon as possible.
Installation of Wireless PIR motion Sensors:
PIR Sensors are used for detecting if someone moves within in a certain area. Attach the sensor to the wall, 2 - 2.2
meters (6.5 - 7.2 ft) high and adjust the position to make it face to area being monitored.
15
VII. Alarm operation with either the remote control or the alarm panel buttons:
-AWAY alarm activation:
Momentarily press “ ” on the remote control or press the AWAY button on the alarm panel for 2 seconds. The alarm
panel will beep and the AWAY status LED will begin to flash for 30 seconds, allowing sufficient time to exit the
building. If you continue to hold the AWAY button on the remote, the alarm panel will beep 5 times and enter the
HOME alarm status.
-HOME alarm activation:
Press “ ” on the remote or press the HOME button on the alarm panel for 2 seconds, the alarm panel will beep and
the HOME status LED will illuminate immediately. In this mode, the detectors configured for Home will not activate
the alarm.
-DISARM:
Press “ ” on remote control or input the password+[DISARM] on control panel, the system will disarm.
-PANIC (Emergency Help)
In a panic or emergency situation, you can press “ ” on remote control or momentarily press the PANIC button on the
alarm panel.
Note: Please allow approximately 10 seconds between disarming and entering into another operation. The alarm
panel needs time to reset.
16
VIII. Receiving a call from the alarm panel:
When a sensor is tripped, the alarm panel will activate the siren (if connected and enabled) either immediately or
after 30 seconds if the sensor configuration is delayed and dial the programmed telephone numbers. The ALARM
status LED on the alarm panel will be illuminated. When a user answers the phone, they have the following features
available:
a) Press * to be able to listen to the area around the alarm control panel, for period of 30 seconds.
b) Press # to confirm that you have already received notification of the alarm. This will stop the alarm from dialing,
unless a sensor is tripped again. Then the alarm will start calling again. This can be useful in determining if the
trip is a nuisance trip, for instance by rodents. When the alarm is tripped again, it indicates additional activity in the
defense area covered by the alarm panel. If you do not input “#”, the alarm system will continue to dial out all alarm
phone numbers circularly, a total of 3 times each.
17
IX. Remote operation via telephone:
Call the telephone number of the line connected to the alarm control panel. After the alarm panel answers the call,
input the password+ #. If the password is correct, the system will beep two times. If wrong, it will beep for four
times. The system will hang off automatically if passwords entered are wrong for 3 times or no further commands
are entered within 20 seconds. If the password is accepted, you can control the panel with following commands:
Press “1” to arm the alarm panel in the AWAY mode.
Press “2” to disarm the alarm panel.
Press “*” to enter into a 30 second listening mode.
Press “#” to exit and disconnect the call.
It will immediately arm (no 30 second delay).
Note: Be careful not to enter other numbers, than the above, after entering the password successfully.
When you enter the password above, you are also entering the programming section of the alarm operation.
Pressing other keys can alter your alarm's programmed settings.
18
X.
Use of remote controls:
a) AWAY button – press it to arm the system. The siren will have a short chirp(if siren notification is enabled).
b) HOME button– press it to arm the exterior sensors when you are at home. The siren will have a short chirp (if
siren notification is enabled).
c) DISARM button – press it to disarm the system. The siren will have two short chirps (if siren notification is
enabled).
d) PANIC button – press it and the siren will start to operate continuously (for the siren alert time), and the alarm will
dial the programmed telephone numbers.
*********
19
This manual is brought to you courtesy of Mr. Leonard Lieblein.
http://www.phoenixhomesecuritysystems.com/contact-us/
20