1
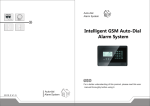
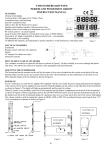
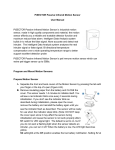
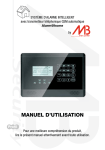
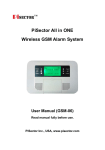
PiSector Home security systems User Manual (ALM-S02) Read manual fully before use. PiSector Inc., USA, www.pisector.com Thank you for purchase this alarm system, For proper use and your safety, please read these instruction thoroughly and carefully before you put the system in use. Keep this manual carefully for your reference in the future Commands Description Change password Command Remarks 10 * PPPP # PPPP is new password; default: 1234 Arm the system in OUT mode hold the OUT key till beep All interior sensors and exterior detectors are armed Arm the system in HOME mode hold the HOME key till beep Only exterior detectors are armed Disarm the system PPPP then DISARM PPPP is password, default 1234 Don't press # or you'll enter setting mode Enter Setting Mode PPPP Program or PPPP # PPPP is password, default 1234 Exit Setting Mode Return then Return Return to operational mode Add phone number to the notification queue to call them in case of alarm [31~36] * NNN-NNN-NNNN # NNN-NNN-NNNN is a 10-digit phone cell or landline number (without 1 at start) Add monitoring center if you use one [38~39] * NNN-NNN-NNNN # Don't set if do not have a monitor center Record outgoing voice message 6# Give address and ask for help or calling 911 Replay outgoing voice message 6* Will be played to numbers in the queue Code a wireless detector to zone ZZ 7 # ZZ # 01-03 IR sensors 04-07 Smoke/Fire/Water detectors 09 Panic Button 08-16 Gap detectors 30-32 Remote controllers Delete ALL wireless detectors 7* DON'T DO THAT unless you must. Change delay mode or zone type * ZZ 2 X # ZZ 01~08 wireless, 91~97 wired 09-32 are instant zone, can't change X is zone type: 1: instant (windows) 2: delay (doors) 3: emergency (fire/smoke/water/panic) 5: home (IR sensors) 0: disabled ( or move battery) * ZZ 7 1 # ON * ZZ 7 0 # OFF (System Default) 8# ON (System Default) 8* OFF Anti-interference so no one can jam the communication between sensors and main unit (433MHz frequency) 17 * 1 # ON 17 * 0 # OFF (System Default) Anti-decode so on one can decouple your sensors from the main unit. 18 * 1 # ON 18 * 0 # OFF (System Default) Telephone line cut or short-circuit alert 22 * 1 # ON (System Default) Forgot-To-Arm-System warning where ZZ is entry or exit zones Remote controller arm/disarm tone (annoying turn it off) 22 * 0 # OFF Ringing times before system answers call waiting for remote commands Siren sound duration 12 * RR # RR: 00~12, default 00 answer immediately 1: Arm 2: Disarm *: Listen In (for 30 sec or till press 1,2, or #) #: Exit (stops calling other numbers in the queue if system called you) Siren sound duration 29 * MM # MM: 00~30 minutes; default: 01 minute Factor Reset 0000 # Lose all coding inc. remote controllers Features 1. Anti-interfere function. When someone interferes it with same frequency, the control unit will activate siren to alarm. 2. Support anti-decode with remote control 3. Digital LED Defense zone display. Users can know which defense zone is triggered 4. 32 wireless defense zone display (1 to 32) and 7 wired defense zone display (91-97). 5. Every defense zone can set independently arm, disarm, delay alarm and so on. 6. Have the function of “one-key arm”. User can start “Home arm” or “Out arm” freely by keeping pressing one key on remote control 7. Can set the reminder sound of defense zones. Will remind users of remembering arm the alarm system when going out. 8. Can work with other products of our company. Such as wireless black outdoor siren WSR-01 and mini siren 9. It stores 3 groups of monitoring center and 6 groups of user phone numbers to dial out and play the recorded message if there is an alarm. 10. Can arm/disarm with remote control or keypad on the control panel 11. Can arm/disarm/listen-in by calling the host phone number (The phone numbers of control panel). 12. Have the function of reminder for circuitry failure. For example, if telephone line is cut or short, the control panel will alarm. 13. Have the superior of connection. 14. Have in-built backup battery and can continue to work and last for 24 hours when electricity is cut or in failure. 1. Install battery to all door sensors Step 1. Open cover Step 2. Install battery Step 3. close cover Step 4. keep two parts touch each other 2. Install all 9V battery to IR motion sensor, keep switch off 3. Connect control panel to an outlet using the included power adapter and switch it on. wait for 5 seconds till the main system start properly, then enter setup password 1 2 3 4 # on control panel and wait for the Out and Home indicators to light up indicating that you are in Setup mode, ready to code all wireless sensors and remote controllers. Hint 1: If you do not press any key for 30 sec, the unit will auto exit, so re-enter the password 1 2 3 4 # again. Hint 2: To trigger a door sensor move the two parts apart until their red light, then return the parts back so they don't interfere with the coding of other sensors. Hint 3: To trigger a motion sensor switch it on till you see a red light, then switch it off. Hint 4: To trigger a remoter controller press any one of buttons on the remoter controller Hint 5: To trigger a panic button press the red button till you see a right light on then release the button. Hint 6: Please press “ registering sensors. ” to make the system disarmed to avoid it activate the siren to alarm when While in setup mode, press command 7 #, you will see 01 displayed (i.e. Ready to code zone 01). then trigger your first remote controller, You should hear two short beeps indicating that this remote controller has been coded, then press 02# to trigger your second remoter controller after you hear two beeps, then press 03#,to trigger you third remoter controller after you hear two beeps, then press 04# to trigger your first door sensor, after hear two beeps, then press 05# to trigger your second door sensor... and so on for all sensors. When done, press return key to exit setup mode. Disconnect controller panel from power adapter 4. Installation of Control panel and keep the place where you like 1) Connect the mini siren to the controller panel SIREN port 2) Connect a phone cable from the wall to the OUT LINE port on the controller panel and connect a phone cable from the TELEPHONE port to your landline phone. 3) Connect the power adapter to the system and switch it “ON”, the power status will be blinking and sound “beep” which shows the control panel works normally. It will sound three “beeps” every 30 seconds, which helps users remind of setting alarm phone numbers. The sound “beep” will disappear when you finish the alarm phone number setting. (even you have no land line, please pretend to set any number to void the "beeps" if you feel annoy ) 4) Record alarm message. To record an outgoing voice message to be played out in case of alarms, enter setup mode and use command 6 # and start talking immediately until the counter down reaches 00. Every recorded message will replace the last message. The message should be short and clear. For example: “We have an emergency at <your address>, please call 911 immediately”. if you want to play back the recorded message, then press 6 * on the main panel to hear it. 1) To add a cell phone (or any landline number) to the system, enter password 1 2 3 4 #, till you see out and home lights are on (i.e. in setup mode), then press command: 31* XXX-XXX-XXXX # To add another use 32 instead of 31 and so on up to 36. 38 and 39 are reserved for telephone numbers of monitoring centers if you have any. To remove a number from the list of numbers to call in case of an alarm, simply enter the command without a number. For example to 6th number then press 36*# Operation Diagram: Input password (default 1234 # ) Sensors Register Record Voice Message 6# 6* Record voice message Replay voice message 7# 7* Register BEWARE sensor Delete ALL sensors with system the Alarm Phone No. Settings. 31* 1st User phone number # 32* 2nd User phone number # 33* 3rd User phone number # 34* 4th User phone number # 35* 5th User phone number # 36* 6th User phone number # 38* 1st monitoring center # 39* 2nd monitoring center # Set each sensor to different defense zone so you can tell which sensor was triggered from the message on the LCD. To code a sensor to zone 2 for example: - Ensure all sensors are OFF including the sensor to be programmed to zone 2 and ensure that all gap detectors have no gap between their two parts (close doors/windows). - Input 1 2 3 4 # to enter setting mode - Input 7 # 0 2 # to add sensor to zone 2 - Switch ON the sensor (or if a gap detector then separate the two parts) to trigger it. - The system should sound 2 beeps indicating that the system has recognized this sensor. - Switch OFF sensor (or bring back the two parts of a gap detector) to continue coding other sensors. Attention: Try to install the control unit in the center of defense zone and pull antenna and make it up for getting more wireless receiving distance. Installation position should be far away with huge metal objects and wireless device. Connect the trunk line with control panel in order that it can dial out in the first second when there is an alarm. Should be installed in a shelter. 5. Installation of door sensors: Door sensors are used for detecting the status of open and close of windows and doors. It will detect it and send the signal to control panel. a. Tear apart the double-side adhesive tape on the magnet(small piece) and the transmitter(Larger Piece), then adhere them to the appropriate position. (stronger recommend fix it again with super glue or screw to avoid it fall down in floor.) Caution: Magnet should be close to near to the side of transmitter with indicator. The two should align with each other and the distance should not exceed 1/2 inch. b. In order to get the best receiving distance, you should pull the antenna and make it upwards c. if the low-power indicator is on, please change the battery 6. Installation of Wireless PIR motion Sensors PIR motion sensor are used to detect the movement within a certain range. Fix the adjustment bracket on the wall with the provided screws and attach the detector to the bracket, it is recommended to mount at a height of 6.5ft to 7.2ft above the floor Effect of the PIR motion sensor is best when the detection direction is 90 degree angle with the walking direction of the intruder. Choose the most suitable installation place and angle according to actual situation and taking the following installation diagram as reference to ensure the detection effect is best Please do not fix it under direct sunlight or other strong lights and also keep it away from places with frequent strong air steam or air condition If the low-power indicator is on, please change the battery 7. Wired detectors if you have exist At the back side of the host, there is a wired connector which can link with 7 wired detectors. The +12V and GND are to connect with the power supply, the COM is the public port. When using the wired detectors, Connect the +12V and GND to the power supply, connect one line of the wired detector to the COM, and the other to 1, or 2, or 3...or 7. 8. Add or Delete Door/Window Sensors or Motion Sensors Each detector has its unique ID. It must be coded with the main panel for normal working. If it is not coded with main panel, the main panel would not identify it and could not receive the signal, so the alarm will fail If you want to add more wireless sensors late, please refer to the instruction as follows input password 1 2 3 4 # in the main panel to enter setup mode, press command 7 #, you will see 01 displayed , then think a zone number which you have not use yet, e.g. 20, input 20#, then trigger the new sensor which you want to add, you will hear two beeps, mean you have identify/code the new sensor to the system, if you have more you can continue to code another zone as above step, after finish all code, then press return to exit setting status. Delete Sensors, to delete a sensor simply code another sensor over its zone. To delete ALL sensors then in setup mode, use command 7 *, you will hear "beep" twice. then all sensors will be deleted. 9. Change Password Command: 10 * new password # ( new password must be 4 digits ), this password is used for remote control, e.g. you use you cell phone or other phone to call system 10. Alarm Delay & Zone type Setting You can set the type of defense zone according to your needs. The system default is " instant zone " for all zones. Only wireless zone " 01 -08 ", and wired zone " 91- 97 " can be set Command: *ZZ2X# where X is zone delay type as follows: 1 Instant Zone 2 Delay Zone (30 seconds delay) 3 Emergency Zone (24 hours. will sound off regardless of system armed or disarmed) 5 Home Zone 0 Disable zone Example: To set the second defense zone to be Home zone, input: * 0 2 2 5 # Recommendation Set door/window sensors as " Instant zone ". The sensor in those area will activated to send signal to main panel immediate if detect any change Set wireless IR Motion Sensor as " home zone ", it will enable only in " OUT ARM " mode, disable in " HOME ARM " mode. ( when you are at home set " HOME ARM", all window/door sensor are protect your house, but the motion sensor will not disturb you ) You can set the door sensor at the main door as " Delay zone" if you do not want to take remote controller when going out. In this case, you can disarm the system in 30 seconds after open the door, but the alarm system will not activate during this period. 11. Turn on / off Forgot-To-Arm-System warning If you turn on this warning for an entry or an exit zone, then the system will "beep' three times to remind you to arm the system before leaving. Use the following commands to turn it on and off: * ZZ 7 1 # for ON where ZZ is the entry/exit zone (doors) Do this for all such zones. * ZZ 7 0 # for OFF (default) 12. Turn on / off the function of anti-interference When turning on the function of anti-interference in arming status, it will activate siren to alarm ( not calling users ) if someone interferes the alarm system with the same frequency for more than 20 seconds. Command On: 1 7 * 1 # Off: 1 7 * 0 # System default: Off 13. Turn on / off function of anti-decode In order to prevent people from decoding the alarm system, it is recommended to turn on this function. Disarm only by the keypad. ( will not disarm by remote controller ) Command: On: 1 8 * 1 # Off: 1 8 * 0 # System default: Off 14. Turn on / off the reminder for phone line trouble It will warn you if the phone line is cut or short circuit, It will sound three " beep" every 10 seconds during disarm status, and siren goes off during arm status. 15. Set the ringing times for telephone Call the main panel, after the ringing circle, the main panel will active automatically. then you can remote control the alarm system follow prompt. E.g. set the ringing times as 04, then you dial the number of the main panel, you will hear prompt from main panel after 4times rings ( please do not connect with a auto answer machine ) Command: 1 2 * X X # X X shows times of ring, from " 00-12 ", 00 means the main panel will not active and you aren't able to remote control the system. System default is 00 16. Set the alarm time of siren You can set alarming time of the siren according to the user's request from 0 to 30 minutes. Command: 2 9 * X X # X X is 00 -- 30 minutes. System default: 01 minute 17. Turn on / off the warning tone of remote controller Turn on this function, the siren will make a short beep each time when you press the remote controller Command: On: 8 # Off: 8 * System default: On Factory Reset Reset will delete all registered/coded information include password which you changed All settings will return to the default status Command: 0 0 0 0 # 18. Operation Instructions OUT Arm Home arm 19. Disarm Emergency Out Arm Press “ ” in remote controller or pressing the key “OUT” on the panel ” for 2 seconds, with the status LED flashing, take 30 seconds when the OUT indicate light stop flashing change to a solid yeller light, the system will enter into the mode of Out Arm. and all the detectors will be enabled. 20. Home Arm Press “Home arem” button in remote controller or keep pressing “Home” for 2 seconds, with the sound “beep”, the Home indicator light on the main panel will flashing, the system enter Home Arm mode, all home zone sensors( inside house which you set as home zone sensors) will disable, so that you can move in home freely, but others instant sensor which for door window or garage still enable, if intruder come, system will give you call and siren goes off. 21. Disarm Press “ ” on remote control or input password+[DISARM] on control panel, the system will disarm. 22. Emergency When there is an emergency, press the “Emergency” button on remote controller or the main panel, the system will alarm immediately no matter it is in arm or disarm status. Note: Please wait 10 seconds or so repress disarm and enter into next operation. It needs time to be activated again. 23. Receiving Alarm Call When there is an alarm, the siren will goes off, the " alarm " indicator light on the main panel will light up, the defense zone indicator will display the number on LCD. and the system will make alarm call to your authorization pre-saved number. After answer the call, user will hear the recorded message. and then can do the following operations: Press * Press # for listen in (30 seconds ) to confirm that you have received the alarm and system will stop to call you and others on the queue (if any), siren will off sounds. If you do not input #, the alarm system will continue to dial out all authorization pre-saved phone numbers one after the other. 24. Remote control You call the main panel to remote control the system, after dial the number, you will hear a long "beep", then input password follow by #, (if the password is correct, you will hear" beep " twice, if wrong, it "beep" four times.) Then you can control the main panel with following commands: Press “1” to arm. Press “2” to disarm Press “*” to listen-in. Press “#” to EXIT. Note: The system will hang off automatically if passwords are wrong for 3 times or no command received within 20 seconds. 25. Add Wireless Siren(WSR-04) Coding / Setting-up the Wireless Siren 1) Connect the main unit power adapter (12V 0.5A) to the DC input port . 2) Connect the siren power adapter (12V 0.5A) to the DC port of wireless black siren. 4) Connect and disconnect the siren from the power adapter connector 3 times in succession so it beeps 3 times( Hint: first connect you will hear a short beep, then disconnect, second time connect you will hear a short beep, then disconnect, third time you will hear 3 short beeps). Now the siren is in the coding status. 5) Press "Emergency" key once on the main panel(console), the siren will beep once. Now the siren is recognized by the main unit and the coding is successful. 6) Then disconnect the siren from the power adapter connector waiting for 10 seconds, and switch off the main panel waiting for 10 seconds too. 7) Test: Connect the siren power adapter (12V 0.5A) to the DC port, hear one beep, switch on the main panel, press emergency key once, the black wireless siren will goes off Now you can remove the adapter and mount the black siren outside of house where you like ( wireless siren to main panel range about 50-80ft ) 26. Add Smoke Detector Step 1: Before you code the smoke detector to system, first set up the communication jumper to D0 at L , and D1 at H, please look follow diagram Connect the jumper as above red arrow position Step2: close the cover, install battery. Step3: Enter password 1234# at your PiSector Alarm System main controller ( ALM-S02 ), you will see OUT and HOME light on, then enter code comment 7#, enter zone number 05#, you will see 05 display on the main panel, press test button on the smoke detector (which next power light), you will hear two beeps from main panel like you add door sensors, and a test sounds from smoke detector, then press return key on the main controller Step4: Enter password 1234# at your PiSector Alarm System main controller ( ALM-S02 ), you will see OUT and HOME light on, then press *0523# , you will hear two beeps, then press return ( this is step for set zone 05 as a emergency zone, regardless of your system arm or disarm, when smoke detector triggered, system goes off immediately, advice set only for smoke detector, CO detector or panic button detector ) The following sensors are optional: Optional sensors/ available. You can choose according to your specific requirements. 27. Technical Parameters Main Panel Power Supply: AC: 220V±10%, DC: 9V Recharge Battery: Ni-MH DC=7.2V Working Current: ≤50mA Alarm Current: ≤300mA Wireless Receiving Frequency: 433MHz±0.5MHz Wireless Receiving Sensitivity: 5mV/m Anti-jamming Intensity: 1V/m (frequency range: 20-1000 MHz) Outside Alarm Siren: 110db Working Condition: Temperature: -10℃~+40℃ Relative Humidity≤90% Detector Capability: 99pcs Wireless Door/ Window Detector Battery: 12V 23A Static Current: ≤20uA Transmission Current: ≤15mA Transmission Frequency: 433MHZ±0.5MHZ Wireless Range: (No obstacle) 150feet Gap Distance: 1/2 Inch Working Condition: Temperature -: -10℃~+40℃ Humidity ≤ 90% Wireless PIR Detector Battery: DC 9V Static Current: ≤100uA Transmission Current: ≤20mA Transmission Frequency: 433MHZ±0.5MHZ Wireless Range: (No obstacle) 200m Detective Speed: 0.3~3m/s Detective Distance: 15ft to 25 ft Detective Range: Horizontal 110° Vertical 60° Working Condition: Temperature -10℃~+40℃ Humidity ≤ 90% Remote Controller Power Supply: DC 12V (built-in 12V battery) Static Current: 0 Transmission Current: 15mA Transmission Frequency: 433±0.5 MHz Wireless Range: (No obstacle) 150feet Working Condition: Temperature -10℃~+40℃ Relative Humidity≤90% 28. Care and Maintenance The alarm system has excellent design and used advanced technologies. It shall be used with care. The following suggestions are required to maintain your obligations under the warranty terms, and for prolonging the service life of the system. Place the control panel and all parts and accessories out of children’s reach. Keep the alarm system dry. Rain, humidity and various fluids or moisture all will corrupt the electronic circuit. Do not use or place the alarm system in dirty locations, otherwise the electronic elements will be damaged. Do no place the system in excessively hot locations. High temperature will shorten the service life of electronic equipment, damage batteries, deform or even melt some plastic parts. Do not place the system in excessively cold locations. Otherwise condensation many occur and damage the circuit board of the alarm system. It is recommended that you check and test the alarm system periodically: Check the main unit every three months: 1. Whether it can arm/disarm normally. 2. Whether it can dial the number for alarm normally. 3. Whether it can receive wireless detectors’ signal normally 4. Whether the back-up battery can work normally. Check the wireless detectors once a month: 1. Trigger wireless detectors to see if system can alarm normally. 2. Check all detectors’ batteries to see if it’s in low voltage. 3. Check whether wireless detectors can send signal to the main unit normally. Since the alarm system is continuously in operation or standby mode, the supply adaptor of the control panel shall be connected to a safe and reliable socket. Do not place the system near your bedroom or office table, because the siren will make high-loudness sound in the case of alarm, which may adversely affect your rest or work. If the alarm system will not be used for a long time, please disconnect the system from the power supply. Please do not disassemble, repair and alter the products without permission, or it may cause accidents and faults. Do not drop this product on the ground or on hard objects, as it may lead to massive impact to cause faults and damages. Without approval and consent of relevant authorities, please do not set “110”, “119” or the alarm phone number of police station for this main unit. Please read the suggestions above carefully and follow the instructions herein. If any of the equipment does not work properly, please send it to the dealer or authorized service point for repair. We will try our best to solve the problem for you as soon as possible. 29. Troubleshooting Problem Possible Causes Possible Solutions Cannot alarm by phone 1. Hasn’t armed 2. Less than 30 seconds after arming 3. Set wrong phone number 4. The two parts of door/window sensor are installed too far from each other 5. Hasn’t activated PIR 6. Hasn’t checked code 1. Arm the unit 2. Operate 30 seconds later 3. Set the number again according to the manual 4. Adjust the installation place of the door sensor 5. Activate the PIR 6. Check code again 1. The battery of remote controller is rusty 2. Low power battery 1. Clean the rust 2. Change battery Low power battery Change battery Dial alarm number slowly The main panel has stored other numbers Set it again according to the operation manual The main panel cannot receive signals from the accessory 1. Low power battery in the accessory 2. There is block between the control panel and the wireless accessory or the distance between them is too far 3. The accessory has not been coded to the panel 1. Replace the battery 2. Pull out the antenna of the accessory and the main panel, and adjust the position 3.Code it to the main panel Alarm panel makes beep sound continuously 1. Telephone line connection 2. Hasn’t setup user number 3. Hasn’t record 10s voice message. 1. Connect telephone line again 2. Setup user number 3. Record 10s voice message. Remote controlling distance is too short and the light indicator is not bright enough Light indicator of door sensor and PIR is always on.