1
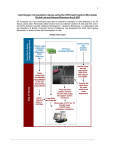
Protocols
Islet Assay using the XF24 Islet Capture Microplate
Introduction
XF Analyzers are most commonly used with an adherent monolayer of cells attached to an XF tissue culture plate. Many researchers,
however, desire to use more physiologic cellular sources such as primary pancreatic islets which are routinely utilized to study diabetes.
Seahorse Bioscience, in collaboration with the Mitochondrial ARC (Advancing Research through Collaborations) at Boston University
School of Medicine, has developed a protocol that employs a novel consumable, the XF24 Islet Capture Microplate, to assess whole
islet bioenergetics in vitro. The advantages over traditional methods (e.g. Clarke Electrode Apparatus) include higher throughput (20
sample per assay) and smaller amounts of pancreatic islets (as low as 30 islets per well).
Materials and Methods
The assay workflow (Figure 1) describes the procedure used to prepare reagent, materials and injected compounds.
The whole islet protocol described below is a modification of the XF24 Analyzer Protocol described in the XF24 User Manual
(Verson 1). Please feel free to modify the protocol to realize your intended research goals.
Modified XF Assay Media (MA Media): Supplement XF DMEM assay media with 3 mM
glucose and 1% FBS to run whole islets. (FBS) is needed to prevent the islets from
becoming too adherent.)
NOTE: When planning a Pancreatic Islet
assay, Seahorse recommends using an antiadherent for accurate reproducable results.
Please contact Seahorse Technical Support
with any questions.
Figure 1 | Pancreatic Islet Assay Workflow
Day Before Assay
Day of Assay
Add the islets into
the appropriate wells of
the islet capture microplate
Prepare stock compounds
in DMSO (Olygomycin,
FCCP, Rotenone, etc.)
Dilute compunds into
Modified Assay Medium
(MAS) at 10X the
desired final
concentration
Warm plate at 37oC
for 1 hr. Transfer
plate to XF24 Analyzer
upon calibration completion
Transfer the islets from
the outer shelf to the
inner depressions
Run experiment
XF sensor cartridge
hydration
OCR vs TIME
OCR
570
A
508
B
Perform whole
islet isolation
protocol
Add to injection ports
of cartridge
Place the islet capture
screens into the wells
using the capture screen
islet tool
OCR (pmoles/min)
446
385
323
261
199
137
76
14
-48
0
7 14 20 27 34 41 48 54 61 68 75 82 88 95 102
TIME (min)
116
129
OCR vs. time for Beta Cells
Analyze Data
Islet Assay using the XF24 Islet Capture Microplate
Table 2 | Components/Formulation of Modified XF Assay Media
Compound
Brand
Catalog
Number
MW or Molar
Concentration
Final
Concentration
Grams or ml for 500 ml
of XF Assay Media
Glucose
Sigma
G7528
180
3 mM
0.27 g
FBS
Hyclone
SH30070.03
100%
1%
5ml
It is recommended that all compounds to be added or injected are diluted into MA Media as
described in Table 3.
Table 3 | Dilutions of Modified XF Assay Media
Compound
Brand
Catalog
Number
Final
Concentration
Dissolve in:
Rotenone
Sigma
R8875
5μM
Stock 1000X in DMSO.
Dilute to 10X in MA Media.
Oligomycin
Sigma
O4876
5μM
Stock 1000X in DMSO.
Dilute to 10X in MA Media.
Table 3 | Typical Mix and Measurement
Cycle times for XF24-3 assays
Command
TIme
(minutes)
Port
Calibration
–
–
Equillibrate
12*
Mix
2
Wait
2
Measure
3
Mix
2
Wait
2
Measure
3
Mix
2
Wait
2
Measure
3
Inject A
1μM
Stock 1000X in DMSO.
Dilute to 10X in MA Media.
Mix
2
Wait
2
Measure
3
Mix
2
Wait
2
Measure
3
Mix
2
Wait
2
XF24 Sensor Cartridge
Measure
3
XF24 Islet Capture Microplate
Inject B
FCCP
Sigma
C2920
Glucose
Sigma
G7528
20 μM
Stock 1000X in DMSO.
Dilute to 10X in MA Media.
FBS
MP Biomedicals
155765
5μM
Methanol
Note: Oligomycin, FCCP, rotenone, and myxothiazol should be freshly diluted in MA Media for
each experiment. Stock solutions in DMSO may be stored at -20ºC.
Other items needed:
Mix
2
Wait
2
Capture Screen Insert Tool
Measure
3
Calibration buffer (Seahorse Bioscience)
Mix
2
Wait
2
Measure
3
Mix
2
Wait
2
Measure
3
Islet Capture Screens
Dissecting microscope
Open faced bio-hood
Multi-channel pipettes and tips
Eppendorf and 15/50 ml Falcon tubes
Day Before the Assay:
*Default equilibrate command consists of 2 min
Mix, 2 min Wait repeated 3X. The same pattern
could be followed for more injections.
1. Prepare an XF Assay Template (via the Assay Wizard)
a. Using the XF24 Operation Manual as a guide and incorporating proper experimental design.
b. Upload the assay template to the XF24 Analyzer before starting the assay. The experiment outlined here is an example of
how to obtain the various mitochondiral respiration states using the XF24.
c. Use Table 3 as a guide to program the Mix, Wait, Measure and Injection protocol.
2. Prepare the XF Sensor Cartridge
a. Hydrate the XF Sensor Cartridge overnight in XF Calibration Buffer at 37ºC, without CO2
b. Prepare whole islets by the standard protocol(s) used in your laboratory. For the protocol described here, ~8 mice were
sacrificed to obtain ~1400 islets – enough for 20 wells at 70 islets/well. Incubate whole islets in a petri dish overnight under
standard conditions for islet culture. (For the data shown, islets are cultured in RPMI media with 11 mM glucose, 10% FBS,
and 1% pen/strep).
2
www.seahorsebio.com
Islet Assay using the XF24 Islet Capture Microplate
Day of the Assay:
Figure 3 | Steps outlined in Day of Assay/Step 3
1. Add whole islets and capture screens to the wells.
Face-up: Pre-wetting
of screens to remove
air bubbles.
a. Aspirate islets from petri dish and dispense into a 50 ml tube.
b. Wash 1X in MA Media.
c. Remove supernatant and re-suspend in 2 ml MA Media.
d. While creating turbulence in the tube with a 20 μl
pipettor, take 20 μl aliquots and place as a drop on a
culture dish – make 3 drops total (this gives you ~3% of
the islets).
Use capture
screen Insert Tool
e. Count islets under a dissecting microscope.
This will give you an average amount of islets per
volume from which you can estimate the total number
of islets.
f. Determine the count of the islets, and adjust volume
so you get ~70 islets for every 100 μl of medial (700
islets/ml).
g. Add 400 μl MA Media to each well of the XF24 Islet plate.
h. Add 50 μl of the islet suspension to each well, and repeat
so each well gets a total of 100 μl of the islet suspension.
Press firmly into place to capture screen
Final volume should be 500 μl per well.
Screen Capture
Tool (Head)
i. When islets are seeded use a 20 μl pipette to move all of
the islets ionto the depressed chamber in the bottom of
the well.
This step is tedious – use a dissecting microscope to
be sure all of the islets are in the depression at the
bottom of the well as in Figure 2.
2. Add screens by pre-wetting them in MA Media in a small
Petri dish to remove any air bubbles. (See Figure 3)
a. Use a pair of sterile forceps to position the screens so
that the ring is facing up. (Figure 3)
Ring
Screen
b. Use the capture screen insert tool to pick up an islet
capture screen from the petri dish.
c. Carefully place the islet capture screen in the bottom of
each well using the capture screen insert tool. (Figure 4)
Figure 2 | Be sure all of the islets are in the depression at the bottom of the well.
Move islets into the
depression at the
bottom of the well
Well
Cells
www.seahorsebio.com
3
Islet Assay using the XF24 Islet Capture Microplate
d. Take care during this step that you don’t cause too
much turbulence so as to keep the islets resting in the
depression at the bottom of the well.
e. Release the islet capture screen into the well by pulling
up on the T-lever on the capture screen inset tool.
Figure 4 | Day of Assay/Place Islet Capture Screen
Carefully place the screen
in the well, create as little
turbulence as possible.
f. Be sure the islet capture rings are stuck firmly at the
bottom of the well. This can be confirmed by gently
pushing the screen down with a blunt pipette tip. (Figure 5)
g. Make sure that there is an islet capture screen in each
well, even if there are no cells in the well. A microplate
without a full complement of screens will cause problems
with the head on the XF24 unit.
3. Run the Islet Capture Microplate on the XF24
a. Place the microplate in an incubator set at 37ºC,
without CO 2.
b. Store the microplate in the incubator for at least 1 h
to equilibrate temp and adjust islet metabolism to
3 mM glucose.
c. While plate is incubating, prepare cartridge with desired
injections (See step 4).
d. After cartridge is filled with compounds for injection, load
the cartridge and start program and calibration.
e. When the XF24 calibration is complete, place the islet
plate into the XF24.
Run the program
f. After the program is complete you can normalize by
counting the number of islets per well with the dissecting
microscope. Islets may also be harvested for further
downstream analysis, e.g. protein.
g. Some users have found that this step was not necessary,
as basal rates were sufficient for normalization.
Pull up on the T-lever to release the capture screen once it’s
in place.
Figure 5 | Day of Assay/Checking the screen
placement
4. Prepare Biosensor Cartridge with Injections and Calibrate
a. Before calibration, load the XF sensor cartridge injection
ports with following compounds listed in Table 4. (Next
page bottom)
b. Calibrate the sensor cartridge (loaded with desired
compounds) as described in the XF manual.
Well with screen in place
Islets under screen
4
www.seahorsebio.com
Islet Assay using the XF24 Islet Capture Microplate
Data Analysis
The results in tables 5 & 6 were obtained using 70 mouse islets/well or isolated beta cells.
Table 5 | Oxygen Consumption Rate vs. time for Whole Islets
OCR vs TIME
OCR
570
A
570
B
A
508
446
446
385
385
323
261
199
137
B
323
261
199
137
76
76
14
14
-48
15.8
OCR vs TIME
OCR
OCR (pmoles/min)
OCR (pmoles/min)
508
Table 5 | Oxygen Consumption Rate vs. time for Beta Cells
28.9
42.0
55.1
68.1
81.2
94.3
TIME (min)
-48
107.4 120.5 133.5 146.6
0
7 14 20 27 34 41 48 54 61 68 75 82 88 95 102
TIME (min)
116
129
Whole pancreatic islets show a similar response to glucose addition as clonal INS1 beta cells run in a standard XF culture plate. Red lines – Blank
OCR vs. time for Whole Islets
OCR vs. time for Beta Cells
injection at A: oligomycin at B. Blue lines – 20 mM glucose injection at A: oligomycin at B.
*Unpublished data from the Shirihai lab at Boston University School of Medicine
Tables 7 & 8 show a direct camparison between normal human islets and diabetic human islets. Note that the basal OCR readings for
the normal islets are 4X higher than that of diabetic islets and the response to glucose is depressed in the diabetic islets as compared to
the normal islets.
Table 7 | Oxygen Consumption Rate vs. time for Normal Human Islets
Table 8 | Oxygen Consumption Rate vs. time for Diabetic Human Islets
OCR vs TIME
OCR
A
821
B
B
263
233
651
204
566
481
OCR (pmoles/min)
OCR (pmoles/min)
A
292
736
396
311
227
174
144
115
85
142
52
57
26
-28
7.8
OCR vs TIME (Avg)
OCR
-3
19.4
30.9
42.4
53.9
65.5
TIME (min)
77.0
88.5
100.0
24.9 32.6 40.3 48.0 55.7 63.5 71.2 78.9 86.6 94.3
123.1
109.7
TIME (min)
125.1
140.6
156.0
171.4
OCR vs. time for Diabetic Human Islets
Comparisons of normal
versusHuman
diabetic
human islets run in the Islet Capture Microplate. Red lines – Blank injection at A; oligomycin at B.
OCR human
vs. timeislets
for Normal
Islets
Blue lines – 20mM glucose injection at A; oligomycin at B.
*Unpublished data from the Shirihai lab at Boston University School of Medicine
Table 4 | XF sensor cartridge injection port compounds table
Injection Ports
Volume
Concentration in Port
Final Concentration in Well
Glucose
50 μl
200 mM
20mM
Oligomycin
55 μl
50 μM
5 μM
FCCP
60 μl
10 μM
1 μM
Rotenone
65 μl
50 μM
5 μM
Myxothiazol
65 μl
50 μM
5 μM
Note: Vigorous mixing of the stock 20 μM oligomycin is required to prevent precipitation. Rotenone and Myxothiazol are mixed together in the appropriate
concentrations for injections.
www.seahorsebio.com
5
Notes, Suggestions and Comments
The methods described above have been used successfully with
whole pancreatic islets isolated from both mouse and humans.
We believe that whole islets from other species can be used by
following this protocol, however, the tissue, species (including
age and sex), and method of isolation will contribute to the overall
activity and other variables associated with the whole islets.
Starting values, ranges, and optimaization: it is recommended
that the following parameters be explored and optimized depending
on the overall goal(s) of the experiment and research topic.
• Amount of whole islets per well
• The concentration of substrates and compounds injected
• Mix, Wait and Measure times.
References:
Please see Seahorase Biosciene’s XF24 Trainig Course Workbook for a complete guide to operating and analyzing data used in the
Seahorse XF24 Flux Analyzer Instrument.
For methods on isolating whole islets, please see: http://www.jove.com/video/255/murine-pancreatic-islet-isolation
Corporate Headquarters
European Headquarters
Asia-Pacific Headquarters
Seahorse Bioscience Inc.
16 Esquire Road
North Billerica, MA 01862 US
Phone: 1.978.671.1600
Seahorse Bioscience Europe
Fruebjergvej 3
2100 Copenhagen DK
Phone: +45 31 36 98 78
Seahorse Bioscience Asia
199 Guo Shou Jing Rd, Suite 207
Pudong, Shanghai 201203 CN
Phone: 0086 21 33901768
201204308
www.seahorsebio.com