Transcript
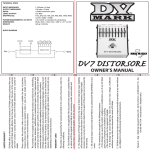
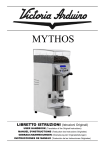
installed outside Italy, it is necessary to know the geographical data (latitude and longitude). User Manual V3IS00451-011 Mod. INITIAL SETTING (selection of language and place of installation) ASTRONOMICAL TIME SWITCH Read all the instructions carefully AST Lux Vemer S.p.A. I - 32032 Feltre (BL) • Via Camp Lonc, 16 Tel +39 0439 80638 • Fax +39 0439 80619 e-mail: [email protected] - web site: www.vemer.it The AST-Lux device is an astronomic time-switch conceived to manage electric users from sunset to dawn, according to the geographic area set. The external probe permits diurnal lighting in case of little luminosity. Dimensions SAFETY WARNINGS A S T Lux 45 87 1) The device should be installed by a competent operator 2) The device should be installed in a panel in such a way as to guarantee that the terminals are inaccessible after fitting 3) Connect the device as shown in the alongside diagrams 4) Before touching the connector terminals make sure that the wires to be connected or already connected to the device are not live 5) Before supplying power to the instrument, connect the probe and make sure this is correctly closed and positioned 6) Do not power or connect the device if any part of it is damaged NOTA: t he appliance is switched off when supplied, to avoid unnecessary use of the battery. To switch it on, press “R”. Code VE148300 Model AST Lux Description Astronomical Time Switch with external probe TECHNICAL SPECIFICATIONS 60 35 Connection diagrams 1 2 16(10)A / 250V AC EXTERNAL PROBE External probe 40 Ø5 Ø 8,5 48 SETTING THE ASTRONOMICAL PARAMETERS Note: for correct operation, it is essential to enter certain items of information (astronomical parameters) to enable the device to identify the geographical area in which it is to be installed. • T his operation is important as the instants of sunrise and sunset in calculated by the AST one appliance depend not only on the date set but also on the geographical location of installation. The procedures to be followed for this setting depend on whether the device is to be installed in Italy or abroad. If the device is to be installed in Italy, the procedure is simplified, as it is not necessary to know the latitude or longitude of the place of installation, but merely to enter the code for the Italian province (see the “Province code / Capital” table). When the device is to be 2 1 SETTING THE ASTRONOMICAL PARAMETERS FOR ITALY • I f installation in Italy was selected in the previous point, the message “SELEZIONARE (APOLUOGO ITALIANO” will move across the screen. To select the code for the provincial capital, see the “Province code / Capital” table. - Press the button “1” or “2” to increase or decrease the field - Press “OK” to confirm the information and go to the next stage in the programming (the values that can be set range from 0 to 103) • CORRECTION SUNSET TIME OFFSET The message “(ORREZIONE ORARIO TRAM iONTO” will move across the screen Due to the characteristics of the location (altitude, surrounding mountains and other geographical features), the sunrise and sunset times may differ from those calculated, and this parameter provides a correction in minutes with respect to the sunset time - Press the button “1” or “2” to increase or decrease the field - Press “OK” to confirm the information and go to the next stage in the programming (the value of this parameter may range from +120 min to -120 min) • CORRECTION SUNRISE TIME OFFSET The message “(ORREZIONE ORARIO ALBA” will move across the screen (this parameter provides a correction in minutes with respect to the sunrise time) - Press the button “1” or “2” to increase or decrease the field - Press “OK” to confirm the information and go to the next stage in the programming (the value of this parameter may range from +120 min to -120 min) • DISPLAY / ZEROING OF THE RELAY OUTPUT TIMER The number of hours for which the relay will be on is displayed (displayed as CH1). The timer can be zeroed by pressing the “PRG” key for at least 3 seconds The timer does not move forward if the device is not connected to the power supply - Press “OK” to confirm the information and go to Diurnal operation (the parameter range is 0-99999 h) • SELECT THE DIURNAL OPERATING MODE Enable/disable the diurnal operation (from dawn to sunset) of the AST-LUX using the external probe: the activation of the load take place in case the luminosity decrease under the threshold value set (for example in case of a storm). When the message “FUNZIONAM iENTO DIURNO” will move across the screen: - Press the button “1” or “2” to increase or decrease the field - Press “OK” to confirm the information and go to PASSWORD MODIFY operation (the parameter range is OFF, 1÷10, with 10= max thresold) • MODIFY THE PASSWORD The message “SEt PASS For bLo(” will move across the screen (use the password to disable the settings guard). The default password is “123”. - Press the button “1” or “2” to increase or decrease the field - Press “OK” to confirrm the information and go to NORMAL operation (the parameter range is 000÷999) • T his involves entering the degrees of latitude and longitude for the location This information can be obtained from an atlas. • If you have selected “OTHER (OUNTRY” from the “place of installation/language” settings, the message “LATITUDE NORTH = PLUS SIGN” will move across the screen - Press the button “1” or “2” to increase or decrease the field - Press “OK” to confirm the information and go to the next stage in the programming (the parameter range is -60° ÷ +64°) Note: the degrees latitude for the northern hemisphere are preceded by the plus sign Insert a screwdriver in the slot and raise the attachment flap (1) Turn the probe cover in an anticlockwise direction until it stops and remove it (2) IMPORTANT: to maintain the IP level, do not lose the gasket Remove the cable clamp from the lower part Place the bi-polar cable in the cable clamp and then in the cable passage of the probe IMPORTANT: use a dual insulation cable Connect the two conductors to the terminals IMPORTANT: don’t connect the terminals to accessible metal parts Tighten the cable clamp and return the cover of the probe by turning it in the clockwise direction 7) Connect the cable to terminals “3” and “4” of the device 20 ress the “R” key. The message “sele(t your (ountry” will move across the screen. P Use the “1” and “2” keys to make the selection between “ITALIA” and “OTHER (OUNTRY”. Press “OK” to confirm and go on automatically to the astronomical parameter menu. The programming menu for Italy or abroad will appear, depending on the selection made. • T he message “LONGITUDE EAST = PLUS SIGN” will move across the screen - Press the button “1” or “2” to increase or decrease the field - Press “OK” to confirm the information and go to the next stage in the programming (the parameter range is ±180°) Note: the degrees longitude for the eastern direction are preceded by the plus sign • T he message “TIME ZONE EAST = PLUS SIGN” will move across the screen. This parameter stands for the hours of difference from Greenwich meridian zero. The value proposed for this field is based on the previous latitude and longitude selection. If necessary, this can be modified in the following way: - Press the button “1” or “2” to increase or decrease the field - Press “OK” to confirm the information and go to the next stage in the programming (the parameter range is ±14 h in steps of 30’) Note: the plus sign corresponds to eastern longitudes • F or the other parameters (correction of sunset/sunrise time, selection the diurnal operating mode, modify the password and display/zeroing of timer output), see the instructions for the “Setting the Astronomical Parameters for Italy” menu Note: the “Astronomical Parameter Setting” menu can be entered in two ways: - automatically after setting the installation zone and language - later by holding down the “PRG” key TIME AND DATE PROVINCE CODE / CAPITAL Code Abbrev. Name Code Abbrev. Name 0 1 2 3 4 5 6 7 8 9 10 11 12 13 14 [AG] [AL] [AN] [AO] [AR] [AP] [AT] [AV] [BA] [BL] [BN] [BG] [BI] [BO] [BZ] Agrigento Alessandria Ancona Aosta Arezzo Ascoli Piceno Asti Avellino Bari Belluno Benevento Bergamo Biella Bologna Bolzano 15 16 17 18 19 20 21 22 23 24 25 26 27 28 29 [BS] [BR] [CA] [CL] [CB] [CE] [CT] [CZ] [CH] [CO] [CS] [CR] [KR] [CN] [EN] Brescia Brindisi Cagliari Caltanissetta Campobasso Caserta Catania Catanzaro Chieti Como Cosenza Cremona Crotone Cuneo Enna 30 31 32 33 34 35 36 37 38 39 40 41 42 43 44 45 46 47 48 Abbrev. [FE] [FI] [FG] [FO] [FR] [GE] [GO] [GR] [IM] [IS] [SP] [AQ] [LT] [LE] [LC] [LI] [LO] [LU] [MC] Name Ferrara Firenze Foggia Forli Frosinone Genova Gorizia Grosseto Imperia Isernia La Spezia L’Aquila Latina Lecce Lecco Livorno Lodi Lucca Macerata Code 49 50 51 52 53 54 55 56 57 58 59 60 61 62 63 64 65 66 67 Abbrev. [MN] [MS] [MT] [ME] [MI] [MO] [NA] [NO] [NU] [OR] [PD] [PA] [PR] [PV] [PG] [PS] [PE] [PC] [PI] • T his is used to enable and disable the automatic change between summer and winter time. It also defines the time change method. The time change is enabled in Italian mode by default: winter summer winter summer Name Mantova Massa Matera Messina Milano Modena Napoli Novara Nuoro Oristano Padova Palermo Parma Pavia Perugia Pesaro Pescara Piacenza Pisa Code 68 69 70 71 72 73 74 75 76 77 78 79 80 81 82 83 84 85 86 Abbrev. [PT] [PN] [PZ] [PO] [RG] [RA] [RC] [RE] [RI] [RN] ROMA [RO] [SA] RSM [SS] [SV] [SI] [SR] [SO] Name Pistoia Pordenone Potenza Prato Ragusa Ravenna Reggio Calabria Reggio Emilia Rieti Rimini Roma Rovigo Salerno San Marino Sassari Savona Siena Siracusa Sondrio in Italy in UK in North America last Sunday in March last Sunday in March 1st Sunday in April last Sunday in October 4th Sunday in October last Sunday in October hold down “” for at least 3 seconds to see the “(HANGE TIM iE ENABLE” message move across the screen with the symbols “ ” or “ ”. Select ON or OFF with the “1” and “2” keys. Press “OK” to confirm the information and go to the next stage in the programming. If the previous parameter is OFF the programming will terminate, if ON the time change modes will be displayed. To modify, press “PRG”. The following selections are possible: 1) in a pre-determined month and day (every year) 2) on the same day of the last week of a pre-determined month 3) on the same day of week 1, 2, 3 or 4 in a pre-determined month SUMMER / WINTER TIME MODIFICATION • After setting the winter time change mode, the symbol “ ” stays on. During the time change setting for summertime, the symbol “ ” stays on. • P ress “1” and “2” to select the time change mode (LAST, 1st, 2nd, 3rd, 4th, DATE): The display shows: LAST If the time change takes place on a determined day of the last week of a predetermined month 1st If the time change takes place on a determined day of the first week of a predetermined month 2nd If the time change takes place on a determined day of the second week of a predetermined month 3rd If the time change takes place on a determined day of the third week of a predetermined month 4th If the time change takes place on a determined day of the fourth week of a predetermined month DATE If the time change takes place on a precise date (month and day) press “OK” to confirm the selection. - For LAST, 1st, 2nd, 3rd and 4th modes, the month, day of the week, hour and minutes have to be set (during modification, the parameter flashes in the relevant field); press “1” and “2” to select and “OK” to confirm - For DATE mode, the month, number of the day, hour and minutes have to be set (during modification, the parameter flashes in the relevant field); press “1” and “2” to select and “OK” to confirm. Press “OK” consecutively to go to winter time setting ADVANCED OPERATIONS MANUAL OUTPUT FORCING • From normal operating mode, it is possible to modify the status of output using the “1” key. The forcing of the output is temporary, up to the next programmed event (the current status is reset at the following midnight or when the programming parameters are modified), at which time the output will return to the status set in the programming. The output may be permanently forced if key “1” is held down for 3 seconds approx. In this way, the programming has no influence on the status of the output. The status of the output is indicated on the display: - temporary forcing is indicated by the flashing of the current relay status and permanent forcing is indicated by the “LOCK” message SWITCHING THE DEVICE ON AND OFF • W hen “R” followed by “OK” are pressed, the message “AST OFF” will appear on the display, then the device will switch off completely (use this method to avoid running down the battery if the device is to be switched off for a long time). Press “R” to switch on. Note: the relay output timer is not deleted SETTINGS GUARD • To enable the settings guard, hold down the keys “PRG” and “2” simultaneously for at least 3 seconds (until the display reads “blo(”). W hen enabled, this function inhibits keyboard operation (only the RESET key is active): after pressing of any key, the display will read “blo(” for a few seconds. SETTING THE TIME AND DATE • Press “” to synchronise the seconds PROVINCE CODE / CAPITAL Code PROGRAMMING THE CHANGE BETWEEN SUMMER AND WINTER TIME SETTING THE ASTRONOMICAL PARAMETERS FOR FOREIGN INSTALLATION 1) 2) 3) 4) 5) 6) 10 51 Power supply voltage: 230V AC (-15%÷+10%) 50/60Hz Absorption: 8VA (2W) Outputs: relay 16(10)A/250V AC Contact capacity for lamps: - incandescent/halogen 1500W 240V AC - fluorescent 600W 240V AC Annual clock with calendar up to 31.12.2172 - clock precision ±1s per day - precision of sunrise/sunset calculation ±1 minute - programming resolution 1 minute - charge reserve (with lithium battery) 4 years approx. (if not powered) LCD rear lit display Automatic change of summer/winter time with settable change mode Diurnal operating with external probe: - switch the threshold of intervention: 1÷10 lux - reading update: every 4 minutes Simplified programming in two languages: - Italian: provincial capital - English: latitude, longitude, time zone Operating timer for each channel max 99999 h Daily update of sunrise/sunset times Manual forcing of the temporary and permanent outputs 2 DIN module container Operating temperature: 0 ÷ +50 °C Relative humidity: 10% ÷ 90% non condensing Storage temperature: -10 ÷ +70 °C Protection level: IP20 at the connector terminals IP41 on the front panel External probe: - Protection level: IP65 - Operating temperature: -20 °C ÷ +50 °C - Maximum distance between probe and device: 50 m CONNECTING THE PROBE Ø 37 3 • • • • • • • • • • • • • • • • • • • - Press “1” to synchronise to the next minute - Press “2” to synchronise to the current minute (the seconds will flash in the field month with to the symbol “"” and the day of the week will disappear) • Press “OK” to terminate the adjustment of the seconds and go on to the minute setting - Press “1” to increase the minutes - Press “2” to decrease the minutes (the seconds will disappear and YYYY.MM.DD and the minutes will appear in flashing mode) • Press “OK” to terminate the minute setting and start the hour setting Proceed in the same way to adjust the hours, year, month and day. On completion, press “π” to return to normal operation with the automatic update of the day of the week and flag (“ ” or “ ”), summer or winter time and the relay status. Normal operation is restored even if no key is pressed for 30 seconds. Code 87 88 89 90 91 92 93 94 95 96 97 98 99 100 101 102 103 Abbrev. [TA] [TE] [TR] [TO] [TP] [TN] [TV] [TS] [UD] [VA] [VE] [VB] [VC] [VR] [VV] [VI] [VT] Name Taranto Teramo Terni Torino Trapani Trento Treviso Trieste Udine Varese Venezia Verbania Vercelli Verona Vibo Valentia Vicenza Viterbo • T o disable the settings guard, hold down the keys “PRG” and “2” simultaneously for at least 3 seconds (until the display reads “000”), press the keys “1” or “2” to select the password and press “OK” to confirm. SUNRISE-SUNSET TIME DISPLAY he sunrise and sunset times for the current date can be displayed alternately by T pressing “OK” The message remains on the display for approximately 2 seconds, then the device returns to normal operation. Note: the time displayed takes the sunrise and sunset correction parameters into account. REFERENCE STANDARDS Conformity to the EU directives: 2006/95/EC (Low Voltage) 89/336/EEC modified by 92/31/EEC and 93/68/EEC (EMC) is declared with reference to the following harmonised standard: EN 60730-2-7, EN 61000-6-1, EN 61000-6-3