1
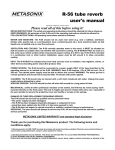
COMPRESSOR
Thanks for purchasing a Diamond Compressor! We hope you have as much fun playing guitar
through this pedal as we did designing and testing it. Our goal is to provide a versatile ‘guitar
channel’ – a dynamics and tone shaping tool to front-end your effects chain.
Remember to protect your hearing and wear appropriate hearing protection when playing loud…
Design Features
Vactrol opto-isolator variable resistance path as used in high-end studio compressors for smooth
attack and decay characteristics while preserving initial signal transients.
Post-compressor ‘tilt’ EQ provides a very musical tailoring of frequency response - seamlessly
transition from a darker jazz voicing to a bright jangle, with flat frequency response at the center detent position.
Optimized gain staging and use of ultra low noise transistor and opamps in signal path for lowest
possible noise and extended signal headroom.
Premium audio components, including 2% polypropylene capacitors and 1% metal film resistors.
Dual AC capacitive coupling paths for improved transient response.
Bi-color LED provides visual indication of depth of compression.
True bypass signal path.
Battery or standard negative tip 9V DC adapter operation, can be powered from 9 to 24 V negative tip.
�������������������
�������������
�����������������������
�����������
�������
�������������
�����
��
����
������
������
��
��������
�������
����������������
������������
���������������
�����������
��
�����
��������
����
��������
1
Controls
Comp
This controls the amount of compression to be applied to the guitar signal. Backing it off all the
way gives just a touch of compression on signal peaks, while turning the control clockwise gives
an increasing amount of signal ‘squash’. The compression threshold, the input signal level at
which compression begins to take effect, is sensitive to level variations like pickup output and
players picking strength, so certainly experiment with this control for your particular setup.
EQ
The EQ in the Diamond Compressor is not a typical boost/cut treble control. Instead, we’ve
implemented a ‘tilt’ style EQ first introduced in the 1970’s hi-fi market. The goal of this eq is to
provide subtle yet powerful spectral shifts in the overall frequency balance, not just a simple
dulling or brightening of the treble frequencies. You can think of the EQ as a spectral ‘see-saw’
with the balance point fixed at a mid range frequency. With the EQ in the center detent position,
the EQ is completely flat. Turning the EQ counterclockwise tips the balance of the ‘see-saw’ towards the low-end, with a gradual increase in lows moving out from the midrange balance point
toward the low end of the frequency spectrum and a simultaneous gradual decrease in highs
moving toward the high end. Clockwise past the detent position, the converse takes place, with
a gradual increase in highs moving out from the midrange balance point toward the high end
of the frequency spectrum and a simultaneous gradual decrease in lows moving toward the low
end. So, it works like a tone control, but it affects sound more musically.
Volume
This adjusts the overall output volume of the compressor. Once the relative levels of compression and EQ are set, this control can be used to adjust overall clean vs. effect levels.
Switches
On/Off (external)
This switches the pedal between bypass and in-circuit operation. A green color in the LED indicates that the pedal is on, while increasing levels of red mixed with the green indicates increasing levels of compression on the guitar signal.
EQ In/Out (internal)
This switch inserts or removes the tilt EQ circuit from the signal path. Although the EQ gives a
flat frequency response at the center detent position of its control, this switch is provided for
those who wish to bypass the EQ processing entirely. The switch can be accessed by removing
the back – it’s a small slide switch on the PC board labeled with In/Out or I and O depending on
the PC board vintage.
Hi-cut jumper (internal)
This jumper is factory set so that the 4.8 kHz hi-cut filter is not in the signal path. However, if
you use the compressor frequently in front of a high gain device like a distortion pedal, you may
want to enable the internal hi-cut filter by setting its jumper to the on position. This places a
4.8 kHz cutoff, 6 dB/octave lowpass filter between the tilt EQ and volume control. This will help
reduce any audible amplification of low level white noise by subsequent high gain stages without significant impact on the midrange band. The jumper is easy to set – with the pedal oriented
with the effect on-off switch at the bottom, first find the jumper located to the left of the EQ
slider switch, then move the jumper from the bottom and middle pins (hi-cut filter out) to the
middle and upper pins (hi-cut filter in).
2
COMPRESSOR
Usage Notes
How The Compressor Works
The basic concept behind compression is simple: the audio level in the signal path is measured
and this value is then used to control the overall output level by some amount proportionate to
the measured level. There have been a number of different schemes and circuit topologies designed over the years to accomplish this task – it’s well beyond the scope of this user manual to
delve into all of them in detail. The Diamond Compressor uses a simple and relatively non-intrusive resistive divider gain reduction system that utilizes an analog optical isolator to map output
signal level to a variable resistance. The opto-isolator (for short) is placed in a feedback loop – it
uses the output level from the gain reduction system to stabilize its own gain reduction system.
This stabilization can seem somewhat counterintuitive, but basically the louder the signal, the
more gain reduction takes place, which lowers the signal level, and reduces the gain reduction,
and so on… until the output level stabilizes at some reduced level. The amount of reduction that
takes place is dependent on the input signal level, the amount that level is above a gain-reduction threshold, and the steepness of the gain reduction slope once the threshold is met. Basically, any input signal below the threshold is not compressed, and any signal rising above the
threshold is reduced in level by a gain-reduction slope or ratio. The Diamond Compressor has a
very simple system for providing control over compression. The Comp control is in reality a control for a voltage amplifier placed in the signal path which performs several duties:
a. it provides make-up gain to compensate for overall loudness loss due to the resistive
divider compression loss circuit
b. it provides a mechanism to boost the input signal which in turn has the effect of increasing the amount of signal above the fixed threshold in the signal level measuring circuit
(aka sidechain). The more signal above the threshold, the deeper the attenuation of the
resistive divider, and the more perceived ‘compression’.
The Volume control is simply a final attenuator that the user can use to balance the perceived
loudness between effect on and off. This volume balance between effect on and off is very much
dependent on how hard the player picks – try setting the Volume and Comp controls iteratively
to the desired amount of compression and overall level while playing a chord or run at your
usual picking strength.
Unfortunately, there’s still a bit more to it all… Along with the threshold and compression ratio, the ‘personality’ of a compressor is defined by just how quickly (or not quickly) it reacts
to changes in level. Things can get really confusing here… Each guitar note played has certain
dynamic characteristics. Sound synthesis people often talk about ADSR – Attack, Decay, Sustain
and Release when designing synthesizer sounds or patches, and many of those concepts hold for
how a compressor reacts to a guitar waveform. Basically, when a note is picked, there is a short
Attack and Decay period that covers the initial transient of the picking action. The string then
begins to vibrate in a more steady-state fashion for a certain period of time, constantly decay-
3
ing until either stopped, picked again, or let die out. For simplicity, we’ll call this the Sustain of
the note, we won’t worry about the mechanics of the Release action. When a note is picked, it
takes a finite amount of time for the compressor to measure the rising signal and then begin to
attenuate it once it exceeds the compressor’s threshold. If the speed of the compressor is too
fast, too much of the initial note transient may get attenuated giving a ‘lifeless’ kind of sound.
Conversely, beginning compression too long after the initial transient has begun can lead to an
uneven and unnatural note dynamic. On the release side, having a compressor that removes its
compression too quickly once the note begins to decay can lead to note ‘pumping’ or a feel of
lack of compression. Conversely, too long a time period to remove the compression can lead to
strange noise artifacts – e.g. background noise seems to rush in well after a note has finished.
Optical isolator based compression has been a desired form of compression in professional recording studios for decades. The optical isolator works by shining a light of some fashion (in our
case an LED, with brightness proportional to signal strength) onto a variable resistance cadmium
sulfide photocell. The photocell itself has finite attack and decay characteristics for its resistance,
in the order of milliseconds, which turns out to be about the right time lags to provide smooth
gain adjustments and allows just about the right amount of initial signal transients through to
permit the compressed signal to ‘breathe’.
Where To Place The Compressor
The compressor should be placed either as the first effect in your effect chain or very close to
first (e.g. a clean boost could be placed effectively in front of the comp). As usual, there are no
hard and fast rules here, there are certainly interesting possibilities in putting the compressor
elsewhere in the chain (e.g. by turning comp to minimum, you could use the pedal as an EQ after a distortion pedal). If you use the compressor frequently in front of a high gain device like a
distortion pedal, you may want to enable the internal hi-cut filter by setting its jumper to the on
position (see description in ‘Switches’ section above).
Powering
Changing the battery
Changing the standard 9V battery first requires the removal of the four back corner screws of
the pedal. The battery clip is attached to the inside of the back plate - gently pull the back plate
off so as not to strain the connecting wires between the battery clip and main circuit board. After
replacing the battery, carefully place any slack in the connecting wires into the box cavity, and
replace the back plate with the four screws, taking care not to pinch the connecting wires.
Using a 9V adapter
Any standard 9V DC negative pin AC adapter for effect pedals can be used to power the Diamond
Drive. The insertion of the AC adapter plug automatically removes the internal battery from the
circuit.
Warranty
Diamond Pedals carry a full five year warranty on registered products - make sure to send us
your warranty card! The warranty is simple - if you have a problem, call us, send us the pedal if
necessary, and we’ll make it right.
4
Suggested Settings
Here are a few suggested settings for the comp as starting points to experiment with...
Basic Comp
From this starting point, adjust Comp to
get an orange glow on peaks, set the EQ
to taste, and set Volume to balance your
compressed volume level versus effect off.
����
��
�� �� � �
����
��
�� �� � �
����
��
�� �� � �
����
��
�� �� � �
����
��
�� �� � �
����
��
�� �� � �
Country Squash
Pickin’ and cluckin’…
Mo’ Jangles
A Ric or Strat in the bridge position works
great.
Mellow Yellow
Mellows it down without wiping out the
high end.
Clean boost / EQ
Gives just a touch of limiting on peaks Set
the EQ to taste, and the Volume to the
level you’d like to overdrive your amp.
Acoustic
Really nice for smoothing out piezo pickups.
5