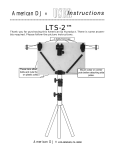
1
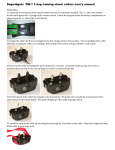
Dogwidgets DW-2 2 dog training shock collars user's manual
Preparation:
1) Check the 9-volt battery of the remote control and see if it's properly installed. The +/- side of the battery
should touch against the 2 springs of the remote control. Follow the diagram inside the battery compartment on
where to put the +/- side of the 9-volt battery.
2) Charge the collars for 8 hours straight for the first charge and 4 to 6 hours after. The red led light of the collar
will flash, meaning the collars are charging. Red led light of the collars will go solid after a full charge.
3) Install the rubber prongs if you have a small/medium size dog or the metal prongs if you have a medium/large
dog.
4) Test the shock of the collars by using the wire shock tester. Wrap the wires around the 2 metal posts of the
collar then press the shock button. The bulb will light up if the collar is giving a shock.
5) Install the strap to the collar by inserting them through the 2 brackets on the collar. Adjust the length and snug
fit the collar to your dog's neck.
Training tips:
1) Familiarize the collars and the remote control and check the collars if they are working properly and safely
before putting them on your dogs.
2) Start with the vibration correction before using the shock correction. Most dogs will respond to the vibration
correction.
3) Always praise your dog after a punishment.
Troubleshooting the collars:
1) The collar has a built-in motion sensor. The collar will go into sleep mode after few minutes if it doesn't sense
any movement from the dog or if it's not in use to save the battery life. Shaking the collar will turn the collar back
on.
2) The collar has a built-in Lithium-Ion battery that can be charge by the wall charger or on the USB port of the
computer. If the collar won't hold a charge by the wall charger, try charging the collar on the USB port of the
computer, if the collar charges on the USB port then the wall charger needs to be replaced.
3) If the collar has power but won't respond to the remote control or would only work half the time, then the collar
needs to reset.
Follow these steps on how to reset the collar:
1) Take off the screw and rubber cover of the collar then hit the reset button inside the hole. The red led light of
the collar will start flashing after the reset button is hit.
2) Press and hold the "L" button of the remote for the corresponding collar right after the red led light of the collar
starts to flash and keep holding the "L" button until the red led light of the collar goes solid.
3) Repeat the procedure for the 2nd collar but this time hold the other "L" button of the remote control.
6 months warranty:
The collars comes with a 6 months warranty, contact us at our email address [email protected] for
technical support, replacement parts and replacement warranty.