1
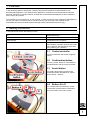
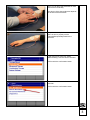
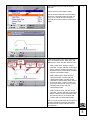
Practical
Guidelines
Electrotherapy
Application
For the Enraf-Nonius Commercial Training
Copyright: & Exclusive Sales and Service:
Enraf-Nonius B.V.
P.O. Box 12080
3004 GB ROTTERDAM
The Netherlands
Tel: +31 (0)10 – 20 30 600
Fax: +31 (0)10 – 20 30 699
[email protected]
www.enraf-nonius.com
Content
1
Preamble ...................................................................................................................................... 1
2
Naming convention ..................................................................................................................... 1
2.1 Central controller................................................................................................................. 1
2.2 Confirmation button............................................................................................................. 1
2.3 Assist button........................................................................................................................ 1
2.4 Button A to D....................................................................................................................... 1
2.5 Electrotherapy connector channels..................................................................................... 2
3
The first Electrotherapy demonstration.................................................................................... 2
3.1 Set up the machine and your patient .................................................................................. 2
3.2 Search for the proper intensity............................................................................................ 6
3.3 The actual treatment ........................................................................................................... 7
3.4 End of treatment.................................................................................................................. 7
1
1 Preamble
In the following pages we will present a step-by-step practical guidelines for demonstration of an
electrotherapy application. This electrotherapy application can be done on an Enraf-Nonius Endomed,
Myomed, Sonopuls or Sonopuls StatUS. All steps are documented and displayed, but don’t hesitate to
ask in case of any queries.
This guideline is not an instruction- or user-manual. In case you need to know in depth the possibilities of
the unit you need to consult the User’s manual of the unit you are using. User manuals can be
downloaded from the Enraf-Nonius partnersite (http://www.partnersite.enraf-nonius.org/)
2 Naming convention
In this manual we will use the following names:
US
Ultrasound therapy
StatUS
Stationary Ultrasound
Electrotherapy
Therapeutical use of currents
Russian stim
A current form that is excellent for
demonstration purposes. Russian stim is soft
and it creates a clear perception at the side
of the patient (your customer).
2.1
Central controller
The big round button that scrolls trough the
menu’s
2.2
Confirmation button
The long “mouse” button for confirmation of
the selected item with the central controller
2.3
Assist button
The small orange button just above the
confirmation button that allows for a quick
jump to Home – Stop etc.
2.4
Button A to D
The 4 small buttons just below the screen.
Functionality of these buttons is defined by
the current “tabs” in the menu screen.
1
2.5 Electrotherapy
connector channels
For electrotherapy we connect the electrodes
to one of the 2 channels. Channel 1 is the
connection on the left-hand side (frontal
view).
3 The first Electrotherapy demonstration
3.1
Set up the machine and your patient
Turn on the unit.
After approximately 30 seconds, the unit is
ready for use.
Explain to the customer that we will
demonstrate the Russian Stimulation. This
is not painful, and shows very well how the
reaction of the patient is to the intensity of
the used current.
Connect the Electrodes:
1. Connect the 2 electrodes to the cable.
For this demonstration any size of
electrodes can be used.
2. Connect the cable in the left part of the
unit. This is Channel 1. Make sure that the
red plug will be put into the red channel and
the black plug into the black channel.
3. Now it is time to place the electrodes on
the skin of the patient.
First locate the muscle belly on the patients
arm. Ask him to extend his hand and it is
obvious where it is located!!
2
Then you can place the electrodes on both
ends of the muscle belly.
The placing of the electrodes also depends
on the size of the electrodes.
The patient is ready for the treatment.
Now it is time to properly set the
Endomed/Sonopuls/Myomed for the
treatment.
In the main menu of the unit, select
“Electrotherapy” with the central controller.
Confirm with the confirmation button.
Select “Muscle Stimulation” with the central
controller.
Confirm with the confirmation button.
3
Select “Russian Stimulation” with the central
controller.
Confirm with the confirmation button.
The following screen is the “Channel
Selection”.
Select “Channel 1” with the central
controller (remember – we attached our
electrodes to channel 1 in the first steps of
this demonstration).
Confirm with the confirmation button and
you will return to the previous menu.
Select “Treatment Time” with the central
controller.
Confirm with the confirmation button.
Use the central controller to set the time on
4 minutes.
Confirm with the confirmation button and
you will return to the previous menu.
Select “Surge Program” with the central
controller.
Confirm with the confirmation button.
4
Select “Ramp-up Time” with the central
controller.
Confirm with the confirmation button.
Use the central controller to set the Rampup time to 2 seconds (make sure that you
turn it up to 2 seconds, and not just 0.2
seconds) and confirm with the confirmation
button.
In the Surge program the same sequence
has to be used to set the “Hold Time”, the
“Ramp Down Time” and the “Interval Time”
•
Select “Hold Time” with the central
controller. Confirm with the confirmation
button. Use the central controller to set
the Hold Time to 6 seconds and confirm
with the confirmation button.
•
Select “Ramp-down Time” with the
central controller. Confirm with the
confirmation button. Use the central
controller to set the Ramp-down time to
2 seconds (again, make sure that you
turn it up to 2 seconds, and not just 0.2
seconds) and confirm with the
confirmation button.
•
Select “Interval Time” with the central
controller. Confirm with the confirmation
button. Use the central controller to set
the Interval Time to 10 seconds and
confirm with the confirmation button.
Now you have programmed all you need for
this demonstration of Russian stimulation.
We now will look for the intensity level of
this treatment.
5
3.2
Search for the proper intensity
With the above setting we are now going to
search for the proper intensity level. This
means we are slowly going to increase the
current and look for that specific value
where a visible contraction is generated.
In order to accomplish this, press button A
(2 times). On the left “Tab” of the screen
you will see that a part of the screen will
turn red with white letters that indicate the
current intensity (in mA).
At the start it shows you the value of 0.0
mA.
In order to find the intensity of the current
that fits the condition of your patient you
slowly intensify the current by using the
central controller.
As you do this, keep looking at the patient’s
arm and hand. The patient will experience
an itchy feeling, which intensifies as you
increase the current. At a certain point a
contraction of the muscle becomes visible.
The hand will also slightly extend. This is
the intensity we want for our treatment.
Now let go of the central controller and
press the Assist button.
6
3.3
The actual treatment
Once you pressed the Assist button you will
come in the assist menu. Select “Start” with
the central controller.
Confirm with the confirmation button. The
actual treatment will start now.
You can see the treatment time counting
down in the left “tab” and a small green
triangle that indicates that the treatment is
running.
3.4
End of treatment
After 4 minutes the treatment will be
finished and you can carefully remove the
electrodes.
In case you want to stop the treatment
earlier, you can always press the Assist
button again, select “Stop” and the
treatment ends.
7