1
B23Q8YA-G-01-F
PRIMEPOWER
Hardware Platform Guide: Installation
for Solaris™ 10 Operating System
-- Start Here--
Preface
Solaris™ Operating System is described as Solaris in this manual.
Purpose
This manual provides information for installing the software on PRIMEPOWER.
Intended Readers
This manual is intended for system administrators who install Solaris™ Operating System (Solaris).
Readers are expected to have the basic knowledge of a system administrator.
Organization
This manual is organized as follows:
z Chapter 1 Supported hardware
This chapter describes Fujitsu hardware supported by Solaris 10 OS.
z Chapter 2 Preparing for Installation
This chapter describes the preparation prior to installing the software on PRIMEPOWER.
z Chapter 3 Installation
This chapter describes how to install the software on PRIMEPOWER.
z Chapter 4 System Upgrade
This chapter describes how to upgrade existing PRIMEPOWER to a new version of the Solaris OS.
z Chapter 5 Solaris OS network installation using DHCP service
This chapter describes implementation of the Solaris OS network installation using DHCP service.
High Risk Activity
The Customer acknowledges and agrees that the Product is designed, developed and manufactured as
contemplated for general use, including without limitation, general office use, personal use, household use,
and ordinary industrial use, but is not designed, developed and manufactured as contemplated for use
accompanying fatal risks or dangers that, unless extremely high safety is secured, could lead directly to
death, personal injury, severe physical damage or other loss (hereinafter "High Safety Required Use"),
including without limitation, nuclear reaction control in nuclear facility, aircraft flight control, air traffic
control, mass transport control, medical life support system, missile launch control in weapon system. The
Customer, shall not use the Product without securing the sufficient safety required for the High Safety
Required Use. In addition, Fujitsu (or other affiliate's name) shall not be liable against the Customer and/or
any third party for any claims or damages arising in connection with the High Safety Required Use of the
Product.
Trademarks
Sun, Sun Microsystems, the Sun Logo, Solaris and all Solaris based marks and logos are trademarks or
registered trademarks of Sun Microsystems, Inc. in the U.S. and other countries, and are used under license.
Microsystems, Inc. in the United States and other countries.
Java and all Java-based trademarks and logos are trademarks or registered trademarks of Sun Microsystems,
Inc. in the United States and other countries.
Microsoft, MS-DOS and Windows are registered trademarks of Microsoft Corporation in the United States
and/or other countries.
All SPARC trademarks are used under license from SPARC International,Inc. and are trademarks or
registered trademarks of that company in the U.S. and other countries. Products with the SPARC trademark
are based on architecture developed by Sun Microsystems,Inc.
All other products, or company names mentioned in this document are claimed as trademark and trade
names by their respective companies.
March, 2005
1
April
2008
Sixth
Edition
Notes
z This manual may not be copied by any means without the express written permission
of FUJITSU LIMITED.
z FUJITSU LIMITED reserves the right to make changes to this manual without prior
notice.
All Rights Reserved, Copyright © FUJITSU LIMITED 2005-2008
All Rights Reserved, Copyright © PFU LIMITED 2005-2008
2
Contents
Chapter 1 Hardware Supported .............................................................................................................................1
1.1
Maximum memory capacity ............................................................................................................................................1
Chapter 2 Preparing for Installation......................................................................................................................3
2.1
Related documents ...........................................................................................................................................................3
2.2
System console ................................................................................................................................................................3
2.2.1
PRIMEPOWER1/200/250/400/450/600/650/850 ....................................................................................................3
2.2.1.1 Personal computer (serial port connection) ..........................................................................................................4
2.2.1.2 Personal computer (connection via Remote Console Connection Unit)...............................................................4
2.2.2
PRIMEPOWER800/900/1000/1500/2000/2500 ......................................................................................................5
2.3
Deciding System Configuration.......................................................................................................................................6
2.3.1
Software groups .......................................................................................................................................................6
2.3.2
File system ...............................................................................................................................................................6
2.3.2.1 Notes on planning disk space ...............................................................................................................................6
2.4
Instance numbers of PCI cards and basic network interfaces...........................................................................................8
2.4.1
Network interface name and disk controller number ...............................................................................................8
2.4.1.1 PRIMEPOWER800/1000/2000............................................................................................................................8
2.4.1.2 PRIMEPOWER900/1500/2500............................................................................................................................9
Chapter 3 Installation........................................................................................................................................... 11
3.1
Installation Flowchart ....................................................................................................................................................11
3.2
Notes on Installation ......................................................................................................................................................13
3.2.1
"Link Down - cable problem?" message when installing Solaris...........................................................................13
3.2.2
Messages of st driver..............................................................................................................................................13
3.2.3
Messages of fjulsa driver .......................................................................................................................................13
3.3
Set for Multiple-Partition Configuration........................................................................................................................14
3.4
Add Partition Administrators .........................................................................................................................................15
3.5
Install Solaris 10 ............................................................................................................................................................15
3.5.1
Notes of PRIMEPOWER800/900/1000/1500/2000/2500 ......................................................................................17
3.5.2
Notes of PRIMEPOWER1/200/250/450/400/450/600/650/850.............................................................................17
3.6
Set up system with large amount of memory .................................................................................................................17
3.7
Apply Recommended & Security Patch Cluster ............................................................................................................19
3.8
Apply Solaris 10 PTF.....................................................................................................................................................19
3.9
Install Enhanced Support Facility ..................................................................................................................................19
3.10 Install Solaris 10 Documentation ...................................................................................................................................19
3.11 Install Optional Software ...............................................................................................................................................20
3.12 Apply Modifications (Patches) ......................................................................................................................................20
Chapter 4 System Upgrade...................................................................................................................................21
4.1
Upgrade Flowchart.........................................................................................................................................................22
4.2
Note for Updating Solaris ..............................................................................................................................................24
4.3
Remove Enhanced Support Facility...............................................................................................................................24
4.4
Create an Install Server ..................................................................................................................................................24
4.5
Prepare for Network Installation....................................................................................................................................24
4.6
Install Solaris 10 ............................................................................................................................................................24
Chapter 5 Solaris OS network installation using DHCP service ........................................................................25
5.1
Outline ...........................................................................................................................................................................25
5.2
Notes..............................................................................................................................................................................25
i
5.3
How to set configuration of server.................................................................................................................................25
5.3.1
Installation of DHCP server ...................................................................................................................................25
5.3.2
General configuration of DHCP server ..................................................................................................................26
5.3.3
Configuration of install server................................................................................................................................26
5.3.4
Configuration of the client system .........................................................................................................................26
5.3.5
Configuration of Custom JumpStart.......................................................................................................................27
5.3.6
Creating DHCP option and Macro for install parameter ........................................................................................27
5.4
Network installation.......................................................................................................................................................29
5.4.1
Installation .............................................................................................................................................................29
5.4.2
Execution of sys-unconfig command .....................................................................................................................29
5.5
Known problems and limitations ...................................................................................................................................30
5.6
Configuring static IP address using sysidcfg file ...........................................................................................................30
ii
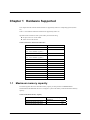
Chapter 1 Hardware Supported
This chapter describes what FUJITSU hardware is supported by Solaris™ 10 Operating System (Solaris
10).
Table 1.1 lists hardware and kernel architectures supported by Solaris 10.
Input the kernel architecture of the system when you do the following:
z Set up a boot server on the subnet.
z Add a client on the network.
Table 1.1 Hardware and kernel architecture
1.1
System
Kernel architecture
PRIMEPOWER1
sun4u
PRIMEPOWER200
(CPU clock 360MHz or greater)
sun4us
PRIMEPOWER250
sun4us
PRIMEPOWER400
(CPU clock 360MHz or greater)
sun4us
PRIMEPOWER450
sun4us
PRIMEPOWER600
sun4us
PRIMEPOWER650
sun4us
PRIMEPOWER850
sun4us
PRIMEPOWER800
sun4us
PRIMEPOWER900
sun4us
PRIMEPOWER1000
sun4us
PRIMEPOWER1500
sun4us
PRIMEPOWER2000
sun4us
PRIMEPOWER2500
sun4us
Maximum memory capacity
The following table shows the maximum memory capacity for each partition on PRIMEPOWER
800/900/1000/1500/2000/2500. Be sure to configure a system with memory within the maximum memory
capacity.
Table 1.2 Maximum memory capacity
Kernel
Maximum memory capacity
(gigabytes)
PRIMEPOWER900/1500/2500
512
PRIMEPOWER800/1000/2000
256
1
2
Chapter 2 Preparing for Installation
This chapter describes the required preparation prior to installing the software on PRIMEPOWER.
2.1
Related documents
When installing software, you need some documents.
To view the following documentation, go to
http://www.fujitsu.com/global/support/computing/server/unix/documents.
z PRIMEPOWER Hardware Platform Guide: Installation for Solaris™ 10 Operating System
-- Start Here --(this manual)
z PRIMEPOWER Hardware Platform Guide: Operation for Solaris™ 10 Operating System
-- Start Here -The Following documents are provided with Enhanced Support Facility
z Enhanced Support Facility INSTALLATION Guide
z eXtended System Control Facility User’s Guide
The following documents are provided with System Management Console.
z PRIMEPOWER System Management Console (SMC) User’s Manual
z System Console Software User’s Guide
The following documents are shipped with PRIMEPOWER.
z PRIMEPOWER USER'S MANUAL
z PRIMEPOWER Installation Guide
To view the following documentation, go to http://docs.sun.com/. The Documentation DVD has been
excluded from Solaris 10 Media after 1/06.
z Solaris 10 Installation Guide: Basic Installations
z Solaris 10 Installation Guide: Custom JumpStart and Advanced Installations
z Solaris 10 Installation Guide: Solaris Live Upgrade and Upgrade Planning
z Solaris 10 Installation Guide: Network-Based Installations
z Solaris 10 Installation Guide: Solaris Flash Archives (Creation and Installation)
z Solaris 10 Documentation README
2.2
System console
Set up a system console, which is required for system installation, operational administration, and
maintenance.
2.2.1
PRIMEPOWER1/200/250/400/450/600/650/850
You must connect a console to a system by selecting one of the following two methods
z Personal computer (serial port connection)
3
z Personal computer (connection via Remote Console Connection Unit)
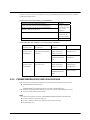
2.2.1.1
Personal computer (serial port connection)
To use a personal computer as the console, the following environment is required.
Table 2.1 Required environment when a personal computer is used
Required environment (Hardware/Software)
Remarks
RS232C cable (See "Table 2.2.")
It is only possible
to connect to
serial port-A of
the computer.
OS (Windows®)
Terminal software
Refer to the following table to connect the RS232C cable to the RS232C connector of the personal
computer.
Table 2.2 RS232C cable used for connection with personal computer
Personal computer
Personal computer connector
PRIMEPOWER
connector
Available cable
PC/AT compatible
machine
D-sub 9-pin
(DTE specification, male, inch
screw)
D-sub 25-pin
(DTE specification,
female, inch screw)
DCBL-RCQ05U
DCBL-RCQ10U
RJ45
(PRIMEPOWER250
/450)
DCBL-RSD05
DCBL-RSD15
D-sub 25-pin
(DTE specification,
female, inch screw)
Use a cross cable or
a conversion plug
with the connector
shown in the left
column.
Other than above
RJ45
(PRIMEPOWER250
/450)
Set the port as Table 2.3 shown below.
Table 2.3 Port setting
2.2.1.2
Item name
Setting value
Bits per second
9600
Data bits
8
Parity
None
Stop bits
1
Flow control
None
Personal computer (connection via Remote Console Connection Unit)
Here the Remote Console Connection Unit (RCCU) is used to enable the connection of two or more server
node UNIX consoles from a single personal computer via the LAN.
To use a personal computer and RCCU as the console, the following environment is required.
A Console for PRIMEPOWER250/450 can connect to its SCF-LAN port directly without Remote Console
Connection Unit. If a console is connected to PRIMEPOWER250/450’s SCF-LAN port directly, you need a
4
category 5 UTP cable. For more information, refer to the "eXtended System Control Facility User's Guide"
of Enhanced Support Facility.
Table 2.4 When a personal computer is used with RCCU
Required environment (Hardware/Software)
Remarks
Remote Console Connection Unit (GP7B3RM2U) or
Multi-port Console Connection Unit (PW007RM1U)
It is only possible
to connect to serial
port-A of the
computer.
RS232C cable (See "Table 2.5.")
LAN card
LAN card is
required for the
personal computer.
Connection software (attached to Windows®)
TELNET, etc.
Table 2.5 RS232C cable available to a personal computer with RCCU
Remote Console
Connection Unit
Remote Console Connection
Unit connector
PRIMEPOWER
connector
Available cable
Remote Console
Connection Unit
(GP7B3RM2U)
D-sub 25-pin
(DTE specification, female,
inch screw)
D-sub 25-pin
(DTE specification,
female, inch screw)
DCBL-RCT05U
DCBL-RCT15U
RJ45
(PRIMEPOWER250/
450)
DCBL-RSC05
DCBL-RSC15
D-sub 25-pin
(DTE specification,
female, inch screw)
DCBL-RCW05U
DCBL-RCW10U
DCBL-RCW15U
Multi-port Console
Connection Unit
(PW007RM1U)
D-sub 9-pin
(male, inch screw)
RJ45
(PRIMEPOWER250/
450)
2.2.2
DCBL-RSD05U
DCBL-RSD15U
PRIMEPOWER800/900/1000/1500/2000/2500
Refer to the following document for information and connect the System Management Console.
z "PRIMEPOWER Installation Guide”
or
"PRIMEPOWER System Management Console (SMC) USER'S MANUAL"
Refer to the following document for information on how to use the System Management Console.
z "System Console Software User’s Guide"
Note
You cannot use the following consoles with PRIMEPOWER800/900/1000/1500/2000/2500.
z Personal computer (serial port connection)
z Personal computer (connection via Remote Console Connection Unit)
z Bit map display unit
5
2.3
2.3.1
Deciding System Configuration
Software groups
You can select any of the following software groups and install them on the Solaris.
It is recommended that you select "Entire Solaris Software Group" or "Entire Solaris Software Group plus
OEM" because some optional software products may depend on the Solaris packages, supplied only with
Entire Solaris Software distributions. “Reduced Networking Support Software Group” has been added since
Solaris 10 3/05.
You can select the following software groups:
z Reduced Networking Support Software Group
z Core System Solaris Software Group
z End User Solaris Software Group
z Developer Solaris Software Group
z Entire Solaris Software Group
z Entire Solaris Software Group plus OEM support
Refer to “Disk Space Recommendations for Software Groups” in “Solaris 10 Installation Guide: Custom
JumpStart and Advanced Installations” for details of each software groups and recommended disk capacity
for them.
2.3.2
File system
When installing Solaris software, set the size of the file systems.
This section provides information and notes on how to determine the size of a file system.
2.3.2.1
Notes on planning disk space
Location of file systems
In Solaris, a single hard disk can be divided up into a maximum of eight slices.
A slice is composed of contiguous blocks, and you are able to create separate file systems in each slice.
Slice2 represents the entire disk, and file systems can be created on the other seven slices.
The following file systems are the main file systems, which comprise the Solaris.
root (/)
This file system is the top of the hierarchical file tree.
It also contains the kernel modules, the device drivers, and the programs used to boot the system.
Note that directories such as /etc, /dev, /devfs, /kernel, /platform and /sbin must be placed on the same
slice as root(/) for booting of the system. Otherwise, the system might not boot successfully.
swap
This space is used as virtual memory storage areas when the system does not have enough physical
memory to handle current processes.
It is also used as the dump device when the system crashes.
If you do not create /tmp file system, this space is used as the work file system (/tmp).
/usr
This file system contains UNIX-standard programs, libraries, and static databases.
A standalone system or a file server has this file system. A data-less client shares the /usr file system of
file server.
/var
This file system contains system files and directories that are changeable on the local system during
system operation. These include system logs, vi and ex backup files, mail files, uucp files, and spool files.
/opt
This file system contains optional software.
/export
This file system is one of the shared file systems with other systems on a network.
The root file system for the disk-less client and swap spaces are in this file system. Moreover, the home
directory (generally, created in /export/home/'username') for the users on the network is also in this file
6
system.
Number of file systems
When installing Solaris 10, the default set of file systems is only the root (/) file system and the swap.
The file system hierarchy can be divided further by adding the /usr, /var, and /opt file systems.
The following table summarizes the advantages according to the number of the file systems, used to
compose the Solaris. Decide the number of the file systems depending on the system operation.
Table 2.6 Number and advantage of file systems
Number of file
systems
Advantage
Large
z
z
z
Small
z
Efficient backup and restoration
Performance improvement by dividing the system over several disks
Easy to divide the file system by using the unused slice.
If resources in root (/) file system are not insufficient, you can allocate space
to the root (/) file system by shifting the resources in the /var or /opt file
systems to other file system.
Efficient use of free space in the file system
Unused space
If you plan to use disk mirroring in the future, it is recommended that you leave 10 Mbytes or more of
unused space on the system disk.
Size of file system
root (/), /usr, /opt
After installing Solaris 10, file system use can increase further by the addition of functions and fault fixes
shown below. Therefore, at the time of installation, set the size of the file systems with room for such
activities.
z Adding the ISV and optional software
z Changing the Solaris software group
z Applying patches, etc.
swap (swap space)
Swap space size is determined by considering the swap space size requirement of the application and the
physical memory size.
If the system runs out of swap space when the application is in use, the system may terminate abnormally.
Therefore, ensure that you allocate enough swap space to satisfy the demands of all the applications.
The memory image is written once in the swap space listed first in the /etc/vfstab file. If the system crashes,
the memory image in the swap space is copied as a crash dump file under the /var/crash/hostname directory
as the system reboots.
To ensure crash dump files are complete, follow the table to determine the swap space size.
Table 2.7 Swap space
System
Physical memory
Swap space size
PRIMEPOWER 1/200/400/600
Less than 1Gbytes
Same as physical memory or
greater
Greater than 1Gbytes
Greater than 1Gbytes
Less than 32Gbytes
Greater than 2Gbytes
Greater than 32Gbytes
Greater than 4Gbytes
PRIMEPOWER 250/450/650/850
7
System
Physical memory
Swap space size
PRIMEPOWER
800/900/1000/1500/2000/2500
Less than 32Gbytes
Greater than 2Gbytes
32Gbytes and less than
128Gbytes
Greater than 4Gbytes
128Gbytes and less than
256Gbytes
Greater than 8Gbytes
Greater than 256Gbytes
Greater than 16Gbytes
Note:
A greater amount of swap space may be required for the memory image, depending on how the system has
been used at the time of the system crash. If the memory image is larger than the swap size, the crash
dump file cannot be taken. In this case, enlarge the swap space or the device of the crash dump file with
the dumpadm(1M) command. For use of the dumpadm(1M), see the relevant man pages.
/var
Refer to the following descriptions when setting the size of /var file system.
z Function addition/Fault fixes
When you add functions or fix faults after installing Solaris 10, more space is needed under /var as well
as root (/), /usr and /opt.
Therefore consider about size of application and size of Patch backout data, which is necessary when
removing a patch.
z Spool for printer/mail
The spool file during system operation is temporarily held in the /var file system. Ensure this file size is
taken into account when using a printer or a mail server.
z Dump file
The dump file produced following a system crash is saved in /var. (The default location is
/var/crash/'system-name'.) This dump file is saved with a new file name every time and requires space
equivalent to two to five times of the "swap size".
z Long term operation
During long term operations, resource demand increases. In particular, log file space can fill up and
cause unexpected system problems. For log files and crush dump files, initialize the files or remove them
as necessary.
2.4
Instance numbers of PCI cards and basic network
interfaces
A partition can be composed of two or more system boards on PRIMEPOWER800/900/1000/1500/2000
/2500.
If you have installed Solaris or PCI cards in the partition, instance numbers (SCSI controller number, etc.)
are assigned to each system board and to the interfaces on the slots in system board number order.
On PRIMEPOWER 800/1000/2000, these instance numbers are assigned in a certain order and include all
cards mounted in the six PCI slots and the basic network interfaces on the system board.
For more detailed information, refer to " 2.4.1 Network interface name and disk controller number."
2.4.1
2.4.1.1
Network interface name and disk controller number
PRIMEPOWER800/1000/2000
When Solaris is installed in a partition, it is necessary to know the interface name of the interface used for
8
the Administration LAN on the partition side. This section describes how to obtain the interface name
(hmex) used for the Administration LAN that you will use in the network installations and the disk
controller number (cx) for installing Solaris.
If the partition is composed of two or more system boards, the instance numbers (SCSI controller number,
etc.) are assigned for PCI slots interfaces in the order of system board number.
For the cards mounted in the six PCI slots and the basic network interfaces on the system board, the instance
numbers are assigned in the following order:
1.
PCI0B
2.
PCI0A
3.
PCI1B
4.
PCI1A
5.
Interfaces on the system board (basic network interface, etc.)
6.
PCI3B
7.
PCI3A
Example:
When Solaris is installed in a partition consisting of a single system board with SCSI interface cards
(plugged into PCI0B and PCI0A) and a network interface (plugged into PCI1B), the controller number and
interface name will be assigned as Table 2.8. In this case, specify the interface name (hme1) as the
network interface at the network installations.
Table 2.8 Assignment of controller number/interface name
Place
Interface
Controller number/
Interface name
PCI0B
SCSI interface
c0
PCI0A
SCSI interface
c1
PCI1B
External network interface
hme0
Basic network interface
hme1
PCI1A
System board
PCI3B
PCI3A
2.4.1.2
PRIMEPOWER900/1500/2500
When you install Solaris 10 using the partition installer, use on-board LAN of the system board numbered
the least number in the partition. Then specify the hme0 as the interface of Administration LAN.
9
10
Chapter 3 Installation
This chapter describes how to install the software on PRIMEPOWER.
3.1
Installation Flowchart
The installation flowcharts are Figure 3.1 and Figure 3.2 shown below. Refer to each section for detail
instructions.
Start
3.5 Install Solaris 10
Reboot the system
3.6 Set up system with large
amount of memory
This is necessary for system
with 32Gbytes or greater
memory
3.7 Apply Recommended &
Security Patch Cluster
Reboot the system
3.8 Apply Solaris 10 PTF
Reboot the system
3.9 Install Enhanced Support Facility
Apply Enhanced Support Facility Patches
Apply Enhanced Support Facility
patches before rebooting the
system if the patch CD-ROM
comes with Enhanced Support
Facility
Reboot the system
3.10 Install Solaris 10
Documentation
If you install Solaris 10 3/05 OS,
you can install this software
product together from Solaris
Interactive Install.
3.11 Install optional software
Reboot the system
Some of the optional software
products require rebooting the
system. See the install guide of
each product for the descriptions.
3.12 Apply modifications (patches)
Reboot the system
End
Figure 3.1 PRIMEPOWER 1/200/250/400/450/600/650/850
11
Start
3.3 Set for Multiple-Partition
Configuration
3.4 Add Partition Administrators
3.5 Install Solaris 10
Reboot the system
3.6 Set up system with large
amount of memory
This is necessary for system
with 32Gbytes or greater
memory
3.7 Apply Recommended &
Security Patch Cluster
Reboot the system
3.8 Apply Solaris 10 PTF
Reboot the system
3.9 Install Enhanced Support
Facility
Apply Enhanced Support Facility
Apply Enhanced Support Facility Patches
Reboot the system
3.10 Install Solaris 10 Documentation
patches before rebooting the
system if the patch CD-ROM
comes with Enhanced Support
Facility.
If you install Solaris 10 3/05
OS and this is necessary for
system , then you can install it.
3.11 Install Optional Software
Reboot the system
3.12 Apply Modifications (Patches)
Reboot the system
End
Figure 3.2 PRIMEPOWER 800/900/1000/1500/2000/2500
12
Some of the optional software
products require rebooting the
system. See the install guide of
each product for the descriptions
3.2
3.2.1
Notes on Installation
"Link Down - cable problem?" message when installing
Solaris
If Solaris is installed without connecting Ethernet interfaces (basic network interfaces, X1033A-X card,
X1034A-X card, etc.) to a HUB, the following messages will be displayed.
z "unix: SUNW,hmeX: Link Down - cable problem?" or
z "unix: SUNW,qfeX: Link Down - cable problem?"
Even if Ethernet interfaces are not connected to a HUB, the installation will complete normally.
3.2.2
Messages of st driver
After upgrading to Solaris 10 or installing Solaris 10, if you edit /kernel/drv/st.conf file, the following
message may be displayed while the system is booted afterwards.
<device path name> (stXX):
<data-property-name> options value invalid bits set: 0x4000
"XX" shows the instance number of st driver.
This message shows that the bit value 0x4000(ST_BUFFERED_WRITES) of <options> in the
/kernel/drv/st.conf file is invalid. However the system is not influenced even if this message is displayed,
because the Solaris 10 system ignores the bit value ST_BUFFERED_WRITES of <options>.
If you do not want to display the message, change the <options> setting in the /kernel/drv/st.conf file so that
the bit value 0x4000 is not specified. Refer to the following example.
Before changing the st.conf file
Tape-config-list=<vid+pid>, <pretty print>, <data-property-name>;
<data-property-name> = 1,0x34,0,0xd639,4,0x00,0x8c,0x8c,0x8c,3;
After changing the st.conf file
Tape-config-list=<vid+pid>, <pretty print>, <data-property-name>;
<data-property-name> = 1,0x34,0,0x9639,4,0x00,0x8c,0x8c,0x8c,3;
3.2.3
Messages of fjulsa driver
When installing Solaris 10 on PRIMEPOWER250/450/650/850 connected to the extension file unit
(PW007FL2, PW0R7FL2 or PW007FL2U), the following messages may be displayed while the system is
booting.
WARNING: <device path name>(fjulsaXX):
command timeout for target Y.0
<device path name>: The path name to which the extension file unit (PW007FL2, PW0R7FL2 or
PW007FL2U) is connected.
(Example: /pci@85,2000/FJSV,ulsa@1 )
XX
: the instance number of fjulsa driver.
Y
: the SCSI ID of disk unit mounted in the extension file unit
(PW007FL2, PW0R7FL2 or PW007FL2U).
This message may be displayed when there is no setup for the transfer rate of the SCSI interface of an
13
extension file unit (PW007FL2, PW0R7FL2 or PW007FL2U) in a fjulsa.conf file. Set up a transfer rate
according to the following instructions.
1.
Log in as super user by typing "su" at the shell prompt.
2.
Add the following lines to the /platform/sun4us/kernel/drv/fjulsa.conf file.
name="fjulsa"
parent="/pci@##,####"
unit-address="#"
disable-u320=0x1;
parent
: Specify the device path name of the PCI card (PW008SC3) , to which the extension file
unit (PW007FL2, PW0R7FL2 or PW007FL2U) is connected, to "/pci@##, ####."
unit-address: Specify the device number of the PCI card (PW008SC3) of a device path name to "#."
3.
Reboot system.
# /usr/sbin/shutdown -y -i6 -g0 <Return>
Example1:
When the following message is displayed.
/pci@85,2000/FJSV,ulsa@1 (fjulsa2):
command timeout for Target 0.0
:
Add the following 4 lines.
name="fjulsa"
parent="/pci@85,2000"
unit-address="1"
disable-u320=0x1;
Example2:
When the following message is displayed.
/pci@8c,4000/FJSV,ulsa@2 (fjulsa4):
command timeout for Target 0.0
:
/pci@8c,4000/FJSV,ulsa@2,1 (fjulsa5):
command timeout for Target 0.0
:
Add the following 8 lines.
name="fjulsa"
parent="/pci@8c,4000"
unit-address="2"
disable-u320=0x1;
name="fjulsa"
parent="/pci@8c,4000"
unit-address="2,1"
disable-u320=0x1;
3.3
Set for Multiple-Partition Configuration
See "System Console Software User's Guide" for information about the necessary settings for establishing a
multiple-partition configuration on PRIMEPOWER 800/900/1000/1500/2000/2500.
14
3.4
Add Partition Administrators
The administrator of the system has the right to specify both a partition administration group for each
partition and a user account for each partition administrator.
For more detailed information, refer to "System Console Software User's Guide."
3.5
Install Solaris 10
Refer to “System Console Software User’s Guide.” for detailed instructions on PRIMEPOWER
800/900/1000/1500/2000/2500.
Refer to the following manuals for detailed instructions on PRIMEPOWER
1/200/250/400/450/600/650/850.
z Solaris 10 Installation Guide: Basic Installations
z Solaris 10 Installation Guide: Network-Based Installations
z Solaris 10 Installation Guide: Solaris Live Upgrade and Upgrade Planning
z Solaris 10 Installation Guide: Custom JumpStart and Advanced Installations
z Solaris 10 Installation Guide: Solaris Flash Archives (Creation and Installation)
z Solaris 10 Release Notes
Set up for NFS V4
At the first system boot after installing Solaris 10 OS 11/06 or earlier, you are prompted to answer the
following question about NFSv4. If you need to override NFSv4 default domain, answer “yes”.
This system is configured with NFS version 4, which uses a domain
name that is automatically derived from the system's name services.
The derived domain name is sufficient for most configurations. In a
few cases, mounts that cross different domains might cause files to
be owned by "nobody" due to the lack of a common domain name.
Do you need to override the system's default NFS version 4 domain
name (yes/no) ? [no] :
You are prompted to select NFSv4 domain name configuration during installation since Solaris 10 OS 8/07.
- NFSv4 Domain Name ----------------------------------------------------------NFS version 4 uses a domain name that is automatically derived from the
system's naming services. The derived domain name is sufficient for most
configurations. In a few cases, mounts that cross domain boundaries might
cause files to appear to be owned by "nobody" due to the lack of a common
domain name.
The current NFSv4 default domain is: ""
NFSv4 Domain Configuration
---------------------------------------------[ ] Use the NFSv4 domain derived by the system
[ ] Specify a different NFSv4 domain
15
Selection of keyboard layout
You may be prompted to select the keyboard layout during installation since Solaris 10 OS 8/07.
If no keyboard is connected, select the default value and continue the installation.
- Configure Keyboard Layout --------------------------------------------------Please specify the keyboard layout from the list below.
> To make a selection, use the arrow keys to highlight the option and
press Return to mark it [X].
^
|
|
|
|
|
|
|
|
|
-
Keyboard Layout
------------------------[ ] Slovenian
[ ] Slovakian
[ ] Spanish
[ ] Swedish
[ ] Swiss-French
[ ] Swiss-German
[ ] Taiwanese
[ ] TurkishQ
[ ] TurkishF
[ ] UK-English
[X] US-English
---------------------------------------------------------------------------F2_Continue
F6_Help
Solaris Registration Wizard
When you login as super user, the window "Sun Update Manager Registration Wizard" or "Solaris
Registration Wizard" may pop up. Follow the instructions below and choose Never Register.
Sun Update Manager Registration Wizard
1.
At the "Solaris Registration Wizard", select the "Discard Registration" option and click "Next".
Sun Update Manager Registration Wizard
[ ]
[ ]
[X]
Register the Solaris software and receive software updates
Register later
Never Register
[Next]
2.
[Cancel]
At the "Discard Registration?", click the "Discard Registration".
Discard Registration?
[Discard Registration]
[Continue Registration]
Solaris Registration Wizard
1.
At the "Sun Update Manager Registration Wizard", select the "Run the Solaris software without
registering" option and click "Next".
Solaris Registration Wizard
[ ]
Continue with Registration
[ ]
[X]
Register the Solaris software later
Run the Solaris software without registering
[Next]
16
[Cancel]
2.
At the "Never Register?", click the "Never Register".
Never Register?
[Never Register]
3.5.1
[Continue Registration]
Notes of PRIMEPOWER800/900/1000/1500/2000/2500
z Do not use PRIMEPOWER as a DHCP client after installation is done.
z Do not use a disk array system connected by a Fibre Channel Card (PW008FC3, PW008FC2 or
GP7B8FC1), as a boot disk. Although such a boot disk is theoretically possible, it is not preferable.
z Do not use a tape device or a disk raid system, connected by a Fibre Channel Card (PW008FC3,
PW008FC2 or GP7B8FC1), when the system is boot from Solaris 10 CD-ROM/DVD or
INSTALL/BOOT server.
z Do not install SunVTS contained in Solaris 10, or FJVTS contained in Enhanced Support Facility
does not perform.
z SunVTS has been contained in Entire Solaris Software Group since Solaris 10 5/08.
3.5.2
Notes of PRIMEPOWER1/200/250/450/400/450/600/650/850
z Refer to "Chapter 5 Solaris OS network installation using DHCP service" for detailed instructions of
network installation using DHCP service.
z If you install from Solaris Web Start, do not leave the front cover of the main cabinet closed as the
tray of the CD-ROM/DVD drive unit automatically slides out during the installation and also when
the installation finishes.
z A CD-ROM/DVD drive for PRIMEPOWER1 is optional. You may use the CD-ROM/DVD drive
mounted on other systems/remote console.
z Do not use PRIMEPOWER as a DHCP client after installation is done.
z When installing with Solaris 10 DVD, do not select “default install” or Java™ Enterprise System will
be installed automatically. Fujitsu does not support Java™ Enterprise System. So select “Custom
install” and cancel the selection of Java™ Enterprise System.
z Do not use a disk array system connected by a Fibre Channel Card (PW008FC3, PW008FC2 or
GP7B8FC1), as a boot disk. Although such a boot disk is theoretically possible, it is not preferable.
z Do not use a tape device or a disk raid system, connected by a Fibre Channel Card (PW008FC3,
PW008FC2 or GP7B8FC1), when the system is boot from Solaris 10 CD-ROM/DVD or
INSTALL/BOOT server.
z Do not install SunVTS contained in Solaris 10, or FJVTS contained in Enhanced Support Facility
does not perform.
z Solaris 10 CD-ROM media has not been provided since Solaris 10 1/06. If you install Solaris 10 on a
system without a DVD drive, install it from the network.
z SunVTS has been contained in Entire Solaris Software Group since Solaris 10 5/08.
3.6
Set up system with large amount of memory
CPU time is extensively occupied by fsflush daemon and memory scrubbing daemon.
fsflush daemon finds modified data and metadata, which have not been written into backing store, then
writes the data into backing store.
Therefore on a system with large amount of memory, fsflush takes a long time to examine the whole of the
memory, which may result in occupying a certain cpu for a long time.
By changing the following kernel parameters, you can adjust the timing of launching fsflush daemon and
17
size of memory scanned per launch.
tune_t_fsflushr
autoup
Specifies the interval by seconcd at which fsflush daeamon is launched. The default is
1.
Specifies the time by second at which fsflush daemon scans whole memory.
Increasing the value of autoup keeps the buffers around for a longer time in memory.
The default is 30.
If tune_t_fsflushr is too large, then amount of memory fsflush examines at a time will be large, too. So the
default value is recommended.
In addition, in a system with Enhanced Support Facility 2.5/2.5.1 and more than 256 Gbytes of memory, a
warning message like below might be displayed by System Parameter Diagnosis. Ignore a warning about
tune_t_fsflushr value.
Example: warning message by system Parameter Diagnosis
warning: tune_t_fsflushr(1) and autoup(30) may fully occupy CPU activity.
The numbers in () shows each parameter value.
If 914192-01 for Enhanced Support Facility 2.5/2.5.1 has been applied to the system, the warning
message is not displayed.
In the case of a system with more than 32 Gbytes of memory, fsflush might not be able to examine all
memory within 30 seconds, which is the default value of autoup. If fsflush cannot examine memory within
30 seconds, fsflush does not run periodically and it affects the system.
You may observe by the mpstat(1M) commad that the system time of a certain cpu is nearly 100%.
In such a case, you should change the value of autoup according to amount of memory of the system. The
recommended values are as Table 3.1. “amount of memory” means the amount of memory installed to each
partition/domain on a system with multiple partitions/domains.
Table 3.1 recommended value of autoup
amount of memory
[gigabyte]
autoup
[second]
Less than 32
30
32 and less than 64
60
64 and less than 128
120
128 and less than 256
240
256 and less than 512
480
Do not make the value of autoup larger than the recommended one above.
Too large value of autoup causes the system to lose updated data when power outage occurs or the system
panics.
Memory scrubbing daemon examines installed memory periodically to check memory ECC error.
The following parameter can change intervals of memory scrubbing daemon invocations.
memscrub_period_sec
Specifies the time by second at which memory scrubbing daemon
examines all installed memory. The default is 43200 (12 hours).
If the installed memory size within a partition is 256 Gbytes or larger, you should specify 172800 as
memscrub_period_sec at least.
To make the above values effective on your system, add the parameters to /etc/system and reboot the
18
system.
Example: specify autoup=60 and memscrub_period_sec=172800
set autoup=60
set memscrub_period_sec=172800
3.7
Apply Recommended & Security Patch Cluster
Recommended & Security Patch Cluster contains important patches. So apply the latest Recommended &
Security Patch Cluster immediately after installing Solaris 10 OS.
You can download the latest Recommended & Security Patch Clusters and Recommended & Security
Patches from the following site.
Global Site
http://www.fujitsu.com/global/support/software/security/products-s/patch-info/
Japanese site
https://software.fujitsu.com/jp/security/products-others/unix/
3.8
Apply Solaris 10 PTF
The Solaris 10 PTF an integration of patches for Solaris 10. So apply Solaris 10 PTF.
3.9
Install Enhanced Support Facility
When you install Solaris 10 5/08 or later, packages related to SunVTS may be installed automatically. If the
packages have been installed, delete them in advance as follows:
# pkgrm SUNWvtsts SUNWvtss SUNWvtsr SUNWvtsmn SUNWvts <Return>
If you install Enhanced Support Facility 2.5, 2.5.1 or 2.6, apply the following patch before installing it.
124599-01 or later SunOS 5.10: Fujitsu PRIMEPOWER ESF redact script
See “INSTALLATION GUIDE Enhanced Support Facility” for how to install Enhanced Support Facility.
Enhanced Support Facility is attached to PRIMEPOWER.
Note
Apply Enhanced Support Facility patches before rebooting the system if the patch CD-ROM comes with
Enhanced Support Facility.
3.10 Install Solaris 10 Documentation
If you install Solaris 10 3/05 and it is necessary, install Solaris 10 Documentation. See the following manual
for how to install it.
z Solaris 10 Documentation README
The Documentation DVD has been excluded from Solaris 10 Media after 1/06. To view the Solaris 10
manuals, go to http://docs.sun.com/.
19
See "System Console Software User's Guide" for information on how to use CD-ROM/DVD drive on the
System Management Console or System Console Unit.
3.11 Install Optional Software
For information on how to install optional software, refer to "System Administration Guide: Basic
Administration" and the install guide of the optional software.
Each product’s installation guide describes the installation procedures with a CD-ROM/DVD drive in the
main cabinet, but PRIMEPOWER 800/900/1000/1500/2000/2500 does not have a CD-ROM/DVD drive.
For the information about using the installation procedures with the CD-ROM/DVD drive is in the System
Management Console or System Console Unit, refer to "System Console Software User’s Guide."
3.12 Apply Modifications (Patches)
If modifications, like Required Patches, etc., are supplied, apply them.
See the supplied guides for information on how to apply the modifications.
If both PTF and Required Patches are provided, apply PTF first and then apply Required Patches.
Use the CD-ROM drive on the System Management Console to apply the modifications on PRIMEPOWER
800/900/1000/1500/2000/2500. See "System Console Software User’s Guide" for how to use the
CD-ROM/DVD drive on the System Management Console.
20
Chapter 4 System Upgrade
This chapter describes how to upgrade existing PRIMEPOWER systems to a new version of the Solaris.
When you install a new version of Solaris on a system, you can choose one of the following options:
z Initial
z Upgrade
Initial
This option overwrites the system disk with the new version of Solaris. It does not save the
modifications that you have made to the previous version of Solaris. If you upgrade the Solaris with
this option, refer to "Chapter 3 Installation."
Upgrade
This option saves as many modifications you have made to the previous version of Solaris as
possible.
For upgrading from Solaris 7, Solaris 8 or Solaris 9 using this option, follow the flowchart shown in
"4.1 Upgrade Flowchart."
For upgrading from a previous version of Solaris 10 using this option, refer to the documents
supplied with the Solaris software.
Solaris 10 3/05 supports upgrade option from Solaris 7 or later.
Solaris 10 1/06 or later supports upgrade option from Solaris 8 or later.
21
4.1
Upgrade Flowchart
The upgrade flowcharts are Figure 4.1 and Figure 4.2 shown below. Refer to each section for detail
instructions.
Start
4.3 Remove Enhanced Support Facility
Reboot the system
4.4
Create an Install Server
4.5
Prepare for Network Installation
4.6
Install Solaris 10
This procedure is required only in
the following cases:
- Upgrade from Solaris 7, Solaris 8
or Solaris 9
- Upgrade from Solaris 10 8/07 or
earlier to Solaris 10 5/08 or later
Reboot the system
3.6
Set up system with large amount
of memory
3.7
Apply Recommended &
Security Patch Cluster
This is necessary for system with
32Gbytes or greater memory.
Reboot the system
3.8
Apply Solaris 10 PTF
Reboot the system
3.9
Install Enhanced Support Facility
Reboot the system
This procedure is required only in
the following cases:
- Upgrade from Solaris 7, Solaris 8
or Solaris 9
- Upgrade from Solaris 10 8/07 or
earlier to Solaris 10 5/08 or later
3.10 Install Solaris 10 Documentation
You can install these software
products if you install Solaris 10
3/05.
3.11 Install Optional Software
You can install these software
products if necessary.
Reboot the system
Some of the optional products
require rebooting the system. Check
this by referring to the Install Guide
of each product.
3.12 Apply Modifications (Patches)
Reboot the system
End
Figure 4.1 PRIMEPOWER 800/900/1000/1500/2000/2500
22
Start
4.3
Remove Enhanced Support
Facility
This procedure is required only in
the following cases:
- Upgrade from Solaris 7, Solaris 8
or Solaris 9
- Upgrade from Solaris 10 8/07 or
earlier to Solaris 10 5/08 or later
Stop the system
3.5 Install Solaris 10
Reboot the system
3.6 Set up system with large amount
of memory
This is necessary for system with
32Gbytes or greater memory.
3.7 Apply Recommended &
Security Patch Cluster
Reboot the system
3.8 Apply Solaris 10 PTF
Reboot the system
This procedure is required only in the
following cases:
3.9 Install Enhanced Support Facility
- Upgrade from Solaris 7, Solaris 8
or Solaris 9
- Upgrade from Solaris 10 8/07 or
earlier to Solaris 10 5/08 or later
Reboot the system
3.10 Install Solaris 10 Documentation
You can install these software
products if you install Solaris 10
3/05.
3.11 Install Optional Software
You can install these software
products if necessary.
Reboot the system
Some of the optional products
require rebooting the system. Check
this by referring to the Install Guide
of each product.
3.12 Apply Modification (Patches)
Reboot the system
End
Figure 4.2 PRIMEPOWER 1/200/250/400/450/600/650/850
23
4.2
Note for Updating Solaris
When upgrading Solaris OS, the patch 124599-01 is deleted. Therefore, if upgrading Solaris OS without
removing Enhanced Support Facility, apply the 124599-01 or later to the system again.
For other notes, refer to “3.2 Notes on Installation.”
4.3
Remove Enhanced Support Facility
This procedure is required only in the following cases:
z Upgrade from Solaris 7, Solaris 8 or Solaris 9
z Upgrade from Solaris 10 8/07 or earlier to Solaris 10 5/08 or later
For information on how to remove Enhanced Support Facility, refer to "INSTALLATION GUIDE
Enhanced Support Facility."
Note
esfrm might not remove the FJSVcpc package on Solaris 8 7/01 or earlier systems. If so, please remove
FJSVcpc using the pkgrm command.
# pkgrm FJSVcpc <Return>
Do not remove the FJSVcpc package on Solaris 8 10/01 or later system.
4.4
Create an Install Server
Refer to " Setting Up the Installation Server " in "System Console Software User's Guide" to Set up an
Installation server.
4.5
Prepare for Network Installation
Refer to the /etc/inet/hosts and /etc/ethers files to determine the IP address and the MAC address of the
partition where you will install Solaris 10. Once determined, execute the add_install_client command on the
System Management Console or System Console Unit.
# SolarisOS_directory/Solaris_10/Tools/add_install_client
-i IP_address_partition
-e MAC_address_partition
-s host_name_System_Management_Console: SolarisOS_directory
-p host_name_System_Management_Console:
/etc/opt/FJSVclis/etc/inst_info/sysid_dir/host_name_partition
host_name_partition sun4us <Return>
4.6
Install Solaris 10
For information about how to install Solaris 10, refer to the following manuals.
z Solaris 10 Installation Guide: Basic Installations
z Solaris 10 Installation Guide: Network-Based Installations
z Solaris 10 Installation Guide: Solaris Live Upgrade and Upgrade Planning
z Solaris 10 Installation Guide: Custom JumpStart and Advanced Installations
z Solaris 10 Installation Guide: Solaris Flash Archives (Creation and Installation)
z Solaris 10 Release Notes
There are some notes when installing Solaris 10. Refer to “3.2 Notes on Installation” and “3.5 Install Solaris
10”.
24
Chapter 5 Solaris OS network installation
using DHCP service
This chapter describes implementation of Solaris network installation using DHCP service.
5.1
Outline
Solaris can be installed on a system over network using DHCP service.
By using DHCP service on the network installation, it allows installation without placing a boot server on
each subnet.
The following machines support installation of Operating System using DHCP service.
z PRIMEPOWER 250
z PRIMEPOWER 450
z PRIMEPOWER 650(with SPARC64 V)
z PRIMEPOWER 850(with SPARC64 V)
z PRIMEPOWER 900
z PRIMEPOWER 1500(with SPARC64 V)
z PRIMEPOWER 2500
5.2
Notes
z Do not use PRIMEPOWER as a DHCP client after installation is done.
5.3
How to set configuration of server
This section describes configuration of DHCP server and install server that supports Solaris network
installation.
For details on configuration of DHCP server, refer to the following documents.
“System Administration Guide: IP Services”
“Solaris DHCP Administration Guide”
For details on configuration of install server, refer to the following documents.
“System Administration Guide: Basic Administration”
“Solaris 10 Installation Guide”
5.3.1
Installation of DHCP server
The following packages must be installed in order to implement DHCP server:
system
SUNWdhcm
DHCP Manager
system
SUNWdhcsr
BOOTP/DHCP Server Services, (Root)
system
SUNWdhcsu
BOOTP/DHCP Server Services, (Usr)
25
The DHCP server that supports network installation must have DHCP capability included in Solaris 8 2/02
or later.
5.3.2
General configuration of DHCP server
First, begin with general configuration of DHCP server.
DHCP server supports an address distribution beyond subnet, however in order to distribute address beyond
subnet, you must startup DHCP relay agent on each subnet or use a router that supports DHCP relay.
In this type of configuration, use "/usr/sbin/dhcpconfig" command or DHCP manager.
Refer to the “Solaris DHCP Administration Guide” for configuration.
5.3.3
Configuration of install server
Use any or all of the scripts below, which are supplied in the Solaris 10 CD/DVD, to store the Solaris install
image into install server:
setup_install_server, add_to_install_server.
As for the install server, it is necessary to install the software group of Developer Support or higher.
To store the install image under /export/install, execute the following commands:
# cd /cdrom/cdrom0/s0/Solaris_10/Tools <Return>
# ./setup_install_server /export/install <Return>
For detail instructions, refer to the “Solaris 10 Installation Guide”.
5.3.4
Configuration of the client system
In order to proceed installation using DHCP, define each of the kernel architecture for the platform.
To define it, "add_install_client" command is executed.
For detail add_install_client command, refer to the “Solaris 10 Installation Guide”.
The execution example is shown below.
# cd /export/install/Solaris_10/Tools <Return>
# ./add_install_client -d FJSV.GPUZC-M sun4us <Return> *1
To specify the platform name, substitute periods for any commas in the string returned by the "uname -i"
command.
After executing the command, the followings are displayed. Make note of these values because you will
use them for creating DHCP option and macro described later in this document. *2
To enable FJSV.GPUZC-M in the DHCP server,
add an entry to the server with the following data:
Install server
(SinstNM) : server
Install server IP (SinstIP4) : 10.20.30.40
Install server path (SinstPTH) : /export/install
Root server name
(SrootNM) : server
Root server IP
(SrootIP4) : 10.20.30.40
Root server path
(SrootPTH) : /export/install/Solaris_10/Tools/Boot
*1 The add_install_client command displays the hostname and IP address of a basic network interface.
When you install it in the client of a different network interface, please use the value of the network
interface used.
*2 Specify the platform name for the installed client as follows.
26
5.3.5
Client System
Platform name
PRIMEPOWER 250
PRIMEPOWER 450
PRIMEPOWER 650(with SPARC64V)
PRIMEPOWER 850(with SPARC64V)
FJSV.GPUZC-M
PRIMEPOWER 900
PRIMEPOWER 1500(with SPARC64V)
PRIMEPOWER 2500
FJSV.GPUZC-L
Configuration of Custom JumpStart
For custom JumpStart installation, create the same file as normal custom Jumpstart and place it in the same
directory.
In the example of the macro of 5.3.6, it is placed under /export/config.
See the “Solaris 10 Installation Guide” for the method of creating this file.
5.3.6
Creating DHCP option and Macro for install parameter
In order to enable Solaris installation from network, create a vendor category option and provide appropriate
information for installing Solaris. The followings are the required options to create.
Table 5.1 Values for Creating Vendor Category Options for Solaris Clients
Name
Code
Data Type
Description
SrootIP4
2
IP address
IP address of root server
Specify the value outputted by add_install_client
command. *2
SrootNM
3
ASCII text
Host name of root server
Specify the value outputted by add_install_client
command. *2
SrootPTH
4
ASCII text
Path to the client's root directory on the root server
Specify the value outputted by add_install_client
command.
SinstIP4
10
IP address
IP address of Jumpstart Install server
Specify the value outputted by add_install_client
command. *2
SinstNM
11
ASCII text
Host name of install server
Specify the value outputted by add_install_client
command. *2
SinstPTH
12
ASCII text
Path to installation image on install server
Specify the value outputted by add_install_client
command.
SsysidCF
13
ASCII text
Path to sysidcfg file, in the format server:/path
SjumpsCF
14
ASCII text
Path to JumpStart configuration file in the format
server:/path
Sterm
15
ASCII text
Terminal type
*2 The add_install_client command displays the hostname and IP address of a basic network interface.
When you install it in the client of a different network interface, please use the value of the network
interface used.
27
Configuring Macro
To register information to install it in the DHCP server, the macro is made. Create macro using a text editor.
The following box shows an example of creating macro. (Each command must be written in a single line
without the blank)
# Define Solaris vendor specific code
# To replace the value already specified, change "-A" to "-M"
# Defines each type of option symbol
# Specify the platform name of client for network installation
# To specify the platform name, substitute periods for any commas
# in the string returned by the "uname -i" command.
# Modification is not neccessary except for Vendor option
dhtadm -A -s SrootIP4 -d 'Vendor=FJSV.GPUZC-M,2,IP,1,1'
dhtadm -A -s SrootNM -d 'Vendor=FJSV.GPUZC-M,3,ASCII,1,0'
dhtadm -A -s SrootPTH -d 'Vendor=FJSV.GPUZC-M,4,ASCII,1,0'
dhtadm -A -s SinstIP4 -d 'Vendor=FJSV.GPUZC-M,10,IP,1,1'
dhtadm -A -s SinstNM -d 'Vendor=FJSV.GPUZC-M,11,ASCII,1,0'
dhtadm -A -s SinstPTH -d 'Vendor=FJSV.GPUZC-M,12,ASCII,1,0'
dhtadm -A -s SsysidCF -d 'Vendor=FJSV.GPUZC-M,13,ASCII,1,0'
dhtadm -A -s SjumpsCF -d 'Vendor=FJSV.GPUZC-M,14,ASCII,1,0'
dhtadm -A -s Sterm
-d 'Vendor=FJSV.GPUZC-M,15,ASCII,1,0' *
# Define the macro related to installation client
# In this example, "Solaris" is used for the name
dhtadm -A -m Solaris -d ':SrootIP4=10.20.30.40:
SrootNM="server":
SinstIP4=10.20.30.40:
SinstNM="server":
Sterm="vt100":
# Define the macro related to the sparc platform
dhtadm -A -m sparc -d
':SrootPTH="/export/install/Solaris_10/Tools/Boot":
SinstPTH="/export/install":'
# Define the macro related to the hardware group sun4us
# Include Solaris macro and sparc macro for general use
# Define for number of hardware groups
dhtadm -A -m sun4us -d ':Include=Solaris:Include=sparc:'
# Define the macro for option
# Define if neccessary
dhtadm -A -m option -d ':SsysidCF="server:/export/config":
SjumpsCF="server:/export/config":'
# Define the specific macro for each platform
# During installation, each macro is searched using this value
# include the specifc value for the platform, sun4us macro, and option
macro
dhtadm -A -m FJSV.GPUZC-M -d ':Include=sun4us:Include=option:' *
# If subnet exists, accomodate network address and boot server
# Definistion is required for number of subnet
dhtadm -M -m 10.20.40.0 -e BootSrvA=10.20.30.40
# Define the host name send to the client
dhtadm -M -m server -e Hostname=_NULL_VALUE_
* Specify the platform name for the installed client as follows.
28
Client System
Platform name
PRIMEPOWER 250
PRIMEPOWER 450
PRIMEPOWER 650(with SPARC64V)
PRIMEPOWER 850(with SPARC64V)
FJSV.GPUZC-M
PRIMEPOWER 900
PRIMEPOWER 1500(with SPARC64V)
PRIMEPOWER 2500
FJSV.GPUZC-L
After the macro is created, register the macro by executing "/usr/sbin/dhtadm" in batch mode.
For example, if the created file name is "netinstalloptions", execute in the following way:
# /usr/sbin/dhtadm -B netinstalloptions <Return>
5.4
5.4.1
Network installation
Installation
Check if /export/install and /export/config in the install server is NFS shared.
If they are NFS shared, then execute the following command at "ok" prompt of PROM.
Solaris Interactive Installation
ok boot net:dhcp <Return>
Solaris Custom JumpStart
ok boot net:dhcp – install <Return>
5.4.2
Execution of sys-unconfig command
If network installation is performed using DHCP service, then that machine is set as DHCP client.
PRIMEPOWER series cannot be operated as DHCP client. After completing the Solaris 10 installation,
execute sys-unconfig command to unconfigure DHCP settings. Then, designate a static IP address. It can be
confirmed whether the system is configured as a DHCP client, by the "ifconfig -a" command. An example
of executing the "ifconfig -a" command on a DHCP client is shown below(the underlined part would be
displayed).
# ifconfig –a
lo0: flags=1000849<UP,LOOPBACK,RUNNING,MULTICAST,IPv4> mtu 8232 index 1
inet 127.0.0.1 netmask ff000000
hme0:flags=103<UP,BROADCAST,RUNNING,MULTICAST,DHCP,IPv4> mtu 1500 index 2
inet 10.20.40.50 netmask ffffff00 broadcast 10.20.40.255
ether 8:0:12:34:56:78
While installing it is possible to configure the settings so that it can operate using static IP address.
However, it conflicts with administration of DHCP server, hence the network may become unstable. For
configuring sysidcfg file, refer to “5.6 Configuring static IP address using sysidcfg file” below.
29
5.5
Known problems and limitations
Installation of Enhanced Support Facility should be performed after switching to static IP address. The
influence and the recommended action when Enhanced Support Facility is installed by mistake on a DHCP
client, are as follows.
z Web-Based Admin View
Influence : It will not be possible to connect to Web-Based Admin View.
The client will display the following messages.
0005 Cannot connect to Management. Server. Do you want to re-connect?
Recommended action : After changing to static IP address, take the steps described in the following
documents to add additional settings related to static IP address.
“Web-Based Admin View Operation Guide”
6.1 Changing an IP Address on the Public LAN
z Remote support
Influence : A remote support which uses PtoP connection (ISDN) cannot be done.
Recommended action : Please request the service of "Set change in the router for
REMCS PtoP connection (ISDN) connection" from your authorized dealer after
changing to the static IP address.
5.6
Configuring static IP address using sysidcfg file
z
Setting static IP address for DHCP server
Distribute static IP address against the MAC address for the client on which installation is performed.
Refer to the “Solaris DHCP Administration Guide” for details.
z
Creating sysidcfg file
Overwrite the parameters reported from DHCP server by the parameters of the sysidcfg file.
Refer to the “Solaris 10 Installation Guide” for the detailed description of the parameter.
The following is an example of creating sysidcfg file under /export/config.
The distributed IP address is 10.20.40.1.
# cat /export/config/sysidcfg
name_service=NONE
network_interface=PRIMARY{
hostname=client
default_route=10.20.40.254
ip_address=10.20.40.1
netmask=255.255.255.0
protocol_ipv6=no
}
security_policy=NONE
system_locale=C
terminal=vt100
timezone=GMT
timeserver=localhost
root_password=xxxxxxxxxxxxxx
Any paramters shown above must be specified by the value reported from DHCP server.
Incorrect hostname(hostname=), IP address (ip_address=), network mask (netmask=) causes contradiction
on the network environment and installation may fail to start.
When IP address is specified, it is necessary to make this file for each client.
By omitting hostname (hostname=) and IP address (ip_address=) entries, it is possible to operate with a host
30
name and static IP address, leased from the DHCP server.
# cat /export/config/sysidcfg
name_service=NONE
network_interface=PRIMARY{
default_route=10.20.40.254
netmask=255.255.255.0
protocol_ipv6=no
}
security_policy=NONE
system_locale=C
terminal=vt100
timezone=GMT
timeserver=localhost
root_password=xxxxxxxxxxxxxx
31
32