1
TPC Soft Im age Software
Instructions
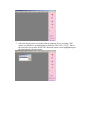
1. Installation is now complete. You may now locate the TPC soft image icon in the
start menu and click on it. It is also located on you desktop.
2. Click on the TPC logo to access the program.
3. Enter data into the o
f llowing fields to insert a patient ifle into the software. Then
click add to add the information.
REV. 1-1-13
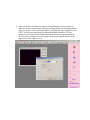
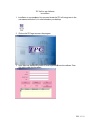
4. Use your mouse to select the patient and then click enter to enter the selected
patient. You may also locate a patient by doing a blank search. This is done with
all the fields being blank and you click the search button. All patients will show
up that are listed in the database. You can also search by the first letter in the
patient name. For example insert the letter “M”, then chick the search button and
all the “M” patients will appear in the selection below. Exit will exit the program
when you are finished taking images. Shown below is an example of a blank
search
5. Click on the patient name, number, identity card or telephone number then click
enter to enter the patient.
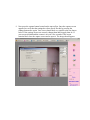
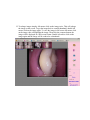
6. You will now enter the software-imaging program and be able to capture images
into a specific patient name. This is a sample of what your screen should look
like. Notice that the patient information that was entered is now on the lower right
hand side of the screen.
7. Select the image source icon in the software program. If you are using a TPC
camera you should see an imaging device that says TPC 1.603 {32-32}. This is
the correct device to select for the TPC intra-oral camera. Once highlighted press
the select button with your mouse.
8. After you hit the select button a capture screen will appear. Now lets check to
make sure that the correct camera settings are being used. Press the settings button
with your mouse. A new screen will appear, verify that the video standard is set to
NTSC_M. Only one signal should be detected and there should be 525 lines
detected. If you need to make changes make them then press apply and then hit
ok. After this is complete close the capture screen by pressing the small x in the
right corner of the capture screen.
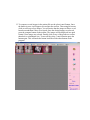
9. Now press the capture button located on the top tool bar. Once the capture screen
appears lets verify that the settings have been saved. Do this by pressing the
settings button once again. Your screen should look very similar to the one shown
below. If the settings are not set correctly change them and hit apply then ok. If
your screen in blank and the camera is on wait a few seconds. If the screen
remains black close the capture screen and re-open it. The image should appear.
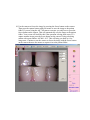
10. Use the camera to freeze the image by pressing the freeze button on the camera.
Then press the capture button with your mouse to save the image to the patient
folder. If you are using the AIC 700 camera converter you only have to press the
freeze button on the camera. This will automatically save the image to the patient
folder. Your screen will look like this if the operation is being done correct. To
capture another image press the freeze button on the camera if using a docking
station with a part number: AIC800 – 815. This will bring you back to a live
image state. Continue to use the camera to freeze the image with the freeze button
on the camera then use the mouse to capture it in to the patient folder.
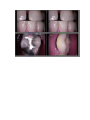
11. Once you are done capturing images into your patients record you can close the
capture window. This is done by clicking the x, in the upper right hand corner of
the capture window. Not the software program. Your new screen will look similar
to the one shown below with images in it.
12. To enlarge images simpley left mouse click on the image twice. This will enlarge
the image on the screen. To get the image back to a small thumbnail, double left
mouse click on the image again. To view the image in full screen left mouse click
on the image, this will highlight the image. Then click the compare button; the
image will be displayed in a full screen format. Double left mouse click on the
image again and the image will be reduced to a thumbnail.
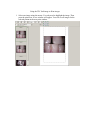
13. To compare several images in the patient file use the select/cancel button. Once
the button is press it will appear recessed into the tool bar. Then using left mouse
clicks to select up to four images. You will notice that the images will have a red
boarder around them if they are selected. Once the desired images are selected
press the compare button on the toolbar. The images will be displayed in a quad
format if four images are selected. Double click on any of the pictures to reduce
them back to a thumbnail size. To turn off the select / cancel function press the
button again. This will make the button look like all the other buttons in the
program.
14. To use the delete function, you need to click on the image once so that I is
highlighted then press the delete button. This will delete the image that is
highlighted.
15. The save as button let’s you save a copy of the image to a different location. The
image will always remain in the software when you use the save as function. This
feature allows you to save images in an additional location. You need to select the
file location and a file name to save the image. (Advanced computer users only).
Using the TPC Soft image to Print images
1. Select one image using the mouse. You only need to highlight the image. Then
press the print icon. A new window will appear. You will see all images for the
selected patient in the new print window.