1
PBUM-002E(Rev2.1.0.2;140714)
Point-of-Sales
POPs for Restaurant
User Manual
Table of Contents
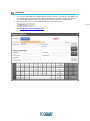
Table of Contents ................................................................................................................ ii
Copyright © POSBANK Co., Ltd. All Rights Reserved. ............................................................. viii
POPSBANK User’s Manual Revision History ............................................................................ ix
Preface ............................................................................................................................. xi
END-USER LICENSE AGREEMENT (EULA) .............................................................................. xii
Software Service License Agreement (SLA) ........................................................................ xviii
PART 1. Getting Started ...............................................................1
POPs Installation ................................................................................................................. 2
Steps to Getting Started ............................................................................................. 2
Install and Start ......................................................................................................... 3
Registration ............................................................................................................... 8
Program Update ....................................................................................................... 10
Manual Update .............................................................................................. 10
Auto Update ................................................................................................. 10
Windows Configuration ...................................................................................................... 12
Microsoft SQL Configuration ....................................................................................... 12
Firewall Settings ...................................................................................................... 15
Windows 7 ................................................................................................... 15
Windows XP .................................................................................................. 20
Resolution Settings ................................................................................................... 23
Regional, Date & Time Settings, ................................................................................. 24
POS Hardware Configuration .............................................................................................. 25
Printers ................................................................................................................... 26
Receipt Print ................................................................................................. 26
Customer Order Print ..................................................................................... 27
Kitchen Print ................................................................................................. 28
Label ........................................................................................................... 29
Magnetic Stripe Reader (MSR) ................................................................................... 30
Customer Display (CDP) ............................................................................................ 31
Dual Display ............................................................................................................ 32
Cash Drawer Information .......................................................................................... 34
Barcode Scanner ...................................................................................................... 35
Weighing Scales ....................................................................................................... 36
Guest Pager ............................................................................................................. 37
Caller ID (CID) ......................................................................................................... 38
POPs Software Configuration .............................................................................................. 39
Database Server Connection and Language Selection ................................................... 39
Store Information Settings ........................................................................................ 42
Network Configuration ....................................................................................................... 63
Connecting Client to Database Server ......................................................................... 63
Sharing Kitchen Printer ............................................................................................. 66
Local Security Settings .............................................................................................. 70
PART 2. Basic Screen .................................................................72
Login, Exit, & Main Screen .................................................................................................
Login ......................................................................................................................
A)
Agent logo: ask administrator. ........................................................................
B)
Merchant Logo: open to the public...................................................................
Exit ........................................................................................................................
Main Screen ............................................................................................................
Dine-In Screen .................................................................................................................
Basic Screen ............................................................................................................
Quick Settlement Screen ...........................................................................................
73
73
73
73
74
75
77
77
79
ii
Table Information Screen .......................................................................................... 81
Table Design ............................................................................................................ 82
Information displayed on Table ....................................................................... 82
Tables Based on Status .................................................................................. 83
Order Screen .................................................................................................................... 86
Title Bar Section....................................................................................................... 87
Menu Group Section ................................................................................................. 88
Menu Section ........................................................................................................... 89
Order List Section..................................................................................................... 91
Order Edit Function Bar ............................................................................................. 92
Seat Order & Customer ............................................................................................. 94
Order Finalization Function ........................................................................................ 95
Settlement Screen ............................................................................................................ 96
Title Bar Section....................................................................................................... 97
Settlement Type Section ........................................................................................... 98
Cash ............................................................................................................ 98
Credit Card ................................................................................................... 98
Check .........................................................................................................100
Terminal Credit Card Input ............................................................................101
House Account .............................................................................................102
Gift Card .....................................................................................................103
Coupon .......................................................................................................103
Point ...........................................................................................................104
Debit Card ...................................................................................................105
Partial Payment Section ...........................................................................................106
Settlement Information Section ................................................................................107
Total Amount Tab .........................................................................................107
Order Detail or Order Sum Tab .......................................................................107
Member Search Section ...........................................................................................108
Other Functions ......................................................................................................108
Other Functions ...............................................................................................................109
Time Card ..............................................................................................................109
Cashier-In ..............................................................................................................110
Cashier-Out ............................................................................................................111
Pay-In....................................................................................................................112
Pay-Out .................................................................................................................113
Dine-In ..................................................................................................................113
Quick Serve ............................................................................................................114
Delivery .................................................................................................................114
Delivery List ...........................................................................................................114
Delivery Hold List ...............................................................................................114
Recall ...............................................................................................................115
Order List ..........................................................................................................116
Tip Adjustments .................................................................................................118
Gift Card ...........................................................................................................119
Safe Mode .........................................................................................................120
Cash Drawer......................................................................................................121
Data Initialization ...............................................................................................122
Cloud Service ....................................................................................................124
Help Desk .........................................................................................................127
Operation Management or Operations ...................................................................127
PART 3. POPs Operation ........................................................... 128
Opening Procedures .........................................................................................................129
Time Card ..............................................................................................................129
Cashier-In ..............................................................................................................133
Market Price Menu ...................................................................................................135
Order Procedures .............................................................................................................137
Menu Item Selection ................................................................................................137
General Menu ..............................................................................................137
iii
Combo Menu ...............................................................................................138
Weighable Menu ...........................................................................................140
Modifier Menu ..............................................................................................140
Qty .......................................................................................................................141
Pricing Change ........................................................................................................141
Void / Edit ..............................................................................................................141
Hold Time ..............................................................................................................143
Rush Order .............................................................................................................144
Hold Order .............................................................................................................145
Split ......................................................................................................................146
Combine ................................................................................................................148
New Check ........................................................................................................150
Last Receipt ......................................................................................................150
Order by Table Seat ............................................................................................151
Surcharge .........................................................................................................154
Maunal Surcharge ........................................................................................154
Auto Surcharge ............................................................................................155
Menu Search .....................................................................................................156
No Tax ..............................................................................................................157
Pager................................................................................................................158
Pager for Quick Server ..................................................................................158
Pager for Dine-In .........................................................................................159
Dine-In ...........................................................................................................................161
Menu Item Selection ................................................................................................161
Move / Join .............................................................................................................161
Link Table ...............................................................................................................162
Serving ..................................................................................................................164
Clear Table .............................................................................................................164
Tender ...................................................................................................................165
Quick Serve ............................................................................................................165
Cash Drawer ...........................................................................................................165
Refund ...................................................................................................................166
Reservation .......................................................................................................166
Wait .................................................................................................................167
Delivery ..........................................................................................................................168
CID (Caller ID)........................................................................................................168
Registering Delivery.................................................................................................169
Delivery List ...........................................................................................................171
Delivery Hold List ....................................................................................................173
Order Settlement Procedures.............................................................................................176
Order Sheet Selection ..............................................................................................176
Settling at Main Screen .................................................................................176
Settling in Dine-In Basic Screen .....................................................................177
Settling in Dine-In Quick Settlement Screen ....................................................178
Settling from Order Screen ............................................................................179
Settling from Linked Table .............................................................................180
Selecting Tender Type ..............................................................................................181
Discount ................................................................................................................185
Item Discount ..............................................................................................185
Amount Due Discount ...................................................................................187
Manual Discount ...........................................................................................188
Gratuity .................................................................................................................190
Change Settlement ..........................................................................................................191
Void .......................................................................................................................191
Refund ...................................................................................................................194
Change Payment Method ..........................................................................................197
Reprint...................................................................................................................200
Hostess Procedures ..........................................................................................................201
Reservations ...........................................................................................................201
New Reservation ..........................................................................................203
Modifying Reservations .................................................................................207
Check-In .....................................................................................................208
iv
Canceling and Deleting Reservation ................................................................210
Wait ......................................................................................................................210
Registering to Wait List .................................................................................212
Call and Check-In .........................................................................................212
Customer Procedures .......................................................................................................213
Membership Registration & Search ............................................................................213
Opening House Account ...........................................................................................213
Adding Initial Point to New Member ...........................................................................214
House Account Settlement........................................................................................215
Point Settlement .....................................................................................................216
Gift Card Procedures ........................................................................................................218
Selecting Gift Card Processors ..................................................................................218
1)
In-house .....................................................................................................218
2)
Merchant Warehouse (MW) ............................................................................219
Gift Card Issuance (In-house Only) ...........................................................................220
Gift Card Search (In-house Only) ..............................................................................222
Using Gift Card .......................................................................................................223
Gift Card Recharge (In-house Only) ...........................................................................224
Gift Card Disposal (In-house Only) ............................................................................225
Gift Card Re-activate (In-house Only) ........................................................................225
Closing Procedures ...........................................................................................................227
Cashier-Out ............................................................................................................227
End-of-Day .............................................................................................................230
PART 4. Operation Management............................................... 231
Settings ..........................................................................................................................232
Store .....................................................................................................................232
Store (information).......................................................................................233
Store Operations ..........................................................................................234
Tax Definition...............................................................................................234
Print Options ...............................................................................................234
Language ....................................................................................................235
User Defined Language .................................................................................236
Surcharge ...................................................................................................237
Gratuity ......................................................................................................238
Business Hours ............................................................................................240
Cash Drawer Information ..............................................................................241
Membership Accumulation Ratio .....................................................................242
Payroll Calculation ........................................................................................242
User Defined Format .....................................................................................245
Update Server Setting...................................................................................245
Backup Settings ...........................................................................................247
Backup Restore ............................................................................................248
Data Initialization .........................................................................................249
Cloud Service ..............................................................................................250
POS .......................................................................................................................251
POS Info .....................................................................................................252
Printer ........................................................................................................254
Customer Display (CDP) ................................................................................255
Dual Display ................................................................................................257
MSR (Card Reader) .......................................................................................260
Pager ..........................................................................................................261
Caller ID (CID) .............................................................................................261
Weighing Scale ............................................................................................262
POS Setting .................................................................................................263
Screen Design ........................................................................................................264
Order Screen ...............................................................................................265
Table Screen ................................................................................................273
Function Button Screen .................................................................................278
Menu Font & Color ........................................................................................280
v
Table Design Setting .....................................................................................281
System Codes .........................................................................................................283
Card Type ....................................................................................................284
Credit Card Company ....................................................................................285
Gift Card Company .......................................................................................293
Cash Unit ....................................................................................................293
Discount .....................................................................................................294
Kitchen Memo Group ....................................................................................296
Kitchen Memo ..............................................................................................297
Kitchen Printer .............................................................................................300
Tare ............................................................................................................303
Cash Drawer ................................................................................................305
Occupation ..................................................................................................306
Email Server ................................................................................................307
Security .................................................................................................................308
Security Level ..............................................................................................309
Security Roles ..............................................................................................309
Assigning Roles To Level ................................................................................311
Assigning Roles To Employee .........................................................................312
Menu ..............................................................................................................................313
Menu Category .......................................................................................................314
Menu Registration ...................................................................................................315
Inventory Category .................................................................................................317
Inventory Item .......................................................................................................318
Recipe Builder .........................................................................................................320
Combo Menu ..........................................................................................................321
Pricing Controls .......................................................................................................326
Market Price Menu ...................................................................................................327
Modifier Configuration ..............................................................................................327
Modifier Group ................................................................................................327
Modifier Additional Item ...................................................................................328
Modifier Item ..................................................................................................329
Register Modifier Item......................................................................................329
Apply Modifier To Menu ....................................................................................330
Employee ........................................................................................................................333
Job Group ..............................................................................................................334
Employee Registration .............................................................................................335
Employee Pay .........................................................................................................336
Employee Schedule .................................................................................................337
Payroll ...................................................................................................................338
Holiday ..................................................................................................................341
Customer ........................................................................................................................342
Membership Group Management ...............................................................................343
Membership Management.........................................................................................344
Membership Point History .........................................................................................346
House Account Tender .............................................................................................348
House Account History .............................................................................................349
E-Mail Sender .........................................................................................................350
Vendor Group .........................................................................................................351
Vendor Manager ......................................................................................................352
Management ...................................................................................................................353
Training Mode .........................................................................................................354
Announcement ........................................................................................................356
Gift Card Search .....................................................................................................357
Menu Search ..........................................................................................................358
Employee Clock In/Out ............................................................................................358
Hold Time List .........................................................................................................360
Inventory Manager ..................................................................................................360
Beginning Inventory ................................................................................................361
Purchase Order Policy ..............................................................................................363
Make Purchase Order ..........................................................................................364
Sales Report ....................................................................................................................367
vi
Sales Total..............................................................................................................367
Simple Sales Total ...................................................................................................368
Cashier-Out Report ..................................................................................................368
Cancelled Order History ...........................................................................................368
Daily Cashout Report ...............................................................................................368
Sales / Gratuity by Employee ....................................................................................368
Sales Report by Employee ........................................................................................369
Sales Report by Server ............................................................................................369
Sales Report for the Day ..........................................................................................369
Sales by Hours ..................................................................................................369
Sales Volume by Item Type .................................................................................369
Sales Volume by Account Type .............................................................................370
Top Sales Item Report ........................................................................................370
Sales Report by Card Types .................................................................................370
Cash-In/Out Report ............................................................................................370
Cash Drawer Open History ..................................................................................370
Sales Report By Customer ...................................................................................371
Profit/Loss Report ..............................................................................................371
Delivery Report ..................................................................................................371
Detail Sales Report .............................................................................................371
Inventory Count .................................................................................................371
PART 5. Print Format ............................................................... 372
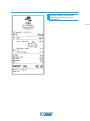
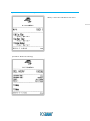
Receipt Format........................................................................................................373
Customer Order Format ...........................................................................................374
Kitchen Order Format ..............................................................................................377
PART 6. System Maintenance ................................................... 379
Database Backup & Restore ......................................................................................380
PART 7. Questions & Answers .................................................. 383
vii
Copyright © POSBANK Co., Ltd. All Rights Reserved.
Specifications and information contained in this manual are furnished for informational use only,
and are subject to change at any time without notice.
We make no warranty of any kind with regard to this material, including, but not limited to, the
implied warranties of merchantability and fitness for a particular purpose. We shall not be liable
for errors contained herein or for incidental or consequential damages in connection with the
furnishing, performance, or use of this material.
This document contains proprietary information that is protected by copyright. All rights are
reserved. No part of this document may be photocopied, reproduced, or translated to another
language without the prior written consent of the manufacturer.
POSBANK is a registered trademark of POSBANK Co., Ltd. in the United States and other
countries.
* Other names and brands may be claimed as the property of others.
Copyright© POSBANK Co., Ltd. All rights reserved.
viii
POPSBANK User’s Manual Revision History
The following section provides information for any updates to the software and documentation.
Version
Description
V 1.0
New
10/15/2013
V 2.0.4.006
Modify
10/17/2013
V 2.0.4.007
Modify
11/12/2013
V 2.0.4.008
Add some business logic about data synchronization in Cloud
services.
Improve printer registration on the Printer Setting Screen
when adding a kitchen printer.
Improve the backup feature of an end-user specifies the
path for a backup file.
Add a feature to display total number of orders and total
amount due for unpaid orders in Order List Screen.
Add a feature to change serving types in Order List Screen,
for instance, changing from Dine-In order to Quick Serve,
and vice versa.
Add a feature to search an order by scanning a barcode on
the order sheet in Order List Screen.
Enlarge the clickable area for check boxes.
Date
12/09/2013
Add a feature to drag-and-drop menu groups even to other
pages.
Add a feature to print out an instant table or page number in
V 2.1.0.000
V 2.1.0.001
Order Screen.
Improve the feature to print out a menu which has submenus.
Add a feature to print out receipts for Even Split.
Improve date format to be set automatically based on the
country settings in the system.
Improve the feature of Customer Display.
Add the last order time to the dining table.
Add delivery report.
Add profit/loss report.
Add a feature that can customize company’s logo.
Add card processors: Precidia and WorldPay.
Upgrade POSLink, the card processing module of PAX.
Fix the “Batch Close” problem in NETePay.
Optimize credit card payment system.
Improve Terminal Input Tender screen.
Improve the user interface (UI).
Improve the Operation Management area.
Improve the printing feature; supporting multilingual prints,
easily setting up for printing store’s logo, etc.
Improve Cloud project.
Update the activation module.
Add and update languages.
Add the features of Complimentary, Staff Meal, and Half
Meal orders.
Add a feature to print out House Account orders.
04/07/2014
06/16/2014
ix
V 2.1.0.002
Add a feature to view submenus in a certain report.
Add reports of transactions of VOID, RETURN, and CANCEL.
Improve Tare in the tender section.
Change the term “Sub Menu” to “Combo Menu”.
Add a feature to duplicate the level of combo menu.
Fix a bug in Pager, and improve its function.
Fix a bug in Caller ID (CID).
Fix a bug in ordering items sold by weight.
Add a feature to send the order screen to the second display.
Include gratuity for splitting orders.
Improve Cashier-Out report.
Improve displaying or printing two-byte languages like Asian
characters.
Show a message ten days before the demo version is
expired.
Add the server (waiter or waitress) report.
Add “Paid Amount” and “Change Cash” lines in Reprint
sheets
Add the reports of Dine-In, Delivery, Take-In, and Take-Out.
Add Menu Search in Combo Menu Configuration.
Show images for Combo Menu items.
Move the item “Select an employee for gratuity pay” from
Dine-In and Quick Serve tab to Common tab in Store
Operations
Improve the “Terminal Credit Card Input” screen.
Add the receipt number to Detail Sales Report.
Add the date to the barcode number.
Make “Quick Settlement” and “Table Search” optional.
Print customers’ name on order sheets.
Print card tips on the printouts.
x
07/14/2014
Preface
This User's Guide gives information about basic setup of ‘POPs Restaurant solution’.
Intended Audience
The User's Guide is intended for technically qualified personnel.
audiences.
It is not intended for general
xi
END-USER LICENSE AGREEMENT (EULA)
END-USER LICENSE AGREEMENT (EULA) FOR POPs FOR
RESTAURANT
AND POPs FOR RETAIL POINT OF SALE SOFTWARE (REV-02PEL)
IMPORTANT! PLEASE READ THE TERMS AND CONDITIONS OF THIS LICENSE
AGREEMENT CAREFULLY BEFORE CONTINUING WITH THIS PROGRAM
PURCHASE AND/OR PROGRAM INSTALL: PBUS TECH, INC (DBA POSBANK USA)
End-User License Agreement ("EULA") is a legal agreement between “YOU” (either an
individual or a single entity licensee) and PBUS TECH, INC. for the PBUS TECH, INC.
software product(s) identified above which may include associated software components,
media, printed materials, and "online" or electronic documentation ("SOFTWARE
PRODUCT"). By installing, copying, or otherwise using the SOFTWARE PRODUCT, you
agree to be bound by the terms of this EULA. This license agreement represents the
entire agreement concerning the program between you and PBUS TECH, INC., (referred
to as "licenser"), and it supersedes any prior proposal, representation, or understanding
between the parties. If you do not agree in entirety to the terms of this EULA, do not
install or use the SOFTWARE PRODUCT.
The SOFTWARE PRODUCT is protected by United States of America copyright laws and
international copyright treaties, as well as other intellectual property laws and treaties.
The SOFTWARE PRODUCT is licensed, NOT SOLD.
NOW THEREFORE, in consideration of the mutual covenants, promises, and obligations
contained herein, and other good and valuable consideration, the receipt and sufficiency
of which the parties acknowledge, PBUS TECH, INC. and YOU hereby agree to the
following:
1. GRANT OF LICENSE
1) Installation and Use
PBUS TECH, INC. grants only you the right to install, register, activate and use a single
copy of the SOFTWARE PRODUCT on your computer in a specific location as registered in
the product registration, running a validly licensed copy of the operating system for
which the SOFTWARE PRODUCT was designed [e.g. Windows XP Pro, Windows 7 Pro,
POS Ready 7, POS Ready 2009]. Only you are authorized to use the SOFTWARE
PRODUCT. Any changes (after the date of original registration) to the original registration
information and/or physical location must be reported to PBUS TECH, INC immediately
and are subject to registration change fees set by PBUS TECH, INC, and such SOFTWARE
PRODUCT information change request(s) may be denied at the sole discretion of PBUS
TECH, INC.
2) Backup Copies.
You may also make copies of the SOFTWARE PRODUCT as may be necessary for backup
and archival purposes only.
(c) You are limited to four (4) license activations of the SOFTWARE PRODUCT if you are
the original licensee. And any exceptions to this policy must be approved by written
instrument direct from PBUS TECH at its own discretion.
2. DESCRIPTION OF OTHER RIGHTS AND LIMITATIONS
1) Maintenance of Copyright Notices.
xii
You must not remove or alter any copyright notices on any and all copies of the
SOFTWARE PRODUCT.
2) Distribution.
You may not distribute registered copies of the SOFTWARE PRODUCT to third parties.
Only evaluation versions available for download from PBUS TECH, INC. and approved
PBUS TECH, INC. authorized agent websites may be freely distributed.
3) Prohibition on Reverse Engineering, Decompilation, and Disassembly.
You may not reverse engineer, decompile, or disassemble the SOFTWARE PRODUCT,
except and only to the extent that such activity is expressly permitted by applicable law
notwithstanding this limitation.
4) Rental.
You may not rent, lease, or lend the SOFTWARE PRODUCT.
5) Software Transfer.
You can permanently transfer all of your SOFTWARE PRODUCT rights to another person
under this EULA, only if the following process occurs:
I. You no longer keep copies of the SOFTWARE PRODUCT.
II. You transfer all of the SOFTWARE PRODUCT components and parts thereof.
III. The person you transfer your SOFTWARE PRODUCT rights to must recognize
and be willing to comply with all of the terms of this EULA herein.
IV. You have correctly transferred your PRODUCT SOFTWARE rights under the
terms set by PBUS TECH, INC., and it is considered a “successful” license
transfer process by PBUS TECH, INC., including any re-licensing fees paid in
full, if applicable.
V. If the SOFTWARE PRODUCT is an update, any transfer of SOFTWARE
PRODUCT rights must also include your SOFTWARE PRODUCT rights for all
previous versions of the SOFTWARE PRODUCT if any should exist for you.
6) Support Services.
PBUS TECH, INC. may provide you with support services related to the SOFTWARE
PRODUCT ("Support Services"). Any supplemental software code provided to you as part
of the Support Services shall be considered part of the SOFTWARE PRODUCT and subject
to the terms and conditions of this EULA.
If this SOFTWARE PRODUCT was received by you “kitted” or pre-loaded onto another
hardware manufacturer's product, you are required to contact that manufacturer(s) for
support services first. Otherwise, PBUS TECH, INC. may provide you with support
services related to the SOFTWARE PRODUCT ("Support Services"). PBUS TECH, INC.
does not offer support for any other hardware/software products that are not
manufactured by PBUS TECH, INC. The provision and use of Support Services is
governed by the PBUS TECH, INC. policies and programs described in the SOFTWARE
PRODUCT user manual documentation in hard copy or on the PBUS TECH, INC. website.
Any supplemental software code provided to you as part of the Support Services shall
considered part of the SOFTWARE PRODUCT and subject to the terms and conditions of
this EULA. Support services purchased through an Annual Support Contract are not
transferrable if you transfer your software rights.
7) Compliance with Applicable Laws, Standards and Provisions.
Although PBUS TECH, INC. does its very best to ensure the SOFTWARE PRODUCT
complies with current applicable laws and standards, you are also responsible to
recognize and comply with all current applicable laws, including PCI-DSS/PA-DSS
compliance standards that ensure correct usage and maintenance of the SOFTWARE
xiii
PRODUCT for the public good. This provision shall also apply to any other third party
credit/debit card processing software integrated with the SOFTWARE PRODUCT and/or
the SOFTWARE PRODUCT’s built-in credit/debit card processing gateway module installed
and operated on your computer/computer network/site of registration for the purpose of
charging credit/debit cards for sales transactions. You agree to indemnify and hold
harmless PBUS TECH, INC., its shareholders, officers, and employees from and against
any claims, demands, liabilities, or expenses, including attorney’s fees and costs, for any
and all actions relating but not limited to PCI-DSS and PA-DSS computer
network/hardware/software implementation.
8) Network Security.
You agree to be solely responsible for maintaining your computer network security the
SOFTWARE PRODUCT is installed and operated on. You agree to indemnify and hold
harmless PBUS TECH, INC., its shareholders, officers, and employees from and against
any claims, demands, liabilities, or expenses, including attorney’s fees and costs, for all
actions relating but not limited to an unlawful data breach by a known or unknown third
party of the SOFTWARE PRODUCT and/or any of its optional components manufactured
by PBUS TECH, INC. that are installed on your computer network.
9) Return/Refund.
All SOFTWARE PRODUCT license purchases are final. PBUS TECH, INC., under no
circumstances, will not accept any returns, exchanges and/or refunds for the SOFTWARE
PRODUCT after it has been purchased by you. There will be no exceptions to this policy,
and PBUS TECH, INC. will strictly enforce this in order to prevent any possible
infringement of the SOFTWARE PRODUCT’s intellectual property rights.
3. TERMINATION
Without prejudice to any other rights, PBUS TECH, INC. may terminate this EULA in the
event you fail to comply with the terms and conditions set forth in this EULA.
I.
II.
III.
Upon termination, you agree to cease using the SOFTWARE PRODUCT. You
shall immediately remove and destroy any and all instances of the SOFTWARE
PRODUCT including any and all copies existing on hard disk or other storage
mediums and destroy any documentation relating to the SOFTWARE PRODUCT.
The termination of this EULA shall not extinguish any rights or obligations of
the parties relating to protection of CONFIDENTIAL INFORMATION.
If PBUS TECH, INC. ceases business operations, and no surviving entity own
the rights to the SOFTWARE PRODUCT, you may retain and continue to use the
SOFTWARE PRODUCT under the terms outlined in this EULA.
4. SOFTWARE PRODUCT UPDATES
The SOFTWARE PRODUCT version revisions, also known as an “update”, must be
supplied directly from PBUS TECH, INC or an authorized agent thereof. You must have an
existing, verifiable, licensed version of the SOFTWARE PRODUCT and a current
SOFTWARE PRODUCT support services agreement in order to receive a product update.
All terms and conditions of this EULA still apply to any and all SOFTWARE PRODUCT
update(s), unless otherwise specified by PBUS TECH, INC.
5. COPYRIGHT
All title, including but not limited to copyrights and trademarks, in and to the SOFTWARE
PRODUCT and any copies thereof are owned by PBUS TECH, INC. All title and intellectual
property rights in and to the content which may be accessed through use of the
SOFTWARE PRODUCT is the property of the respective content owner and is protected by
xiv
applicable United States of America copyright laws and/or other international intellectual
property laws and treaties. This EULA grants you no rights to use, modify or copy such
content. All rights not expressly granted are reserved by PBUS TECH, INC.
6. ACKNOWLEDGMENT OF PBUS TECH, INC. OWNERSHIP RIGHTS
You acknowledge that you obtain no ownership rights to the SOFTWARE PRODUCT. You
agree to take all reasonable steps to ensure that the provisions of this EULA are not
violated by you or by any other person(s) or entity under the control or in the service of
you.
7. EXPORT RESTRICTIONS
You agree that you will not intend to or will, directly or indirectly, export or transmit (i)
the SOFTWARE PRODUCT or (ii) any DEVELOPED SOFTWARE and/or DERIVATIVE WORKS
or service that uses the SOFTWARE PRODUCT, to any country to which such export or
transmission is restricted by any applicable United States of America. regulation or
statute, without the prior written consent, if required, of the Bureau of Export
Administration of the United States of America Department of Commerce, or such other
government entity as may have jurisdiction over such export or transmission.
8. GENERAL PROVISIONS
1) Applicable Law
This EULA shall be governed by and construed in accordance with the laws of the State
of California without giving effect to any choice or conflict of law provision (of that or any
other jurisdiction) that would cause the application of laws of any jurisdiction other than
the State of California. The courts of Los Angeles County, California, United States of
America, shall have exclusive jurisdiction over any claim, action or proceeding relating
directly or indirectly to this EULA. Should you have any questions concerning this EULA,
or if you desire to contact PBUS TECH, INC. for any reason, please call 1-310-808-9114
or email [email protected].
2) Mandatory Arbitration
All disputes between the parties arising out of or relating to this EULA, including to
interpret or enforce the terms herein, shall be settled solely on an individual basis by
binding arbitration in the State of California, Los Angeles County, United States of
America, before a single arbitrator pursuant to the Commercial Arbitration Rules of the
American Arbitration Association. The arbitrator may award any legal or equitable
remedy. The prevailing party shall be awarded its costs and expenses incurred in any
arbitration proceeding, including administrative expense. The courts of Los Angeles
County, California, United States of America, shall have jurisdiction over the arbitrating
parties and may enforce the arbitrator's award.
3) Class Action Waiver
Any proceedings to resolve all disputes between the parties arising out of or relating to
this EULA will be conducted solely on an individual basis. You and PBUS TECH, INC.
agree that no dispute or actions arising out of this EULA will be heard as a class action,
private attorney general action, or in any other proceeding in which either party acts or
proposes to act in a representative capacity. No arbitration or proceeding will be
combined with another without the prior written consent of all parties to all affected
arbitrations or proceedings.
4) Modification
This EULA may not be modified or amended except by written instrument explicitly of
PBUS TECH, INC. at its own discretion.
xv
5) Force Majeure
Neither party shall be deemed in default of this EULA to the extent that performance of
their obligations or attempts to cure any breach are delayed or prevented by reason of
any “Act of God”, such as fire, natural disaster, accident, act of government, shortages of
materials or supplies or any other cause beyond the control of such party ("Force
Majeure") provided that such party gives the other party written notice thereof promptly
and, in any event, within fifteen (15) days of discovery thereof and uses its best efforts
to remedy the delay. In the event of such Force Majeure, the time for performance or
remedy shall be extended for a period equal to the duration of the Force Majeure but not
in excess of three (3) months.
6) Entire Agreement
This EULA constitutes the sole and entire agreement of the parties with respect to the
subject matter hereof and supersedes any prior oral or written promises or agreements.
There are no promises, covenants or undertakings other than those expressly set forth in
this EULA.
7) No Waiver
The failure of either party to exercise any right or the waiver by either party of any
breach, shall not prevent a subsequent exercise of such right or be deemed a waiver of
any subsequent breach of the same of any other term of the EULA.
8) Equitable Remedies
The parties recognize that monetary damages may not be an adequate remedy for any
material breach of any obligation hereunder involving intellectual property,
CONFIDENTIAL INFORMATION or use of the SOFTWARE PRODUCT beyond the scope of
the license granted by this EULA. The parties therefore agree that in addition to any
other remedies available hereunder, by law or otherwise, each party shall be entitled to
an injunction against any such continued breach of such obligations.
9) References
In this EULA, clause headings are for convenience and shall not be used in its
interpretation, and unless the context indicates the contrary intention, any expression
which denotes the singular shall include the plural and vice versa; any gender includes
the other gender.
10) Severability
If any portion of this EULA is held to be illegal or unenforceable, such partial illegality or
unenforceability shall not affect the enforceability of the remainder of the EULA.
9. REPRESENTATIONS AND WARRANTIES
I.
PBUS TECH, INC. hereby warrants that all copyright(s), patents, trade secrets,
trademarks and other intellectual and property rights in the SOFTWARE
PRODUCT either are now and shall remain the valuable property of PBUS TECH,
INC. or has been granted sufficient rights to those claims in the SOFTWARE
PRODUCT as to afford PBUS TECH, INC. all necessary authority to execute this
agreement.
II.
PBUS TECH, INC. further warrants that the SOFTWARE PRODUCT does not and
will not infringe or misappropriate the intellectual property rights of any THIRD
PARTY.
III.
LIMITED WARRANTY: PBUS TECH, INC. warrants that the SOFTWARE PRODUCT
CD Media will operate without defect in material and workmanship with for a
xvi
period of thirty (30) days only from the date you physically receive it. To the
extent that implied warranties on the SOFTWARE PRODUCT are disclaimable,
they are disclaimed herein below. Some states and jurisdictions do not allow
disclaimers of or limitations on the duration of an implied warranty, so the above
limitation may not apply to you. To the extent implied warranties may not be
entirely disclaimed but implied warranty limitations are allowed by applicable
law, implied warranties on the SOFTWARE PRODUCT, if any, are limited to thirty
(30) days only. This warranty is void if failure of the SOFTWARE PRODUCT has
resulted from accident, abuse or misapplication. YOU ARE THE ONLY
BENEFICIARY OF THIS WARRANTY. YOU MAY NOT PASS THIS WARRANTY ON TO
OTHERS EVEN IF YOUR SOFTWARE PRODUCT RIGHTS HAVE BEEN APPROVED
AND TRANSFERRED TO ANOTHER PERSON(S) OR ENTITY UNDER THE TERMS OF
THIS EULA. Although PBUS TECH, INC. has tested the SOFTWARE PRODUCT
and reviewed the documentation, this PRODUCT is licensed "AS IS" and you
assume the entire risk as to its quality and performance.
NO OTHER WARRANTIES: TO THE MAXIMUM EXTENT PERMITTED BY APPLICABLE
LAW, PBUS TECH, INC. AND ITS SUPPLIERS DISCLAIM ALL OTHER WARRANTIES, EITHER
EXPRESSED OR IMPLIED, INCLUDING, BUT NOT LIMITED TO, IMPLIED WARRANTIES OF
MERCHANTABILITY AND FITNESS FOR A PARTICULAR PURPOSE, WITH REGARD TO THE
SOFTWARE PRODUCT.
NO LIABILITY FOR CONSEQUENTIAL DAMAGES: TO THE MAXIMUM EXTENT
PERMITTED BY APPLICABLE LAW, IN NO EVENT SHALL PBUS TECH, INC. OR ITS
SUPPLIERS BE LIABLE FOR ANY SPECIAL, INCIDENTAL, OR CONSEQUENTIAL DAMAGES
WHATSOEVER (INCLUDING, WITHOUT LIMITATION, DAMAGES FOR LOSS OF BUSINESS
PROFITS, BUSINESS INTERRUPTION, LOSS OF BUSINESS INFORMATION, OR ANY
OTHER PECUNIARY LOSS) ARISING OUT OF THE USE OF OR INABILITY TO USE THE
SOFTWARE PRODUCT, EVEN IF PBUS TECH, INC. HAS BEEN ADVISED OF THE
POSSIBILITY OF SUCH DAMAGES. IN ANY CASE, PBUS TECH, INC. ENTIRE LIABILITY
UNDER ANY PROVISION OF THIS EULA SHALL BE LIMITED TO TEN UNITED STATES OF
AMERICA DOLLARS (U.S.D. $10.00); PROVIDED, HOWEVER, IF YOU HAVE ENTERED
INTO A PBUS TECH, INC. SOFTWARE PRODUCT SUPPORT SERVICE AGREEMENT. PBUS
TECH, INC. ENTIRE LIABILITY REGARDING SUPPORT SERVICES SHALL BE GOVERNED BY
THE TERMS OF THAT AGREEMENT. BECAUSE SOME STATES AND JURISDICTIONS DO
NOT ALLOW EXCLUSION OR LIMITATION OF LIABILITY, THE ABOVE MAY NOT APPLY TO
YOU.
END OF AGREEMENT
xvii
Software Service License Agreement (SLA)
PBUS TECH, INC (dba POSBANK USA)
POPs for Restaurant Support Contract
Software Service License Agreement (REV.07)
IMPORTANT: PLEASE READ THIS SOFTWARE SERVICE LICENSE AGREEMENT (SLA)
TERMS AND CONDITIONS AS DEFINED HEREIN BEFORE PURCHASING A POPs FOR
RESTAURANT TECHNICAL SUPPORT UPGRADE. IT IS THE RESPONSIBILITY OF THE
PURCHASER TO KNOW THIS SLA’S DETAILS.
Product Covered
POSBANK USA will offer phone and online remote-in 24/7/365 technical support for the following
POSBANK USA software product:
POPs for Restaurant Software, United States of America (USA) Release ONLY, starting
at Version V.2.0.1.004 and all subsequent releases thereof, unless otherwise specified
by POSBANK USA.
Definition of “tech support” is all discussion of issues and an attempt to find a resolution relating
to problem(s) or error(s) with the POPs for Restaurant software, whether caused by the software
itself, the software’s End User or by the hardware the software is operated on; the POPs for
Restaurant support team will only provide hardware technical support for POSBANK branded
hardware.
Technical Support Contact
Anyone needing support for the POPs Restaurant software can contact POSBANK USA directly for
assistance:
Phone: 13108089114 or 18889981767
Email: [email protected]
Support Terms & Conditions
All licences of POPs for Restaurant software will receive 90 days FREE tech support starting from
the first day of software license registration. After the first 90 days has expired, POSBANK USA will
provide POPs for Restaurant support for a fee basis only. The End User customer can purchase
annually 1 (one) year of tech support for $250 USD per license/per machine. OR the End User
customer can purchase ‘per incident’ tech support for $80 USD per license/per machine. Please
refer to the following table for full tech support pricing details:
SUPPORT TYPE
COST (MSRP)
USES/CALLS
First 90 Days Standard
FREE
Unlimited
1 Year Tech Support
$250/Per License/Yearly*
Unlimited
Per Incident Support
$80/Per Incident/Per License
1 (One) Usage Allowed**
POSBANK USA does not guarantee that all POPs for Restaurant software issues that may arise can
be successfully resolved. For example, this can happen if there is a hardware/software
compatibility issue that POSBANK USA has no control over. In such instances, the End User
customer would need to contact the hardware vendor for resolution of the issue. POPs for
Restaurant tech support is provided on a ‘best effort’ basis and (in some cases) is prioritized
dependant on the severity of the issue reported. POSBANK USA does, however, ensure that all
requests for support will be addressed in a timely manner.
xviii
*PLEASE NOTE: THERE IS A CAP ON TOTAL DOLLAR AMOUNT PER SITE. IF AN END USER
CUSTOMER HAS OVER 4 LICENCES AT THE SAME SITE, THAT END USER CUSTOMER WILL ONLY BE
CHARGED FOR UP TO 4 LICENSES ($1000 USD) MAXIMUM MSRP.
**PLEASE NOTE: EVEN THOUGH 1 (ONE) USEAGE/INCIDENT IS ALLOWED, MORE THAN 1 (ONE)
PHONE CALL MAY BE REQUIRED BEFORE A RESOLUTION IS FOUND OR AS DEEMED NECESSARY
BY POSBANK USA SUPPORT TEAM.
Software Enhanced Releases with Current Support Contract Only
All POPs for Restaurant Software ‘bug fixes’ or ‘patches’ for a specific software version number will
always be at no cost. However, any major rewrites of the software that includes additional
functionality and features that allows for a new version, the End User customer will need to have a
current annual support contract after 12 (twelve) months from the first day of software
registration in order to obtain any future releases of POPs for Restaurant software that is deemed
by POSBANK USA to have additional features that are considered to greatly enhance the
operational functionality of the software. Purchasing a current annual support contract is the only
method to receive future enhanced version releases. Please refer to the following table for
software update specifics:
SOFTWARE UPDATE TYPE
WITHOUT A CURRENT
SUPPORT CONTRACT
WITH A CURRENT
SUPPORT CONTRACT
Software Patches
FREE (Always)
FREE (Always)
Software Enhanced Versions
FREE First 12 mos of Use
FREE
Required for Tech Support Access
It is imperative that any individual seeking POPs for Restaurant software support under the terms
of this support contract have a telephone next to the Point of Sale (POS) system for effective
telephone support. An active email account and high speed internet access is also required to
facilitate POSBANK USA’s ability to resolve any software issues expeditiously.
Hardware Supported
The following lists hardware types that are supported by the POPs for Restaurant software*:
ALL POSBANK USA Point of Sale (POS) hardware products.
Computer that has any one of the following operating systems: Windows POS Ready
2009TM, Windows POS Ready 7TM, Windows 7 ProTM, Windows XP ProTM.
Windows based computer that has a minimum of 2G RAM DDR3.
Windows based computer with an IntelTM Dual Core AtomTM 1.80GHz CPU minimum or
equivalent.
A USB, Serial (RS232), or Ethernet 3” 150mm/sec thermal receipt printer or impact receipt
printer that emulates the EpsonTM Printer Language (EPL ESC/POS).
Touchscreen monitor with a VGA type connection and appropriate Windows drivers.
POSBANK USB or Serial (RS232) 2 line VFD and LCD customer display.
Any RJ11 type interface cash drawer driven by an EpsonTM emulation printer.
Standard USB 3 track MSR.
Rear LCD or LED second display monitor with a VGA type connection.
*Please note that if a hardware failure (or suspected failure) is diagnosed and the hardware in
question is not POSBANK USA branded hardware, you will be asked to contact your hardware
vendor to rectify your problem and be instructed by the POSBANK POPs for Restaurant support
team to contact POSBANK POPs for Restaurant support again if need be after you have spoken
with your hardware vendor and resolved the hardware issue.
Promotional One (1) Hour of Free POPs for Restaurant Training*
POSBANK USA on occasion offers FREE one (1) hour software training via an online webinar and
phone for one (1) hour only. Anyone who has purchased the POPs for Restaurant software is
eligible for this promotion when offered by POSBANK USA. Standard End User customer cost for
xix
online training is $110 USD per hour. Training cost is for each hour, not for each person attending
the online training session. Please Note: The End User customer must have a high speed internet
connection in order to claim on this promotional offer when available. *Please contact POSBANK
USA and inquire if this special promotion is currently being offered.
What is Not Covered
The following lists (but is not necessarily limited to) what the POPs for Restaurant software Service
License Agreement (SLA) does not cover:
Ongoing Software Training (Please note: ongoing software training for a fee basis is
available and is not offered under the terms of this SLA. Please ask your POSBANK USA
salesperson for ongoing software training details and cost.)
Operating System (OS) corruption due to malicious software (i.e. virus, malware) or OS
file corruption due to improper use.
Operating System (OS) configuration and settings and OS support.
Network issues or any kind that are not related to or caused by POSBANK USA software or
hardware products.
Network security of any kind to include firewall, antivirus, etc.
All inclusive or in part POPs for Restaurant software setup, for example, creation of reports
customization, item and modifier lists and customization, GUI customization, etc.
Any other software program that is not manufactured by POSBANK USA or any of its
subsidiaries.
Possible data loss during the diagnosis phase. It is the responsibility of the End User
customer to backup all data before any attempt is made by the POPs for Restaurant
support team to diagnose or repair an error.
Questions or issues related to the operation of the POPs for Restaurant software on a non
MicrosoftTM/WindowsTM Operating System.
Support of hardware that does not meet the POPs for Restaurant minimum operational
hardware specifications.
Continual inability of the End User customer to operate the software to its full capacity.
Please refer to the POPs for Restaurant EULA for more details.
Non POSBANK USA branded hardware failures or incompatibility issues that causes
catastrophic failure or errors with the POPs for Restaurant software.
Credit card processing issues that are deemed by POSBANK USA to not be caused by the
POPs for Restaurant software credit card processing module. In such cases, the End User
customer will be instructed to contact their payment processor for issue resolution.
IMPORTANT DISCLAIMER:
POSBANK USA offers this software Service License Agreement (SLA) to the individual that
purchases this service “AS IS” and does not warrant that the information and product(s) provided
will be errorfree or will meet any or all customer needs. Any errors that are identified by clients of
POSBANK USA products(s) and accompanying documentation will then be evaluated by POSBANK
USA to determine whether the errors apply generally to the product(s) or product’s documentation
or are customer specific. Any errors that are peculiar to that specific customer will, at the option of
POSBANK USA, be dealt with by using one or several methods of correction: Software generated
related errors will be forwarded to POSBANK USA software engineers for investigation and remedy,
which could cause a delay with a specific issue resolution. In no event shall POSBANK USA be
liable for any loss, damage, or injury of any nature, due to the above, whether direct or
consequential in connection or resulting from the use of the POPs for Restaurant techical support
service as described herein. Online Support: This service is provided via the internet, and will only
be available to customers with a high speed internet service. POSBANK USA online support is an
interactive service and requires the cooperation of the End User customer. This service cannot
work if one or both parties are not available to initiate the online session. It is at the discretion of
POSBANK USA to determine what circumstances constitute an online support session. Any issue
which requires the evaluation of data or other information by POSBANK USA may not be supported
online (including, but not limited to; report data, report formats, missing data, etc.). POSBANK
USA is not responsible for internet connectivity problems or issues or connection problems or
issues caused by or related to the customer's computer security policies or security software.
POSBANK USA reserves the right to change the terms and conditions of the SLA herein at anytime,
without prior notice. Any issues, claims, torts or otherwise resulting from the terms and conditions
xx
of this SLA will refer to the terms and conditions as outlined in the POPs for Restaurant End User
License Agreement (EULA) for any formal grievances/actions claimed against POSBANK USA.
END of SLA.
ⓒPBUS TECH, INC, 2013
xxi
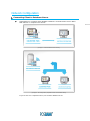
PART1. Getting Started / Chapter 1 ~ Chapter 5
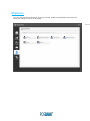
PART 1. Getting Started
Chapter
Chapter
Chapter
Chapter
Chapter
1.
2.
3.
4.
5.
POPs Installation
Windows Configuration
POS Hardware Configuration
POPs Software Configuration
Network Configuration
WHAT YOU WILL LEARN IN THIS
PART
In Part 1, we describe on how to install
POPs Restaurant.
POPs Installation
Steps to Getting Started
Recommended system requirements for POPs Restaurant
CPU with Intel 1GHz or above
512MB RAM (1GB or above is recommended)
5GB HDD(SSD) Space
Display with 1024 x 768 pixels
Windows XP or Later Version of Windows
Supporting Languages
English
Korean
Japanese
Chinese (Simplified)
Chinese (Traditional)
Deutsch
Spanish
Portuguese
Vietnamese
French
Russian
Arabic
English (United States)
한국어 (대한민국)
日本語 (日本)
中文(简体)
中文(繁體)
Deutsch (Deutschland)
españ ol (Españ a)
português (Portugal)
Tiếng Việt (Việt Nam)
français (France)
русский (Россия)
)السعودية العربية المملكة( العربية
2
Install and Start
NOTE:
Antivirus Software Interference
Before installing the POPs Restaurant application, you must disable any antivirus
scanning software on your machine. Antivirus scanning software may prevent the
installation package's custom actions from properly executing. For example, during
POPs Restaurant installation, Norton AntiVirus Auto-Protect warns that a potentially
dangerous script may execute during installation. The script must be able to run in
order to complete installation successfully.
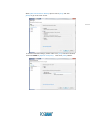
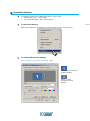
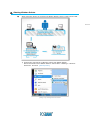
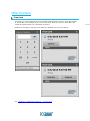
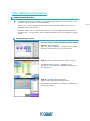
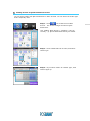
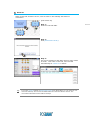
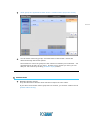
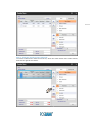
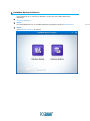
Step 1 : POPs Installation
NOTE: The following screens might be slightly different from your screens based
on Windows versions.
Run the POPs Setup file.
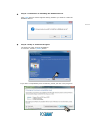
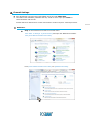
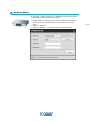
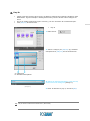
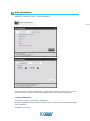
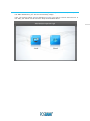
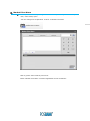
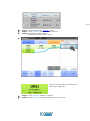
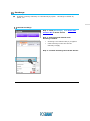
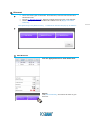
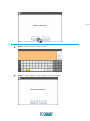
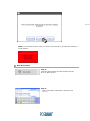
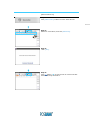
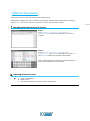
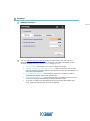
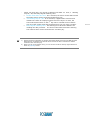
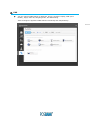
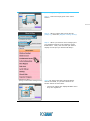
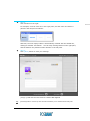
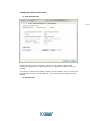
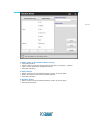
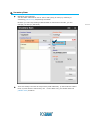
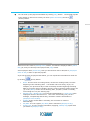
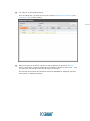
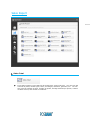
Step 2 : The installation process will start.
The InstallShield Wizard screen will appear. To continue, click the [Next] button.
3
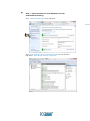
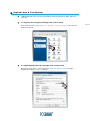
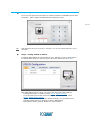
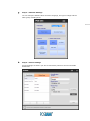
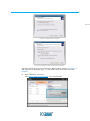
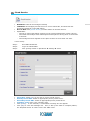
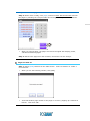
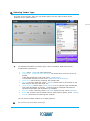
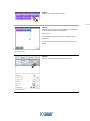
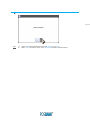
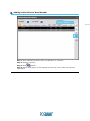
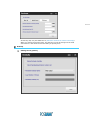
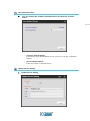
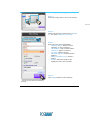
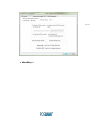
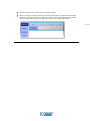
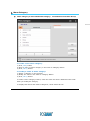
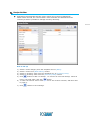
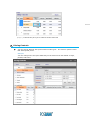
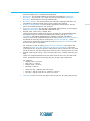
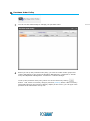
Step 3 : Software Usage License Agreement screen
The License Agreement screen will appear. Please carefully and slowly read over
the license agreement. If you wish to accept the terms in the license agreement,
select [I accept the terms in the license agreement], and then click the [Next]
button.
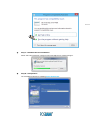
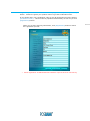
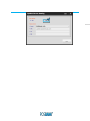
4
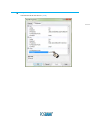
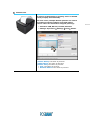
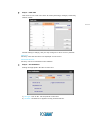
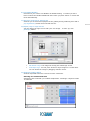
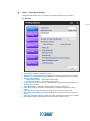
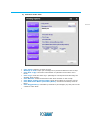
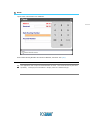
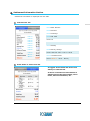
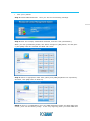
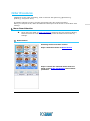
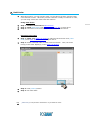
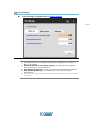
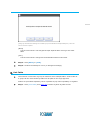
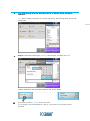
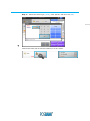
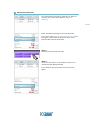
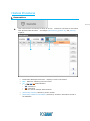
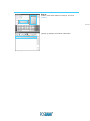
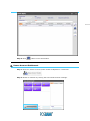
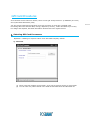
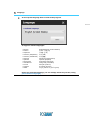
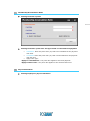
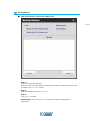
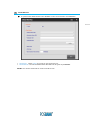
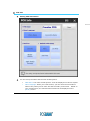
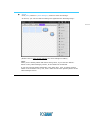
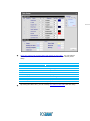
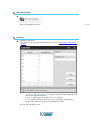
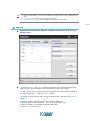
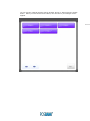
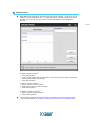
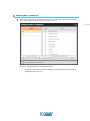
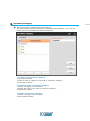
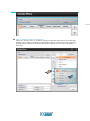
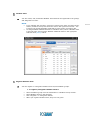
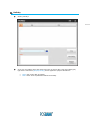
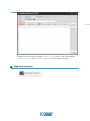
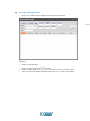
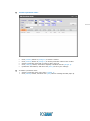
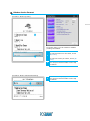
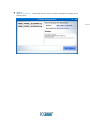
Step 4 : Select Database Option
If POS system needs to install a Database Server, select [SERVER]. If database
server is already installed within your network, select [CLIENT]. And then, click
the [Next] button.
Step 5 : Confirmation of Installing the Database Server
Click [YES] when a window appears asking whether you want to create the
Database Server.
5
Step 6 : Ready to Install the Program
The wizard is ready to begin installation.
To continue, click the [Install] button.
If you have a compatibility issue as follows, please just click “Run program”.
6
Step 7 : Database Server Installation
Please wait while Windows configures Microsoft SQL Server Desktop Engine.
Step 8 : Setup Status
The InstallShield Wizard is installing POPs Restaurant.
Step 9 : Complete
After the installation has completed, press the [Finish] button.
Congratulations! You have successfully installed POPs Restaurant.
7
Step 10 : Firewall Confirmation
If this station is the Database Server, Firewall setting needs to be changed to open
SQL Server port.
Registration
POPs Restaurant License Registration
Please contact your sales representative to obtain Product Key for your POPs
Restaurant software.
To have the Product Certified:
To start certifying the product, click [Certification] button.
Step 1 : Check “I Accept the Agreement”, and then click “Next”.
8
Step 2 : If you do not have Certification Code yet, please click [After Registration]
button. And then register your product online to get the Certification Code.
If you already have your certification code, fill out all the blanks except the field of
[Certification Code]. This field will be populated automatically as soon as you click
[Registration] button.
When you are done entering information, click [Registration] button to finish
the registration process.
* Initial registration of POPs Restaurant software requires internet connectivity.
9
Program Update
POPs supports update services for new or improved features.
Manual Update
Download a compressed update file from the website. Decompress the file
in the program’s installation folder.
Make sure to confirm the update file is newer than the software installed.
Ask your tech support team about the web address for downloading a
update file.
Auto Update
(1) Forced Update: Run “Update Manager” utility
Update regardless of current version of Pops Restaurant.
Run “Update Manager” from Start / Program / Restaurant POS / Update
Manager in Windows 7 or below. In Windows 8, search “Update Manager”
in App search
[ Attention ]
If you have an error as the following image, you need to register server
information. Server information is registered at [Operation Management --> Settings --> Store --> Update Server Setting].
NOTE: Run the application as the Administrator to register the server
information.
(2) Scheduled Update
Whenever POPs Restaurant starts to run, it will search Update Server for
newer version and compares to currently installed version to decide whether
to download and update.
If the currently installed Pops Restaurant is newer than update version, POPs
Restaurant does not proceed with update.
To set up for Auto Update, check the [Yes] button, and click [Save] at
[Operation Management --> Settings --> Store --> Update Server Setting]
10
11
Windows Configuration
Microsoft SQL Configuration
When the Client Station fails to connect to Database Server, use Microsoft SQL
Manager to change port settings.
Step 1 : POPs Install
Click [SQL Server Configuration Manager]
Step 2 : SQL Server Configuration Manager
Protocols for SQLEXPRESS -> Double Click [TCP/IP]
12
Step 3 : TCP/IP Information
Find and Set IP All TCP Port to [1433]
13
Step 4 : Restart the SQL Service
Select SQL Server(SQLEXPRESS), Click Restart service.
14
Firewall Settings
Pops Restaurant communicates with MSSQL Server through PORT:1433
The station with Database (Database Server) should be set to open port 1433 for
communications with clients.
Firewall will block attacks from viruses and malicious codes except for verified processes.
15
Windows 7
Step 1 : Run Windows Firewall from Control Panel
Click Start Settings [Control Panel] and open the Windows as follows.
Click [View Network Status and Tasks].
From [View Network Status and Tasks] run [Windows Firewall].
Step 2 : Check Firewall Use from Windows Firewall
(Inbound Rule Setting)
Click [Advanced Settings] at the left pane.
16
Click [Inbound Rules] from [Advanced Settings] at the left pane
and select [New Rules] from the right pane.
When [New Inbound Rule Wizard] opens. Check [Port] and click
[Next] to go to the next screen.
17
In Protocol and Ports stage, please make sure [TCP] has been checked,
and enter 1433 in [Specific local ports]. Then click [Next] Button.
In Action stage, accept the default values which is
[Allow the connection] checked, and click [Next] .
18
In Profile stage, accept the deault values and click [Next] button.
In Name Inbound Rule stage, enter “MSSQL” or any other name you
like in the Name field, and give some descriptions.
And then click [Finish] button to finish up this wizard.
19
Windows XP
Step 1 : Configuring Windows Firewall in Control Panel
To run Windows Firewall, double-click [Windows Firewall] at Start Settings
Control Panel Windows Firewall as follows:
20
Step 2 : Turning On Windows Firewall
Check [On (recommended)] on General Tab.
21
Step 3 : Setting Exceptions from Windows Firewall
Select [Exceptions] tab and click [Add Program] and [Add Port] to set up the
POPs program and the MSSQL port.
Step 4 : Adding Program
Click [Browse], find POPs Restaurant, and click [Open]. In [Add a Program]
window, click on POPs Restaurant, and click [OK] button.
22
Step 5 : Adding MSSQL Port
Click [Add Port], and type “sql” or any name you like in the Name field. Enter
“1433” in the Port number field. Click [OK].
Resolution Settings
The optimal resolution for POPs Restaurant is 1024 x 768.
Main Display (15”) : 1024 x 768
12” 2nd dual display : 800 x 600 or above
1) Resolution Setting
23
Right click blank space on desktop. Click properties from the context menu.
2) Changing Resolution Settings
Select [Settings] on [Display Properties] Tab
Adjust screen resolution
on Main Display
Adjust screen
resolution on 2nd
Display
Regional, Date & Time Settings,
POPs Restaurant uses values from Windows System Settings for Date and Time
formats.
1) Regional and Language Settings from Control Panel
From desktop screen, click [Start] [ Settings] [Control Panel], and open the
window as follows:
2) Adjusting Regional and Language from Control Panel
Select proper format for your region from [Regional Options Tab] or change
formats by clicking [Customize] button.
24
POS Hardware Configuration
POS Hardware can be configured according to store’s environments with various options.
This chapter covers efficient configurations of POS Hardware to help store operations.
In order to control POS station and peripherals efficiently, it’s better to set up devices
individually.
3
1
2
5
4
1.
2.
3.
4.
5.
POS Software (Software for Restaurant)
POS SYSTEM (Touch Monitor + Terminal)
Magnetic Stripe Reader(MSR), Smart Card Reader(SCR)
Cash Drawer
Receipt Printer
Others: Customer Display, 2nd Display(12.1” or 15”), and so on
25
Printers
Receipt Print
A POS peripheral for prining receipts:
Interface: USB, RS-232, Parallel support
Settings: Operation Settings POS Printer
[Printer Name] Give a Printer Name: could be any name
you like.
[Model Name] Select Printer Model you are going to use.
[Printer Port]
Port: Check this option for the printers that are
connected directly to this POS system through the
Parallel or Serial port.
[Port Setting] Click this button to set up a Serial
Port.
Network / USB: Check this option for the printers
that are shared and connected over network: USB
connection should use this option.
< Method 1 >
Network Path: \\Computer Name or IP
Address\ShareName
This method uses the serial printer driver.
< Method 2 >
Click [Search] button, and then select a printer from
the combo box.
This method uses the Windows printer driver.
26
Customer Order Print
A POS peripheral for printing customer’s order.
Interface: USB, RS-232, Parallel support
Settings: Operation Settings POS Printer
27
[Printer Name] The same as previous
[Model Name] The same as previous
[Printer Port] The same as previous
Port: The same as previous
Network Shared: The same as previous
입력합니다.
Kitchen Print
A printer in the kitchen for printing orders to handle
work promptly and efficiently.
In some cases, multiple kitchen printers are used in
accordance with the settings from POS station,
where orders are deliverd to assigned printer(s).
Interface: USB, RS-232, Parallel, Ethernet
Settings: Operation Settings POS Printer
[Printer Name] The same as previous
[Model Name] The same as previous
[Printer Port] The same as previous
Port: The same as previous
Network Shared: The same as previous
28
Label
A POS peripheral for printing labels or stickers
with barcodes.
Usage: printing product barcodes.
Various stickers or label can be printed.
Ex) A label for hot coffee with customer’s
name on it.
Interface: USB, RS-232, Parallel Support
Settings: Operation Settings POS
Printer
[Printer Name] The same as previous
[Model Name] The same as previous
[Printer Port] The same as previous
Port: The same as previous
Network Shared: The same as previous
[Port Setting] The same as previous
NOTE:
As of version 2.1.0.001, this feature is not implemented
yet.
29
Magnetic Stripe Reader (MSR)
A device for reading information stored in a magnetic stripes on
Credit Cards, Membership Cards, or Gift Cards
Usage: Reads information stored in magnetic cards.
Interface: USB, PS/2 Support
Settings: Operation Settings POS MSR(Card Reader)
30
Customer Display (CDP)
VFD or LCD type
Rear or Pole type: Intergrated / Stand Alone
It displays information of items or payment.
Usage: Displays Menu Information, Settlement Information
(Amount Due, Tender Type, Change, etc.)
Interface: RS-232 support
Settings: Operation Settings POS Customer Display
31
Dual Display
2nd Display or Dual Display
(15 inch or 12.1 inch or 10.1 inch supported)
It displays price information, or plays videos for store promotions,
special events, etc
Usage: Display Commercials, Videos, Menu Information, or
Settlement Information
Interface: USB and VGA
Settings: Operation Settings POS Customer Display
Select [Dual Display] from Customer Display Model.
Refresh Image Every: Image cycling period in seconds
Play List File: Click this button for further settings of images and
videos. (refer to Play List File setting)
Screen Option
- Resize on Order/Tender: Automatically resizes screen to
display Order and Settlement Information
- Fullscreen: Displays Preset Images and Videos in Full Screen.
- Display order details: Check [Yes] to show the information
when order is processed
Scroll Text
- Scroll Text: The text to be displayed and scrolled on the screen
- Font: Font Settings for the text
- Scroll Speed(Sec): Scrolling speed in seconds, scrolling from right
to left
- Location: Position of the text (Bottom/Top)
32
Play List File setting
33
You can play the whole images/videos identically, or play them in the
scheduled time creating “Play Box”.
Example 1: To play File List in all time
Step1. Select [All] in [Hour] section.
Step2. Click [ADD] button.
Then, “All.playlist” is created in Play Box.
Step3. After clicking “All.playlist”, add files by clicking “File Open” button.
The order of adding is the order of playing.
Step4. Click [Save] button to save the Play List File.
Example 2: To play File List in a certain period of time (ex: 18:00 ~ 18:59)
Step1. Select [18] in [Hour] section.
Step2. Click [ADD] button.
Then, “18.playlist” is created in Play Box.
Step3. After clicking “All.playlist”, add files by clicking “File Open” button.
The order of adding is the order of playing.
Step4. Click [Save] button to save the Play List File.
The same way will apply to different time frames.
To insure system stability, do not make a single large sized file, but make video in a series of
small files.
Caution
Cash Drawer Information
Cash Drawer
A peripheral for storing Cash, Card, etc.
Usage: During tender and settlement with cash or card, it opens
automatically in accordance with settings. You can set password
to open Cash Drawer.
Connection : Through POS printer with cash drawer port or
through direct connection with POS station
Settings: Operation Settings Store Cash Drawer
Information
34
Barcode Scanner
It reads barcode information
Usage: It reads Barcodes and recognizes item information
receipts that are returned.
It also reads Membership Cards, Gift Cards or Coupons.
Interface: PS/2 and USB
35
Weighing Scales
It measures weights of meat, fish, vegitables and send information
to POS Station. Some devices print labels.
Usage: Measure weights of items and send them to POS station,
where prices are decided with the value transferred from the
scale.
Interface : RS-232
Settings: Operation Settings POS Weighing Scale
36
Guest Pager
The Pager Transmitter calls employees or customers with Pagers.
The transmitter is connected to POS station to work with POPs
Restaurant.
Usage: Used for calling employees or customers who wait for a
service
Interface : RS-232
Settings: Operation Settings POS Pager
37
Caller ID (CID)
Caller ID transmits the caller’s phone number on the POS screen. It
is useful for taking delivery order.
Usage: The caller’s phone numbers are extracted from this device
Interface : RS-232
Settings: Operation Settings POS Caller ID
[CTI-XXX Default Baud rate: 19200bps]
38
POPs Software Configuration
For first time setup, users are recommended to set up information following the instructions
on the screen. You can also do settings later in [Operation Management].
Database Server Connection and Language Selection
Step 1 : POPs Run
Double-click POPs Restaurant Icon on the Desktop.
When you run the program right after installation, you will see the screen as
follows. For more information about this, please see “Login, Exit, & Main Screen”
section in Part 2 Basic Screen.
Step 2 : Database Server Connection and Lanuage Setting.
Select Database Server and Language, and click [OK].
39
40
Tip
-
Database Server
If the station that you are currently working on has a database, type “.”,
“localhost”, or the IP Address.
If database is on another station, you must enter IP address of the station that
has the database.
Language: Select your preferred language.
This is one-time setting for first running the program. You still can reset when server
information changes. (File Name: POSGlobal.ini)
Finding IP Address
Click [Start] [Run] and type cmd.exe, and then type ipconfig in the DOS prompt.
Step 3 : Login To Database Server
If you can see login screen as below, it means connection to Database Server was
successful. Enter “9999” the default demo password to login.
41
Tip
POPs Restaurant does not require ID or username. You can use numbers between 0 (zero)
and 9999.
Step 4 : Setting POS ID to Station
If multiple POS stations are deployed at a store, POS ID is given to each station
for identification purpose. Select a proper ID of your station and click [OK].
Each POS Station’s ID is unique: can not be the same with other stations.
- If single POS station is installed, select ID: 10, NAME: Counter.
- If you already have Counter and need a separate Order Station, select
ID: 11, NAME: Waiter Station
- If you have more stations than the default settings, you can add them at
Operation Management Settings POS POS Setting.
- Each station can be grouped. Please see Tip as follows:
Tip
POS Station Types
- Counter: Processes All functions including Order and Settlement processing.
- Waiter Station: Processes Table Order
- Table Assign Manager: Store Information (Reservation, Waiting, Table Allocation)
42
Store Information Settings
Basic Store Information settings. You can reset information in the Operation
Management.
Step 1 : Store Setting
Input Store Information. This information is printed on the receipts.
(Image 1. Receipt with Store Information)
Step 2 : Cash Unit
Cash Unit is to be used in the store for Money Exchange, Changes, Smart Pay,
Cashier In/Out.
43
Default setting is USD($), and you may change it to other currency formats.
Cash Unit:
Currency units and amounts to be displayed on the Screen.
Converted Amount:
Currency unit to be translated in the software.
Step 3 : Tax Definition
Setting the appropriate Tax Rate is done here.
1) Tax Type: Title of Tax. Can be printed on the Print
2) Tax Rate: Tax Rate to be applied. Zero(0) denotes No Tax.
Step 4 : Store Operations (Basic Option Settings)
Fill out Settings for POPs Restaurant.
44
< Common Tab >
1) Display Change after Tender
Select this option to display change screen after Tender.
2) Display Change Auto Progress Bar
Enter number of seconds to show change. It will show a progress bar as
below for that seconds and close itself.
Click
button to stop the progress bar.
45
3) Display Login Screen In
It locks the system, and displays the login screen when the idle time
reaches to the time you’ve set up.
4) Printing Kitchen Order when tendering from Order Screen
If it is checked, the kitchen order will be directly printed out.
If it is not, it will display a window like below, and prompt you to decide
whether you print the kitchen order or not.
5) Check customer before tendering
It check a customer’s information right before tendering.
6) Check Cashier-In when POPs program starts
It will remind you to do Cashier-In when the program starts.
7) Check Cashier-Out when POPs program exits.
It will remind you to do Cashier-Out when the program exits.
8) Check Time Card when POPs program starts.
It will remind you to do Clock-In/Out when the program starts.
9) Check Time Card when POPs program exits.
It will remind you to do Clock-In/Out when the program exits.
10) Use Default Modifier
Check this if you want to use Modifier as default setting. It means you don’t
have to select the Modifier Additional items when you place orders: it selects the
items automatically.
11) Select an employee for gratuity pay
It allows you to select an employee for the gratuity during tendering time and in
[Tip Adjustment] section from the Main Screen.
12) Display Logo on Login Screen
You can design the login screen with your own image. To set it up, click
[Settings] button.
Full Screen Logo: The image will occupy the whold logo screen.
Icon Style Logo: You can put a small icon style image on a certain area.
You can locate the image by dragging with the mouse.
13) Smart Pay Display Option
It shows expected amount to receive from the customers.
Showing Pre-setted Cash Unit:
It displays cash units that you created at Operation Settings System Codes
Cash Unit
46
Showing Estimated Amounts:
It displays amounts that are expected from the customers.
47
14) Order List Sort Option
In the [Order List] section, it displays customers’ orders by the order you set up
here.
15) Restrict Business by Schedule
You can restrict people to access to POS System based on your business hours.
Click [Day] button to setup daily schedule as follows:
48
16) Staff Meal
You can limit the prices for staff meal.
< Dine-In & Quick Serve Tab >
1) Display Manual Gratuity
Use this to input Tip using [Gratuity] button on Tender Screen.
2) Display Name of Person Ordering
It will pop up a screen for selecting a person who is ordering.
3) Display Name of Person Accepting Payment
It displays the names of employees, so that you can select an employee who
accepts payments.
4) Input Quantity
It will ask you to enter quantity of Menu Item to order.
5) Input # of Guest When Ordering (Dine-In only)
It will ask you to enter the number of guests when you place orders.
6) Use Auto Clear Table (Dine-In only)
If you check this option, the tables will be cleaned up automatically when the
payments are made.
To clean up the table manually that was already tendered, please click the
empty table. Then, it will be cleaned up.
When an image was pre-assigned to the table, an image (yellow circle and
blue arrow) will be added to the table after tendering. This image will
disappear when you click on the table, which means the table was cleaned
up.
If no image was pre-assigned, then the table will be turned out yellow by
default when payments are made. You can change the color at Operations
Settings Screen Design Table Design.
49
Table With Image
Table Without
Image
7) Use Quick Settlement
It makes “Quick Settlement” button visible or invisible in Table Screen.
8) Use Table Search
It makes “Table Search” button visible or invisible in Table Screen.
9) Use Take-Out & Eat-In in Quick Serve (Quick Serve only)
Take-Out & Eat-In are printed on Kitchen Printer and Receipt Printer.
By doing so, orders are decided to be packaged (Take Out), or not (Eat-In)
Step 5 : POS Info Settings
You can setup the default values for Menu Language, the type of usage and the
table group of POS system.
50
Step 6 : Printer Settings
Printer Settings are where you can set and select printers to be used for POPs
Restaurant.
*) Printer Types for POPs Restaurant
Receipt: Prints Final Receipt
Customer Order Print: Print Customers Order. Usually utilizes a Receipt
Printer.
Kitchen Print: Print Menu Items to be processed in the Kitchen.
Multiple Kitchen Printers could be selected.
Label Print: Used in Kitchen to print identification Label for the Orders ready for
service, delivery, or packing.
[Image 1]
Kitchen
Printers
Layout
POS system set as Counter POS can only print Customer Order Sheet and Receipt.
Waiter Station (POS) is only allowed to execute order and print customer orders.
Multiple Kitchen Printers are to be installed for a larger size kitchen, where you can
receive orders by multiple printers.
51
Step 7 : Print Option Settings
This option allows the user to customize the printer that was set in STEP 6.
1) Receipt
52
Copy Count: Number of copies to print
Message to Print: Input your message to be printed at bottom of the receipt.
Number of Credit Card Receipt: Number of credit card receipt to be printed.
Receipt Print Option:
o After Final Tender: Prints after final Tender
o After Each Tender: Prints after each Tender
Print Logo: Prints the store logo: (NVimage for serial ports and JPG image for
windlws’ print drivers).
Print Receipt No: Hides the receipt number from the printouts.
Print Sum of Qty: Prints the total number of quantities of the same menu
items.
Print Barcode: Prints the barcode of the check number on the receipt.
Print Multi-Menu Name (Secondary Name): Prints the secondary name of
Menu.
Print Card Holder’s Name: Prints the credit card holder’s name on the receipt.
Print Menu Items: Tells whether menu items are printed or not.
2) Customer Order Print
53
Copy Count: Number of copies to print
Message to Print: Input your message to be printed at bottom of the receipt
Print Sum of Qty: Prints the total number of quantities of the same menu
items.
Print Logo: Prints the store logo: (NVimage for serial ports and JPG image for
windlws’ print drivers).
Print Barcode: Prints the barcode of the check number on the receipt.
Print When Joining/Moving Table: Prints when tables are moved or joined.
Print Multi-Menu Name (Secondary Name): Prints the secondary name of
Menu.
Print Suggested Tip: Calculate Tip amount in percentages (%) and print on the
customer order sheet.
3) Kitchen Order Print
54
Copy Count: Number of copies to print
Print Kitchen Memo:
o By Order: Prints by orders.
o By Item: Prints by items.
Print Check No:
o Top: Prints a check number on the top.
o Bottom: Prints a check number on the bottom.
Print Customer Info: Prints customer’s information.
Print Logo: Prints the store logo: (NVimage for serial ports and JPG image for
windlws’ print drivers).
Print Sum of Qty: Prints the total number of quantities of the same menu
items.
Print In Red When Rush or Void: Not all printers are supported for this.
Show Number of Guests: Prints number of guests.
Print Multi-Menu Name (Kitchen Alias): Prints Kitchen Alias.
Print When Joining/Moving Table: Prints when tables are moved or joined.
4) Waiting List Tag
You can print out messages to the “Waiting List Tag”.
55
5) Logo Settings
You can design and print your own logo.
56
6) Font Size
57
[Default] button: It restores the default values.
: Increase the size.
: Decrease the size.
7) Other Settings
58
Print Gratuity Report after Cashier-Out Report: Prints out information of
gratuities when you do Cashier-Out at the end of day.
Print Discount Report after Cashier Out Report: Prints out discount
information when you do Cashier-Out at the end of day.
Print Item Sales: Prints sales information on items when you do Cashier-Out at
the end of day.
Auto-Print Pay-In/Out Receipt: It prints when doing Pay-In/Out.
Auto-Print Clock In/Out Receipt: Employee’s time report is printed on the
receipt.
Step 8 : Cash Drawer Information
You can control opening cash drawer by setting password.
59
Auto-open for Card Processing: Opens cash drawer when a card payment is
processed.
Auto-open for Check Processing: Opens cash drawer when a check
payment is processed.
Step 9 : MSR (Card Reader )
Settings for reading information on Payment Cards, Gift Cards, and Membership
Cards with magnetic stripes.
Enter values provided by MSR manufacturer. Please verify the setting information
from www.easyset.org for further information on string settings.
Step 10 : Customer Display
There are two types of Customer Display.
-
1) VFD 2L x 20C EPSON Emulate
2) LCD Display (1024 x 768)
POPs Restaurant CDP Settings
-
It displays price information, plays video for store promotions, or special events,
etc.
Usage: Displays Commercial, Video, Menu Information or Settlement Information
Interface: USB and VGA
Settings: Operation Settings POS Customer Display
Cf. POS Hardware Configuration
60
61
Step 11 : Update Server Settings
You need to setup Update Server so that you can update the program periodically,
running UpdateManager utility.
62
Network Configuration
Connecting Client to Database Server
A POS station or computer with database installed is considered the Server. Other
POS stations or computers are clients.
63
[Image 1. Counter POS is set as Server]
[Image 2. At a large store, separate server runs at back office]
If you do not run a separate server, use Counter POS as server.
Server Settings
Please install database. See “PART 1 - Chapter 1. Getting Installation – 2. Install and
Start“ “Step4. Database Server Install”.
64
POPs Settings
Set as below. See “PART 1 - Chapter 4. POPs Sofeware Configuration – 1. Database
Server “ “Step2. Database Server Connection and Language Selection”.
For Database Server type “localhost”, “.” , or IP Address of the Server.
Client Settings
Select as below. See “PART 1 - Chapter 1. Getting Installation – 2. Install and Start
“ “Step4. Database Server Install”.
65
POPs Settings
If you have a separate server, set as below.
See “PART 1 - Chapter 4. POPs Sofeware Configuration – 1. Database Server “
“Step2. Database Server Connection and Language Selection.”
Type IP address of the database server.
Sharing Kitchen Printer
When a Kitchen Printer is connected to Waiter Station, share it with Counter POS
66
1) Confirm the connectivity of Kitchen printer with Waiter Station
Add a Local Printer from Waiter Station. Select Start Settings Printers
and Faxes and click [Add a printer].
[Image 2-1] Running Printer and Faxes
67
[Image 2-2] Adding Local Printer at Waiter Station
[Image 2-3] Selecting Port
[Image 2-4] Selecting Printer Driver Given by Manufacturer
2)
3)
Test printing Kitchen Printer from the Waiter Station
Share the Kitchen Printer at Waiter Station as follows.
Right click on the Kitchen Printer and select [Sharing…].
Type share name and click [OK].
Keep the Share name on a note or remember .
68
[Image 4-1] Sharing Local Printer
[Image 4-2] Inputting Share Name of the Printer
4)
Add the network printer to Counter POS.
69
[Image 5-1] Adding Network Printer
[Image 2] Specifying a Printer By Browsing or Manual
The above screen shows correct setting for Waiter Station with IP 192.168.0.101,
and separated by backslash sign, “\”, with Share name of the Kitchen Printer:
EASYSET.
5)
After installation, test print.
Input Printer Settings information from Counter POS.
Local Security Settings
If you receive error messages and shared resource is not accessible from the
clients, change local security settings.
Error Message
70
1) Click Start Settings [Control Panel]- [Administrative Tool].
2) Click [Local Security Policy].
3) Click [Local Policies – User Rights Assignment] and double click [Deny access
to this computer from the network].
71
4) Select [Guest] and click [Remove].
5) Confirm [Guest] is removed.
PART2. Basic Screen / Chapter 1 ~ Chapter 5
72
PART 2. Basic Screen
Chapter
Chapter
Chapter
Chapter
Chapter
1.
2.
3.
4.
5.
Login & Main Screen
Dine In Screen
Order Screen
Settlement Screen
Other Functions
WHAT YOU WILL LEARN IN THIS
PART
Understanding of POPs Basic Screen
Login, Exit, & Main Screen
Login
When you run the POPs Restaurant program, the login window pops up. Enter
the password assigned by administrator. The password could be any number or
numbers between 0 (zero) and 9999.
[Image1]
Login
You can change logo on the login screen:
A) Agent logo: ask administrator.
B) Merchant Logo: open to the public.
A
B
Tip
Password for Demo is “9999” .
To simplify the procedures, we do not use ID or Username: only use password to
authenticate. The passwords must be unique.
Please refer to Employee Registration.
73
There are two types for operating POPs Restaurant: Local and Cloud.
[Local]: The database will be resided in the local POS station.
[Cloud]: It synchronizes data between the database in the Cloud and the local
database.
You can select the operation type from the following window:
Exit
When you click [Exit Program] on the main screen, the [Exit Program] window
pops-up as follows:
[Return To Windows]: closes the POPs application, and returns to Windows.
[Shutdown Windows]: turns off the system.
[X] mark: returns to the POPs application.
74
Main Screen
2
1
75
3
3
[Figure 2] Main screen
Main screen consists of up to 19 Functionality Buttons.
1) POS Name (Identifying name for the POS station), User (Name of the current
logged-in User), and Date and Time (Date and Time)
2) Expiration Date : Demo version expires on this date.
3) Announcement : Notice to users
: This button toggles between the full and normal size of screen.
Tip
1)
2)
3)
4)
19 Buttons are subject to change or removal according to the user’s preference.
Choose 4 Main Buttons.
See Chapter21. Setting 2.Basic Management C. Button Display Setting. For customizing
Function buttons.
You can view the User’s Manual in PDF file by pressing F1 key in the main screen. If there’s
no Adobe Reader installed on you system, you need to install it first.
Main Screen Function Buttons
Icon
Name
Description
Time Card
Check Employee Clock-In & Out as well as
Breaks
Cashier-In
Cashier checks in with initial deposit to cash
drawer.
Cashier-Out
Cashier closes operations (Shift Change or
End of the Day)
Pay-In
When money is added to to Cash Drawer
without transaction from POS station.
Pay-Out
When money is withdrawn from Cash
Drawer without transaction from POS
station
Dine-In
When you take order from Table.
Quick Serve
Service for payment in advance like TakeOut or Eat-In
Delivery
When your restaurant makes deliveries
Delivery List
Manage and Monitor delivery orders
Delivery Hold List
Hold Phone Call for delivery and take order
from this list
Recall
Change Settlement Information or Cancel
the Completed and Settled Orders.
Tender
Settle the Order
Tip Adjustments
Add Tip after Credit Card Processing
Gift Card
Issue and Sell Gift Card.
Safe Mode
Screen Protection Mode.
Cash Drawer
Opens Cash Drawer.
Cloud Service
Web Service to support analyzing statistical
data for the sales online
Help Desk
Remote connection service to troubleshoot
POS system
Operations
Settings and analysis tools for POS
Operation.
Page
Chapter10
76
Dine-In Screen
Basic Screen
This screen is to handle orders and services for Tables.
2
1
77
3
[Figure 3] Dine-In screen
Switch screens for Basic, Quick Settlement, Table Information
Quick Settlement: Switch screen to show table order info and facilitate settlement
Table Information: Switch to screen for customer allocation to Table
[Main], [1st Floor]… : Name the table group by floor or location. (Default Table
sections and settings are provided)
ex) Floor 1, Jason, Table Group1, Room 1
Simulate the selected Table section to real table location.
(You can design and customize table floor) resolution : 724 x 644
Dine-In Basic Screen Function
Icon
Name
Description
Move/Join
Move or Join Customers to another table.
Link Table
For Groups, linking multiple tables works like a
single table.
Tender
Receive payment for the Order at the table.
Quick Serve
From Dine In switch to Quick Serve
Serving
Show status of order served to the Table
Check Out
It reminds that checks have been given to
customers.
Cash Drawer
Open Cash drawer
Refund
Void completed transaction and give money
transaction back.
Reservation
Function to manage reservations for customers.
Wait
Create and Manage customer wait list.
Pre-AUTH
Pre-Authoriztion of Credit Card Settlement
Close
Finish Dine-In Operation
Reprint
Reprint Order. Click this Icon First → Select
Table
Page
Dine-In is composed of twelve functions you can customize with functions that you need for your store.
78
Quick Settlement Screen
From Dine-In Screen, Click
settlement on the same screen.
icon to show order status of the table and expedite
2
1
79
[Screen That Shows Table M-9 Selected in Dine-In Screen]
Toggle Icon
to return to Dine-In Screen.
Quick Info Section: Shows the order status of the selected table. From this screen,
click Tables to directly input order from this screen.
Quick Tender Types: You can directly receive payment without switching to
settlement screen.
Dine-In Quick Settlement Functions
Icon
Name
Description
Cash
Payment to be made in Cash ($)
Credit Card
Payment to be made by Credit Card.
Credit Card is present.
Check
Payment to be made by Check
Gift Card
Payment to be made by valid Gift Card
Terminal Credit
Card Input
Payment to be made by Credit Card
number. Credit Card not present.
House Account
Payment made by the establishment to
be paid by customer later.
Page
80
Chapter9. Settlement
Screen 2.Settlement Type
Section
Table Information Screen
1
From Dine-In, click
icon. It will show table status and customer serving.
81
[Dine-In Screen, M-9 Table]
: If you click this icon in Dine-In screen, it shows table information so that can
help guide customers.
This option finds tables that meet customer’s need with five function filters. If tables
are found, they blinks as shown [M-14] [M-15] above.
Select another table section to continue to search.
Dine-In Table Information Function
Icon
Name
Description
Total Guest
Shows total number of guests
Smoking
Tables allowed for smoking
Page
Windows
Tables by the windows
Booth
Tables with Booth
Room
The place of room
82
Table Design
Information displayed on Table
Customer and Order Information is displayed to serve
the customer better.
[Order Information on Table]
Dine-In Table Information Function
Text
Name
Description
M-2
Table Name
Name of Occupied Table
-
In Time
Time when customer ordered first.
-
Elapsed Time
Time passed after the first order.
Big Steamed
Dumpling
Menu Name
Ordered Menu Item
-
Order Employee
Employee received order
1
Total Guest
Number of customers at table
12.94
Amount
Order Total
-
Partial Payment
Partially paid amount
-
Last Order Time
Indicates the last order time on the
table
Memo
Tip
Order information shows according to setting at Table Options as follows.
83
Location : Operations Settings Screen Design Table Design
Tables Based on Status
Tables are visually differentiated in colors or shapes according to the status. The
followings are the default visibility.
[주문
(With Table)
전
]
(Without Table)
The table before ordering (empty)
- Table images are customizable
[
The reserved table
- Show Reservation Information
- Colors are selectable
The table after ordering
- Shows order information
- Waiting for serving
The serving completed table
- Prevents delaying service.
[계산 후
84
(With Table)
]
(Without Table)
The table after settlement
- The table is not cleared yet.
(With Table)
(Without Table)
The table after get cleared
- Ready to serve next customer
[주문
후]
The table after the check given to
customer
Reminds you that you gave checks
to customers
Colors are selectable
The table in the midst of
“Move/Join”
[주문
후]
The table in the midst of “Link
Table”
The reserved table that passed
the reserved time
Tip
You can select and assign colors using Color Management for certain purposes.
85
Order Screen
Both Dine-In and Quick Serve use this screen for entering orders.
2
8
1
3
4
86
5
7
Title Bar Section
Menu Group Section
Menu Section
Order List Section
Order Edit Function Bar
Seat Order & Customer
Order Finalization Function
Hot spot to send the order screen to the second display: double click to send it
back and forth.
6
Title Bar Section
Order Screen Title Bar
Image
87
Name
Description
Business Type
Dine-In or Quick Serve
Table Name
Table Name for Order
Check Number
Check number for Order.
Additional Order for the same
table will use the same check
number
Date
Current date
Kitchen Memo
Special note to the order can be
sent to Kitchen with the order
sheet.
Server
Server assigned to the Table
Guest
Number of Guests at the Table
Table/Pager
Number *
Table or pager number
Kitchen Order
Print
It is On/Off feature for printing
kitchen orders.
Memo
For Dine-In
For Dine-In
* Table/Pager Number
You can print an instant number on the order and kitchen print by clicking this icon.
When you click this icon, a number entry form pops up as follows:
[Table #] and [Pager #] are the buttons to
toggle each other. When you click it, it
toggles between [Table #] and [Pager #].
When you order by entering a number
here, this number will be printed on the
order and kitchen sheets.
Menu Group Section
Order Screen with Menu Group: Both Dine-In and Quick Serve use this screen.
88
1
Tip
When you click on a menu group, menu items that belong to the group will display in
the center pane.
A screen shows up to ten groups. If there are more than ten groups, they are
displayed in the next pages. You can navigate them with up and down arrow
button.
You can add, remove and customize menu groups.
Administrator can create and manage menu groups by pressing [F12] in the Order Screen
Menu Section
Menu Items are arranged and displayed for easy order processing.
89
1
The screen can display up to thirty (30) Menu items. Menu items over thirty will be
shown when you click the left and right arrow button ()
You can add, remove, and customize Menu items.
Photos or Images of Menu items are displayed by using Menu-Photo/Images.
You can select and assign color too.
< Out-of-Stock Menu >
90
When you set up a menu as out-of-stock, this menu will look like the image above. If
you click on the menu, you will see a message window with options you can select as
follows:
[ YES ]: You can make
the menu available again.
[ NO ]: still can order the
menu.
[ CANCEL ]: return to the
Order Screen.
Tip
Administrator can create and manage Menu items and their colors by pressing [F12] in the Order
Screen.
Order List Section
This section lists the ordered menu items with summation of amounts.
91
Selected Menu items are listed here.
Additional Order: Previous menus are in grey backgound, and new menus are in
white background.
If Menu items are too many to be shown, you can navigate them by clicking up
and down arrow button (ꜛꜜ).
Total amount of order is shown.
Order Edit Function Bar
Function buttons are customizable based on tasks such as Dine-In, Quick Serve, and
Delivery.
92
Order Edit Function Bar
Name
Description
Memo
Modifier
Customizes the Order by adding options to the
menu items.
Void/Edit
Cancels or changes the Order.
Split
Divides the orders into two or more separate
sheets.
Combine
Combines orders together
Hold Time
Holds Kitchen Order to be printed.
Dine-In Only
Hold Order
Holds current Order
Quick Serve
Only
Qty
Inputs quantities first before selecting Order
Discount
Performs Discounts.
Pricing Change
Changes prices for ordered menus.
New Check
Takes a new order.
Menu Search
Performs search on Menu items
Last Receipt
Reprints the last receipt
Surcharge
Adds surcharge
No Tax
No Tax on Order.
Rush Order
Sends Kitchen rush for urgent order processing
Pager
Calls Guest Pager.
Reprint Kitchen
Order
Prints kitchen orders again.
Page
93
Dine-In Only
Dine-In Only
Dine-In Only
Seat Order & Customer
Click
Seat Icon to process order by seat and get membership information.
94
This button toggles between the modes of searching customer and ordering by seats.
1
Click here to search and select member
Name: Member’s name
Date Visited: Date of the last visit
Count Visited: Number of visits
Point: Accumulated Memebership Points
Click here to process Order by Seat.
Order by Seat facilitate serving and payment by seat.
See Order by Seat at “PART3 – Chapter12. Orders Procedures – 12. Order by Table Seat”.
Order Finalization Function
Functions to finalize Order. (Payment)
95
Order Finalization Function
Name
Description
Cash
Tender by Cash
Credit Card
Tender by Card
Tender
Tender by other means. i.e. Check or House Account
Page
Finish Order.
On Quick Serve Order, you can accept payment right away.
On Dine-In Screen: Returns to Table Screen.
Order
On Quick Serve Screen: If order already exists, check is saved
as unsettled order. If order information does not exist, it searches
pending checks for settlement.
TIP: The difference between [Order] and [Hold Order] in Quick Serve is to whether the order
has been completed or not. [Order] completes the order, but contrarily [Hold Order] holds
the order and puts it in the waiting list: the order is not completed yet.
If a menu item has a barcode, just scan the barcode on the Order Screen to palce the order.
Then the item will be placed in the Order List Section.
Settlement Screen
This screen is to finalize the method of payment for the Order.
1
4
96
3
(1)
(2)
(3)
(4)
(5)
(6)
2
Title Bar Section
Settlement Type Section
Partial Payment Section
Settlement Information Section
Member Search Section
Other Functions
5
6
Title Bar Section
97
Screen Title Bar
Image
Name
Description
Table Name
Shows table name to make
payment.
Check Number
Check number
Clear Table
Option
Toggles ON/OFF for clearing
tables.
Receipt Print
Option
Toggles ON/OFF for printing
the receipts.
Memo
Dine-In Only
Dine-In Only
Settlement Type Section
There are nine tender types.
Cash
98
Label Description
Blance : Amount to receive
Received : Amount received
Smart Pay shows expected tender amount.
Change : Shows changes
Smart Pay Button
Smart Pay buttons at right side show expected tender amount from the Customer.
Tip
1)
Smart Pay buttons can be set up in “Cash Unit”.
See Operations Settings System Codes Cash Unit
2)
Cash Unit helps expedite cash count when you perform Cashier In/Out
Credit Card
There are two types of processing.
-
Swiping: Read card information from MSR or PIN Pad
Manual: Cashier inputs card information
99
Label Description
Balance: Amount to Receive
Received: Amount Received (going to be approved )
Card No: Credit Card Number
Expire Date: Expiration Date of the Card
Card Issuer: Card’s Issuing Company
Member: Customer Name on the card
Zip: Five Digit Postal Code
Street: Street of the Address
CVC: Card Verification Code
Tip
1)
2)
Based on the card companies, you are not required to fill out the blanks, even the card
number. In this case, just click “OK” button with the amount, and then swipe the card
on the terminal. If you like to know more about the card processing, please ask us.
When you input Card Number manually, you must input expiration date of the card.
CVC, ZIP, and Street are optional.
Check
Input Check information into database.
100
Enter Bank Routing Number and Account Number, and then click [OK].
Tip This application does not process authentification of check. This should be done by the Store
separately. Check payment information is simpley saved as a settlement type.
Terminal Credit Card Input
Terminal Credit Card Input is used when card payment is processed through a separate
terminal which is not integrated into the POS Station.
101
Verify the payment amount with the approved amount from the external card terminal.
For additional information, enter the last four digits of the credit card number and the
approval number from the terminal. Then select a proper Card types, and click [OK].
Tip
1) Processing payment at the external card terminal is not controlled by this program.
2) Payment information on this screen is simply saved as type of tender. Contact card
service company for setting this terminal.
House Account
102
Customers with membership are eligible for using House Account. Either swipe
Membership Card or click Customer Search and select the Customer and click [OK].
Tip
Label Description
Card No: Membership card number
Member Name: Member’s name
Contact Phone: Member’s phone number
Previous Balance: Remaining amount of House Account. It excludes the received
amount.
See Operations Customer “House Account Tender” or “House Account History”.
Gift Card
103
Label Description
Card No: Gift Card Identification Number
Expire Date: Gift Card Expiration Date
Remaining Balance: Gift Card’s remaining Value
Balance After Use: It excludes received amount
Tip Chapter 20. Gift Card Procedure
Coupon
Point
104
Label Description
Card No: Member’s ID number
This number is displayed on Order Screen and Tender Main Screen when the
member’s information is entered.
Either swipe membership card or click Customer Search and select the customer
Member Name: Member’s name
Contact Phone: Member’s phone number
Remaining Point: Member’s point remaining for use
Debit Card
105
Label Description
Balance: Amount to Receive
Received: Amount Received (going to be approved )
Card No: Debit Card Number
Expire Date: Expiration Date of the Card
Card Issuer: Card’s Issuing Company
Member: Customer Name on the card
Zip: Five Digit Postal Code
Street: Street of the Address
CVC: Card Verification Code
NOTE: Based on the card companies, you are not required to fill out the blanks, even the card
number. In this case, just click “OK” button with the amount, and then swipe the card on the
terminal. If you like to know more about the card processing, please ask us.
Partial Payment Section
Shows Settlement information.
106
Total Received shows settled amount.
You can cancel settled amount by clicking Cash Button above.
Settlement Information Section
Settlement information is displayed with two tabs.
Total Amount Tab
107
No.1 Order Amount
No.2 Discount
No.3 Surcharge
←No.1→
←No.2→
←No.3→
←No.4→
←No.5→
←No.6→
←No.7→
No.4 Sub Total
←No.8→
No.8 Delivery Charge
←No.9→
No.9 Total Due: No.6 + No.7 + No.8
←No.10→
No.5 Tax
No.6 Amount Due
No.7 Gratuity
No.10 Total Received
←No.11→
No.11 Balance: No.9 – No.10)
Order Detail or Order Sum Tab
It toggles Order Detail and Order Sum
when you click the tab.
It shows ordered menu information in
details such as the time elapsed, menu
items, amount summation, etc.
Member Search Section
Membership information can be searched and displayed here for both Dine-In and Quick
Serve.
108
You can search membership information by clicking on any space in the image above.
Other Functions
[ Even Amount Split ]: Splits amounts evenly so the same amount is to be paid by
each person
[ Gratuity ]: Can add tips.
[ Print ]: Prints check (order sheet), and change the status of the table as telling the
check has been delivered to the customer.
[ Close ]: Closes the screen.
Other Functions
Time Card
There are four types of employee time schedule management (Clock-In, Clock-Out, BreakIn, Break-Out). For example, if you clock in this time, then you will see “Clock-Out” and
“Break-In” buttons when you come back next time.
Employees’ checking in and out is the basis for deciding how much for payroll.
See Chapter 11. Opening Procedures – 1. Time Card
109
Cashier-In
Cashier enters initial cash drawer amount.
110
See Chapter 11. Opening Procedures – 2. Cashier In
Cashier-Out
Cashier enters money amount in cash drawer at closing time.
111
See Chapter 11. Closing Procedures – 1. Cashier Out
Pay-In
Casher uses this function when money is added to Cash Drawer without transaction from
POS station. A good example is adding small money into the drawer when changes are
short.
Pay-In is usually itemized by input. However, you can use Memo for unitemized input.
Click [Pay-In] in Main Screen.
112
Pay-In
1. Main Screen.
2. Select a category for [Pay-In] (A). Detailed
descriptions for [Pay-In] wil be shown below.
A
B
A. Categories 1
B. Itemized Descriptions
3. Select an itemized description. Then the top
of the screen will change as [Image C].
[Image C]
4. Enter an amount to pay in, and click [OK].
Tip Pay-In will be confirmed at Cashier-Out / End of Day
Pay-Out
Cashier uses this function when money is withdrawn from the Cash Drawer without
transaction from POS station. Good example is paying store expenses from the cash
drawer.
Pay-Out is usually itemized by input. However, you can select a single itemized
description for unitemized input.
Click [Pay-Out] Function Button
Pay-Out
1. Click.
2. Select a [Pay-Out] category. Detailed
descriptions for [Pay-Out] will be shown
below.
A
B
1
A. Pay-Out Categories
B. Itemized Decriptions in Pay-Out
Category
3. Select an itemized description. Then the
top of the screen will change as [Image C].
[Image C]
Dine-In
Dine-In orders are orders associated with a table and establishment receives payment
after serving.
Tables should be created and managed for Dine-In
113
To run, click [Dine-In] Function Button.
Quick Serve
114
Quick Serve is used when customer pay first for the order. It is not associated with
Tables.
Quick Serve uses 2 options:
1: Eat-In
2: Take-Out
To run, click [Quick Serve] Function Button.
Delivery
Detailed customer information is necessary for Delivery.
For Delivery service, select one of two functions as follows:
1: Delivery
2: Quick Serve
If a customer comes to pick up the order, use [Quick Serve]. Using the Caller ID will
maximize efficiency of this operation.
Customer information must be entered.
To run, click [Delivery] Function Button.
Delivery List
Delivery List monitors and manages registered delivery orders
Customer information must be entered
To run, click [Delivery List] Function Button
Delivery Hold List
When you receive a call during processing an order for delivery, put the call on hold and
have the customer wait. Later, you can find customer on wait from Delivery Hold List,
and start receiving orders:
Recall
Recalls the settled orders to change settlement information or cancel the settlement. It
has 4 functions as shown on 5.
It applies to settled order.
To run, click [Recall] Button
2
1
115
5
2
B
A
3
4
You can set a date for search. Use (A) [Search by Receipt] button, and start search by
receipt number.
Sort the result by (B) [Payment Information] or [Customer Information].
Menu information for the searched receipt
Settlement information for the searched receipt.
Five buttons perform proper functions as the name denotes
Recall Function
Name
Void
Refund
Change Payment
Reprint
Description
Void the settlement (entire order)
Refund the settled transaction, entirely or partially.
Change the tender type for the settled transaction.
Reprint the receipt.
Page
Chapter
Chapter
Chapter
Chapter
17
17
17
17
Order List
Tender is used for settlement.
Use it for unpaid orders.
To run, click [Tender] Function Button
1
2
4
3
116
5
Order List Title Bar:
It tells total number of orders and amount dues.
You can change serving types with this button,
changing Dine-In orders to Quick Serve, and vice
versa.
You can change the server’s name on the orders.
You can print orders to the kitchen.
Search unpaid orders by clicking [Check No], [Table Name], [Check No Search], or
[Customer Search]: [Check No] and [Table Name] sort the list by check number and table
name respectively. You can search an order by a check number using [Check No Search]
button.
Shows all pending orders. If the orders are more than the orders that the page can
accommodate, you can utilize the buttons to view the next page.
Shows detailed sale information of the orders.
You can narrow down the list to “My Order” or by order types: “All Type” shows all
transactions.
Click proper buttons: To edit, click the “Edit” button. To tender, click the ”Tender” button. To
exit the screen, click “Cancel” button.
Tip
1)
2)
You can use Server and Kitchen Memo at Title Bar.
You can scan a barcode on the order sheet to find an order.
117
Tip Adjustments
It is the function to adjust tips for the orders that were paid by a credit card.
Use this function for settled transactions with card payment. Transactions with “Terminal
Credit Card Input” are not applicable.
To run, click [Tip Adjustment] Function Button.
118
Gift Card
You can sell Gift Cards and accept them as a type of tender. It works like a prepaid card.
Processing Gift Card includes New, Charge, Disposal, Re-activate, Tender and Search.
For Charge and Disposal, Gift Card information should have been registered first.
To access, click [Gift Card] Function Button from the Main Screen.
119
See Chapter20. Gift Card Procedure.
Safe Mode
-
POS screen is protected in Safe Mode.
Safe Mode protects POS system by blocking access by unauthorized person. In this
mode a pre-defined images can be displayed on the screen for information or
commercial purposes.
To run, click [Safe Mode] Function Button.
To unlock Safe Mode, requires the user’s password.
Image Files Path : \Image\SafeMode\
120
Cash Drawer
Cash Drawer can be protected from randomly opening by setting a password.
After password setting, you need to enter to open cash drawer.
To run, click [Cash Drawer] Function Button.
121
Data Initialization
Operation Settings Store Data Initialization
122
It’s the feature to initialize the database. Some data is related to another data. In this
case, the check box will be checked automatically when you check the related data.
< Data Initialization >
[Purchase / Sales / Inventory / Payment]
All sales transactions will be deleted: the sales report, inventory and tendering information
will be initialized.
[Member / Vendor]
It deletes all the information of members (customers) and vendors. When you check this,
the first one, [Purchase / Sales / Inventory / Payment], will be checked at the same time.
[Sort / Item]
It initializes menu items on the Order Screen: it deletes all the registered items of Menu,
Modifier, and Inventory. When you check this, the first one, [Purchase / Sales / Inventory /
Payment], will be checked at the same time.
[Table]
It deletes all the tables and their layout information. When you check this, the first one,
[Purchase / Sales / Inventory / Payment], will be checked at the same time.
[Employee]
All employees will be deleted except the default account: the password is 9999 and ID
number is 100000. When you check this, all of the above will be checked at the same
time.
< Sales Data Deletion >
You can delete only the sales transactions within a period of time.
123
Cloud Service
Definition: Data can be managed remotely
Limitation: Should apply for this service to receive Cloud URL, and then this URL
should be registered on the POS station.
How to Run: Click [Cloud Service] Function button in the Main Screen.
Explanation:
- Can set up menu information remotely on the central management system (Server).
- Can search and analyze sales data anytime and anywhere as long as PC is connected
to internet.
- Can manage all stores together at one place if there are more than one store.
How to setup:
Step 1:
Step 2:
Run POPs Restaurant.
Login as administrator.
Step 3:
Click [Cloud] button in Operations Settings Store.
Cloud Use: Check [Yes] if you like to receive Cloud service.
Primary Server URL: Select an appropriate primary Cloud Server.
Secondary Server URL: Select an appropriate primary Cloud Server.
Company Code: Enter your company code.
Click [Verify]. In few seconds, a confirmation message box will appear.
Click [OK] to close this message box. Then, it fills up the field of “Company Name”,
the dropdown boxes of “Store Code” and “POS Code”.
124
Enter the time interval in minutes in the field of “Sync Daemon Time Interval”.
Click [Save] button.
Step 4: Restart POPs Restaurant. Then you will see the following message.
125
Step 5: Enter the Company Certification Password, and then click [Certification].
When you click [Certification] button, this button changes to [OK] button, and the [Stor
e] and [POS] fields are activated and filled with codes.
Step 6: Select an appropriate codes from [Store] and [POS] dropdown box respectively.
And then, click [OK] button to finish up.
NOTE: If there is no POSGlobal.ini file in the POPs Restaurant folder and start POPs Rest
aurant, you’ll see the following image. In the very beginning when you install POPs Res
taurant from the scratch, POSGlobal.ini is not generated yet. In this case, when you res
tart POPs Restaurant, you will see the following image.
Here, you need to select [Cloud] instead of [Local] if you like to receive Cloud service. A
fter that, just follow not all but some steps as described above.
126
Help Desk
Definition: It is for receiving a fast service when there happen troubles in the system.
Limitation: Should apply for this service to receive Help Desk URL, and then this URL
should be registered on the POS station.
How to Run: Click [Help Desk] Function Button in the Main Screen.
Operation Management or Operations
Configure all kinds of settings for system operations here.
Administrator use only
To run, click [Operation Management] in the Main Screen.
See: 4. Operation Management.
127
PART3. POPs Operation / Chapter 1 ~ Chapter 10
128
PART 3. POPs Operation
Chapter
Chapter
Chapter
Chapter
Chapter
Chapter
Chapter
Chapter
Chapter
Chapter
1. Opening Procedures
2. Order Procedures
3. Dine-In
4. Delivery
5. Order Settlement Procedures
6. Change Settlement
7. Hostess Procedures
8. Customer Procedures
9. Gift Card Procedures
10. Closing Procedures
WHAT YOU WILL LEARN IN THIS
PART
In part 3, you will learn about operations
based on tasks of POPs.
Opening Procedures
Store begins operations with two primary Functions: [Time Card] and [Cashier-In].
Time Card
There are four types of employee time schedule management (Clock-In, ClockOut, Break-In, Break-Out). These are toggled each other. For example, if you
clock in this time, then you will see “Clock-Out” and “Break-In” buttons when you
come back next time.
As employees’ checking time is the basis for deciding their payrolls, the additional
care should be given to correctness.
Four(4) Digit log-in password is required for each employee.
To run, click [Time Card] Function Button in the Main Screen.
Clock-In
Step1. Click [Time Card]
129
Step 2 : Enter password (Time Card begins to run)
130
Step 3 : Time and Employee’s name show up(POPs for example). Select Clock-In
to check in for the work.
Step 4 : Screenshot below, “Clock-In Successful”
131
Clock-Out and Break-In
Step 1 : If you run [Time Card] after Clock-In, you will choose Clock-Out or
Break-In. Choose Clock-Out for reporting out of work, or choose Break-In for
taking a break.
Break-Out
Step 1 : After Break-In, run [Time Card], and choose Break-Out. Your work time
begins to count.
132
Tip
Mistakes occurred during running [Time Card] will be adjusted by Administrator only.
Use Memo for detailed description on each In-and-out.
[Time Card] activities are printable.
Option: Auto-print Clock-In / Out Receipt
Cashier-In
Definition: Cashier puts initial money into cash drawer for operation.
Limitation: [Cashier-In] and [Cashier-Out] cannot run simultaneously
because they are mutually exclusive.
How To Run: Click [Cashier-In] Function Button in the Main Screen.
Doing Cashier-In:
Step 1 : Click [Cashier-In] in the Main Screen.
Step 2 : Select a cash tray.
Cashier can select his/her own cash tray.
133
Step 3 : Enter Beginning Balance
Enter quantity for each bill and coins. The total amount will be shown.
If you do not want to enter by bills or coins, input the amount into “Cash” field.
134
Tip
Cash Tray can be added or changed with other name.
After doing Cashier-In, pritner will generate a report.
Users with Casher-In option (permition) can only perform Cashier-In.
Market Price Menu
Market price reflects daily change of the Menu item price. If you have Market price
item, enter today’s price.
You can configure it at Operation Menu Market Price Menu
135
How to get the list of market price menu:
Check “Market Price Menu” on Menu Registration screen as follows:
136
Tip
1)
Prices are not set for Market Price Menu Items and Open Price Menu Item.
Market price menu: Set price when daily operation begins.
Open price menu: Set price at the point of sale.
Order Procedures
Chapter12 covers order processing, used in common with [Dine-In], [Quick Serve],
[Delivery], and [Drive-Thru].
It handles customer’s order in an easy and speedy way with various functions.
When you complete order, Order and Kitchen Printers print order sheets in accordance with
settings.
Menu Item Selection
Menu items are listed on Order List Section whenever they are selected. [Order]
button finalizes the order with order sheets printed at Kitchen and Counter by
settings.
General Menu
Selecting menu from Menu section
Step1. Click Menu items at Menu Section
Step2. Confirm the selected menu items are
listed on the Order List Section with ordered
quantities.
137
Combo Menu
If Menu items consist of combo menus, Combo Menu
window pops up to show selections accordingly.
Step1. Click a Menu item on Menu Section.
Step2. Combo Menu window is displayed.
(Select the pre-set combo menus.)
Sub Menu Structure with Three Levels
Three buttons with the magnifier show three levels for
selecting combo menus. When you select a combo
menu, the menu name will be displayed on the button
of the level.
Step3. Select “Stew” from the combo menus in
the first level.
Stew, the first selected combo menu displayed on 1st
Button and Order List Section.
Then the control moves to the next level (level 2)
automatically, displaying combo menu(s) of the level 2
at the right side.
Step4. Select “Green Coctail” from the combo
menus in the 2nd level.
“Green Cocktail” is displayed on 2nd Button or Level
and Order List Section.
Then the control moves to the next level (level 3)
automatically, displaying combo menu(s) of the
level 3 at the right side.
138
Step5. Select “Santa Fe Salad” from the
combo menus in the 3rd level.
“Santa Fe Salad” is displayed on 3rd Button and
Order List Section.
Step6. If you want to change a selected combo
menu, click on a button with the combo menu
name on it, and select a different combo menu
from right hand side.
Click [Finish] to finish your configuration.
[Delete Combo Menu]: deletes selected combo
menus
[Pricing Change]: change prices.
[Menu Search]: search menus for Combo which
have not been pre-configured.
Step7. Confirm Combo menus from the Order
List Section in Order Screen.
139
Weighable Menu
Menu items are priced by weight. It works with
weighable items.
Step1. Click a menu from Menu Section On the
Order Screen.
140
Step2. “Enter Weight” window appears.
Confirm the net weight, and click [OK] button.
When a scale is connected, net weight
is automatically displayed. Manual
input is also possible.
Step3. Confirm the weight displayed in Order
List Section.
Modifier Menu
Modifier Menu provides various options to the Menu
to meet Customer’s preferences.
Qty
If multiple menu items are selected, select [Qty] from Order Edit Function Bar .
In this mode, it works like a retail sale.
Step1 : Select [Qty] from Order Edit Function Bar, and enter the desired quantity.
Step2 : Click a menu from Menu Section.
Step3 : Confirm the quantity is displayed on Order List Section
Pricing Change
Can change the unit price of selected menu item.
Step1 : Click [Pricing Change] from Order Edit Function Bar .
Step2 : Select a menu item.
Step3 : Enter new price for the menu.
Step4 : Select another menu from Menu Select Window to continue to change
the price, or click [Done] to end [Pricing Change].
Step5 : Confirm the changed price in Order List Section.
Void / Edit
The ordered menu items can be cancelled or changed in quantities.
To start this feature, click [Void / Edit] from Order Edit Function Bar. Then
[Void/Edit] window will be shown as follows:
141
NOTE:
To cancel a menu, select a menu, and then click [Cancel Current
Selection] button.
To cancel all the order, just click [Cancel All] button.
To add quantities, select a menu, and then click [+] button.
To substract quantities, select a menu, and then click [-] button.
To save changes, click [Apply] button.
During taking orders but before pressing [Order] button, you can do both
cancelling and changing quantities in [Void/Edit] window. But, you can do ONLY
cancelling once you click the [Order] button on the Order Screen.
Even though you’ve completed the orders by pressing [Order] button, but if you
add new items to the completed orders, then you can still change quanities of
those new items if you didn’t press [Order] button yet.
TIPS:
You can directly type in quantities in the [Qty] column.
142
Hold Time
The orders are not delivered immediately to the kitchen, but held for the hold
time. For example, if customers order menus in advance and arrive thirty
minutes later, then you can set up Hold Time to thirty minutes. It means the
order sheets will be printed in thirty minutes.
Step 1 : Click [Hold Time] on Order Edit Function Bar.
Step 2 : Click a menu item on Menu Section.
Step 3 : [Enter Hold Time] window pops up.
Click desired time on the table, or enter exact hold time in minutes using
Numberic Key Pad. Then click [OK].
Step 4 : If necessary, you can change the time setting by clicking [Hold Time
List] at Operations Management Hold Time List
143
Rush Order
If urgent change or additional order is made, use [Rush Order]. The word,
“RUSH ORDER”, is printed in black background on Kitchen Order Sheet.
144
Tip
For printing in red, check “Print in Red When Rush or Void“ option. Not all the printers
support this.
Hold Order
With this function, you can hold the order you are taking currently, and then take
next customer’s order. When the previous customer is ready to continue to order,
you can bring out his/her order back and continue.
Doing Hold Order:
Step 1 : Click an menu item in Menu Section.
Step 2 : Click [Hold Order] from Order Edit Function Bar in Quick Serve.
Step 3 : The order is now on hold, and it reurns to the Order Screen.
Recalling Hold Order:
Step 1 : Make sure Order List Section is without ordered items. Click [Hold
Order] from Order Edit Function Bar in Quick Serve.
Step 2 : Select a desired order in Order Hold List window. Then, the menu
item(s) of the order display(s) in the Order List Section.
Step 3 : Click [Select] button.
Step 4 : Do other tasks.
Tip
[Held Order] is not printed to the Kitchen: It just holds the order.
145
Split
It splits an order into multiple order sheets. This is usefull when customers want to pay
individually.
1
2
146
3
Original Order:
The order to be splitted
Page Numbers for Splitted Order Sheets:
Splitted sheets go under the page numbers.
Split Buttons:
[Even Split] : It splits orders with the same amount of money.
[Seat Split] : It splits oders by seats when the orders were placed by seats.
[Item Split] : It splits the selected menu from the original order.
Ex) The below is an order sheet with three menu items ordered by seat
147
Step 1 : Click the table on order from Dine-In screen.
Step 2 : Click [Split] from Order Edit Function Bar in Order Screen.
Step 3 : [Split] window pops up.
Click items and click [Split]. The split order sheet appears to the right as seen
above. (Clicking “X” on the right top corner of the splitted receipt will return it to
the original receipt.)
If you take orders by seats, you can split them by seats. In this case, you can
click [Seat Split] instead of [Split].
Step 4 : Click [Save] button to save and finish splitting.
Combine
Merge orders into single order.
It is useful to merge multiple orders into a single order.
3
1
148
2
Search current orders and combine them.
Search & Sort Orders:
[Check No], [Table Name] : Search by order number / Table name.
[Check No Search]: Search by order number.
Search By Service Type:
My Order: Search by current logged-in user’s order
All Type: Search by all types.
Others : Search by Dine-In, Take-Out, and Delivery respectively.
Order Sheet details to be combined
Greyed out items in the list show that the order was previously processed.
New order will be added in white when you select order sheet from the left
pane.
Ex) The below table shows two menu items where another order sheet is to be
combined
149
Step 1 : Click the table from Dine-In screen.
Step 2 : Click [Combine] button from Order Screen.
Step 3 : [Combine] window pops up.
Click the order sheet (Table : M-14).
10011 is now merged into current order
sheet at the right pane.
Step 4 : Click [Combine] button to combine.
Step 5 : Click [Cancel] to discard changes and exit the screen.
New Check
This is a function for adding a new check to the same table: it’s like “pre-split”.
When customers want to place orders individually, checks are issued to each
customer. You can also take orders in one order sheet and split it later. If new
customers join the table, just click new check and create order when order is
placed.
Step 1 : Select a table from Dine-In.
Step 2 : Ordered items are displayed on Order List Section
Step 3 : Click [New Check] button on Order Edit Function Bar Bar.
Menu items on Order List Section are cleared and ready to create new
sheet for the order.
Step 4 : Procede the order as usaul.
When multiple orders exist in a table, the tables shows information as follows:
Last Receipt
Reprints the last receipt.
It reprints Customer Copy and Merchant Copy respectively.
To reprint the previous orders, you can do it by selecting Recall from the Main
Screen.
Click [Last Receipt] from Order Edit Function Bar.
150
Order by Table Seat
Click Seat icon to perform “Member Information search” and “Order by Seat”: it toggles.
Enhance serving by taking orders by seat in Dine-In.
151
There are three ways to select Seats:
Assign Seat with pre-defined number
-
-
Order by Seat from Pop up Window
When the table is created with information on number of seats ( ex. 5 Seat
Table)
When Number of
Guests are entered before ordering
(Example: Five guests are to be assigned to a table with four guests are predefined)
Click Seat as below.
Then click a seat and select menu for the seat.
Seat number is displayed.
The five-seat table with three guests will show five seats.
152
Settings for seat without number of guests
153
When you click the (+) seat (the middle button), seats will be added as the first
button below:
Click menus to process order for the seat.
Change the numbers of seats by clicking (+) and (-) button.
Surcharge
It applies surcharge manually or automatically by option. Surcharge is taxable by
option, too.
154
Maunal Surcharge
Step 1 : Click [Surcharge] from Order Edit
Function Bar in Order Screen
Step 2 : Select desired method from
Surcharge window.
Surcharge: Pre-defined rate(%) is applied
Cash Surcharge: Enter the amount
manually to apply
Step 3 : Confirm Surcharge from Order Screen
Auto Surcharge
Auto Surcharge is applied based on Option Settings.
155
1) Surcharge Settings are available from Operation Management Settings
Store Surcharge.
2) Minimum amount for Surcharge Exempt: No surcharge will be applied
when order value is over this amount.
3) Auto Surcharge Amount: Amount fixed here will be charged automatically.
4) Auto Surcharge Rate(%): A fixed rate(%) set here will be charged
automatically.
5) When auto surcharge amount set with both rate and amount, the rate(%) will
be applied.
Menu Search
If number of menu items increase and it is hard to find a menu in Menu Section on Order
Screen, then Menu Searh will help you to find menus fast and easy.
*) Menu Search default screen:
156
Click [Menu Search] in Order Edit Function Bar to access to the menu search
screen.
[Menu Search]
You can search by Menu Group or Menu Category.
1) Search by Scanning Barcode
Click or touch the text box, and scan the barcode of the menu.
2) Search by Typing Menu Name
While typing menu names in the text box, you will see the menus in the list box.
No Tax
This function nullifies the tax: it sets the tax to zero (0).
Click [No Tax] from Order Edit Function Bar at Order Screen. It toggles between
adding and removing tax.
157
< Before Clicking [No Tax] Button >
< After Clicking [No Tax] Button >
Pager
You can call Dine-In or Quick Server customers through the pager.
158
Pager for Quick Server
Step 1 : Process Customer Order as usual all the way to the tender.
When you see the following window, click “YES”.
Then POS sends an order number to the pager or receiver.
Step 2 : Deliver the pager to the customer.
Step 3 : When order is ready, click [Pager] button in Order Edit Function Bar and call
the pager by selecting the receipt number and clicking “Call Pager” button as follows.
159
When you call the pager, the pager will receive the signal with beeping sound,
vibration and blinking lights.
Step 4 : Retrieve the pager from the customer, and mount it on the charger.
Pager for Dine-In
Step 1 : Select [Wait] button from the Table Screen. Select a customer or create a
new customer.
When you see the following window, click [YES].
Then POS sends a page number to the pager or receiver, popping up a window as
follows. Then click “OK”.
160
Step 2 : Deliver the pager to the customer.
Step 3 : Select the waiting customer in [Waiting] window, and click [Pager] button.
When you call the pager, the pager will receive the signal with beeping sound,
vibration and blinking lights.
Step 4 : Invite the customer to the assigned table. Then withdraw the pager, and
mount it on the charger.
Dine-In
In Dine-In mode, it is to possible to perform Reservations, Table Managerment , Order Processing,
and Order Settlement.
Dine-In is comprised of 12 Functions. In this chapter, each function is described based on Dine-In
mode.
Menu Item Selection
Menu items are displayed in Order List Section when you select them for order. Then,
when you select Order Finalize Function, the order is concluded and Kitchen Order and
Customer Order are printed based on option settings.
Move / Join
This function is used when customers want to move to other table. Move/Join is one
function. If the destination table is empty it is Move, if not Join.
Step 1 : Click [Move/Join] function button on [Dine-In] table screen.
Step 2 : Click a table that already has an order.
(Table color changes when clicked)
Step 3 : Click the destination table.
Step 4 : A confirmation window appears as follows.
[Image 1] Window When Clicking Current Table (M-1) and Destination Empty Table(M-3): There is only
“Move” option.
161
162
[Image 2] Window When Clicking Current Table (M-1) and Destination Occupied Table(M-2): There are
“Move” and “Join” options.
[Move]
Current order sheet is not merged but kept separate after moving to the other
table
[Join]
Current order sheet is merged to the destination table’s order sheet.
Step 5 : Click [Move] or [Join].
Step 6 : Confirm the Table(M-2 or M-3) is changed accordingly.
Link Table
This function is used when a group of customers uses multiple tables. It links table as
a group. All the order sheets by tables can be paid as one single payment.
Orders are processed separately, but it is possible to pay either separately or together.
Step 1 : Click [Link Table] from [Dine-In] function at [Dine-In] table screen.
Step 2 : Select an occupied table to make it as a main table. Click [YES] from the
message window.
163
Step 3 : Select tables to link consecutively.
Step 4 : Click [Link Table] from [Dine-In] table screen once again.
Before [Link Table]
After [Link Table]
To run, click [Link Table], click the first Table( 2-12), and set it as Main Table.
Then, click Target Tables( 2-13 > 2-14 >).
Serving
[Serving] shows status by color whether the table is served with menu items. By
Table color you can tell whether the table’s order is being served or not. This is
good for finding tables not being served with their orders.
Step 1 : Click [Serving] from [Dine-In] function buttons on the table screen.
Step 2 : Click the table .
Tip
[Before Serving]
164
[After Serving]
The color for served table is customizable by user, and the time passed since the first roder
also can be displayed on the table by option settings.
Clear Table
Table Status: A table, of which payment is completed but the customers still
stays or the table is not cleaned after the customers left, is not ready to receive
new customers. [Clear Table] is the function to set a table to get ready for
receiving cutomers by changing the status of the table’s color and shape.
Step 1 : Click [Clear Table] from [Dine-In] function buttons on the table screen.
Step 2 : Click the table that you would like to clear.
[Before Clear]
Table With
Image
Tip
[After Clear]
Table Without
Image
1)
Auto Clear Table Setting: It clears tables automatically as soon as completing the
payment.
2)
When you receive payment, click
icon on Tender screen.
Tender
It enables to receive payment from [Dine-In] screen .
See “Chapter16. Order Settlement Procedure” .
165
Quick Serve
It enables to switch from Dine-In Screen to Quick Serve Screen
Cash Drawer
This is the function to open Cash Drawer without sale. It requires users to provide
password and reason by option settings. It also records attempts to open cash
drawer.
You many type in reasons to open the cash drawer.
Refund
This is the function to cancel payment partially or all. It does not delete paid
transactions but substract items from order sheets. Refunded transactions are not
recallable. Thus, “Void”, ”Refund”, and ”Change Payment Method” are no more
possible after refund.
See Chapter 17 Change Settlements”.
Reservation
This is the function exclusively for Dine-In. Customer can make a reservation
with specified table and time. It manages [Reservation], [Check-In], and
[Cancel] together.
See “Chapter 18 Hostess Procedure-1.Reservation”
166
Wait
This is the function to make customers wait for the seats. When tables become
available, the customers can be invited to the tables.
[Wait] function is similar to [Reservation], and uses common processes internally.
167
See “Chapter 18 Hostess Procedure-1.Reservation.
Delivery
This service is for receiving orders by phone. It uses customer information stored in the
database and enhance services. It also extracts phone numbers from CID (Caller ID), and
matches customer’s phone number stored in the database to expedite order processing.
CID (Caller ID)
168
If CID is connected to the POS station, [Delivery] window pops up when a customer
calls for an order.
A
A.
Last Orders
If the call does not show customer’s information, please enter it to store in the
database. Select either “Reservation”, “Delivery”, “Quick Serve” or set “Order”, “DineIn” or “Hold” as default.
You can search orders using “Recent Order History” to find the caller’s order details
and to find the customers favorite items.
Registering Delivery
POPs Restaurant has a separate Delivery screen to take order, but CID (Caller ID)
device will open Delivery window automatically.
If CID (Caller ID) is not connected, it is possible to take orders as follows.
Step 1 : Click [Delivery] from Main Screen.
If it’s not there, you can add it at Operations Settings Screen Design Function
Button Screen Main Screen tab.
Step 2 : Select meun items from Delivery Order screen.
Click [Order] button.
Step 3 : Click [Delivery] button from popped up window.
169
170
Step 4 : Enter necessary information such as phone numbers and delivery address.
A
A.
Last Orders
If the phone number already exists, delivery information will pop up automatically.
Step 5 : After information input, click [OK]. The order is now completed.
For delivery order status, See “ Delivery List” at the following section.
Delivery List
Delivery List is a function for monitoring delivery orders from registration to delivery
completion.
Delivery List manages [Before Start], [After Start], [Delivery Complete] with
[Departure], [Arrival], [Tender]. Please refer to the flow chart for this process:
171
Status
------------------------------------------------------------------------------------------Action
To access the Delivery List, click the “Deliver List” function button from the Main Screen.
(Deliver List Function Button)
Delivery List manages delivery order from registration to delivery completion. Delivery list has
[Delivery Status] Buttons and [Delivery Action] Buttons.
1
2
1) Delivery Status Buttons
Haven’t Left: Confirms delivery details before starting delivery.
On The Way: Confirms orders on the way to deliver.
Delivery Completed: Confirms orders delivered but not paid yet.
2) Delivery Action Buttons
Departure: Driver clicks this button before starting delivery.
It changes status from [Haven’t left] to [On Then Way].
Arrival: Driver clicks this button after completing delivery.
It changes status from [On The Way] to [Delivery Completed].
Tender: It processes payment after delivery.
After the tender, this delivery will be listed on the report - “Transaction
Completed”.
3) Other Buttons
Order Order + Address: Reprint order information and delivery address
Print Address: Reprint delivery address.
172
Delete: Delete order sheets.
Delivery Hold List
If phone call rings in while taking an order with Caller ID enabled, you put the call on
[Hold]. The on-hold call information is saved and retrieved for order reception.
173
When CID is idle, you can process order using delivery windows as follows:
174
If CID was being used for order processing, [Incoming Calls] window pops up and the
caller’s information is on [Hold] temporarily.
[Delivery Hold List] handles orders from [Hold].
A
B
A.
B.
Proceed: Activates [Hold] information and process the order.
Delete: Delete information on [Hold]
175
Order Settlement Procedures
Order Sheet Selection
In [Quick Serve] mode, it is easy to use settlement at Quick Serve order screen.
“D. Settling at Order Screen” described below.
See
In some case, orders from Quick Serve can be processed from Main Screen. See
Settlement from Main Screen”.
“A.
In Dine-In Mode, use “B. Dine In Basic Screen”, “C. Dine-In Quick Settlement Screen”
for settlement. You can either use “D. Settling at Order Screen” for changed or added
orders.
Settling at Main Screen
You can search orders and settle at Main Screen
Step 1 : Click [Tender].
(By your choice of settings, [Tender] can be hidden
from the main screen, or put in function list.)
Step 2 : Select a check, and click “Tender” button.
See [PART2 Basic Screen] – [Chapter10. Etc
Function] – [12. Tender] for detailed information on
Tender Screen.
Step 3 : [Tender] window pops up.
Select tender type and proceed payment.
See [PART2. Basic Screen] – [Chapter 9. Settlenemt
Screen] for details.
176
Settling in Dine-In Basic Screen
This is to Settle directly from Dine-In table screen.
Step1. Click the [Tender] function button, and
then select a table which is occupied.
([Tender] button might not be shown by setting your
preferences.)
Step2. When the [Tender] screen is shown,
select a tender type, and then proceed
payments.
See [PART2. Basic Screen] [Settlenemt Screen] for
details.
177
Settling in Dine-In Quick Settlement Screen
You can quickly settle with Quick Settlement in Dine-In Mode. You can select the tender type
that is frequently used.
Step 1 : Click
icon at the Dine-In Table
Screen. The screen changes to Dine-In Quick
Settlement.
See. [PART2. Basic Screen] – [Chapter 7. Dine In
Screen] – [2. Quick Settlement Screen] for details.
Step 2 : Click a table that has an order, and select
tender type.
Step 3 : If you select “Cash” as a tender type, cash
widnow pops up.
178
Settling from Order Screen
You can process orders and settlement at the same time in this sceen.
Step1 : Place orders as usual, and then select one of
the tender types.
179
Step2 : If you select “Credit Card” as a tender type,
Credit Card settlement window pops up.
Settling from Linked Table
There are additional ways of settling orders from the Table Screen.
From the Table Screen of the linked table group, you can accept tender all together for the
table group.
Step 1 : Select the main table of linked tables, and
then select a tender type.
Then, it will ask you whether you want to process the
checks all together.
Step 2 : If you have chosen to process as all
together, it will display order information for each
linked table as the image on the left side.
When you click [Combine & Tender] button, the
linked orders of each table will be combined together,
and then it displays the tendering screen that was
selected by you.
180
Selecting Tender Type
As of the current version, there are nine tender types, but only eight of them can be
displayed on the Tender Screen.
181
For detailed information on Tender types, refer to Chapter9. Settlement Screen –
2.Settlement Type Section .
Cash: Select [Cash] for Cash settlement.
Credit Card / Terminal Credit Card Input: For Credit Card, select one of two as
follows:
- If the POS authorizes credit card, select [Credit Card].
- If a separate terminal is used, select [Terminal Credit Card Input]
Debit Card: Select this for tendering with a debit card.
Check: If check is tendered, select [Check]: Please check if the amount on the
back check is the same with total due.
House Account: Please select [House Account] for a customer with membership,
who need adjustment of account. House Account is managed and settled in
separate functionality and the balance is verifiable.
Gift Card: If the customer present [Gift Card] sold previously, select [Gift Card.
Point: If a customer with memship wants to settle with his points, select [Point]
Coupon: Select this for tendering with coupons.
You can choose multiple tenders for a single payment.
Tip
You can remove an unnecessary tender type.
The following section decribes how to settle with multiple
tenders.
Ex ) “Steve” wants to pay $32.70: $10.00 with Check, $20.00 with Cash, $2.70 with
Credit Card.
182
Step 1 : Select the tender type, [Check], enter $10.00, and then click [OK].
Confirm that Check $10.00 and the balance $22.70 are shown.
Tip
If it remains in balance, [Tender] screen stays open.
In our example, the remaining balance is $22.70, so the tender screen waits for further
payments.
Step 2 : Select the tender type, [Cash], enter $20.00, and then click [OK].
183
Confirm that Cash $20.00 and the balance $2.70 are shown.
Step 3 : Select the tender type, [Credit Card], enter $2.70, and then click [OK].
184
Then the tender screen closes because there is no remaining balance to pay.
Discount
There are three types of discounts. Item Discount, Amount Due Discount and
Manual Discount
Except [C. Manual Discount], applying multiple discount types is not allowed.
Need to set up the standard of discount related to tax at [Apply Tax before
Discount].
Click [Discount] from [Order Screen]. A window for discount will pop up as follows:
Item Discount
You can apply discount on each menu item.
Step 1 :
Click [Item Discount], and choose an item to give
discount.
185
Step 2 :
Select a pre-setted discount rate.
186
Step 3 :
Background color for the discounted menu changes
to show that the discount is applied.
Click [Done].
A
It is possible to add other items to apply further
discounts.
If you want to cancel the discount, click the menu
again.
[P1] Discount 1
Step 4 :
You can see the discount applied from [P2].
[P2] Discount 2
Amount Due Discount
You can discount sub total or amount due. But this
discount can not be used together with [Item
Discount].
187
Order information displays to the left hand side.
If you have chosen [Apply Tax before Discount] from
tax option, [Sub Total] will be discounted. If not,
[Amount Due] will be discounted.
Step 1 :
Select a pre-setted discount rate.
Step 2 :
As seen in the picture, from subtotal of $10, $1 is
discounted and displayed as $9.
If you want to cancel the discount click the item
again.
Manual Discount
Manual Discount is applied to sub total or amount
due. Manual discount is also applicable together with
[Item Discount]
188
Order information is displayed on the picture.
If tax option is set to [Apply Tax before Discount],
[Sub Total] will be discounted. If not, the amount
due will be discounted.
Step 1 :
Enter $1, and click [OK].
Step2 :
Discounted amount is displayed at [Cash Discount]
box.
189
Gratuity
You can add charges to the amount due
Manual input is set as below. But you can use automatic input through Settings.
Order information is as follows:
Add 10% charge to [Amount Due] $11.
190
Step 1 :
Click [Gratuity].
Step 2 :
Enter 10.00, and click [%].
(It adds 10% of $11.)
Click [OK].
When click [Difference], changes on the received amount will be gratuity amount. If
received $20, $11 of [Amount Due] will be subtracted and balance of,
($20-$11) = $9 will be gratuity.
Change Settlement
As it describes, it is used when cashier makes a mistake or customer’s change of mind forces to
change the settled transaction by Recall function.
See: Chapter 10. Other Functions – 11. Recall
Void
191
Use this to cancel the paid order. It does not delete the order but create an offset
order. Once you void the order, it is not allowed to do “Void”, ”Refund”, or ”Change
Payment method” from Recall.
Step 1 : Select an order to be voided, and then click [Void] button.
Step 2 : Click [YES].
192
Step 3 : Enter a reason or note for Void.
Step 4 : Select whether to print voided order to the kitchen.
Step 5 : Void is completed. Click [OK] .
193
Tip
It performs Void, and creates an order with negative amount equivalent to offset the void amount.
Refund
This is the function to cancel payment partially or all. It does not delete paid
transaction but substract items from order sheets. Refunded transactions are not
recallable. Thus, “Void”, ”Refund”, and ”Change Payment method” are no more
possible after refund.
Step 1 : Select a menu item to refund, and click [Refund].
Step 2 : Click [YES].
194
Step 3 : Select a menu item for refund, enter a reason for Refund, and then click
[Finish] .
195
Step 4 : Screen switches to the settlement window.
Select proper payment method.
Step 5 : Refund is completed. Click [OK].
196
Tip
1)
2)
There is no significant difference between [Refund] and [Void]
While [Void] cancels the whole order, [Refund] cancels the individual items.
Change Payment Method
It changes tender types for the orders that were already settled out.
Step 1 : Select a receipt from the “Recall” screen, and click the [Change Payment
Method] button.
197
Step 2 : Click [YES].
Step 3 : If the order got paid by multiple tender types, you will see the screen as
follows. In this case, select a payment that you want to change the payment type.
NOTE: This screen will not be displayed for the order that was paid with a single
tender type.
198
Step 3 : Select settlement method.
199
Reprint
Select an order, and then click [Reprint] button.
200
Hostess Procedures
Reservations
201
This is the function exclusively for Dine-In service. Customers can make a reservation
with specified table and time. It manages [Reservation], [Check-In], and [Cancel]
together.
A
B
Reservation Management Screen – displays current reservations.
(A): Dates for searching reserved orders.
(B): [R], [I], [C] Status Buttons
o [R]: Reserved
o [I]: Checked-in
o [C]: Cancelled
o You can choose multiple status buttons.
[Search By Contact]: Search by phone number.
[Search By Customer Information]: Search by customer information stored in
the database.
The reservation can be confirmed by the information on the table.
202
The reserved table begins to display reservation information one hour before the
reserved time.
Table: M-1
Reserved Time: 4/10/2014 14:40:00
Reservation Title: Birthday Party
Reserved by: John Johnson
The reserved table can be seated by unreserved customers during non-reservation
time. In this case, a message window pops up as below. Click [Order] to proceed with
order for non-reservation customers.
203
NOTE: If a customer doesn’t check-in until the reserved time, the table will change to
red as follows:
New Reservation
Step 1 :
Click the [Reservation] function button from the
Dine-In Table Screen.
Step 2 :
Enter reservation information, and then click
[Finish] .
Label Explanation
No
Name
Description
1
Reservation For
Enter event name.
2
Customer Name
Enter the name of the contact.
For registered member, click [Customer] button to search.
3
Contact Phone
Enter phone number of contact person.
Party Size
Displays number of persons.
Adult
4
Enter number of adults
Children
Enter number of children
High Chair
Enter number of persons who need a high chair
Wheel Chair
Enter number of persons who need a wheel chair.
5
Reservation Date
[…] Enter reservation date.
6
Reservation Time
[…] Enter reservation time.
7
Description
Enter other necessary information.
Step 2 :
To designate a table for the reservation, click [Table
Selection].
204
Step 3 :
Reservation and Table assignment can be excuted at
once.
When you enter reservation information with “Party
Size”, the table that suits for the number will blink.
205
[Image 1] illustrates the maximum number that the
table accomodates.
[Image 1]
Step 4 :
Select reservation time and table, and then click
[OK].
[Image 2] shows that the table M-10 got reserved at
3:50 pm. The table’s layout is changed.
[Image 2]
[Before Assigning Time]
[After Assigning Time]
Tip
1)
2)
When you reserve more than two tables. Just click them all.
Tables with existing reservatiion can not be selected.
Step 5 :
Confirm reservation details at “Step4”, and click
[Finish].
206
[Image 3] displays reservation information.
[Image 3]
Modifying Reservations
When a customer wants to change reservation information or there is a mistake in
reservation, the reservation information needs to be modified.
Step 1 :
Click the [Reservation] function button from the
Dine-In table screen.
Step 2 :
Select a reservation, and then click [Edit] button.
Step 2 :
Reservation information widnow pops up. Enter
necessary information, and click [Finish] button.
207
Check-In
When a reserved customer arrives, need to check-in and manage the status of
reservation.
[Auto Check-In]
Step 1 :
Click the reserved table.
Step 2 :
Click [Reservation Order].
Step 3 :
The screen switches to the Order Screen. Place orders
as usual. This order is reserved, and recorded
automatically as “Check-In” in status.
Tip
If you click [Order] instead of [Reservation Order] from Step2 above, it is an order for nonreserved customer, who can use the table before the reserved customer arrives. The
reservation information for the table is still kept.
208
[Manual Check-In]
Step 1 :
Click [Reservation] button from the Table Screen.
209
1
Step 2 :
Selerct a reservation, and click [Check-In]
Step 3 :
Click [Yes].
1
Step 4 :
Click [I] button () to see the list of reserved orders
that are already checked-in.
Canceling and Deleting Reservation
1
[Cancel]
Select a reservation, and then click the [Cancel]
button.
To view the cancelled reservations, click [C] button.
[Delete]
Click [Delete] button to delete reservations. The
deleted ones cannot be searched.
Wait
This is the function to make customers wait for the seats. When tables become
available, the customers can be invited to the tables.
[Wait] function is similar to [Reservation], and uses common processes internally.
210
211
[Image 1] Waiting Customer Management Screen
Here, you can search and select customers who are waiting for seats, and guide
them to the available tables in order.
To access to the “Waiting” screen as
above, click [Wait] function button from
the Dine-In table screen.
Registering to Wait List
Click [New] button from the “Waiting” screen, and
enter customer’ s information who waits for a seat.
If pagers are used , enter a pager number,
and let the customer carry it.
If pagers are not used, “Waiting List Tag”
will be printed out. Let the customer carry
the tag.
Call and Check-In
Step 1 :
Select a customer, and click [Pager] button.
It calls the pager.
You may not use pager. Instead, use
Waiting List Tag to call customers.
Step 2 :
Call the customer with caller pager, and receive the
pager back.
Help the customer check-in by clicking [Check-In]
button, and assign an available table to the customer.
.
212
Customer Procedures
Customer procedures describe membership management .
Membership management covers member information, member point management, birthday
coupon, etc. This service enhances customer services and boost store sales.
213
Membership Registration & Search
Step 1 :
Click [Operation Customer Membership
Management], and perform registration or search a
member.
Step 2 :
From Operation Customer Membership
Management, Click [New] and register a member, or
click [Edit] to modify the member’s information.
Enter membership card number for exiting member, or
enter phone number for new member .
Opening House Account
1) Create membership.
2) Order menus.
3) Do payments with the “House Account” tender type.
Adding Initial Point to New Member
214
Step 1: Click “Membership Point History” at Operation Customer.
Step 2: Select a customer.
Step 3: Click
button.
Step 4: When “Point Apply” screen displays as below, fill out the form with required
information
215
Step 5: Click
button to save information.
House Account Settlement
Step 1: Click the “House Account Tender” button at Operation Customer.
Step 2: Search a customer by clicking the area inside the blue rectangle.
Step 3: Select one of the tender types, and do settlement as usual.
216
Point Settlement
This function is used for settling with saved Points . You can enable point settlement
from Operation Management. The saved points are subtracted by settlement with .
Settlement details can be seen from History.
To enable points accumulation:
Step 1: Click “Membership Accumulation Ratio” button at Operation Settings Store
Step 2: Setup the point ratio, and then click [Save] button.
To consume the points:
Step 1: Place an order as usuall.
Step 2: Select a customer.
Step 3: Click [Tender] button.
217
Step 4: Click the tender type, [Point].
Step 5: Fill out the “Point Payment” form, and then click [OK] button to finish up the
tendering with the points.
Gift Card Procedures
As of the date of this manual is written, there are two gift card processors: 1) POSBank (in-house)
and 2) Merchant Warehouse (MW).
You can sell gift cards and accept them as a type of tender. It works like a prepaid Card.
Processing GIFT Card includes New, Charge, Disposal (in-house), Tender and Search (in-house).
For charge and disposal, Gift Card information should have been registered first.
Selecting Gift Card Processors
Operation Settings System Codes: Click “Gift Card Company” button
1) In-house
(1) Check “Use this company as processor” if you like to select In-house as a processor.
(2) You can enter any name and ID in the fields of Merchant Name and Merchant ID.
218
2) Merchant Warehouse (MW)
219
(1)
(2)
(3)
(4)
(5)
Check “Use this company as processor” if you like to select MW as a processor.
Merchant Name: issued to merchant by MW.
Merchant ID: issued to merchant by MW.
Merchant Key: issued to merchant by MW.
Keyed-in: check this if you enter card number manually: DO NOT CHECK THIS FOR
SWIPING THE CARD.
(6)
Card Number: click the mouse in the field, and then swipe the card or type in the
card number manually. If you type in manually, please be sure “Keyed-in” is not
checked..
(7)
Amounts to add: enter an amount that you like to add to the card.
(8)
Balance: When you click “Get Balance” button, the remaining balance of the card
displays in the field.
(9)
Save button: It saves the input data of the top section such as Use this company as
processor, Merchant Name, Merchant ID, and Merchant Key.
(10) Activate & Add Value button: It activates the new card, and adds the amount you
entered to the card.
(11) Add Value button: It adds the amount to the card that has already been activated.
(12) Get Balance button: It retrieves the balance of the card from the server in MW.
Gift Card Issuance (In-house Only)
This is the function to issue a gift card. The media for the gift card might be paper,
magnetic stripe or mobile barcode. (Maximum length of the card number is twenty
characters.)
Step 1 :
Click [Gift Card] function buttons from the Main Screen.
Step 2 :
Enter necessary information to issue Gift Card (the Issue Amount is required).
Step 3 :
Click [Tender], and then process the settlement.
220
Label explanation
No
Name
Description
1
Gift Card Number
Enter card number (up to 20 alphanumeric)
2
Expiration Date
3
Customer
4
Phone Number
Phone number of the buyer.
5
Description
Enter other description for reference.
6
Issue Amount
Enter the surface value of the Gift Card.
7
Billed Amount
Billed amount is displayed here.
8
Discount Amount
Enter the discount amount.
9
Payment Amount
Payment amount is displayed here.
10
Used Amount
It shows litmit of the amount for use.
11
Remaining Balance
It shows remaining value of the card.
Expiry date is set to 1 year, which is changeable.
You can not use the card after expiration date.
If the customer has membership, you can bring
his/her information by clicking […] button.
Page
221
Gift Card Search (In-house Only)
This function searches Gift Card information such as balance check and history.
Click [Gift Card Search] at [Operations] [Management] [Gift Card
Search].
222
To search the card, swipe the card or enter the card number manually. If you enter
the number manually, click [OK] button after you’ve done entering.
Using Gift Card
Gift Card is a type of payment to be used before expiry date.
Step 1 :
Click [Tender] [Gift Card].
223
Step 2 :
When[Card No] is entered (or swiped), Gift Card settlement information will be
shown from Gift Card as below. Enter the amount to pay and click [OK].
224
This screen is for Merchant Warehouse (MW) gift card company. For manual
input, you need to check “Key-in”. For the manual input, enter only the card
number. For swiping, enter the whole track data of the card.
Gift Card Recharge (In-house Only)
With recharge, you can continue to use Gift Card.
Step 1 :
Click [Gift Card] from Main Screen Functions.
When Gift Card Number is entered, balance information will be shown.
Step 2 :
Click [Recharge], and enter Adding amount. Then click [Tender] button.
Gift Card Disposal (In-house Only)
This function disposes invalid or lost gift cards.
Step 1 :
Click [Gift Card] from Main Screen Functions.
Gift Card information will be displayed after entering Gift Card Number.
225
Step 2 :
Click [Disposal] button.
Disposed cards are not usable, but its history is still searchable.
Gift Card Re-activate (In-house Only)
This function reactivate the card.
Step 1 :
Click [Gift Card] from Main Screen Functions.
Gift Card information will be displayed after entering Gift Card Number.
226
Step 2 :
Click [Re-activate] button.
Closing Procedures
Cashier-Out
Use [Cashier-Out] when you finish your work and hand the POS station over to
another employee.
Limitation: Cashier-In and Cashier-Out cannot be operated simultaneously.
How to Run: Click [Cashier-Out] at Main Screen.
Step 1 : Click [Cashier-Out] at Main Screen.
Step 2 : When Cash Tray window pops up, select your cash tray to close out.
227
Step 3 : When Cashier inputs amounts based on money units, the total amounts
will be calculated automatically for you. If necessary, you can type in cash
amounts manually.
It shows the information of Credit Card, Check, and House Account. Cashier
should open the Cash Drawer and compare the money against the report sheets.
228
[Image 1]
Information
Screen for
End-Of-Day
[End of Day] is used for closing for the day.
When [Cashier-Out] is completed, the Cashier-Out Report will be printed out
automatically as follows:
229
End-of-Day
Check [End of Day] to finish business for the day.
When you finish business for the day using [End of Day], you can’t use [Void] and
[Change Payment Method].
When you finish business by checking [End of Day] option in [Cashier-Out] screen,
a confirmation window will pop up. Then click [Yes] button.
By checking [Settlement], all transactions that are paid by credit cards will be
settled; the open batch will be closed.
230
PART4. Operation Management / Chapter 1 ~ Chapter 7
231
PART 4. Operation Management
Chapter
Chapter
Chapter
Chapter
Chapter
Chapter
Chapter
1.
2.
3.
4.
5.
6.
7.
Settings
Refer to Gift Card Procedures
Menu
Employee
Customer
Management
Sales Report
WHAT YOU WILL LEARN IN THIS
PART
In part 4, you will learn about overall
system settings and the master
configuration for POPs operations.
Settings
Store
You can configure your store with Store, Store Operations, Tax Definition, Print Options,
Language, User Defined Language, Surcharge, Tip, Business Hours, Cash Drawer
Information, Membership Accumulation Ratio, Payroll Calculation, User Defined Format,
Update Server Setting, Backup Settings, Backup Restore, Data Initialization, and Cloud
Service.
NOTE: Data Initialization and Cloud Service are configured only by administrator.
When we setup the store at one of POS systems, it applies to all POS systems. You
can configure it based on the environment or situation of your store.
232
Store (information)
Entering the basic information of the store
233
Tip
You have to enter the store information very precisely because the store information is
displayed on all kinds of printouts, and you can get a product certification through this
information.
Store Operations
Please see Store Operations under Store Information Settings in Part 1 Getting
Start.
Tax Definition
Please see Store Operations under Store Information Settings in Part 1 Getting
Start.
Print Options
Please see Store Operations under Store Information Settings in Part 1 Getting
Start.
234
Language
It sets up the language that is used in the program.
235
It supports eleven languages:
English
Korean
Japanese
Chinese (Simplified)
EnglishEnglish (United States)
한국어 (대한민국)
日本語 (日本)
中文(简体)
Chinese (Traditional)
Deutsch
Spanish
Portuguese
Vietnamese
French
Russian
Arabic
中文(繁體)
Deutsch (Deutschland)
españ ol (Españ a)
português (Portugal)
Tiếng Việt (Việt Nam)
français (France)
русский (Россия)
)السعودية العربية المملكة( العربية
Under the selected language, you can change words as you like, using
[User Defined Language].
User Defined Language
You can modify the default words with your own words.
236
How To Do:
(1) Select the default language.
(2) To search words, type words in [Word(s) to be searched], and then click
[Search] button.
(3) Type word(s) in [Type default word(s) to be replaced] from the default
language column. These words will be replaced with the new words that
you type in.
(4) Type the new words that you like to replace in [Type new word(s) to
replace].
(5) Click [Preview] button to see the results.
(6) Check the check box in the [Select] column ONLY for the records you’d like
to modify. If there are records you don’t like to modify, then uncheck
them.
(7) To remove the user defined word(s), uncheck the records, and then click
[Save] button.
(8) Restart the application for the changes to take effect.
Surcharge
Setting surcharges:
237
You can apply surcharges manually when you take orders, but you can do it
automatically by setting up here. You can assign surcharges according to the
services such as [Dine-In], [Quick Serve], and [Delivery].
Use Surcharge: Check this if you want to apply surcharges.
Minimum amount for Surcharge Exempt: If the total amount due is more
than the minimum amount that you specified here, then the surcharges are
not applied automatically.
Auto Surcharge Amount: The surcharge amount you enter here will be
applied automatically to the total amount due.
Auto Surcharge Rate (%): The surcharge rate (percentage) that you enter
here will be applied automatically to the total amount due.
If you set up both [Auto Surcharge Amount] and [Auto Surcharge Rate
(%)], [Auto Surcharge Rate (%)] will be applied.
238
In Delivery tab, only the difference is [Minimum Amount for Deliver Excempt]”.
When you specify an amount here, the delivery fee will be charged if the total
amount due is less than the amount that you specify here.
Gratuity
Setting about gratuity
By gratuity settings here, it’s possible to set an automatic charge or manual
charge.
Refund Includes Gratuity: If you check this, gratuities are included to the
refunded amounts.
Check Tip Adjustment before Cahier-Out: It prompts you to handle tip
adjustments. It is just optional to reinforce your business.
Mandatory Gratuity Option:
-
Mandatory Gratuity by People: It charges gratuities based on the number
of guests.
A. People / Amount for mandatory gratuity:
Enter the number of guests here, and then gratuities that are specified
in “Mandatory Gratuity (%)” are applied when guests are more than
the number you enter here.
B. Mandatory Gratuity (%): Enter numbers in percentage to be applied
for gratuities.
-
Mandatory Gratuity by Amount: It charges tips based on the amounts.
A. People / Amount for mandatory gratuity:
Enter amounts here, and then gratuities that are specified in
“Mandatory Gratuity (%)” are applied when the total amount due is
more than the amount you enter here.
B. Mandatory Gratuity (%): Enter numbers in percentage to be applied
for tips.
-
Mandatory Gratuity Without Condition: As it says, gratuities are applied
mandatorily without any conditions.
A. Mandatory Gratuity (%): Enter numbers in percentage to be applied
for tips
You can identify the applied gratuities at the [Total Amount] tab in Tender screen.
239
Business Hours
Setting the business hours of the store
240
It supports a statistical analysis for the major reports. You can analyze sales
statistically by breakfast, lunch or dinner based on the business hours you’ve set
up.
Opening for Business: This is the division time or days of business. For
example, if you set it up as 8:00 am, then all transactions before this time will
belong to the previous day.
Cash Drawer Information
Cash Drawer Settings
241
You can set up a password to Cash Drawer, and restrict it from openings. When
you open it arbitrarily, the reasons to open will be recorded.
Auto-open for Card Processing: opening Cash Drawer automatically for the
payment with the credit cards
Auto-open for Check Processing: opening Cash Drawer automatically for
the payment with checks
Membership Accumulation Ratio
Setting customer’s points
242
Setting customers’ point ratio and type based on cash and card payment
-
Cash Ratio: Enter the point ratio (%) that is accumulated for the payment
with cash.
Card Ratio: Enter the point ratio (%) that is accumulated for the payment
with the card.
Apply Point Type:
“Apply to Total Amount”: The point ratio applies to the total payment.
“Apply to Before Tax”: The point ratio applies to the amount before tax.
Payroll Calculation
Setting employees’ payroll calculation
243
These settings apply to the settings in [Time Card], [Pay Employee], [Holiday],
[Employee Schedule], and then shows the calculations of an employees’ payrolls
on [Payroll] screen.
-
First Day of Week: sets the first working day of the week. In order to
calculate the weekly overtime, we need to identify each week. The first
day of week will be used as a baseline to identify the week.
Pay Interval: sets the cycle of payday, selecting one of three cycles (each
week, every two weeks, or every four weeks)
Weekly OT Hours: sets a standard for the weekly overtime pay. If the
hours worked are larger than the hours entered, then the hours that
exceed the hours entered will be counted as over time.
Use Scheduled Break: sets if we want to apply the break time that is set in
[Employee Schedule] to the payroll. If we don’t check this, the break
time that is set in [Time Card] will be applied to the payroll.
Weekly Overtime Calculation: the overtime is calculated weekly if you
check this.
Daily Overtime Calculation
Check this if you want to take “Daily Overtime Calculation” as addition to
“Weekly Overtime Calculation”.
-
Tip
1)
2)
When you check this, you can set up Double Time After 12th Hour, 7th Working
Day OT / DT, and Daily Regular Working Hour.
Double Time After 12th Hour: If it’s checked, the hours worked that exceed
the twelve hours will be counted as double time pay.
7th Working Day OT / DT: If it’s checked, it applies both overtime and
double time. When an employee works full seven days in a week, the
hours that he/she works on the 7th day will be counted as the overtime
pay out of the regular time and the double time pay out of the overtime.
Daily Regular Working Hour: This working hour will be the baseline for
deciding the daily overtime. The hours worked that exceed the working
hour entered here will be counted as the overtime pay.
If Daily Overtime Calculation is checked, then both Weekly OT Hours and Daily Regular
Working Hour are applied, and then all hours exceed the hours entered here will be
counted as the over time pay.
When you set up the options here, you can see the results on the top-right with check
boxes on [Payroll] screen.
244
User Defined Format
You can specify the number of decimal places for the price of menu
items.
245
Currency Format String:
It shows the string format based on how you set it up in [No. of Decimal
Places].
No. of Decimal Places:
Enter the number of decimal places.
Update Server Setting
Update Server Setting
Setting the server information for updating POPs Restaurant application
Server: selecting update server. If you select the option, User-Defined
Server, you can set up your own update server, adding information of your
own server.
URL: the Update Server address
ID: Enter ID (username) on your server when you select User-Defined
Server
PW: Enter the password of the username when you select User-Defined
Server.
User-Defined Server is designed for a typical situation that users cannot
access the server. If you need this service, please discuss with the
administrator.
246
Backup Settings
You can configure backup operations.
247
There are two types of backup: 1) Automatic Backup and 2) Manual Backup. The
Automatic Backup runs automatically according to the options you set up, and
the Manual Backup is for the users who want to backup at the time you want.
[Automatic Backup]
Backup when the POPs program exits:
It backs up automatically to the location you select when POPs program
exits.
Backup when the POPs program starts:
It backs up automatically to the location you select when POPs Restaurant
starts.
Backup by days:
It backs up automatically to the location you select on the days you check.
[Manual Backup]
To back up manually, select the location and click [Start Manual Backup]
button.
Backup Restore
This shows how to restore the backup files.
248
Step 1 :
Click one of the radio buttons.
When you click the radio buttons, the backup files that were previously saved will
be listed in the [File List] section.
Step 2 :
Select a backup file from the [File List].
Step 3 :
Click [Restore] button.
Alternatively, you can click [Search] button to search a backup file for
restoration.
Data Initialization
You can clean up some tables in the database.
Data Initialization Tab:
It purges data which cannot be recovered. SO, PLEASE BECAREFUL !!!
Some data is interrelated, so will be deleted together, which means it cannot be
selected by itself.
Sales Data Deletion Tab:
You can delete sales transactions within a date range.
249
Cloud Service
It synchronizes data between the database in the Cloud and the local database.
250
Cloud Use: Check [Yes] if you like to use Cloud service.
Cloud Server: Fill out the blanks with data that will be given by POSBANK.
NOTE: You need to subscribe to receive Cloud service.
POS
You can configure POS station for POS Info, Printer, Customer Display, MSR (Card
Reader), Pager, Caller ID, Weighing Scale, and POS Setting.
These seetings are applied to POS stations individually and independently.
251
POS Info
Setting POS information
252
You can set up the name and the uses of POS system.
POS Name: The name of POS system: it will be displayed on various reports.
Menu Language: When you create menus, you can enter the two kinds of
names: the primary menu name and the secondary menu name. Based on
your selection here, the selected menu names will be displayed on the
[Order] screen.
253
[Image 1. Menu (Item) Settings ]
[Image 2. Display on Order Screen: Menu Name
& Secondary Name]
Used For:
Counter: for all services including order and payment
Waiter Station: only for ordering, not tendering
Table Assign Manager: only for guidance (reservation, wait, and table)
Default Table group
It is the beginning screen of Table Map to be displayed in Dine-In screen.
Printer
Setting the printing information for each POS system
254
There are four different kinds of printings:
1) Receipt Print: prints receipts.
2) Customer Order Print: prints customer’s order. We usually use the same printer
for both the receipt and order.
3) Kitchen Order Print: prints orders to the kitchen for cooking. You can use
kitchen printers more than one based on menus. Before you use them, you
should create the kitchen code (name).
4) Label Print: prints the Kitchen Order to the Label Print.
Printer Name: Type in a printer name.
Model Name: Select a printer model.
Printer Port:
Port: set up a local port.
Network / USB: set up a network printer (note network
configuration). Ex) \\computer name\shared name
Port Setting: serial port settings.
Customer Display (CDP)
Setting customer display (CDP)
255
For POS systems that CDP (VFD) is attached, please do settings as follow:
o
o
o
o
o
Customer Display Model:
VFD 2L x 20C EPSON Emulate
LCD 2L x 16C
LCD DISPLAY (1024 X 768)
LCD DISPLAY (800 X 600)
LCD DISPLAY (User Define)
CDP Port: selects a CDP port. For a serial device, click “Port Setting” button
to set it up.
Upper Line Message: displays a message on the upper line of CDP device.
Lower Line Message: displays a message on the lower line of CDP device.
256
[Image 1] [POSBANK POS SYSTEM, AnyShop II Customer Display]
Dual Display
Setting Dual Display of CDP
257
When POS has the second display attached, you can display promotional images or videos,
and also display order information when you take a payment.
The schedules for displaying promotional images or videos can be managed hourly through
[Play List File], so can be configured with various images.
-
Image Display
Refresh Image Every: Image cycling period in seconds
Play List File: Click this button for further settings of images and videos. Please refer
to “Play List File Setting” on next page.
-
Screen Option
Screen Option
A. Resize on Order/Tender: Automatically resizes screen to display order and
settlement information.
B. Fullscreen: Displays preset images and videos in full screen.
Display order details: Check [Yes] to show the information when order is processed
-
Scroll Text
Scroll Text: the text to be displayed and scrolled on the screen
Font: Font settings for the text
Scroll Speed (Sec): Scrolling speed in seconds, scrolling from right to left
Location: Position of the text (Bottom/Top)
[Play List File Setting]
You can play the whole images/videos identically, or play them in the scheduled time
creating “Play Box”.
Example 1: To play File List in all time
Step 1 : Select [All] in [Hour] section.
Step 2 : Click [ADD] button.
Then, “All.playlist” is created in Play Box.
Step 3 : After clicking “All.playlist”, add files by clicking “File Open” button. The order
of adding is the order of playing.
258
Step 4 : Click [Save] button to save the Play List File.
Example 2: To play File List in a certain period of time (ex: 18:00 ~ 18:59)
Step 1 : Select [18] in [Hour] section.
Step 2 : Click [ADD] button.
Then, “18.playlist” is created in Play Box.
Step 3 : After clicking “All.playlist”, add files by clicking “File Open” button. The order
of adding is the order of playing.
Step 4 : Click [Save] button to save the Play List File.
The same way will apply to different time frames.
To secure system’s stability, do not make a single large sized file, but make video in a series
of small files.
Caution
259
MSR (Card Reader)
Setting basic information for MSR (Magnetic Stripe Reader)
260
In case of you use MSR (Magnetic Stripe Reader) on POS, you need to set up card
reading information of which is given by a MSR manufacturing company. If the
default values are different from yours, you should change them with your credit
card information.
Track Selection: Select tracks that you need: each country might have a
different setting.
Initial String, Ending String, Field separator: Enter the information that MSR
manufacturers provide. For non-encrypted MSR, you can get the
information by swiping the card in the Notepad.
MSR Port / Port Setting: If the MSR is the serial device, you can select the
port here, and set it up by clicking [Port Setting].
Pager
Setting Guest Pager
261
It’s used for calling customers who are waiting for food and seats in Quick Serve
and Dine-In respectively.
POPs Restaurant supports the serial device, model GP-100. The unique “Check No”
and “Wait No” can be read and written arbitrarily.
Model Selection: Select a Pager model.
Pager Port: Select a port that is attached to the Pager.
Caller ID (CID)
Setting Caller ID
Caller ID is a supplemental equipment that automatically detects the telephone
numbers that customers call in for orders.
POPs Restaurant supports the CID model CTI-136 (USB to Serial).
Caller ID Model: Select a CID model.
Caller ID Port: Select the serial port that is attached to the CID, and set it
up by clicking “Port Setting”.
Please refer to PART3 for practical application of CID (Delivery).
Weighing Scale
Setting an electronic weighing scale for weighable menu items
POPs Restaurant supports following models:
AB6702, AB6710, AB6712, CAS-SW-10-lb, CAS-SW-10-oz, CAS-SW-20-lb, CASSW-20-oz, CAS-SW-50-lb, CAS-SW-50-oz, CAS-SW-5-lb, and CAS-SW-5-oz
Scale Model: Select a scale model.
Scale Port: Select the serial port that is attached to the Scale, and set it up
by clicking “Port Setting”.
Initial String, Ending String: This information is given by manufacturers, and
these fields are optional for certain scales.
262
POS Setting
Setting all POS systems in the store
263
POS Info is setting for the current active POS, and POS Setting is for setting the
all POS systems in the store.
POS Name: Enter the name of the POS.
POS model: Enter the model of the POS
POS Serial #: Enter the serial number of the POS.
Used For: Select a purpose of the POS.
Screen Design
You can configure screen layouts for Order Screen, Table Screen, Function Button
Screen, Menu Font & Color, and Table Design.
Screen Design is the screen setting for using POPs Software more efficiently. You
can configure the screen structure as you like with menus that you need.
264
Order Screen
[Configuring Order Screen]
265
In [Order Screen], you can create new menu groups and their menus items, or you can
register existing items into the menu groups. Not only this, you can arrange and specify
the locations of the menu groups and menus items.
Each section will be described in detail on the following pages.
[Configuring Menu Groups]
Menu Group Nav. Button
266
Menu Group
Menu Group Nav. Button
Menu Group Section in Order Screen:
There can be ten menu groups per Oder Screen page.
If there are more than ten groups, you can move to the next pages by clicking [∧] and
[∨] icons.
The page numbers are not limited, so you can register groups as much as you need.
You can name the group names as you like.
You can change font color and size of groups; cf. Menu Font & Color.
You can directly come to this page by clicking [F12] button from the order screen.
You can create new groups, change group names, and specify the locations of the
groups.
You can drag and drop menu groups to change locations: you can drag and drop even to
different pages.
[Creating Groups]
Step 1 :
Select an empty button.
267
Step 2 :
When it shows the screen like the [Image 1],
enter a group name in Menu Group Name, and
then click [Add] button.
If you check “Yes”, the newly created menu group
can also be the menu category or item category.
[Image 1. New Menu Group Setting
Screen]
[Changing Group Names]
Step 1 :
Click the name of group that you like to change.
Step 2 :
When it shows the screen like the [Image 2],
modify the the name in Menu Group Name, and
then click [Apply] button.
[Changing Group Location]
Click a group you like to relocate, and then drag
and drop at an empty button.
[Image 2. Menu Group Setting
Screen]
[Configuring Menus]
268
Menu navigation
button
Menu Section in Order Screen
There can be thirty menus per Oder Screen page.
If there are more than thirty menus, you can move to the next pages by clicking [‹] and
[›] icons.
The page numbers are not limited, so you can register menus as much as you need.
You can change font color and size of menus; cf. (Menu Font & Color)
You can set up images to the menus (supporting images: GIF, JPG, BMP and PNG).
You can directly come to this page by clicking [F12] button from the order screen.
You cannot specify menu’s status like [Out of Stock] or [Discontinued].
You can place menus in the menu section by selecting the menus that have been
registered
You can place new menus at the same time you register.
You can change menu’s information such as name, unit price, kitchen printer, image,
tax, and discount.
You can change locations with drag-and-drop.
< How To Display Pre-registered Menus >
Step 1 : Select an empty spot in the menu
section.
269
Step 2 : When it shows the screen like the
[Image 1], check the [Register existing items].
Step 3 : When you select a menu category the
pre-registered menus in the category will be
listed below. Then, click a menu you want to
display on the spot you selected at Step 1.
[Image 1. Menu Item Setting Screen]
Step4. By doing from Step1 through Step3,
menus are saved, so you don’t have to do
further actions to save them.
-
The menu images are displayed ONLY when
they are registered.
< How To Register and Display New Menus >
Step 1 :
Select an empty spot in the menu section.
270
Step 2 :
When it shows the screen like the [Image
2], check the [Register new items].
Step3 :
Enter the new menu information.
Category Name: Select an item
category or menu category.
Menu Name: Type in menu name.
Unit Price: Type in unit price
Tax Type: Check tax type
Discount Applied: Check Discount
Applied
Kitchen Printers to use: Select a
printer.
Image: Select an image to be
displayed in the menu section.
Step 4 :
Click [Add] button to save settings.
[Image 2. New Menu Item Setting
Screen]
< How To Change The Basic Information of Menus
>
Step 1 :
Select the menu you want to change.
271
Step2 :
Modify the information.
(You can change more details of menu
information at Menu Menu Registration.)
Step 3 :
Click [Apply] button to save the information.
-
Click [Delete] button to delete the menu
from the menu group.
< How To Change Menus Location >
Method 1 : Moving to an empty spot
Step 1 :
Select the menu you’d like to move.
272
Step 2 :
Drag it to an empty spot, and drop it.
Method 2 : Swapping menus
Step1 :
Select the menu you’d like to move.
Step 2 :
Drag it to another menu, and then drop it.
Table Screen
Table Group
273
Table Screen
Configuring Table Screen:
Tip
1)
2)
3)
You can make table groups up to six.
You can change table group names as you like.
The numbers of tables are not limited to be displayed on the Table Screen,
but you should consider the simplicity and convenience for users.
You can directly come to this page by clicking [F12] button from the order
screen.
You can modify existing Group names, or create new Group names by
clicking the table group buttons.
Click [Load] button to load floor map and table images.
Click [Delete] button to delete a Table group: all table information in the group will be
deleted.
Click [Apply] button to save information about newly created group or modified group.
[Example: Configuring Table Group]
Step 1 :
Click an empty tab in the Table Group section, and then type “Test” in Table
Group.
274
Step 2 :
Click [Add] button, and the “Test” table group is added.
Step 3 :
To add floor map to the Table Screen, Click [Load] button, and select an image.
Then, clock “Apply” button.
To delete table group, click a table group you’d like to delete, and then click
“Delete” button in Table Group section: all tables and floor map will be wiped
away.
Step 4 :
Click five times on the Table Screen to add five tables.
[Image 1] is the screen that the five tables were created by clicking five times on
the Table Screen.
275
[Image 1] Adding Tables by Clicking on the Table Screen
Step 5 :
Rearrange those tables by draging and dropping, and resize them by dragging
handles (little squares).
Step 6 :
To rename the table name, click a table, and then type the name you like in the
Table Name field in the Table Manager section; cf. Image 2.
Step 7 :
To add an image for a table, click a table, and then click “Load” button. When
Open dialog box appears, select an image for the table; cf. Image 2.
In [Image2], we renamed the tables as 1, 2, 3, 4, and 5, and set up the images
for table 4 and 5.
[Image 2]
Tip
When you install POPs Restaurant, the sample images that you can freely use are saved at
“\POPs Restaurant\image\table\”.
276
Step 8 :
Click [Save] button in [Table Manager] section to save the settings.
In Dine-In, you can see that the settings are applied as the following image:
277
(Please refer to [Table Design Setting] for more settings on tables)
NOTE:
While you are adding tables and before saving them, if you click the “Delete”
button in the [Table Manager] section, all the tables will be deleted.
If you like to delete tables individually, save them first. And, to delete existing
tables or saved tables one by one, click a table and click the [Delete] button in the
Table Manager section.
Function Button Screen
Tip
Configuring main [Function] buttons of Main Screen, Table Screen, Order Screen,
and Tender Screen. You can configure [Function] buttons differently on each POS.
Because the very beginning default configuration of [Function] buttons is the setting for the
main POS system, the other POS systems do not have their own default settings. Therefore,
you may reconfigure [Function] buttons for other POS systems.
[Example: Configuring Table Group]
[Image 1]
1
2
The functions on the left pane (#1 in Image 1) will be displayed on the screen in
the same order, and the functions on the right pane (#2 in Image 1) are the
available buttons.
Step 1 :
Click an empty button on the left pane. When you click it, it’s outlined with a
dotted line as follows.
278
Step 2 :
Click a button on the right.
For example, we click “Dine-In” in the right pane, and the “Dine-In” button is
placed in the left pane as follows:
And then, the next empty button is automatically outlined with the dotted line,
waiting for another new button. You can keep clicking buttons in the right pane,
and the buttons are placed one after another in the left pane.
Step 3 :
Click [Save] button to save your settings.
[Image 1] Main Screen That “Dine-In” Button Was Applied
Tip
[Clear All] button: It clears up the all function buttons you’ve added into the left pane.
279
Menu Font & Color
You can set up the font size and color of menus (items) of Order Screen.
280
You can set up the font size and color of the menu categories (groups) in [Menu
Group Design Setting].
281
You can set up the font size and color of the menus in “Menu Design
Setting”. The font size will be applied uniformly, but you can set up the color
selectively for each menu.
Table Design Setting
You can set up the information and color that are displayed on the tables.
282
There are eight kinds of information that display on the table. You can change
locations, font size, and font color of the information in order to identify them
easily.
Table Option
Name
Description
Table Name
In Time
Elapsed Time
Menu Name
Order Employee
Total Guest
Amount
Partial Payment
Last Order Time
Table name
The beginning time of order
The elapsed time of the order
The menu name of the order
The employee’s name who took the order
The number of guests
The total amount due
Partial payment amounts
Display the last order time on the table.
By setting the table color, you can identify the status of the table fast and easily.
System Codes
You can configure system codes for Card Type, Credit Card Company, Gift Card
Company, Cash Unit, Discount, Kitchen Memo Group, Kitchen Memo, Kitchen Printer,
Tare, Cash Drawer, and Occupation.
Setting default values for the POPs Restaurant application. It applies to all over the
POS system.
283
Card Type
Managing card types:
One of these types can be selected at the tendering time by “Terminal Credit Card
Input”.
284
To register: click [New] and [Save] buttons respectively after entering the
card issuer and card company name.
To delete: select one of card types, and click [Delete] button.
To edit: select one of card types, and then click [Save] button after you
enter the card issuer and card company name.
When you click [New] or [Empty] button, it also enters into the registration
mode.
You can confirm your settings at “Terminal Credit Card Input”.
285
Credit Card Company
At the time of this writing, there are six card companies such as PAX, NETePay
(Datacap/Mercury…), Merchant Warehouse, Elavon, Precidia, and WorldPay.
More companies will be added.
Multiple processors are not allowed to be used.
To select a company as a processor, please check “Use this company as
processor”.
< PAX >
286
Comm. Type: This is the communication type. There are two types: TCP and
UART. TCP is for ethernet terminal or device, and UART is for serial terminal.
IP Address: This is the IP Address of the terminal.
TCP Port: It’s the port of the ethernet terminal. The default port is 10009.
Serial Port: It’s the port of the serial terminal. The default port is COM1.
Timeout (in seconds): You can enter digit numbers in seconds. -1 (minus one)
means no timeout.
Merchant Number: It might be given by PAX.
Terminal ID: It might be given by PAX.
Signature Capture?: You can enable or disable the signature capture feature on
the terminal: it applies ONLY to the terminal that has the signature capture
feature.
Log Setting:
o Log Switch:
On: Activities are logged.
Off: No activities are logged.
o Log Level:
Error: logs only for errors.
Debug: Not only errors, but also other activities.
[Clear Batch] button: If transactions, that are useless, remain in the terminal,
you need to clean up by clicking [Clear Batch] button. if transactions remain in
the terminal, you can’t update the application of the terminal.
< NETePay >
287
Host Name 1: It’s the URL of the primary host server.
Host Name 2: It’s the URL of the secondary host server.
TCP Port: It’s the port of the device. The default port is 9000.
Serial Port: It’s the serial port. If the device uses a serial port, and connects to
COM1, please enter 1 (one) in the field. If the device is USB-HID, enter 0
(zero).
Merchant ID: It’s given by the processor.
Timeout: You can enter numbers in seconds between five to sixty. The default
value is 10 (ten).
Terminal ID: You can put any ID.
Termianl Name: You can put any name.
Product Name: It always must be “POPs Restaurant” unless otherwise we
pronounce a new product name.
Product Version: It always must be “V2.x” unless otherwise we pronounce a new
verion.
Device: You can select a device that matches your device. If you can’t find the
device that you need, please ask the administrator.
Pad Type: When you select a device, Pad Type is populated automatically.
< Settings for Merchant Warehouse (MW) Company >
< Elavon >
288
Merchant ID: Assigned by Elavon.
User ID: Assigned by Elavon
PIN: Assigned by Elavon
POS Public IP: If you set up IP Address Filter in VirtualMerchant of Elavon, you
must provide the public IP address of POS station. Otherwise, transactions will
not be approved.
IP Searching Web: If you cannot get your public IP address even though you
click the [Get IP Address] button, enter a website address here that searches IP
addresses. And then, click [Get IP Address] button.
Operation Mode: If you want to test, then select [Demo]. Otherwise, select
[Live] for real transactions.
< Precidia >
289
IP Address: The IP address of POSLynx device in Precidia or the IP of POS
system that runs TransNetPOS-CG(TMP-CG) application.
TCP Port: The Port of POSLynx device.
Mac Address: The Mac Address of local POS: it should be registered with
Precidia.
Communication Method:
o POSLynx Device:
POSLynx device is located at Precidia. If you select this method, the IP and
Port of this device must be specified above.
o TransNetPOS-CG (TNP-CG):
TNP-CG should be installed on the local POS. If you select this method, the
IP, 127.0.0.1 and the Port 8000 should be specified above. This setting
should match with the setting in TNP-CG application.
Communication Method: If you check “Yes”, then it will prompt you to sign on the
device.
Use external device (Pin Pad): If you use an external device like Pin Pad (not
swiping on the POS), check here.
Configuring TNP-CG of Precidia
1) POS Interface tab
290
Passphrase will be given by Precidia. When you click “Register” button after
entering the passphrase, the Mac Address will be registered in POSLynx device at
Precidia.
If you don’t use TNP-CG and want to register your Mac Address, then you should call
Precidia and give them your Mac Address. They will help you to register your Mac
Address.
2) Network tab
291
< WorldPay >
292
Account ID: Given by WorldPay.
Merchant PIN: Given by WorldPay.
Sub ID: Given by WorldPay.
POS Public IP: IP address is required ONLY when you setup IP filtering on
Merchant Partners (online management).
IP Searching Web.: If “Get IP Address” button doesn’t work, then try again
providing an IP searching website.
Gift Card Company
Refer to Gift Card Procedures.
Cash Unit
Managing cash units:
You can do money changing fast, helping the service of ”Smart Pay” and “Cashier
In/Out”.
To register: click [New] and [Save] buttons repectively after entering “Cash
Unit” and “Converted Amount”.
To delete: select a cash unit, and click [Delete] button.
To edit: select a cash unit, and click [Save] button after modifying the
values in the “Cash Unit” and “Converted Amount” fields.
You can add upto fifteen units.
293
Tip
1)
2)
3)
USD($) is the default: you can set up a different monetary unit if yours is different from
USD.
[Cash Unit]: It’s only for visual management for users.
[Converted Amount]: It’s used for arithmetic operation in the program.
294
Discount
Register discount names in advance, and then use them at the moment of
placing orders.
To add: Click [New] and [Save] buttons respectively after selecting and entering
Discount Type, Discount Name, and Discount Rate or Discount Amount.
To edit: Click a discount name in the left hand section, and edit the information in
the right hand section. Then, click [Save] button.
To delete: Click a discount name in the left hand section, and then click [Delete]
button.
Example: Adding 10% Discount item for birthday customers:
1) Enter a discount name, Birthday – 10%, in Discount Name field.
2) Enter a number in percentage in Discount Rate field.
3) Click [Save] button to save.
You can see the registed discount names at Order Screen Discount as the Image
below. When you click the discount buttons, the amounts or percentages will be
applied.
295
Kitchen Memo Group
Managing kitchen memo groups:
It helps to process orders fast and efficiently by grouping memos that are
delivered to kitchen.
296
To
add a memo group:
Click [New] button.
Type a group name in the field of [Kitchen Memo Group].
Click [Save] button.
To
edit a memo group:
Select a group in the left pane.
Modify the group name in the field of [Kitchen Memo Group].
Click [Save] button.
To delete a memo group:
Select a group in the left pane.
Click [Delete] button.
Those groups are appeared at Order Screen Kitchen Memo (top of the screen)
297
You can select memos by groups, and send them to kitchen fast: memos are
delivered through the kitchen printer.
The numbers in red on the groups are the numbers of memos you’ve selected. You
can add memos as many as you need. If there are no memos you need, you can
add your own memos by clicking [Customer Input] button.
Kitchen Memo
Managing kitchen memos:
They are delivered to kitchen when customers require for their orders.
If you don’t see a kitchen memo group here for memos, you need to create it first in
[Kitchen Memo Group].
298
To
add a memo to the [Kitchen Memo Group]:
Click [New] button.
Select a memo group by clicking from the top pane or clicking […] button.
Type a memo in the field of [Kitchen Memo]
Click [Save] button.
To
edit a memo:
Select a memo from the [Kitchen Memo] column in the top pane.
Modify the memo in the field of [Kitchen Memo].
Click [Save] button.
To delete a memo:
Select a memo from the [Kitchen Memo] column in the top pane.
Click [Delete] button.
Select a group first in order to add memos to orders
When you select a kitchen memo, the color of the button you selected will change.
When you click the memo once again, the color of the button changes back to the
original color, and the memo is removed from the list of selected memos.
299
Kitchen Printer
POPs Restaurant application operates three kitchens by default. If there are more
kitchens, you can add them here. By adding kitchens and connecting these to the
printers you’ve set up, you can print out order information to the designated
printers.
300
To add a kitchen printer:
Click [New] button.
Type a printer name and an alias name in the field of [Printer Name] and [Label
Printing-Format File] respectively.
Click [Save] button.
To
edit a kitchen printer:
Select a printer in the left pane.
Modify the printer name and its alias.
Click [Save] button.
To delete a kitchen printer:
Select a printer in the left pane.
Click [Delete] button.
The following image shows how to assign the printers to the the kitchen printers
you’ve created above (cf. Setting the printing information for each POS system)
301
If you assign printers to each menu, you can print order sheets to the designated
printers when you take orders.
302
[ Order Setting Screen ]
You can print one order sheet to many different kitchens simultaneously: You can
select multiple kitchens (or printers) for a menu at the Menu Registration screen
(Operation Management Menu Menu Registration).
Tare
The Tare feature is for the use to deduct the weight of a container for any weighable
items.
Here, you can add containers with tare that are used for a scale. Then, the tare will
be deducted from the orders of weighable menus.
303
To add a new container:
Click [New] button.
Enter a name of container in the field of “TARE”.
Enter the weight of the container in the field of “Cup Weight”.
Click [Save] button.
To edit the name of container:
Click a container in the left pane.
Modify the name in the field of “TARE”.
Modify the weight of the container in the field of “Cup Weight”.
Click [Save] button.
To make containers inactive, check the check boxes that are labeled as “Not Used”.
After you set up as above, you can see these settings as the image below when you
order weighable items, deducting the container’s weight from the total weight of the
menu.
304
Cash Drawer
Managing cash drawers that are used at the stores
305
To
1)
2)
3)
create a new cash drawer:
Click [New] button
Enter a name of cash drawer in the field of Cash Drawer.
Click [Save] button.
To
1)
2)
3)
edit a cash drawer:
Select a cash drawer in the left pane.
Modify the cash drawer name in the field of Cash Drawer.
Click [Save] button.
To make items inactive, check the check boxes that are labeled as “Not Used”.
When you create cash drawers as the image above, we can see those at Cashier In.
Occupation
Managing occupations
This occupation list is displayed in the customer registration form.
306
To create a new occupation:
1) Click [New] button
2) Enter a name of occupation in the field of “Occupation”.
3) Click [Save] button.
To modify a name of occupation:
1) Select an occupation in the left pane.
2) Modify the occupation name in the field of “Occupation.
3) Click [Save] button.
To make occupations inactive, check the check boxes that are labeled as “Not Used”.
Email Server
Setting an email server.
With this feature, you can do correspondence with customers, sending greetings,
coupons, etc.
Ask your own email provider to get information for configuring Email Server on POPs
Restaurant application.
307
Security
You can configure securities such as Security Level, Security Roles, Assigning Roles To
Level, and Assigning Roles To Employee.
Setting security levels of employees for accessing various tasks in POS system. There
are four steps to enforce security as follows:
308
Step 1: Security Level
You may configure security levels here.
Step 2: Security Roles
You may select security roles that you like to setup.
Step 3: Assigning Roles To Level
You may assign security roles to certain levels that you configured at Step 1.
Step 4: Assigning Roles To Employee
You may assign security roles to employees individually.
Security Level
You can manage security levels here.
309
To create a new security level:
1) Enter a level name in the Security Level field.
2) Click [Add] button
3) Click [Save] button to save it permanetly.
To modify a security level:
1) Select a security level in the left pane.
2) Change the level name in the “Security Level” field.
3) Click [Save] button.
To make security levels inactive and active, check the check boxes in front of the
security level.
To see inactive levels, check the “Show All List”.
Security Roles
You can select roles that you would like to give security levels. Then, you can assign
these to security levels and employees.
310
For enforcing security, select security roles by checking the check boxes in
front of the roles. And then click [Save] button.
Assigning Roles To Level
In the left pane of the image below, there are five authentic levels by default. And,
there is a list of roles in the right pane that you have selected previously in Security
Roles.
To assign the security roles to a level, select a level in the left pane, and check the
check boxes of roles you want to apply in the right pane. Then, press [Save]
button.
When you register employees, you can select one of the authentic levels for
him/her in order to set up a security level.
< Employee Registration screen >
311
Assigning Roles To Employee
Not only you can set up security roles to security levels, but you can also set them
up to each employee as the following image [Image 1].
312
[Image 1: Assigning Roles To Employee Screen]
To assign roles to the individual employee, please see the previous section,
“Assigning Roles To Level.
Menu
You can configure all settings about menu such as Menu Category, Menu Registration, Inventory
Category, Inventory Item, Recipe Builder, Sub Menu, Pricing Controls, Market Price Menu, and
Modifier Configuration.
313
Menu Category
Menu Category is also called Item Category. It’s different from Menu Group.
314
To create a new menu category:
1) Click [New] button
2) Enter a name of menu category in the field of “Category Name”.
3) Click [Save] button.
To modify a name of menu category:
1) Select a category in the left pane.
2) Modify the name in the field of “Category Name”.
3) Click [Save] button.
To make a menu category inactive, check the check box that is labeled as “Not Used”
when you modify the category.
To display both active and inactive categories, check “Show All List”.
Menu Registration
There are two ways to create and edit menu items: 1) In the Order Screen, you can
create and edit menu groups and menu items simply. 2) In Menu Registration, you
can create and edit menu items in more detail. In this section, we will explain about
the latter one
315
1
6
2
3
4
5
Menu Category: Displays menu categories.
Menu Name: Displays menu items that belong to the menu category that you
select in the Menu Category section right above.
Container List for Tare: For weighable items, you can select containers here. It’s
used to calculate the net weight, subtracting the container’s weight from the
item’s weight.
Kitchen Printer List: You can select multiple printers for a menu item so that you
can print the same orders in different places at the same time.
[Menu Copy]: It’s useful for creating similar menus continuously.
[New]: For creating a new menu
[Save]: For saving info to the database
[Delete]: When you click the [Delete] button, the selected menu item will be
hidden, and doesn’t appear in the Order screen.
Image Holder: Displays the menu image when you select a menu in the section
#2.
Fields Name
Description
Menu Name
Type in menu item name (sixty four letters in max)
Unit Price
Type in the unit price for sale that displays on Order screen
Select a tax type.
- Tax: Tax will be applied.
- No Tax: Tax will not be applied.
- Tax Included: Tax is included in the unit price.
Type in the secondary language for the menu item. If you, for
example, use two POS systems, let one POS use the [Menu Name],
and let the other one use the [Secondary Name].
When you specify [Kitchen Alias], this alias will replace [Menu
Name] on the Kitchen Print.
Type in the barcode number of the menu item. You can identify
items by barcodes when you sell them with scanners.
Type in the the cost of menu. It’s the prime cost of menu item,
which is used for the report of profit on sales.
Check this for the items that are sold by weight. The selling price
will be calculated by multiplying the item weight by the unit price.
If you use a container when you weigh an item, select a container
that you use. Then the container’s weight will be deducted from the
total weight. You can add containers and their weights by yourself;
cf. [Tare] section (Settings/System Codes/Tare).
Check the status of the menu item.
- Available: Menu items are available to sell.
- Out of Stock: Menu items are out of stock.
- Discontinued: Menu items are discontinued.
The items of [Out of Stock] and [Discontinued] won’t be
displayed on the Order screen.
Tax Type
Secondary Name
Kitchen Alias
Barcode
Menu Cost
Sell by Weight
Status
Inventory Unit
Account Class
Discount Applied
Point Applied
Market Price Menu
Open Price
Kitchen Printer
Select an inventory unit.
Select an account class: it’s used for statistical reports for sales
according to account classes.
Ex.) Food, Beverage, Liquor, etc.
Setting for whether Discount applies
Setting for whether Point applies
Setting for whether Market Price Menu applies: You can set up the
market price in [Cashier In] or [Market Price Menu] (Operation
Management Management Market Price Menu). You can set it
up only once a day.
Setting for whether Open Price applies: the open price is not set in
advance, so you will enter the price when you take an order.
Select kitchen printers: you can select multiple pirnters for multiple
locations.
316
Inventory Category
Managing inventory categories for food materials:
You can manage inventories efficiently by categorizing the materials. Here, you can
create, edit, and save ONLY the names of categories.
To create a new inventory category:
1) Click [New] button
2) Enter a name of category in the field of “Inventory Category”.
3) Click [Save] button.
To modify a name of inventory category:
1) Select a category in the left pane.
2) Modify the name in the field of “Inventory Category”.
3) Click [Save] button.
To delete an inventory category:
1) Select a category in the left pane.
2) Click [Delete] button.
317
Inventory Item
Managing food materials:
You can make materials for sale or not for sale (using in menu) by checking or
unchecking [Menu Item] respectively as follows:
Because you can keep tracking materials both for sale and not for sale, you can
manage your store(s) efficiently.
There are mainly two kinds of recipe items (food materials): 1) items that are used in
food; 2) items that are sold as they are. For the latter one, you should check the
[Salable Item] as above.
318
To create a new inventory item:
(1)
(2)
(3)
(4)
(5)
(6)
(7)
(8)
To
(1)
(2)
(3)
Click [New] button
Enter a name of item in the field of [Inventory Item].
Enter a unit price in the field of [Unit Price].
If the item is salable, check [Salable Item].
Select a unit from the dropdown box.
Type or scan the bardcode of the item if it has one.
Select one of tax types.
Click [Save] button.
modify an inventory item:
Select an item in the left pane.
Modify the fields in the right pane.
Click [Save] button.
To delete an inventory item:
(1) Select an item in the left pane.
(2) Click [Delete] button.
319
Recipe Builder
Registering food materials that are used in menus for inventory management:
When menus are sold, the “Convert Rate” of the materials are deducted from the
inventory so that it’s possible to manage inventory efficiently.
320
How to set up:
1)
2)
3)
4)
Select
Select
Select
Select
5) Click
a menu category from the dropdown box of [Menu].
a menu from [Menu Name] column.
an inventory item from the dropdown box of [inventory Item].
an inventory item from the [Inventory Item] column.
button to add it to Recipe. To remove an item from Recipe, select an
item in the right pane, and click
button.
6) To enter the convert rate or Memo, select a cell of those columns, and then direc
tly type in.
7) Click
button to save settings.
Combo Menu
Sometimes we sell menu items in a set or group, we call this kind of menu “Combo”,
“Full Course”, or “Set Menu”. To configure this kind of menu, you can use [Combo
Menu].
1
321
3
2
4
5
6
This is the representative menu name for combo menu. You need to create this
menu at [Menu Registration] in advance.
This is the individual combo menu information: you can specify the additional price
and other prices individually based on services such as Dint-In, Quick Serve, and
Delivery
Adding and Removing button
It adds the checked items on the right hand side to the combo menu
list on the left hand pane.
It removes the checked items from the combo menu list on the left
pane.
You can specify a level where you want to add items to. When you select a level here
and add items to the combo menu list, these items will be added under that level.
Level Copy: It duplicates combo menus based on a level. Enter the level number in
the field of “Level to be copied”, and then click [Level Copy] button to duplicate the
combo menu group or the level.
One Item Per Level: If you want to have one item in a level, you can check this. In
this case, the combo menu automatically displays on the Order screen when you take
an order.
Level Selected: The number of levels are generated automatically. If you need to
add a new combo menu into an existing sub-menu group, then select the level
number here.
How to setup Combo Menu
Step 1 : Creating a menu set
Create a menu set in “Menu Registration” section (for example, “Wisky + Beer Set”).
Step 2 : Searching the menu set
Click “Combo Menu” button (Operation Management Menu Combo Menu), and
search the menu, “Wisky + Beer Set” as follows.
3
322
323
Step 3 : Adding menus to the menu set
When you click the menu or inventory category at the top-right section, the items that
belong to the category will display in the bottom section. Then select menus from the
bottom section, and click the left arrow button to add them to the menu set (Wisky +
Beer Set).
324
Step 4 : Removing menus from the menu set
To remove combo menus from the menu set, check the check boxes of the combo menus,
and click the right arrow button.
3
Step 5 : Adding a menu to a certain level of Combo Menu
Select a level from the “Level Selected” combo box that you like to add a menu
to.
Select a menu from the bottom-right section.
Click
button.
325
Step 5 : Assigning prices
Select a combo menu from the combo menu list section, and then enter a price or prices
in the bottom-left section as follows:
Click [Save] button to save it.
326
[Image 1] It shows the price you’ve entered to the sub menu
Pricing Controls
You can specify different sale prices based on sale types. It’s usful for special events
that offer special prices.
Example:
You can configure the unit price differently on the same menu item based on days,
periods, and hours.
3
4
[Configuring Unit Price of Menu Item]
The general unit price of the menu item is the price that is registered in [Menu
Registration].
Ex.) “Burger”: $9.00
If the price is different based on sale types shuch as Dine-In, Quick Serve, and
Delivery, for example, $10.00 for Dine-In and $9.00 for others, then do the following
steps:
Select [Dine-In].
Select [Default] in [Day] section, and the type in 10.00 in [Applied Price].
If you like to set up prices differently based on certain days, periods, or hours,
then select [Day] or [Range] in [Day] section.
Click [Save] to save your settings.
Market Price Menu
Please refer to “Market Price”.
Modifier Configuration
This section will explain how to configure the Modifier.
These are brief steps in overall to configure Modifier:
1)
2)
3)
4)
First, create Modifier groups.
Add new Modifier additional items, or update the existing additional items.
Create Modifier items that will be registered to the Modifier groups.
Assign the Modifier additional items to the Modifier items. If there are no Modifier
additional items that you are looking for, create them first before you create the
Modifier items.
5) Register Modifier items to the Modifier groups.
6) Finally, assign the Modifier groups to the Menu items.
Modifier Group
You can create, edit, activate, and deactivate Modifier groups
To create a group, type in a group name in the field of “Modifier Group”, and then
click [Add] button.
To edit a group, select a Modifier group from the group list box, change the group
name in the field of “Modifier Group”, and then click [Save] button.
To deactivate a group, check the check box in front of the Modifier group in the group
list box.
To view deactivated groups, check “Show All”.
327
328
Modifier Additional Item
You can create, edit, activate, and deactivate Modifier additional items will be
applied to Modifier items in next step.
Modifier Item
You can create, edit, and delete Modifier items that will be registered to the groups,
and assigined to menus.
NOTE:
If you manage the inventory, select an inventory item from “Inventory Item”
section, and then set up the conversion rate in the right most column. The
inventory will be automatically deducted as much as the conversion rate.
To assign Modifier additional items to a Modifier items, select a Modifier item
in the left pane, and check the Modifier additional items in the right pane.
And then click [Save] button.
Register Modifier Item
You can register or unregister Modifier items to/from Modifier groups.
< To register/unregister Modifier Items >
Select a Modifier group from the Combo Box in “Modifier Group” section.
Select Modifier items in the left pane.
Click “Register” or “Unregister” button.
When you register Modifier items, they turn out green.
329
330
Apply Modifier To Menu
You are all done configuring the Modifier base settings. If you are not, please go
back to the first step, and configure the base settings.
Now, it is the time to assign the Modifier, that you’ve configured in the previous
section, to menus.
Step 1 : Assigning Modifier Groups
331
Select a Menu category from the Combo Box in “Menu Category” section.
Select a Menu item from the Menu Item section.
Check Modifier group(s).
To delete Modifier items from Menu items, click “Delete” button.
To continue to setup, click “Next” button: see the next step.
Min : Minimum Amount
Max : Maximum Amount
If you don’t specify amounts, you can use Modifier without limit.
Tip:
When you set up the values of Min and Max of Menu Item, these values must be the
same as the sum of Min and Max values of Modifier Group. Please keep in mind this.
Step 2 : Assigning Modifier Items
Click [Next] button from the previous section. Then you will see the screen as
follows:
332
To
It shows Modifier groups that belong to the Menu items and Modifier items
that were registered to the Modifier groups that were configured in the base
settings.
set up:
Check the check box of a Modifier item.
Set up the prices for Modifier additional items.
Click [Save] button to save all your settings.
To go to the previous screen, click [Previous] button.
Employee
You can configure about Employee such as Job Group, Employee Registration, Employee Pay,
Employee Schedule, Payroll, and Holiday.
333
Job Group
Creating job groups for managing employees and setting up their security levels
334
The groups that employees will belong to can be arbitrarily registered, and their
security levels can be set by Security Level.
To create a new group:
Click [New] button.
Enter the name of a job group in the field of [Job Group].
Click [Save] button.
To edit a new group:
Select a group in the left pane.
Modify the group name.
Click [Save] button.
To delete a new group:
Select a group in the left pane.
Click [Delete] button.
Employee Registration
Registering the basic information of employees
335
By registering employees, you can manage employees who do activities in [Program
Login], [Time Card], [Cashier-In / -Out], [Order], [Tender], and so on.
You can also manage employees giving limitations to various tasks by setting security
levels through the password.
User PW is the password that is used for accessing various tasks. It’s a unique
number.
You can activate and deactivate employees. To deactivate, click [Delete]
button: it doesn’t delete it from database. To activate again, check the [Show
All List] check box and select the inactive employee. Then uncheck the [Not
Used] check box, and click [Save] button.
Employee Pay
Setting employees’ pay information
336
Using this registered information, you can manage employees’ schedules and pay in
[Payroll] and [Employee Schedule].
If you don’t set up the information of the employees’ pay, the employees’ information
doesn’t display in [Employee Schedule], and also the payroll information doesn’t reflect
in [Payroll].
Job Group: Select a job group that employees belong to.
Employee Name: Employee’s full name, which is not editable
Hired Date: Select the employee’s hired date.
Termination Date: Select employee’s terminated date.
Tax Account Number: Enter employee’s tax account number.
Pay Basic: Select a basic pay type. There are two options: Hourly Pay and
Salary Pay.
Pay Rate: Enter pay rate. Ex) Enter 10.00 if it’s $10.00 per hour.
Holiday Pay: Select a holiday pay type. If an employee works on a holiday that
is designated in [Holiday], the pay will be calculated based on the holiday pay
type that you select here.
Employee Schedule
Setting employees working and break time.
337
The employees who got set up in [Employee Pay] will be displayed in the [Employee]
section on the top.
You can set up working schedules and break time to each employee by selecting
employees in the employee section on the top.
The working schedules are not applied to the calculation for payroll, but the break time
is applied if you check [Pay] when you register break time as above.
Payroll
Managing employees’ payroll:
In Payroll screen as follows, you can search and pay wages according to the working
hours that were written through [Time Card] function.
338
By selecting dates on the top of the screen, you can search payroll information during
those dates. If you like to search a certain employee, select an employee from the
employee list in [Employee] section, and then click
(search) button.
Payrolls are calculated based on how you set up in [Payroll Calculation] (Operation
Management Settings Payroll Calculation). Those settings are displayed on the
top of the payroll screen as follows:
This is only for a display purpose. If you like to change the settings, you can do it in
[Payroll Calculation].
You can clear up the payroll information by clicking [Pay] button. The cleared payrolls
won’t display on this screen unless you check [Show Processed] and click
(search) button.
339
If there’s no time value in [Ending Time] column, it means the employee didn’t [Clock
Out] yet, and you cannot process payroll with [Pay] button.
If an employee didn’t [Clock Out], then you should clock out for him/her in [Employee
Clock In Out] in order to process payrolls.
If you like to print out payroll information, you can export the information to Excel file
by clicking
(Excel) button.
Week: It’s the count of working weeks, not the full working weeks, from the
beginning of the searching date. You should notice one thing: If you, for
example, set up the first day of week as Sunday and the beginning searching
date as 4/1/2013 which is Monday, then the count of working weeks will be one
(1) in the [Week] column for the working date, 4/2/2013, which is Tuesday,
even though it’s only one working day.
Starting Time / Ending Time: It’s recorded automatically in [Time Card] when
employees check in and check out. This is the normal way, but you as a
manager, exceptionally and forcibly, can add or edit the information in
[Employee Clock In/Out].
Holiday: If the worked date is a holiday, the check box is checked
automatically.
Pay Rate: It is the regular [Pay Rate] that is selected in [Employee Pay].
Holiday Pay: It is the result of calculation, applying [Holiday Pay] option that
you select in [Employee Pay].
Total Hours Worked: It is the total hours worked, deducting the starting time
from the ending time: it includes the break time.
Break Time: It’s calculated based on the break time setting in [Employee
Schedule]. If you check [Pay] when you set up break time in [Employee
Schedule], this break time won’t be included here.
Net Hours Worked: This is the actual hours worked excluding break time: it’s
calculated by deducting break time from the total hours worked.
Weekly Hour Aggregate: It is the weekly aggregated worked hours, but the
hours on the date worked are not included.
Daily Hour Aggregate: It is the daily aggregated worked hours: it will compute
all the [Clock In/Outs] that happen on the same day.
Regular Time / Over Time / Double Time
- These are the parts of total hours worked, and they are computed differently
according to the the overtime calculation policy that is set up in [Payroll
Calculation] (Operation Management Settings Payroll Calculation).
- The over time is not computed based on the hours set in [Employee Schedule],
but based on the policy that is configured in [Payroll Calculation]. When
worked hours exceed the hours that were set up in [Payroll Calculation], then
the over time will be calculated.
-
For example, in case of setting [Daily Overtime Calculation] as 8 hours and
checking [Double Time After 12th Hour] in [Payroll Calculation], if the total
worked hours are 14 hours, then the regular time will be 8 hours, the over time
will be four hours, and the double time will be 2 hours, counting from 12 th hour.
Regular Time Pay (R/T Pay) / Over Time Pay (O/T Pay) / Double Time Pay (D/T
Pay)
- These are computed based on the pay rates such as one time, one and a half
times, and double times for R/T Pay, O/T Pay, and D/T Pay respectively.
-
For example:
o Regular Time = 8 hours
o Over Time = 4 hours
o Double Time = 2 hours
o Pay Rate = $10.00
o Then, R/T Pay = $80.00 ($10 x 8 hours)
o O/T Pay = $60.00 ($10.00 x 1.5 times x 4 hours)
o D/T Pay = $40.00 ($10.00 x 2 times x 2 hours)
Total Pay: It’s the sum of all pay types such as R/T Pay, O/T Pay, and D/T Pay.
340
Holiday
Setting holidays
341
If you set up holidays here and employees work on these days, then the holiday pay
type that is selected in [Employee Pay] will be applied to payroll calculations.
Date: Set up the date of holiday.
Note: Enter some explanations about the holiday.
Customer
You can configure customer information such as Membership Group Management, Membership
Management, Membership Point History, House Account Tender, House Account History, Vendor
Group, and Vendor Manager.
342
Membership Group Management
You may create and edit membership groups that members will belong to.
343
To
create a new group:
Click [Add] button.
Enter a group name in the field of “Membership Group”.
Click [Save].
To make a group inactive, check the check box in “Hide” column.
Membership Management
You can manage the information of members.
344
You can activate and deactivate members.
To deactivate, click [Delete] button: it doesn’t delete it from the database.
To activate again, check the [Show All List], select the deactivated member, click
[Edit] button. “Customer Registration” screen will be displayed. Here, uncheck the
[Not Used]. Then click [Save] button.
To register a new customer, click [New] button. Then you will see “Customer
Registration” window as follows. Fill out the blanks and click [Save].
345
NOTE:
When you register a member with the membership card, click the field of
“Membership Card #”. And then, swipe the card or enter the card number
manually.
If you need to enter special characters like @ for email, please press the “Shift”
key. Then the special characters will be shown on the keyboard.
Membership Point History
You can manage membership points here, adding or subtracting points regardless of
sales transactions.
346
Points are accumulated by the ratio you set up in [Membership Accumulation Ratio]
(Operations Settings Store) when a customer (member) pays for the orders.
Points are deducted when the member pays for the order with the tender type,
POINT.
In [Point Apply] screen:
Select [Add Points] to add points.
Select [Redeem Points] to subtract points.
Select [Change all to inputted value] to replace the remaining points with the
points you enter here.
If you did checking one of these options, enter points and reasons to update in the
fields of “Point” and “Note” respectively. Then, don’t forget to check the check box in
the [Select] column to select a member. Finally click
settings.
button to save the
347
House Account Tender
The following screen is the tendering screen for the House Account.
348
To do tendering:
NOTE:
Select a member by clicking
button.
Click one of the tendering buttons.
Proceed the tendering as usual.
At the time of this writing, there are five tendering types: 1) Cash, 2) Credit Card, 3)
Terminal Credit Card Input, 4) Check, and 5) Debit Card.
Some card companies do not support processing the debit card. In this case, the
[Debit Card] button may be hidden.
The paid amounts will be shown as a button in the middle section of the screen. You
can cancel the payments by clicking these buttons.
House Account History
You can view the records about members’ house account.
349
To make member a payment, select a member, and then click
button. You
will be led to “House Account Tender” screen. Then do tendering as usuall.
To view members’ payments and balances, click
To export transactions to Excel file, click
button.
button.
E-Mail Sender
You can send greeting messages or coupons to your customers. Prior to do this, you
need to setup the email server at Operation Settings System Codes Email
Server.
350
Vendor Group
You can create / edit / delete vendor groups here.
351
To create a new vendor group:
Click [New] button, and enter a name of vendor group in the field of
[Vendor Group].
Click [Save] button.
To
edit a vendor group:
Select a vendor group from the left pane.
Modify the group name in the field of [Vendor Group].
Click [Save] button.
To delete a vendor group:
Select a vendor group from the left pane.
Click [Delete] button.
CAUTION:
If you delete a vendor group, all the vendors that belong to the group will be
deleted.
Vendor Manager
You can manage vendors.
To
create a vendor:
Click [New] button.
Enter the vendor name and phone number.
Click [Save] button.
To
edit a vendor:
Select a vendor in the left pane.
Modify the vendor name or phone number.
Click [Save] button.
To delete a vendor:
Select a vendor in the left pane.
Click [Delete] button.
The vendors you create here are used in Recipe Manager and Purchase Order.
352
Management
You can configure basic settings to manage POS stations such as Training Mode, Announcement,
Gift Card Search, Menu Search, Employee Clock In/Out, Hold Time List, Inventory Manager,
Beginning Inventory, Purchase Order Policy, and Make Purchase Order.
353
Training Mode
The purpose of the training mode is to help you to practice and be aquainted with the
POPs Restaurant application.
Entering into Training Mode:
When you click [Training Mode] button, it displays a pop-up window as follows:
If you click [Yes], then it takes you into the training mode, copying all primary data
from standard database into the training database, so that you don’t have to worry
about messing up database.
When the training mode is successfully executed, a small pop-up window will display
and blink on the top right corner of the application as follows:
354
Exiting Training Mode:
To exit the training mode, click [Training Mode] button once again, and then it displays
a pop-up window as follows:
355
Then, click [Yes] button to exit the training mode. When you get out of the training
mode, the data that was generated during the training mode will be wiped out.
Announcement
You can post announcements that display in the main screen on all the pos systems.
When you post announcements as above, they display in the main screen as follows: to
see detailed contents, just click the title.
356
357
[Main Screen] The announcements are refreshed every six minutes.
Gift Card Search
Please refer to “Gift Card Search” section.
Menu Search
Please refer to “Menu Search” section.
Employee Clock In/Out
You can check the information about employees’ check in/out and break time.
You can search the information that you like to check by checking the options on the top
right of the screen such as Clock-In, Clock-Out, Break-In, and Break-Out.
You can add activities of Clock-In/Out and Break-In/Out.
358
You can modify the activities. Select an activity prior to clicking this button.
359
You can export the data to Excel file.
Hold Time List
Please refer to “Hold Time List” section.
Inventory Manager
You may register items for inventory adjustment, and check out the adjustments.
Prior to setting this, you need to set up the inventory in [Inventroy Category] and
[Inventory Item] in Menu section.
When you need to adjust inventory, click [New] button. Then, select [Adjustment] in
[Type] section to increase the inventory, or select [Disposed] to decrease the inventory.
360
361
Register inventory items by clicking [Inventory Item] column. Then, after entering
[Processed Amount] and [Unit Price], click [Save] button to save settings.
Beginning Inventory
You may set up the initial inventory.
Prior to setting this, you need to set up the inventory in [Inventroy Category] and
[Inventory Item] in Menu section.
362
When you select an inventory category in the dropdown box and click [Search]
button, the inventory items that belong to the category display on the screen. Then
you can enter the inventory amounts directly into the cells.
This amount is the initial amount which will be the standard for adjusting amounts
during sales or updating inventory.
Purchase Order Policy
You can use this functionality to manage your purchase order.
Before you set up the purchase order policy, you need to create vendor groups and
ventors that belong to the groups at Operation Management Customer Vendor
Group and Operation Management Customer Vendor Manager.
To set up the purchase order policy, select one of the vendors by clicking
button. And, select an inventory category and click [Search] button. When inventory
items that belong to the inventory category display on the screen, you can type in the
purchase order information row by row.
363
Make Purchase Order
You can make your purchase order here.
[Image 1]
364
To create a purchase order:
Click [New] button, then it displays another window as follows:
365
[Image 2]
Select a purchase date.
Select a vendor by clicking
button.
Click the empty field in [Inventory Item] column to enter an inventory item.
Type in all other necessary information and click [Save] to save your setting.
To edit a purchase order:
366
Click [Vendor] button in [Image 1] to select a vendor.
Click [Search] button in [Image 1] to search purchase orders of the vendor.
Select a purchase order that you like to edit in the list.
Click [Change] button, and then it displays a window like the [Image 2].
Update the information, and then click [Save] to save your settings.
To delete a purchase order:
Select a purchase order in the list in [Image 1].
Click [Delete] button, and then click [Yes] when a message window pops up.
Sales Report
367
Sales Total
It’s a sales summary report that can be searched by a period of time. You can view the
amounts by items, tender types, taxes, surcharges, discounts, gratuities, etc. You can
also view the number of sales, number of guests, average amounts per person, number
of tables served, and number of rotations.
Simple Sales Total
You can view totals based on menu categories and employees with taxes, discounts,
and gratuities.
Cashier-Out Report
You can view all the times of Cashier-In/Out, and also can print or export the report.
Cancelled Order History
You can view, print or export all the history of cancelled orders.
Daily Cashout Report
You can print out Daily Cashout Report on the date that you specify.
Sales / Gratuity by Employee
You can view the receipt numers, payment amounts and tips by employees.
368
Sales Report by Employee
You can view the number of sales and the amounts tendered by employees.
Sales Report by Server
You can print or export reports of servers (waiters or waitresses).
Sales Report for the Day
It’s the report by the day. You can view all order and payment information for the day,
and also view and print out reports based on business types such as Dine-In, Take Out,
Take In, etc.
Sales by Hours
It’s the report by the hours within a period of time. You can view the total guests,
total sales amounts and percentages for each hour.
Sales Volume by Item Type
It’s the sales report for each menu item and summation by menu categories.
369
Sales Volume by Account Type
It’s the sales report based on account types. To get this report, you need to assign an
account type to the menu items. You can do this at [Menu Registration].
Top Sales Item Report
You can view sales rank based on menu items in order by quantity or order by total
amounts.
Sales Report by Card Types
It’s the sales report by credit card types. You can select the records by sales date or
card companies. You can also select all the transactions or by transaction types such
as the settled, cancelled, etc.
Cash-In/Out Report
You can see all the activities about Cash-In/Out according to the dates.
Cash Drawer Open History
You can view all the activities about opening cash drawer according to dates.
370
Sales Report By Customer
You can view the sales report by customers including the total amounts they ordered,
total points, redeemed points, remaining points, number of visitations, and memos.
Profit/Loss Report
To enrich Profit/Loss report, you need to enter the cost and the unit price of menus at
Operation Menu Menu Registration.
Delivery Report
You can view the report by delivery persons.
Detail Sales Report
It’s a very specific report based on menu orders. You can view and export the report
to the Excel file.
Inventory Count
You can view the inventory.
371
PART5. Print Format / Chapter 1 ~ Chapter 3
372
PART 5. Print Format
Chapter 1. Receipt Format
Chapter 2. Customer Order Format
Chapter 3. Kitchen Order Format
WHAT YOU WILL LEARN IN THIS
PART
In part 5, you will learn about various
print formats that POS system prints out.
Receipt Format
1
9
1
1
373
2
2
3
4
1
2
5
3
6
4
7
Store Logo
Prints store logo in the printer; To set
up the logo in the printer, please ask
us.
Store Information
Cf. Store basic information
Order Header Information
Receipt#
Receipt number
Station ID
ID # of POS system
M-5
Table number
Anna
Cashier’s name
Menu Information
It’s possible to sum up the same menus
together, and then prints out according
to option settings.
Aggregate Information
Amounts entered
through [Manual
Cash Discount
Discount]
8
Discount
Amounts entered
through [Amount
Due Discount]
5
99
6
7
8
9
Sub Total
Total Order – Total
Discount
Surcharge
Surcharge
Gratuity
Tip or service charge
TAX
Tax
Amount Due
(Sub Total + Surcharge + Gratuity +
Tax)
Member Information
It shows member’s point information.
Tender Information
It shows tender type information.
Guide Information
It prints the message that is set up at
Print Option settings.
Customer Order Format
[Format 1: Order by Seat]
1
9
1
1
2
2
3
4
5
1
2
3
4
5
6
7
8
9
Store Logo
Prints store logo in the printer; To set
up the logo in the printer, please ask us.
cf. Print Option Settings
Store Information
Cf. Store basic information
Order Header Information
Check#
Check number
M-10
Table number
Anna
Cashier’s name
Menu Information
Menus are displayed by seats.
It’s possible to sum up the same menus
together, and then prints out according
to option settings.
Aggregate Information
Total Order – Total
Sub Total
Discount
Surcharge
Surcharge
TAX
Tax
Amount Due =
Sub Total + Surcharge + Tax
Member Information
It shows member’s point information.
Tender Information
It shows tender type information.
Guide Information
It prints the message that is set up at
Print Option settings.
374
[Format 2: Modifier and Sub Menu]
1
Modifier Items
(It displays modifier items and sub
menu names based on your menu
configuration)
375
1
[Format 3: Order for Delivery]
376
Kitchen Order Format
[Format 1: Order by Seat]
377
1
In kitchen order, you can enable or disable
printing information.
2
1
2
Print Kitchen Menu
To print all menus on one sheet, check
[By Order].
To print one menu per sheet, check [By
Item].
Print Check No (Bottom)
You can print check number on the top
or bottom.
[Format 2: Order with Kitchen Memo]
2
2
Print Check No (Top)
You can print check number on the top
or bottom.
[Foramt 3: Order with Sub Menu]
“Wisky + Beer Set” indicates a sub menu.
378
[Format 4: Order for Delivery]
PART6. System Maintenance / Chapter 1
379
PART 6. System Maintenance
Chapter1. Database Backup & Restore
WHAT YOU WILL LEARN IN THIS
PART
In part 6, you will learn about system
maintenance.
Database Backup & Restore
During backing up or restoring a database, please shut down POPs Restaurant
application.
To backup database:
Step1:
Run BackupManager.exe in the POPs Restaurant application folder as administrator.
Step2:
Click [Database Backup] as follows:
380
Step3:
Click [Start Backup] as follows:
381
It always keeps ten backup files. If there are already ten files in the folder, the oldest
file will be replaced with the new backup file. PLEASE DO NOT ATTEMPT TO MOVE OR
MODIFY THE BACKUP FILES. IF YOU DO SO, RESTORING DATABASE MIGHT FAIL.
To restore database:
Step 1:
Click [Database Restore] at Step 2.
Step 2:
Select a backup file that you need to restore from the backup file list.
Step 3:
Click [Start Restore]. Please wait until you can see “Restore Completed” message in the
Message field.
382
PART7. Questions & Answers / Chapter 1 ~ Chapter 3
383
PART 7. Questions & Answers
Chapter1. What data format is used for
memebership card?
Chapter2. How can we print store logo
on a receipt?
Chapter3. There is a conflict during
installation because Microsoft SQL is
running on the sytem. How can I delete
existing database?
WHAT YOU WILL LEARN IN THIS
PART
In part 7, you will learn POPs Restaurant
with answers to various questions.
What data format is used for memebership card?
It should be less than sixteen digit numbers, and written on track one when you
make it as a megnetic card.
384
How can we print store logo on a receipt?
Method 1: NVImage embedded
You first need to register the logo image in VN memory of the printer, using an
application provided by printer manufacturer.
The following is an example based on the products of POSBank.
At http://easyset.org, select the printer model which is the same as yours.
And then, download and install [NVImage Tool].
Run the NVImage application.
Bring the image files to the screen by clicking [File Open], and then upload
it to the printer by clicking [NVImage Upload].
The image should be .bmp file and in monochrome.
Method 2: (Windows printer drivers only)
Click [Logo] button.
Select an image by clicking
button.
385
There is a conflict during installation because Microsoft SQL is
running on the sytem. How can I delete existing database?
You can delete it by running ARPWrapper.exe at C:\Program Files\Microsoft SQL
Server\90\Setup Bootstrap\ARPWrapper.exe/remove.