1
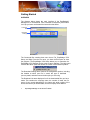
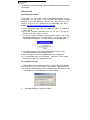
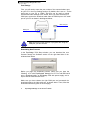
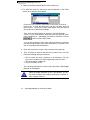
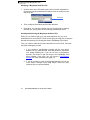
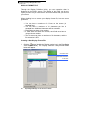
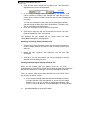
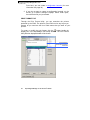
Expobadge®
Manager for PC Professional
User’s Manual
VERSION 1.00.06
CONTENTS
CHAPTER 1
Before you begin
CHAPTER 2
Configuring the
EAIO
CHAPTER 3
Working with
Leads
APPENDIX
Overview......................................................................…1
Installation………….........................................................2
Before you Begin.............................…………….......…...4
The Configuration File.....................................................7
Definition Files...............................................................12
Custom Qualifiers..........................................................24
Downloading from the EAIO..........................................26
Download Format..........................................................27
Emailing your Leads......................................................28
Creating Definition Files ...………………………............29
ExpoBadge® 3750 Commands....................................39
INDEX...........................................................................44
CHAPTER 1
Getting Started
OVERVIEW
The diagram below shows the main interface of the ExpoBadge®
Manager for PC Professional. Take a moment to familiarize yourself with
it to help you better understand the instructions that follow.
Command
Bar
Download
Settings
Download List
Data Received
The Command Bar contains three menu items: File, ExpoBadge 3750
Setup, and Help. From the File menu, you have the Exit option to close
the program. The ExpoBadge 3750 Setup allows you to customize the
ExpoBadge 3750 Settings and to create custom qualifiers. The Help menu
contains the About option that shows the version of the software product.
The Download Settings area contains the configuration options, including
the location to which your file is saved, the type of download
you may make, and what communication port you are using.
The Download List area displays a list of the downloaded files you have
made. This contains the company name, the number of leads, the file
name of your saved download file, the name and serial number of the
device from which you downloaded, and the company email address.
1
Expobadge® Manager for PC Pro User’s Guide
Getting Started
Installation
The Data Received section displays the raw data that was last received by
the Manager.
INSTALLATION
Downloading the Installer
To run setup, you must have a copy of ExpoBadge® Manger for PC
Professional. You will receive a CD containing the software installation
provided in the EAIO package. However, the latest version of the
software, as well as this manual, can be downloaded from AET’s
website: http://www.ExpoBadge.com/downloads.htm.
1. On the Downloads page, click AET Customer in the ‘For Authorized
Users' section.
2. In the AET Customer Download Area, you will see ‘If you are an
Exhibitor: Click Here.’ Click on this link.
3. You will now see the 'Exhibitor’s Download Area' section. Look for the
ExpoBadge® Manager for PC Professional. On the right side, you
will see the following figure. Click the ‘Click Here’ link to download.
4. You will be asked for a user name and password. Enter the user
name and password that was assigned to you.
5. In the next page click the link ‘ExpoBadgePC.exe’ to download.
6. A File Download dialog box will appear. Click Save. Then, choose
the directory to which you would like to save.
The Installation Process
1. Click the Start button, and then click Run. The Run dialog box appears.
2. In the Open box, enter the location of the Installer. Type the directory
to which you downloaded the file, or simply browse and select the file.
For example: type c:\ExpoBadgePC on the Run dialog.
2
Expobadge® Manager for PC Pro User’s Guide
Getting Started
Installation
3. Click Ok. The ExpoBadge® Manager for PC Installation Wizard
appears. Click the Next button.
4. You will then be asked to enter a password; type ‘basic’ to install the
Basic version or type the password provided by AET to install the
Professional version. Wait while the needed files are being copied to
your computer.
5. When Installation is complete, click Finish.
3
Expobadge® Manager for PC Pro User’s Guide
CHAPTER 2
Configuring The Expobadge® All In One
To change the configuration settings of the ExpoBadge® 3750:
1. On the Command Bar, click ExpoBadge 3750 Setup.
2. On the drop down menu, click Configuration. The ExpoBadge 3750
Setup window below appears. In this window you can customize all of
the E3750 settings to suit your needs.
In the ExpoBadge 3750 Setup, you can create or modify configuration
and definition files, configure the Port Settings, update the date and
time, and upgrade to the latest firmware for your ExpoBadge 3750.
BEFORE YOU BEGIN
Before you begin changing any of the settings, it is recommended that
you set the Port Settings, Time and Date Settings, and upload the latest
firmware (if necessary).
4
Expobadge® Manager for PC Pro User’s Guide
Configuring the ExpoBadge® All In One
Before you Begin
Port Settings
First, you will need to enter the port number of the communications port
on your PC in the Port Settings section. By default, this is set to 1 for the
serial port on your PC or COM1. This port can be used to upload
firmware and send settings to the E3750. Once you have selected your
COM port, connect the download cable from the RS232 port to the serial
port on your PC as shown in the diagram below:
DB9 serial port
RS232 port
Make sure that no other devices or programs are using the
COM port you have chosen.
NOTE
Downloding New Firmware
In the ExpoBadge 3750 Setup window, you can download the new
firmware through the Software section on the right hand side of the
window shown below.
Before you begin the download process, make sure you have the
following: a PC with ExpoBadge® Manager for PC Pro and DB9 serial
port, a Download cable, an Expobadge 3750 with power supply, and a
zip file with the latest firmware or fix.
Make sure you have chosen the right COM port and connected the
download cable to the right serial port, as shown above. Then, follow the
download instructions given on the next page.
5
Expobadge® Manager for PC Pro User’s Guide
Configuring the ExpoBadge® All In One
Before you Begin
1. Turn off power on the Verifone. There is no power switch; you
must unplug it (note: the power plug into the Verifone rotates to lock
and unlock).
2. On the main screen, click ExpoBadge 3750 Setup, and then click
Configuration.
3. On the ExpoBadge 3750 Setup window, you will see a section called
Software. Click File and select the zip file of the latest firmware.
4. Click the Download AET Software button. You will see the black
window (command prompt window) with dots running across the
screen shown below.
5. Plug in the power on the E3750. Upon power up the system should
start downloading. Once downloading starts, the dots running across
the black window will stop, and the download status is displayed.
Depending on your PC’s operating system, the black window will
either a) automatically close or b) say 'download successful,' allowing
you to close it yourself. The E3750 will continue to process
data for 20-30 seconds. Let it continue; the download is
complete when you see the main screen of the EAIO shown below.
Rec:0/0
13:00
¬
Menu
6
Names
Expobadge® Manager for PC Pro User’s Guide
Configuring the ExpoBadge® All In One
The Configuration File
Changing the Date and Time
To set the date and time, click on the Other Settings section of
the ExpoBadge 3750 Setup window and click the Set ExpoBadge Date-Time
button. This will synchronize the date and time on the E3750 with your
computer’s date and time. Once the date and time have been sent, you
will see a printout with the text: “New time set: 00:00PM, MM/DD/YYYY” as a
confirmation.
If your date and time are correct for the current time zone, but you are
using the unit in a different time zone, click the Set the ExpoBadge 3750
Time Zone in the Other Settings section. You will see the screen below.
Select the time zone from the list and click Send to ExpoBadge 3750.
Click Close when you are finished.
THE CONFIGURATION FILE
The settings are saved in what we call the 'configuration file' in the E3750.
The default configuration is AETSTAND, which is the AET standard
configuration. Through the ExpoBadge PC Manager Pro, you will be able
to modify these settings. Listed below are the descriptions of the settings
and their default values in the AETSTAND configuration. Changing
the configurations is discussed in the next section.
1. Definition Files are files that define what badge format can be read
and what information will be displayed or printed out. There are four
definition files that you need in order to configure the EAIO:
the Badge Definition File (BDF), Mag Stripe Definition File
(BDF for mag stripe), Display Format File, and Print Format File.
The BDF allows you to read all badge formats for any a 2D barcode
or mag stripe. The Display Format allows you to customize your
view of the E3750’s screen. The Print Format allows you to choose which
format, layout, and fields will appear in the printout. For more
information on how to create these files see Creating Definition Files
on page 29.
7
Expobadge® Manager for PC Pro User’s Guide
Configuring the ExpoBadge® All In One
The Configuration File
By default, the badge definition file is AETSTANB.DEF, the mag
stripe definition is MAGSTANM.DEF, the print format file is
AETSTAND.PFF, and the display definition file is AETSTAND.DFL.
2. The Display Fonts that are available to choose from are
Standard Font, Double Height and Double Width. Below are
screenshots of how they will appear on the E3750’s screen.
Standard Font
Double Height
Double Width
By default, the standard font is selected.
3. Printer On-Off turns the printer on or off. It also determines whether
data is printed out every time the unit receives badge data. The
printer is on by default.
4. Line Feed Settings can be changed through the F2 Line Feed and
Qual. Line Feed Settings. The F2 Line Feed adjusts the number of line
feeds every time you press the F2 button. The Qual. Line feed is the
number of line feed printed after a qualifier is scanned or selected. By
default, their values are 1 and 4, respectively.
5. The Print Font can also be modified. You can choose from three
font sizes in the printout. The fonts available are Standard Font,
Double Height, and Double Width (see exaples on following page).
By default, the print font is the standard font.
8
Expobadge® Manager for PC Pro User’s Guide
Configuring the ExpoBadge® All In One
The Configuration File
Standard Font
Double Height
Double Height
6. Pass Through is the function that sends the data received from the
Pinpad port to the RS232 port. The Pass Through On-Off sets
this function to on or off. If it is set to on, the data scanned or
swiped will be sent across the RS232 port, which can be attached
to a computer to capture the raw data received by the unit. The
Pass Through Mode is on by default.
7. Company Profile is the company name or a description of the
company. You can enter up to a maximum of 255 characters. This
information will be used when downloading data from the
ExpoBadge® 3750. This company name will be used for the file
name of each downloaded file.
8. Company Email is the main email address to which the
leads file to be sent after you download your leads. It can also
handle up to a maximum of 255 characters. The default email is
[email protected].
To see the current settings on the E3750 you can go to Settings, then
Print All Settings, and select Settings.
For more information on how to configure and send commands directly
to the E3750, see ExpoBadge® 3750 Commands on page 39.
9
Expobadge® Manager for PC Pro User’s Guide
Configuring the ExpoBadge® All In One
The Configuration File
Creating a New Configuration File
To create a new configuration file:
1. In the ExpoBadge 3750 Setup window, click New in the
Configuration File section. All the Information displayed on the
screen will be cleared.
New button
2. Then, select the Badge Definition File. To do this, click the arrow
beside the Badge Definition combo box. Then, select from the drop
down list.
Combo box
New BDF
Drop down list
If the badge definition that you need is not in the dropdown list, click
the New BDF button to create a new badge definition file. For
information on how to create a new Badge Definition File, go to page
12. Once you have created a badge definition file, you can select
it from the drop down menu.
Follow the same procedure for the Mag Stripe Definition, Print
Format, and Display configuration settings. For more information on
creating Mag Stripe Definition file go to page 16, for Display Format
file go to page 20 and for Print Format file go to page 22.
3. From the drop down list, select the desired print and display fonts.
To see print and display font options, go to pages 8 and 9,
respectively.
4. Click the down arrow on the Printer On-Off combo box. Selecting 'On'
allows you to print badge data immediately upon receiving it.
Do the same for Pass Through. Set it to 'On' to send data through the
RS232 Port as you received it.
5. Enter the Company Profile and Company Email (You may leave this
blank if you would like).
6. Click Save or Save As to save the configuration file. Enter your
chosen file name. The configuration settings will be saved under the
file name that you entered, and the extension ebm under the directory
c:\ExpoBadge Manager for PC\Config.
10
Expobadge® Manager for PC Pro User’s Guide
Configuring the ExpoBadge® All In One
Definition Files
Modifying an Existing Configuration File
To modify an existing configuration file:
1. Click the down arrow of the configuration name combo box. Then,
select the name of the configuration that you want to change.
Combo box
2. Once you have selected the current settings, the file you selected
will be displayed.
3. Select the settings you want to change by clicking on the down
arrow of the combo box. Select the setting or file that you want
from the drop down list. Delete and retype the Company Profile and
Company Email if desired.
4. Click Save. You can also click Save As to save as a different
configuration file.
Sending the Configuration to the E3750
If you want to have a hard copy of the configuration settings including the
definition files:
1. Click the Create Refurbishing Doc. This will create a refurbishing
sheet with a barcode to refurbish the ExpoBadge® CodeReader,
barcodes for the Configuration file, Badge Definition for 2D Barcode
and Magnetic card, Display Format, and Print Format. The qualifiers
barcode in this sheet are always the AET standard qualifiers. Note that
you are required to have Microsoft Word on your computer to be able
to use this feature.
2. Save the Refurbishing sheet in the desired filename and the directory.
3. Scan this sheet from top to bottom and left to right. Follow the
instructions given on the sheet.
If you have the definition files already in the E3750, you can just click
Print Barcode to print the configuration barcode and scan it. Clicking the
Send to ExpoBadge 3750 button also works in the same way as
scanning the configuration barcode.
11
Expobadge® Manager for PC Pro User’s Guide
Configuring the ExpoBadge® All In One
Definition Files
NOTE
Before scanning or sending the configuration barcode
make sure that all the definition files are already in the
E3750. If the selected definition files do not exist in the
ExpoBadge, the printout and display will be incorrect!
DEFINITION FILES
This section provides information on how to create, modify, and save
definition files. This section also discusses how to send these files to the
E3750. For more information on creating definition files, see page 29.
Badge Definition File
In this section, there are some terms to remember. 'Badge definition'
refers to the badge definition for a 2D barcode and mag stripe definition
file refers to badge definition for the magnetic stripe reader. Note that
they both use the Badge Definition language.
Creating a New Badge Definition File
1. In the ExpoBadge 3750 Setup window, click the
button (beside the
Badge Definition box). You will see the Badge Definition Utility shown
below.
12
Expobadge® Manager for PC Pro User’s Guide
Configuring the ExpoBadge® All In One
Definition Files
2. Click New. The information will be cleared out for you.
3. Enter the badge’s start sequence, end sequence, and new line
character (whichever is applicable). For nonprintable characters, you
must enter the 3 digit decimal ASCII value, preceded by a backward
slash (\). If there is more than one character, these numbers must be
separated with a space. For help on conversion of ASCII characters,
you can click on the ASCII Table button to bring up the screen
below.
4. For each field, enter the field name, line number, and field delimiter in
the Fields section of the window shown below. Click on the row
in which you need to enter data.
In this case, we click the first row. You will see the blinking cursor,
indicating that you can enter information on the selected row. To enter
the field name, click the row under the Field Name column. You will
see a down arrow appear. Click this and you will see the list of field
names available.
Click on Line # and you will see a blinking cursor. Type the line
number. Note that line numbering begins at 0. So, if you have 15
lines, you will have line numbers 0 through 14.
Do the same for each Delimiter. Enter the three digit decimal ASCII
value for nonprintable characters and the ASCII value for printable
characters.
You can also arrange the order of the rows by clicking on a particular
row and clicking the Move Up or Move Down button. To delete a row,
click on it and press the Delete button.
13
Expobadge® Manager for PC Pro User’s Guide
Configuring the ExpoBadge® All In One
Definition Files
selected row
5. Enter any comments or notes in the Comments area (note that this
step is optional).
6. After entering all the fields, click Save or Save As. You will be asked
to enter a file name. The file name can have a maximum of 8
characters, and the last character is always B. (Here, you can only
enter 7 characters because B is automatically appended to the
filename for you.) The file extension is DEF. The file is saved under
the folder c:\ExpoBadge Manager for PC\BadgeDef.
NOTE
There is no validation on the Start Seq, End Seq and New
line. You must try the configuration with a badge and the
ExpoBadge® 3750 to verify that the Badge Def works.
To further illustrate how to create a new definition file, let us look at a
sample 2D barcode with the following format:
Following the steps given above, click New. Then, enter \002
\002 \002 as the start sequence, \026 as the end sequence, and \031 as
the new line. Next, fill up the Fields section.
To parse the first line, the corresponding BDL would be:
FIRSTNAME 0 TODELIM \003
LASTNAME 0 TODELIM \003
So, enter the FIRSTNAME, 0 and \003 in the Field Name, Line #, and
Field Delimiter columns, respectively. Do the same for the LASTNAME
field.
14
Expobadge® Manager for PC Pro User’s Guide
Configuring the ExpoBadge® All In One
Definition Files
Next, parse the second line. Here, we do not have a field delimiter
and there is only one field in the line. Here, we enter ADDR1, 1, and
ENTIRE in the Field Name, Line #, and Field Delimiter columns,
respectively, as shown below.
For the third line, notice that we do not need the comma space and
space. Here, we use the field DUMMY to discard these. We will
use the fields: CITY, STATE, ZIP, and two DUMMY fields as shown
below.
Click Save. Enter the file name TEST1. Now, you will be able to
select this def file both at the File Name dropdown menu in Badge
Definition Utility window and at the Badge Definition combo box in the
ExpoBadge 3750 setup window.
Another BDL command available for us to use is the * LENGTH
command. This is used to parse a badge with fixed length fields. To use
this command, select * LENGTH from the dropdown menu under the
Field Name. Enter the line number on the Line # column and enter the
length of the field in the Field delimiter column. In the example below,
line 0 has a fixed length of 20 characters.
The next row contains the field name, the same line number as above, and
ENTIRE on the Field Delimiter column. For example, the first field in
the first line is ID, so you must enter the following:
15
Expobadge® Manager for PC Pro User’s Guide
Configuring the ExpoBadge® All In One
Definition Files
Modifying an Existing Badge Definition File
1. Click the arrow in the File Name combo box to see the dropdown list.
Click the badge definition file that you want to modify from the drop
down list.
Combo box
2. Modify the start sequence, end sequence, new line, and field
information.
3. Click Save. You can also create a new BDF by modifying an existing
definition file and clicking Save As.
Sending and Selecting the Badge Definition File
When you are finished with your definition file, you need to download this
file to the E3750. There are two ways of doing this: you may either print the
barcode and scan it or click the Send to ExpoBadge 3750 button.
Then, you need to make this the active definition file in the E3750. There
are also two ways of doing this:
1. If you created a Configuration barcode with the definition file you
want selected, scan that barcode to set this as your badge
definition file. If you do not have a configuration barcode, click
Close To and you will go to the ExpoBadge 3750 Setup Window.
From here, you can create a configuration barcode (for more
information, see page 10).
2. If you do not want to create a configuration barcode, you can go
to Menu>Settings>Input>Barcode Port>Select File, then
select the definition file that you just downloaded.
Secondary Badge Definition File
You can also have a secondary definition file. This definition file will be
used to parse your badge in case the first badge definition file cannot
parse the badge.
To use a secondary badge definition file for 2D barcode, you must follow
the naming convention discussed on the next page.
16
Expobadge® Manager for PC Pro User’s Guide
Configuring the ExpoBadge® All In One
Definition Files
1. Primary badge definition can be of any name, as long as it
follows the naming conventions discussed in the Creating A New
Badge Definition File section.
2. The secondary badge definition depends on the primary badge
definition. If the second to last character in the filename of the
primary badge definition is a number (except 9), then the
filename of the secondary badge definition should be that
number + 1. For example, the filename of the primary definition
is ABCD1B.DEF, and then the filename of the secondary badge
definition should be ABCD2B.DEF.
If the second to last character in the filename of the primary def
file is a letter or the number ‘9,’ then the second to last character
of the filename of the secondary badge definition will be ‘0.’ For
example, the filename of the primary definition is ABCDB.DEF.
Then, the secondary badge definition would be ABC0B.DEF.
Simply send the secondary badge definition file to the E3750 and select
the primary definition file.
Creating a New Mag Stripe Definition File
1. In the ExpoBadge 3750 Setup window, click the
button (beside the
Mag Stripe Definition box). The Mag Definition Utility will appear.
17
Expobadge® Manager for PC Pro User’s Guide
Configuring the ExpoBadge® All In One
Definition Files
2. Click the New button (beside the file name combo box).
3. For each field, enter the field name and field delimiter in the Fields
section of the window shown below.
Click on the row in which to enter data. For this case, we click on
the first row. To enter the field name, click the row under the Field
Name column. You will see a down arrow appear. Click this and you
will see the list of field names available.
Then, enter the Field Delimiter by typing it in the Field Delimiter
column. For the field delimiter, enter the three-digit decimal ASCII
value preceded by a ‘\’ (backslash). For help on conversion, click the
button to see the ASCII Table.
You can also arrange the order of the rows by clicking on a particular
row and clicking the Move Up or Move Down button. To delete a row,
click on it and press the Delete button.
4. Enter any comments or notes in the Comments area (optional).
5. Then, click Save or Save As and enter the file name. Here, you must
follow the following naming conventions:
The file name can have a maximum of 8 characters. (You can
only enter 7 because M is always appended to the file name.)
The last character is always M.
The file extension is DEF.
The mag stripe definition file is saved under the folder c:\ExpoBadge
Manager for PC\MagDef.
NOTE
18
Unlike the badge definition file for a 2D barcode, you do
not need to specify line numbers, because the number of
lines is always equal to 1.
Expobadge® Manager for PC Pro User’s Guide
Configuring the ExpoBadge® All In One
Definition Files
Modifying a Mag Stripe Definition File
1. Click the arrow in the File Name combo box to see the dropdown list.
Click on the mag stripe definition file that you want to modify from the
drop down list.
Combo box
2. Then, modify the field names and the field delimiters.
3. Click Save. You can also create a new one by modifying an existing
definition file, clicking Save As, and entering a different file name.
Sending and Selecting the Mag Stripe Definition File
When you are finished with your mag stripe definition file, you must
download this file to the E3750. There are two ways of doing this: printing the
barcode and scanning it or clicking the Send to ExpoBadge 3750 button.
Then, you need to make this the active definition file in the E3750. There are
two ways of doing this, as well:
1. If you created a Configuration barcode with the mag stripe
definition file you have selected, scan that barcode to set this as
your badge definition file. If you do not have a configuration
barcode, click Close To and you will go to the ExpoBadge 3750
Setup Window. From here, you can create a configuration
barcode (for more information see page 10).
2. If you do not want to create a configuration barcode, you can go
to the Menu> Settings> Input> Mag Stripe> Select File, then
select the file you just downloaded.
19
Expobadge® Manager for PC Pro User’s Guide
Configuring the ExpoBadge® All In One
Definition Files
DISPLAY FORMAT FILE
Through the Display Definition Utility, you can customize what is
displayed in the EAIO’s screen. The display of the EAIO can be any
layout you want. All you need are the list of field names that you want on
your screen.
When deciding how to create your display format file, here are some
guidelines:
You can have a maximum of 6 lines on the screen (in
standard font).
You can have a maximum of 21 characters per line in
standard font. Additional characters will be truncated.
Each field must have a line number.
If fields have the same line number, each field must have a
unique column number.
The file name can have a maximum of 8 characters, and the
file extension is DFL.
Creating a New Display Format File
1. Click the
button (beside the Display combo box in the ExpoBadge
3750 Setup Window). The Display Definition Utility window shown
below will appear.
Comments area
Enter field information
in this area
20
Expobadge® Manager for PC Pro User’s Guide
Configuring the ExpoBadge® All In One
Definition Files
2. Click the New button beside the File Name box. The information
displayed on the screen will be cleared.
New button
3. In the Fields to Display, enter the field name, line number, and
column number by clicking in the selected row. Note that you only
need to enter a column number if more than one field is to be displayed
in one line.
You can also arrange the order of the rows by selecting a particular
row and clicking the Move Up or Move Down button. To delete a row,
click on it and press the Delete button.
4. Enter any comments or notes in the Comments area.
5. Click Save or Save As, and you will be asked to enter a File name.
Enter the desired file name, and click Ok.
The definition file you created will be saved under the folder
c:\ExpoBadge Manager for PC\DisplayDef.
Modifying an Existing Display Definition File
1. Click the arrow in the File Name combo box to see the dropdown list.
Click the badge definition file that you want to modify from the drop
down list.
2. Modify the start sequence, end sequence, new line and field
information.
3. Click Save. You can also create a new one by modifying an existing
definition file and clicking Save As.
Sending and Selecting the Display Definition File
When you are finished with your display format file, you must
download this file to the E3750. There are two ways of doing this: printing the
barcode and scanning it, or clicking the Send to ExpoBadge 3750 button.
Then, you need to make this the active definition file in the E3750. There
are two ways to do this, as well:
1. If you created a Configuration barcode with the display format file
you want selected, scan that barcode to set this as your badge
definition file. If you do not have a configuration barcode, click
Close To, which will take you to the ExpoBadge 3750 Setup Window.
21
Expobadge® Manager for PC Pro User’s Guide
Configuring the ExpoBadge® All In One
Definition Files
From here, you can create a configuration barcode (for more
information see page 10).
2. If you do not want to create a configuration barcode, on the
E3750, go to Menu> Settings> Display> Select Field Layout,
then select the file you just created.
PRINT FORMAT FILE
Through the Print Format Utility, you can customize the printout
produced by the EAIO. The printout of the EAIO can be any layout you
choose; all you need are the list of field names that you want on your
printout.
To create or modify the print format, click the
button beside the
Display box in the ExpoBadge 3750 Setup Window. The Print Format
Utility Window displayed below will be shown.
Comments area
Enter field information
in this area
22
Expobadge® Manager for PC Pro User’s Guide
Configuring the ExpoBadge® All In One
Definition Files
Creating a New Print Format File
1. In the Print Format utility, click the
button beside the File
Name combo box. The information displayed on the screen will be
cleared.
2. Enter the field name, line number, and column number (if more than
one field is to be displayed in one line). You can move or delete a row
by selecting it and pressing the Move up, Move down, or Delete
buttons on the right hand side of the window.
3. Enter any notes or comments in the 'Comments' area of your
screen. Note that this step is optional.
4. Then, click Save or Save As, and you will be asked to enter a File
name. Enter the desired file name, and click Ok. The definition file
you create will be saved under the folder c:\ExpoBadge Manager
for PC\PrintFormat.
When deciding how to create your print format file, here are some
guidelines:
You can have a maximum of 43 characters per line in standard
font. Additional characters are printed on the next line.
Each field must have a line number.
If fields have the same line number, each field must have a unique
column number.
The file name can have a maximum of 8 characters and the file
extension is PFF.
Modifying an Existing Print Format File
1. Click the arrow in the File Name combo box to see the dropdown list.
Click the badge definition file that you want to modify from the drop
down list.
2. Modify the start sequence, end sequence, new line, and field
information.
3. Click Save. You can also create a new one by modifying an existing
definition file and clicking Save As.
23
Expobadge® Manager for PC Pro User’s Guide
Configuring the ExpoBadge® All In One
Custom Qualifiers
Sending and Selecting the Print Format File
When you are finished with your print format file, you will need to download
this file to the E3750. There are two ways of doing this: printing the barcode
and scanning it or clicking the Send to ExpoBadge 3750 button.
Then, you need to make this the active print format file in the E3750. There
are also two ways of doing this:
1. If you created a Configuration barcode with the display format file
you want selected, scan that barcode to set this as your badge
definition file. If you do not have a configuration barcode, click
Close to and you will go to the ExpoBadge 3750 Setup Window.
From here, you can create a configuration barcode (for more
information, see page 10).
2. If you do not want to create a configuration barcode, on the
E3750, go to the Menu> Settings> Printer> Select Field Layout,
then select the file you just created.
CUSTOM QUALIFIERS
By default, you have the AETSTAND qualifier list, which is the AET
Standard Action Codes. If you would like to create your own list to qualify
attendee data, you can do so through the Qualifiers Utility.
1. Click ExpoBadge 3750 Setup on the command bar, and then click
Qualifiers.
The Qualifiers Utility window below will appear.
24
Expobadge® Manager for PC Pro User’s Guide
Configuring the ExpoBadge® All In One
Custom Qualifiers
2. Click New beside the File Name box. The current qualifiers list will be
cleared.
3. Simply type your qualifiers in the Qualifiers section by clicking an
empty row. You will see a blinking cursor on the row that you clicked.
You can move the Qualifier up or down the list by clicking on the row
and pressing Move Up or Move Down. You can also remove a
qualifier from the selecting the row by clicking the Delete button.
4. Click Save or Save As when you are finished.
5. Then, to send the list to the E3750, you can either click the Send to
ExpoBadge 3750 button or click Print Barcode, and then scan the barcode
you printed out. You can also press the Print Qual Sheet for a scan
sheet with your list of qualifiers.
Note that you can only have a maximum of 20 qualifiers per list. To
create more, just click New and repeat the steps above.
To modify an existing Qualifier list, simply click on the drop down combo
box and select the file name of the qualifier list that you want to change.
Then, edit or delete the qualifiers by clicking on the corresponding row
and making your changes. Finally, click Save.
25
Expobadge® Manager for PC Pro User’s Guide
CHAPTER 3
Working With Leads
Downloading from the ExpoBadge® All in One
After Installation, you are all set for downloading data from the
ExpoBadge® All In One. To download, you must configure the settings in
the Download Settings section of your screen:
1. Connect one end of the download cable to the serial port of your
computer, and the other end to the RS232 port of the ExpoBadge® 3750.
2. Select the destination folder by clicking the Folder button. Then select
the folder where you want your download to be saved. By default,
the directory is C:\ExpoBadge Manager for PC.
3. Enter the Port Number. By default, it is set to 1 for COM1.
4. Select Download Type and Records Option. Select Auto or Manual,
depending on the download type that you want. For the Records
Option, select whether or not you want the Serial Number of the
E3750 to be included in your download file. (When you choose to
include the serial number, it will be the first field in the database.)
5. Select Download Option. You will see two icons:
to save the data to a floppy disk and the hard drive
to save it only to the hard drive
Click the ExpoBadge 3750 button beside the
floppy icons with the option you want.
6. You will see the window below. If you selected Automatic download,
you don’t have to do anything. Just wait for the data to be transferred.
26
Expobadge® Manager for PC Pro User’s Guide
Working with Leads
Emailing your Leads
If you selected Manual download, you must go to the ExpoBadge®
3750: Press Menu. Select Leads, then select Database
Maintenance. Next, select Download Database. Choose whether to
include or exclude the exhibitor profile.
If there is no company name detected or if you chose to exclude the
profile, the screen below will appear. You will be asked for the
company name. Enter the company name; note that this will also be
the file name of your downloaded file.
When the transfer is complete, you will see the window
below. Click Ok.
Upon completion, you will see the details of the download
in the Download List area, and the data will also be displayed in the
Data Received section, as shown in the figure below.
Download File
Your data will be saved to a diskette as 'leads.txt' if you chose the option
to save both to a floppy disk and to the hard drive. Note that the file
name saved to the disk will always be leads.txt, so if you plan to save
everything on one disk, you will only have the option of appending or
replacing the existing download file.
27
Expobadge® Manager for PC Pro User’s Guide
Your downloaded text file will be a comma and quote delimited ASCII text
file. Depending on what Records Option you selected, your download will
be of the following format:
1.
2.
3.
4.
5.
6.
7.
8.
9.
10.
11.
12.
13.
14.
[SERIAL NUMBER]
RECORD DATE
RECORD TIME
ID
FIRSTNAME
LASTNAME
TITLE/POSITION
COMPANY
ADDR1
ADDR2
CITY
STATE
ZIP
COUNTRY
15.
16.
17.
18.
19.
20.
21.
22.
23.
24.
PHONE1
PHONE2/FAX
EMAIL
CUSTOM1 (UDEF1)
CUSTOM2 (UDEF2)
CUSTOM3 (UDEF3)
CUSTOM4 (UDEF4)
COMMENTS
REP CODES
IS WINNER
25. EMBEDDED ID
26. QUALIFIERS
Below is an example of a download file when you choose to include the
serial number of the E3750 in your Records option.
Emailing your Leads File
To send an email, simply click on the row of the download you want to
email. Then, click Send Email. The leads file that you downloaded will be
sent to the email address that is in the Company Profile menu of the
ExpoBadge® All In One.
28
Expobadge® Manager for PC Pro User’s Guide
APPENDIX
Creating Definition Files
BADGE DEFINITION LANGUAGE
EAIO is able to read almost any badge format. This is accomplished by
allowing a badge format to be described in a 'badge definition' file (BDF).
A BDF is a text file containing instructions on how to interpret the data
coming from the card reader. It is essential to understand two things
before making a new BDF. First, you must understand the structure of
the raw data coming through the serial port on the PC, and second,
you must have a basic knowledge of how the Badge Definition Language
(BDL) works.
To understand the structure of the data from the serial port, you may use
the Diagnostic Mode of EAIO. Another method for viewing or capturing
raw data is to use any communications software, such as HyperTerminal
or Fserial, and turning on the Pass Through option in the EAIO.
The figure to the right is an example of
raw data from the AET standard badge.
The hearts, triangles, happy faces and
arrow are nonprintable characters. In
BDL they are represented using their
decimal ASCII value, which is entered
in the following manner: 3 digit ASCII
decimal value, preceded by a backslash
(for example: \010, \027 for 'new-line'
and 'escape,' respectively.) The comma,
space, and nonprintable characters can
be specified as delimiters. Delimiters
separate information in the badge,
which we call 'fields.' For the purpose of
BDL, we will consider each field as a
token.
To understand how BDL works, let's look at its components. BDL
consists of the following elements:
Comments
Commands
Field Definitions
29
information for the programmer
general instructions for the data parser
assignment of badge data to EAIO fields
ExpoBadge® All In One User’s Manual
Badge Definition Language
Comments
COMMENTS
A line that starts with the '#' (pound sign) character is a comment. The
rest of the line is ignored. You should use comments liberally throughout
the badge definition so that future users of the definition can understand
its operation.
COMMANDS
A line that starts with the '*' (star or splat) symbol is a command. The
currently defined commands are shown on the table below.
Command
START
LINES
LENGTH
REQ
STRIP
END
30
Syntax
* START c [ c [ c [...]]]
where
c = character in the
badge start sequence
* LINES n
where
n = number of lines
per badge
* LENGTH n m
where
n = line number
m = length of the line
in characters
* REQ c [ c [ c [...]]]
where
c = character in the
badge start sequence
* STRIP c
where
c = character to be
stripped
from
incoming data
* END c [ c [ c [...]]]
where
c = character in the
badge end sequence
ExpoBadge® All In One User’s Manual
Description
Defines the character sequence,
which signals the start of a new
badge.
Defines how many 'lines' there
are in a badge. This tells the
input parser how to determine
when all of the data for a badge
has been read.
Tells the parser that the given
line is of fixed length. Usually,
the parser breaks the input into
lines based on the presence of
new
line
characters.
This
provides a means for parsing
badges, which are of made up of
fields of fixed length with no newlines.
Defines a character sequence
that is sent to the badge reader
to request a badge to be sent.
Instructs the parser to strip all
instances of the specified
character
from
the
input
BEFORE parsing out the field
information.
Defines the character sequence
that signals the end of a badge.
This is one method for telling the
input parser how to determine
when all of the data for a badge
has been read.
Badge Definition Language
Field Definitions
FIELD DEFINITIONS
EAIO ultimately assigns the incoming data into the fields that appear on
the EAIO display. The Field Definitions are the means by which you
describe to EAIO what data to put in what fields.
A field definition line has the following form:
[Field Name] [Line Number] [List Operation]
where
Field Name = the name of the field being defined.
Line Number = the badge data line number from which to get the data.
List Operation = defines the parts of the data line to assign to the field.
Field Names
The field names that may be used in a field definition are:
Field Name
ID or IDNUM
FIRSTNAME
LASTNAME
POSITION or TITLE
COMPANY
ADDR1
ADDR2
CITY
STATE
ZIP
EMAIL
COUNTRY
PHONE1
PHONE2 or FAX
UDEF1
UDEF2
UDEF3
UDEF4
DUMMY
Description
ID Field
First Name field
Last Name field
Position field
Company field
1st Address Field
2nd Address Field
City Field
State Field
Zip Code Field
Email Field
Country Field
1st Phone Number Field
2nd Phone Number Field
1st User Defined Field
2nd User Defined Field
3rt User Defined Field
4th User Defined Field
no field (use this field to skip unwanted data)
List Operations
This may be the most difficult concept of the BDL. Each line is viewed
conceptually as a list of 'tokens' that are separated by white space and
defined delimiters. This list of tokens can be broken into pieces using the
list operations provided, and these pieces can then be assigned to the
31
ExpoBadge® All In One User’s Manual
Badge Definition Language
List Operations
Field Names. It is important to remember that the selected tokens are
removed from the line for each list operation that is performed. This
allows successive operations to work with the remaining portions of the
list.
The following are the list operations available:
List Operation
ENTIRE
FIRST
LAST
NOTFIRST
NOTLAST
TODELIM
FIXFIELDLEN
MAXLENORDELIM
32
Description
Selects all of the tokens in the list. This
operation is unique in that it leaves the list
unchanged.
Selects the first token in the list. After the
operation is performed, the selected token is
no longer part of the list.
Selects the last token in the list. After the
operation, the token is no longer part of the
list.
Selects all of the tokens in the list EXCEPT
the first. After the operation, the first token is
all that is left in the list.
Selects all of the tokens in the list EXCEPT
the last. After the operation, the last token is
all that is left in the list.
Selects all of the tokens in the list, from the
first token up to the occurrence of a
specified delimiter. After the operation, all of
the tokens that were selected are no longer
part of the list. The delimiter specified gets
added to a list of delimiters by the parser.
Note that if a defined delimiter appears
ANYWHERE in the badge data, it becomes
a separate token.
This list operation has the following format:
TODELIM [delimiter]
Selects the specified number of characters
in a given line. This can be used if there is
no delimiter separating tokens in a line.
This list operation has the following format:
FIXFIELDLEN [field length]
Selects the token up to the occurrence of a
specified delimiter. If the delimiter is not
found, the parser will take the specified
number of characters in a given line.
This list operation has the following format:
FIXFIELDLEN [delimiter] [field length]
ExpoBadge® All In One User’s Manual
Badge Definition Language
Examples
To illustrate how to use BDL, we give an example on how to get data
from the sample 2D barcode with the following format:
\013
\013
FirstName LastName
Address
City, State Zip
Phone#: XXX-XXX-XXXX
Position^Company
\026
Note: The Badge starts with 2 carriage returns. The Position has a
delimiter ^ or maximum length of 10 characters; if the field has 10
characters, the delimiter ^ will not be present.
Example 1: To get the information from line 0: FirstName LastName
# Select FirstName, then LastName from line 0
FIRSTNAME 0 FIRST
LASTNAME 0 FIRST
Note that after the first name is removed from the list, the last name
becomes the first token in the list.
Example 2: We could also extract the data from line 0 by using:
# Select LastName, then FirstName from line 0
LASTNAME 0 LAST
FIRSTNAME 0 LAST
Example 3: Suppose the FirstName has a first name and middle initial,
but we can assume that the last name is always a single token. Then we
could make sure that the initial gets grouped with the first name by using:
# Grab first name and any initials,
# then grab last name
FIRSTNAME 0 NOTLAST
LASTNAME 0 ENTIRE
Example 4: To grab the entire street address, regardless of how many
separate tokens are in the line, we use:
# Get the entire street address
ADDR1 1 ENTIRE
33
ExpoBadge® All In One User’s Manual
Badge Definition Language
Examples
Example 5: How can we pull apart the data on line 2? Use the comma
as a delimiter.
# Break apart City, State, and Zip
# and define the comma ',' as a delimiter
CITY 2 TODELIM ,
ZIP 2 LAST
STATE 2 ENTIRE
Using unprintable delimiters (like \002 or \003), the data in a badge can
be broken up without affecting the data printed for the badge, and
you can then use these delimiters with the TODELIM list operation to
break apart complex lines without having to make assumptions (like the
one above about the comma).
We can also break this line though the use of FIXFIELDLEN.
# Break apart City, State, and Zip
# State field in line number 2 has a fixed length of 2 characters
CITY 2 TODELIM ,
STATE 2 FIXFIELDLEN \002
ZIP 2 ENTIRE
Example 6: Suppose that we do not want the label 'Phone#:' we can
skip it by doing the following:
# Skip phone number label
# Assign the phone number to PHONE1
DUMMY 3 FIRST
PHONE1 3 FIRST
Example 7: We could also extract the phone number by using:
# Select the phone number from line 3,
# but leave the Phone# label
PHONE1 3 LAST
Example 8: Since the phone number could have spaces in it, a safer
way to select it would be by using:
# Make sure we get all of the phone number on line 3,
# but not the label
PHONE1 3 NOTFIRST
34
ExpoBadge® All In One User’s Manual
Badge Definition Language
Examples
Example 9: To parse line 4, Position will only have a delimiter if it has
less than 10 characters. To parse this line, you must use the
FIXLENORDELIM command.
#Use of FIXLENORDELIM
POSITION 4 FIXLENORDELIM \094 \010
COMPANY 4 ENTIRE
Using comments, commands and field definitions, here is one way of
writing the badge definition file for the sample badge provided:
# Badge definition file for sample badge
#
# the badge starts with two carriage returns
* START \013 \013
# The number of lines in the badge
* LINES 4
# Assume that the first and last name are separated by a \002 delimiter
FIRSTNAME 0 TODELIM \002
LASTNAME ENTIRE
# Grab the entire address line
ADDR1 1 ENTIRE
# Getting the data from line 3
# Break apart City, State, and Zip, define the comma ',' as a delimiter
CITY 2 TODELIM \044
ZIP 2 LAST
STATE 2 ENTIRE
# Make sure we get all of the phone number on line 3, but not the label
PHONE1 3 NOTFIRST
POSITION 4 FIXLENORDELIM ^ \010
COMPANY 4 ENTIRE
* END \026
Creating a badge definition file for a magnetic card is basically the same.
Here is an example of magnetic stripe raw data:
Track 1: %FName^^LName^
Track 2: ;8004909941=7147127351=
Track 3: %Anaheim^CA^92805^
The definition file for the magnetic stripe data will be:
# Sample badge definition file
* LINES 1
FIRSTNAME 0 TODELIM \094
DUMMY 0 TODELIM \094
35
ExpoBadge® All In One User’s Manual
Print Format Language
Lines Command
LASTNAME 0 TODELIM \094
PHONE1 0 TODELIM \061
PHONE2 0 TODELIM \061
CITY 0 TODELIM \094
STATE 0 TODELIM \094
ZIP 0 TODELIM \094
Note that when you create definition files for the a magnetic card reader
of the EAIO, the number of lines is always 1, so the line number for each
field is always 0.
Note that you can only use the todelim, length, and entire in the
manager. To send a definition file to the E3750 using more advanced
operations, all you need is a text editor. Create a 2D barcode and scan it or
import using the RS232 port. This is discussed in the ExpoBadge® 3750
Commands on page 39.
PRINT FORMAT LANGUAGE
Through the Print Format Language (PFL), you can customize the
EAIO’s printout. The printout of the EAIO can be any layout you want. All
you need are the list of field names that you want on your printout and
knowledge of PFL.
To understand how PFL works, let's look at its components: the Lines
command and Line Definition.
There is only one command in this language: the Lines command.
This command has the following format:
LINES = N
where N is the number of lines that will be on your printout
This is the very first item that you will see in any print format file.
The Line Definition defines what is printed out in a particular line. A Line
Definition has the following format:
[Field Name] [PositionY], [PositionX]
where
Field Name - the name of the field that will be printed
PositionY - the line number where the field will be printed
PositionX - the order that it will be printed in a specific line
36
ExpoBadge® All In One User’s Manual
Print Format Language
Field Names
The field names that are available to you are listed on the table below.
Field Name
ID or IDNUM
FIRSTNAME
LASTNAME
POSITION or TITLE
COMPANY
ADDR1
ADDR2
CITY
STATE
ZIP
EMAIL
COUNTRY
PHONE1
PHONE2 or FAX
UDEF1
UDEF2
UDEF3
UDEF4
COMMENTS
QUALIFIERS
Description
ID field
First Name field
Last Name field
Position field
Company field
1st Address Field
2nd Address Field
City Field
State Field
Zip Code Field
Email Field
Country Field
1st Phone Number Field
2nd Phone Number Field
1st User Defined Field
2nd User Defined Field
3rt User Defined Field
4th User Defined Field
Comments
Qualifiers
To illustrate how this works, let us look at the sample badge:
\013
(Badge Starts with 2 CRs)
\013
FirstName LastName
Address
City, State Zip
Phone#: XXX-XXX-XXXX
\026
The field names that we can use in this case are: FIRSTNAME,
LASTNAME, ADDR1, CITY, STATE, ZIP, and PHONE1. Note that this is
the same badge sample that we used in the BDL example.
You must keep in mind the number of characters allowed per line when
you are deciding which fields go to which lines. When you are using the
standard font, the maximum characters that can be printed on each line
is 43. Lines with more characters will be truncated.
Example 1: We want our printout to have 4 lines.
LINES = 4
37
ExpoBadge® All In One User’s Manual
Display Format Language
Display Format Language
Example 2: We want the first line to contain first name and last name,
with last name first.
LASTNAME 1,1
FIRSTNAME 1,2
Example 3: We want the Address on one line, City, State and Zip on the
next line, and the phone number on the last line.
ADDR1 2,1
CITY 3,1
STATE 3,2
ZIP 3,3
PHONE1 4
The print format file should look like this:
LINES = 4
LASTNAME 1,1
FIRSTNAME 1,2
ADDR1 2,1
CITY 3,1
STATE 3,2
ZIP 3,3
PHONE1 4
Type this information in a text editor and save it as filename.PFF. Then,
download it to your EAIO. Use the Manager or see chapter
Configuring the Settings through 2D Barcodes on page 39.
DISPLAY FORMAT LANGUAGE
Similar to PFL, Display Format Language (DFL) works the same way, in
that it allows you to customize what is displayed on the screen.
The command and line definition are basically the same for both PFL
and DFL. The only limitation of DFL is it can only handle a maximum of
six lines and a limit of 21 characters per line. Moreover, the Comments
and Qualifier field names are not available.
The example given above will also work as a display format file.
However, we now use the file extension .DFL.
38
ExpoBadge® All In One User’s Manual
ExpoBadge® 3750 Commands
Commands sent by the Expobadge manager to the E3750 are discussed
in this section. They can be sent by either creating a 2D barcode and
scanning it in or by sending it through the RS232 port.
Downloading the ExpoBadge 3750 Database
To download the E3750 Database automatically, you only need to send
the character “T” to the RS232 port of the E3750. The Expobadge 3750
will return a header, followed by the database contents, followed by the
end sequence.
The Header has the following format:
▲Serial Number▲Number of records▲♠♠Company Name ◘Email♂
where
▲ is the hexademical number 1E (Decimal ASCII value: 030)
♠ is the hexadecimal number 06 (Decimal ASCII value: 006)
◘ is the hexadecimal number 08 (Decimal ASCII value: 008)
♂ is the hexadecimal number 0B (Decimal ASCII value: 011)
Then, the fields in the database will be downloaded in the following
order:
1.
2.
3.
4.
5.
6.
7.
8.
9.
10.
11.
12.
13.
RECORD DATE
RECORD TIME
ID
FIRSTNAME
LASTNAME
TITLE/POSITION
COMPANY
ADDR1
ADDR2
CITY
STATE
ZIP
COUNTRY
14.
15.
16.
17.
18.
19.
20.
21.
22.
23.
24.
25.
PHONE1
PHONE2/FAX
EMAIL
CUSTOM1
CUSTOM2
CUSTOM3
CUSTOM4
COMMENTS
REP CODES
IS WINNER
EMBEDDED ID
QUALIFIERS
The end sequence is ýýý (ý is the hexadecimal number FD and Decimal
ASCII 253 ). This signals the end of transmission.
39
ExpoBadge® All In One User’s Manual
ExpoBadge® 3750 Commands
The Configuration File
The Configuration file
The Configuration file contains a description of all the settings of the
EAIO that is currently selected. It is saved in the EAIO as the
CONFIG.INI file. You will see what a configuration file looks like by going
to the Print All Settings and selecting Settings. For more information on
the Configuration File, see Configuration File on page 7-11.
Below are the contents of the config.ini file, their default values, and
their possible values.
Configuration
Setting
BARCODEDEF
MAGSTRIPEDEF
DISPLAYFILE
DISPLAYFONT
PRINTFILE
PRINTFONT
F2LINEFEED
QUALLINEFEED
PRINTONOFF
PASSTHROUGH
COMPANYPROFILE
COMPANYEMAIL
40
Possible Values
Follows the 8.3 DOS file naming standard (8
characters for the filename and 3 characters for
the extension) and has to end with a B
(*B.DEF); the default is AETSTANB.DEF if not
specified
Follows the 8.3 DOS file naming standard and
has to end with a M (*M.DEF); the default is
MAGSTANM.DEF if not specified
Follows the 8.3 DOS file naming standard; the
default is AETSTAND.DFL if not specified
0 is the standard font, 1 is the double width
font, and 2 is the double height font; default is 0
if not specified
Follows the 8.3 DOS file naming standard; the
default is AETSTAND.PFF if not specified
0 is the standard font, 1 is the double width
font, and 2 is the double height font; default is 0
if not specified
1 through 9 are the values; default is 1 if not
specified
1 through 9 are the values; default is 4 if not
specified
0 for OFF and 1 for ON are the values; default
is 1 if not specified
0 for OFF and 1 for ON are the values; default
is 1 if not specified
255 characters; default is No Company Name if
not specified
255 characters; default is
[email protected] if not specified
ExpoBadge® All In One User’s Manual
Badge Definition Language
Downloading Files to the EAIO
Downloading Files to the EAIO
Configuration files and definition files can be downloaded through
creating 2D barcodes. The encoding of the 2D barcode should look like
this:
ÿÿÿ[filename.extension]
Configuration or Definition File
ýýý
where
ÿÿÿ is the start sequence (ÿ is FF in HEX and 255 in decimal ASCII).
[ ] determines the beginning and end of the filename.
filename.extension is the filename and extension of the file.
Config or Def File is the contents of the file to be downloaded.
ýýý is the end sequence (ý is FD in HEX and 253 in decimal ASCII).
For example, we want to download a CONFIG.INI file. Our 2D barcode or
text file should contain the following information:
ÿÿÿ[CONFIG.INI]
* BARCODEDEF=AETSTANB.DEF
* MAGSTRIPEDEF=MAGSTANM.DEF
* DISPLAYFILE=AETSTAND.DFL
* DISPLAYFONT=0
* PRINTFILE=AETSTAND.PFF
* PRINTFONT=0
* PRINTONOFF=1
* PASSTHROUGH=1
* COMPANYPROFILE=AET
* [email protected]
ýýý
Note that the end sequence is not required, but it is recommended to
make sure that all of the data is sent to the E3750. After sending, you
will get a printout “Accepted: filename.extension.”
The filename.extension must follow the following conventions:
It must meet the 8.3 DOS file name convention (i.e. maximum of 8
characters for the filename and 3 characters for the extension).
The badge definition file must end with *.B.DEF, for example
AETSTANB.DEF.
The badge definition file for a magnetic stripe must end with *M.DEF;
for example, AETSTANM.DEF.
The print format file must have the extension .PFF
The display format file must have the extension .DFL
41
ExpoBadge® All In One User’s Manual
ExpoBadge® 3750 Commands
Secondary Badge Definition
Secondary Badge Definition
To use a secondary badge definition file for 2D barcode, you must follow
the naming convention above and the following:
1. Primary badge definition can be of any name, as long as it follows
the naming convention above.
2. The secondary badge definition depends on the primary badge
definition. If the second-to-last character in the filename of the
primary badge definition is a number (except 9), then the filename of
the secondary badge definition should be that number + 1. For
example, the filename of the primary definition is ABCD1B.DEF, then
the filename of the secondary badge definition should be
ABCD2B.DEF.
If the second to last character in the filename of the primary def file is
a letter or the number ‘9,’ then the second to last character of the
filename of the secondary badge definition will be ‘0.’ For example, if
the filename of the primary definition is ABCDB.DEF, then the
secondary badge definition would be ABC0B.DEF.
Commands
You also have the ability to issue commands to the EAIO. The format for
issuing commands is as follows:
þþþ
* COMMAND=CommandName
ýýý
where
þþþ is the start sequence (þ is FE in HEX and 254 in decimal ASCII)
* COMMAND= must always start the command line
CommandName is keyword for the command
ýýý is the end sequence (ý is FD in HEX and 253 in decimal ASCII)
The available command names are the following:
1. DELETEDB - deletes the database without confirmation. When
you send this command to the 3750, you will get a printout
“Database deleted.”
2. FWVERSION - prints out the firmware version of the EAIO.
When you send this command, you will get a printout “Expobage
3750 FW XX.XX.”
42
ExpoBadge® All In One User’s Manual
ExpoBadge® 3750 Commands
Downloading Company and Qualifiers
3. NEW - deletes the qualifiers and creates an empty one. When
you send this command to the E3750, you will get a printout
“Accepted new qualifier list.”
4. 2PRINTERON - turns the printer on. All of the data going through
the RS232 port after using this command is sent directly to the
printer (with the exception of commands).
5. 2PRINTEROFF - stops the sending of text directly to the printer.
6. READY2PRINT - returns the printer status (i.e., PRINTER
READY, PAPER OUT, PAPER LOW and NOT READY).
For example you can delete the qualifier list by making a 2D barcode
with the following encoding:
þþþ
* COMMAND=NEW
ýýý
When you use the 2PRINTERON command, the EAIO will return,
PRINTER READY, PAPER OUT, PAPER LOW and NOT READY. If the
printer status is changed to PRINTER READY, any printable characters
in the data received through the RS232 port will be sent directly to the
printer.
Downloading Company Profile and Qualifiers
You can create a barcode that automatically changes the Company
Name and Company Email by simply creating a 2D barcode with the
following format:
¸¸ Companny Name 3 Company Email%
where
¸ is the hexadecimal number 06 (Decimal ASCII value: 006)
3 is the hexadecimal number 08 (Decimal ASCII value: 008)
% is the hexadecimal number 0B (Decimal ASCII value: 011)
When you send this command to the E3750, you will get the printout
“Profile Name: [Company name].” You can also go to
Profiles>Exhibitor>Company Profile. You will see the Company Name
that you just scanned in the Company Profile screen. In this same way, you
can add new qualifiers (this will append to the existing list) by creating a
barcode that has the following format:
þþþ
¸New Qualifier3
ýýý
43
ExpoBadge® All In One User’s Manual
Badge Definition Language
Comments
When you send this command to the E3750, you will not get any printout.
To check if the Qualifiers you added are appended to the qualifier list,
press the Qual button (the gray button labeled ALPHA).
You can also add more than one qualifier at a time. The number of
qualifiers you can add at a given time depends on the size of the
barcode; the maximum size is 1024 bytes. Note that you can have as
many as 400 qualifiers.
You can also combine the 'Command New' to delete the qualifier list and
at the same time add the new qualifiers. Your encoding will look like this:
þþþ* COMAND=NEW
¸New Qualifier3
ýýý
Note that the maximum size of this data in the 2D barcodes or file is
1024 bytes. In addition, there can only be one command for each
barcode scan (or each transmission sent through RS232).
NOTE
When downloading files to the EAIO, you can use both
the Pinpad port and RS232 Port. The baud rate is
115200 for the RS232 port and 9600 for the Pinpad port.
The rest of the settings are the same: Data bits - 8,
Parity - None, Stop bits - 1, and Flow control Hardware/None.
You can only use the RS232 port to send text to the
printer.
Comments
A barcode that does not match the badge definition file and does not
contain any special character header is added to a record as Comments.
NOTE
44
If transmitting through the RS232 port, it will wait for end
transmission sequence ýýý to stop receiving and
processing the transmitted data.
If 3750 doesn’t receive end transmission within 2
seconds, it will time out and process data that has been
transmitted.
The end of transmission sequence is not required to
send through the RS232 port, but it is recommended to
be sure that all the data gets through.
ExpoBadge® All In One User’s Manual
INDEX
A
L
B
Badge Definition 7, 10-19, 29
Badge Definition Language 29
M
Mag Stripe Definition 17-19
N
C
Command Bar 1
Company Email 9
Company Profile 9
Configuration File 7
Configuring the EAIO 7
D
Data Received 1
Definition Files 7 ,10-24, 29
Display Font 7
Display Format 7, 20-22
Display Format Language 37
Download List 1
Download Settings 1
Download Type 1, 26
Downloading the Installer 2
Downloading from the EAIO 26
E
ExpoBadge 3750 Setup 1, 11
Emailing your Leads 28
O
P
Pass Through On-Off 9
Print Font 8
Print Format 7, 22-24
Print Format Language 35
Printer On-Off 9
Q
Qualifiers 24
R
Refurbishing Doc 11
S
Setting the Time and Date 7
Setting the Time Zone 7
T
F
U
G
V
H
W
I
Installing the EPC Manager 2-3
X
J
Y
K
Z
45
ExpoBadge® All In One User’s Manual